Android消息机制全面解析(Handler,MessageQueue,Looper,Threadlocal)
Android中的消息机制主要指 Handler的运行机制 以及 MessageQueue,Looper的工作过程 ,三者相互协作,保证着消息的接收,发送,处理,执行。
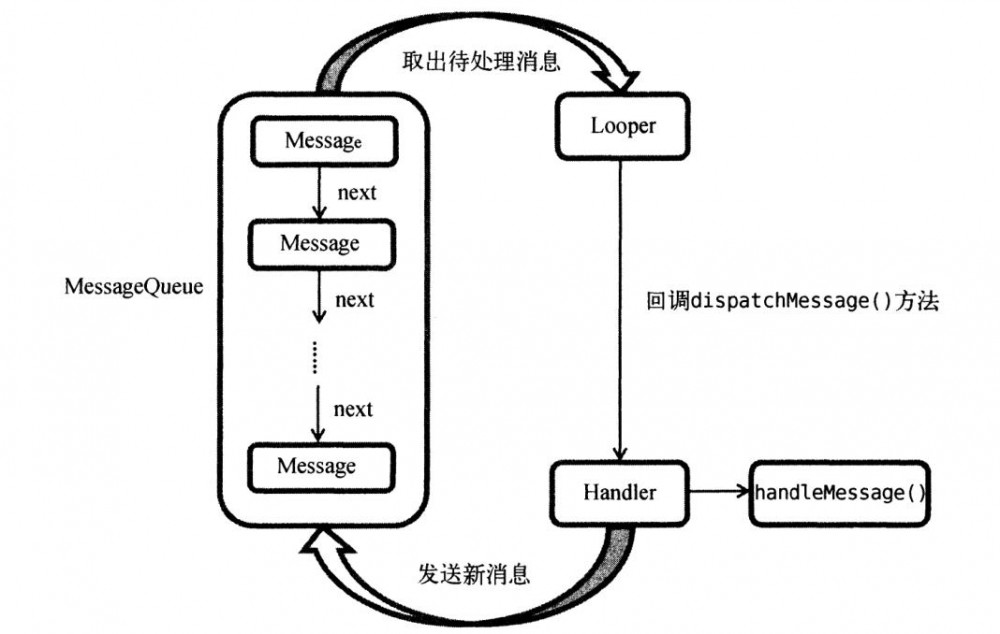
图片来自郭神的《第一行代码》
先简单的介绍一下 Android 中 消息机制大家庭的主要成员 :
-
Handler: 是Android消息机制的上层接口,最为大家常用,相当于Android消息机制的入口,我们通过使用
Handler发送消息来引起消息机制的循环。通常用于:在子线程执行完耗时任务完后,更新UI。 -
MessageQueue: 存储 消息(Message) 对象的消息队列,实则是单链表结构.
-
Looper: 用于无限的从
MessageQueue中取出消息,相当于消息的永动机,如果有新的消息,则处理执行,若没有,则就一直等待,堵塞。Looper** 所在的线程是 创建Handler时所在的线程。主线程创建Handler时,会自动创建一个Looper, 但是子线程并不会自动创建Looper
-
ThreadLocal: 在每个线程互不干扰的存储,提供数据,以此来获取当前线程的
Looper -
ActivityThread: Android 的主线程,也叫UI线程,主线程被创建时 自动初始化主线程的
Looper对象。
问题 : 大家都知道只有在UI线程才能对UI元素进行操作,在子线程更改UI就会报错,为什么?
看完 《Android艺术开发探索》 这本书的第10章之后我也才明白
- Android中的UI控件不是线程安全的,如果在子线程中也能修改UI元素,那多线程的时,共同访问同一个UI元素,就会导致这个UI元素处于我们不可预知的状态,这个线程让它往左一点,那个线程让它往右一点,UI该听谁的,好tm乱。。 干脆我就只听主线程的把。
问题 : 那为什么不通过对访问UI控件的子线程加上锁机制呢 ?
这个很简单了,如果为不同的线程访问同一UI元素加上锁机制,那我们程序员写相关代码的时候会变得超级麻烦。。。 改个UI还得考虑它是不是已经被别的线程占用了,被占用了,还得让那个线程释放锁。。。线程再多一点的话,大大地加大了程序员地工作量.
而且加上锁机制无疑会由于线程堵塞地原因降低访问UI的效率,帧率降低,体验也会不友好。
让UI元素只能再主线程访问就会省下很多事,创建一个 Handler 就行了。
下面从整体概述一下 消息机制的整个工作过程 :
-
Handler创建时会采用当前线程的Looper来构建内部的消息循环系统,如果Handler在子线程,则一开始是没有Looper对象的(解决方法稍后介绍),主线程ActivityThread默认有一个Looper。 -
Handler创建完毕,通过post方法传入Runnable对象,或者通过sendMessage(Message msg)发送消息。post()方法里也是通过调用send()实现的 -
send()方法被调用后,调用 MessageQueue的enqueueMessage()方法将消息发送到消息队列中,等待被处理。 -
Looper对象运行在Handler所在的线程,从MessageQueue消息队列中不断地取出消息,处理,所以业务逻辑(通常是更新UI)就运行在Looper的线程中。
接下来从局部来分析消息机制的每个成员。
(2),ThreadLocal 工作原理
1, 什么是ThreadLocal?
ThreadLocal是一个线程内部的数据存储类,通过它可以在指定的线程中获得存储数据,获得数据,线程之间的ThreadLocal相互独立,且无法获得另一个线程的TheadLocal.
-
相对整个程序来说,每个线程的ThreadLocal是局部变量。
-
相对一个线程来说,线程内的ThreadLocal是线程的全局变量
ThreadLocal是一个泛型类,可以存储任意类型的对象。
示例:
public class ThreadLocalTest {

	public static void main(String[] args) {

		ThreadLocal<Boolean> mThreadLocal = new ThreadLocal<Boolean>();
		mThreadLocal.set(true);
		System.out.println("#Main Thread : ThreadLocal " + mThreadLocal.get());


		new Thread( new Runnable() {

			@Override
			public void run() {
				mThreadLocal.set(false);
				System.out.println("#1 Thread : ThreadLocal " + mThreadLocal.get());
			}
		}).start();

		new Thread( new Runnable() {

			@Override
			public void run() {
				System.out.println("#2 Thread : ThreadLocal " + mThreadLocal.get());
			}
		}).start();

	}

}
复制代码
我们在主线程创建一个 泛型为 Boolean 的ThreadLocal,并 .set(True) ,然后在第一个子线程中 .set(False) ,在第二个子线程中不做修改,直接打印。 可以看到,在不同的线程中获得的值也不同。
输出 :
#Main Thread : ThreadLocal true
#1 Thread : ThreadLocal false
#2 Thread : ThreadLocal null
复制代码
2,ThreadLocal的实现原理
首先每个线程内部都维护着一个 ThreadLocalMap 对象
Thread.Java
/* ThreadLocal values pertaining to this thread. This map is maintained
 * by the ThreadLocal class. */
ThreadLocal.ThreadLocalMap threadLocals = null;
复制代码
这个ThraedLocalMap 与Map类似,一个线程内可以有多个ThreadLocal类型变量,所以通过 ThreadLocalMap <ThreadLocal<?> key, Object value> .保存着多个<ThreadLocal , 任意类型对象>键值对。
看一下ThreadLocal的 set() 方法实现 :
/**
     * Sets the current thread's copy of this thread-local variable
     * to the specified value.  Most subclasses will have no need to
     * override this method, relying solely on the {@link #initialValue}
     * method to set the values of thread-locals.
     *
     * @param value the value to be stored in the current thread's copy of
     *        this thread-local.
     */
    public void set(T value) {
        Thread t = Thread.currentThread();
        ThreadLocalMap map = getMap(t);
        if (map != null)
            map.set(this, value);
        else
            createMap(t, value);
    }
复制代码
先是获得当前线程的 ThreadLocalMap 对象,map.set(this,value) 设置了我这个ThreadLocal存储的值.
get() 方法实现 :
/**
     * Returns the value in the current thread's copy of this
     * thread-local variable.  If the variable has no value for the
     * current thread, it is first initialized to the value returned
     * by an invocation of the {@link #initialValue} method.
     *
     * @return the current thread's value of this thread-local
     */
    public T get() {
        Thread t = Thread.currentThread();//获得当前线程
        ThreadLocalMap map = getMap(t);//根据根据获得它的ThreadLocalMap
        if (map != null) {
            ThreadLocalMap.Entry e = map.getEntry(this);//获得<k,v>键值对
            if (e != null) {
                @SuppressWarnings("unchecked")
                T result = (T)e.value;//通过<k,v>获得值
                return result;
            }
        }
        return setInitialValue();
    }
复制代码
3,ThreadLocal的使用场景
一般,当某些数据是以线程为作用域,并且不同的线程具有不同的数据副本时,可以考虑用 ThreadLocal
场景1:
对于 Handler ,它想要获得当前线程的 Looper ,并且 Looper 的作用域就是当前的线程,不同的线程具有不同的 Looper 对象,这时可以使用ThreadLocal。
场景2:
复杂逻辑下的对象的传递,如果想要一个对象贯穿着整个线程的执行过程,可采用Threadlocal让此对象作为该线程的全局对象。
(3),MessageQueue的工作原理
以 单链表 的形式,存储着 Handler 发送过来的消息,再来一张图加深印象
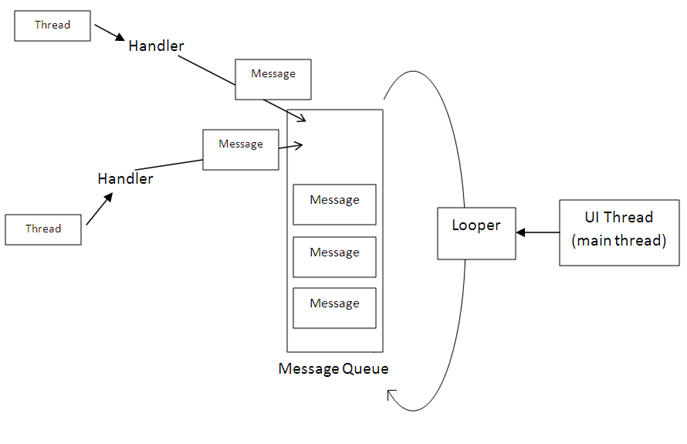
主要包含两个操作:
- 通过
enqueueMessage(Message msg,long when),像队列插入一个消息,这里为了节省篇幅,就不上源码,贴上源码连接, MessageQueue.enqueueMessage() - 通过
next()从无限循环队列中取出消息,并从消息队列中删除。MessageQueue.next()
虽然它叫做 消息队列 ,但内部其实是以单链表的结构存储,有利于插入,删除的操作。
(4),Looper的工作原理
它的主要作用就是 不停地从消息队列中 查看是否有新的消息,如果有新的消息就会立刻处理,没有消息就会堵塞。
持有 MessageQueue 的引用,并且会在构造方法中初始化
private Looper(boolean quitAllowed) {
    mQueue = new MessageQueue(quitAllowed);
    mThread = Thread.currentThread();
}
复制代码
问题: 如何在子线程创建它的Looper对象 ?
前面说到主线程自己会创建一个 Looper 对象,所以我们在主线程使用 Handler 的时候直接创建就可以了。
但是在子线程使用Handler的话,就需要我们手动创建 Looper 了,
示例:
new Thread() {
    @Override
    public void run() {
        Looper.prepare();
        Handler handler = new Handler();
        Looper.loop();
    }
}.start();
复制代码
prepare() 源码如下:
/** Initialize the current thread as a looper.
77      * This gives you a chance to create handlers that then reference
78      * this looper, before actually starting the loop. Be sure to call
79      * {@link #loop()} after calling this method, and end it by calling
80      * {@link #quit()}.
81      */
82    public static void prepare() {
83        prepare(true);
84    }
85
86    private static void prepare(boolean quitAllowed) {
87        if (sThreadLocal.get() != null) {
88            throw new RuntimeException("Only one Looper may be created per thread");
89        }
90        sThreadLocal.set(new Looper(quitAllowed));
91    }
复制代码
可以看到最终是调用了 此 Looper 所在线程的 **ThreadLocal.set()**方法,存了一个Looper对象进去。
除了 prepare() ,还有一些其他方法,我们也需要知道
-
loop(): 启动消息循环,,只有当Looper调用了loop()之后,整个消息循环才活了起来
-
prepareMainLooper(): 给主线程创建Looper对象
-
getMainLooper(): 获得主线程的Looper对象
-
quit(): 通知消息队列,直接退出消息循环,不等待当前正在处理的消息执行完,quit之后,再向消息队列中发送新的消息就会失败( Handler的send()方法就会返回false )
public void quit() { mQueue.quit(false); } 复制代码 -
quitSafety(): 通过消息队列,不再接收新的消息,等当前的消息队列中的消息处理完就退出。
public void quitSafely() {
        mQueue.quit(true);
 }
复制代码
下面分析 loop() 的实现:
/**
119     * Run the message queue in this thread. Be sure to call
120     * {@link #quit()} to end the loop.
121     */
122    public static void loop() {
123        final Looper me = myLooper();
124        if (me == null) {
125            throw new RuntimeException("No Looper; Looper.prepare() wasn't called on                                            this thread.");
126        }
127        final MessageQueue queue = me.mQueue;
128
129        ...//省略部分代码
133		  //从这里开启无限循环,直到 没有消息
134        for (;;) {
135            Message msg = queue.next(); // might block
136            if (msg == null) {
137                // No message indicates that the message queue is quitting.
138                return;
139            }
140
141            // This must be in a local variable, in case a UI event sets the logger
142            Printer logging = me.mLogging;
143            if (logging != null) {
144                logging.println(">>>>> Dispatching to " + msg.target + " " +
145                        msg.callback + ": " + msg.what);
146            }
147
148            msg.target.dispatchMessage(msg);
149			   ...//省略部分代码
166        }
167    }
复制代码
在 for 循环里 :
- 通过queue.next()一直读取新的消息,如果没有消息 则退出循环。
- 接下来,
msg.target.dispatchMessage(msg);,target是发送此消息的 Hander对像,通知Handler调用dispatchMessage()来接收消息。
(5),Handler的工作原理
Handler的主要工作就是 发送消息,接收消息。
发送消息的方式有post(),send(),不过post()方法最后还是调用的send()方法
-
发送消息的过程:
send类型的发送消息方法有很多,并且是嵌套的
sendMessage()
public final boolean sendMessage(Message msg) {
        return sendMessageDelayed(msg, 0);
}
复制代码
sendMessageDelayed()
public final boolean sendMessageDelayed(Message msg, long delayMillis) {
    if (delayMillis < 0) {
        delayMillis = 0;
    }
    return sendMessageAtTime(msg, SystemClock.uptimeMillis() + delayMillis);
}
复制代码
sendMessageAtTime()
public boolean sendMessageAtTime(Message msg, long uptimeMillis) {
       MessageQueue queue = mQueue;
		if (queue == null) {
         RuntimeException e = new RuntimeException(
                    this + " sendMessageAtTime() called with no mQueue");
            Log.w("Looper", e.getMessage(), e);
            return false;
        }
        return enqueueMessage(queue, msg, uptimeMillis);
}
复制代码
三种send的发送消息方式,最后都会通过
enqueueMessage()来通知消息队列 插入这条新的消息。Handler.enqueueMessage
private boolean enqueueMessage(MessageQueue queue, Message msg, long uptimeMillis) { msg.target = this; if (mAsynchronous) { msg.setAsynchronous(true); } return queue.enqueueMessage(msg, uptimeMillis);//调用消息队列的enqueueMessage() } 复制代码 -
接收消息的过程
接收消息由
dispatchMessage(Message msg)为入口dispatchMessage()
public void dispatchMessage(Message msg) {
       if (msg.callback != null) {
            handleCallback(msg);
        } else {
            if (mCallback != null) {
                if (mCallback.handleMessage(msg)) {
                   return;
                }
            }
            handleMessage(msg);
       }
 }
复制代码
这里的
callback是我们调用 post(Runnable runnalbe) 时传入的Runnable对象,如果我们传入了Runnable对象就会执行
Runnable的run方法:private static void handleCallback(Message message) { message.callback.run(); } 复制代码如果没有通过
post传Runnable,就会看创建Handler时的构造方法中有没有传Runnable参数,传了的话由mCallback存储。这个
mCallback是Handler内部的一个接口public interface Callback { public boolean handleMessage(Message msg); } 复制代码如果构造Handler时也没有传
Runnable对象,最终会执行handleMessage(msg),这个 方法就是我们创建handler时重写的handleMessage()方法.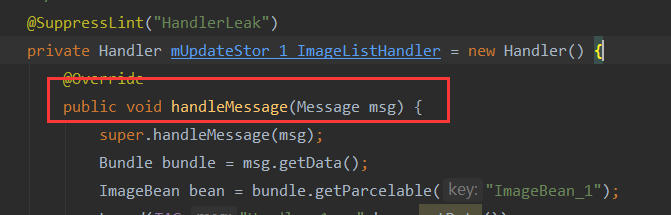
参考资料:Android艺术开发探索
www.cnblogs.com/luxiaoxun/p…
(完~)

正文到此结束
热门推荐


相关文章

近期评论
-
你这基本没有更新呀,最近文章显示还是2019年的文章。不符合要求哈
-
关键词:慕云博客 链接:https://www.lilun.me 描述:分享原创文字的个人博客
-
-
-
可以提供一下源码吗
-
不是商业站,鸡娃学习笔记
-
-
-
-
听他们说很厉害的样子
Loading...
![[HBLOG]公众号](http://www.liuhaihua.cn/img/qrcode_gzh.jpg)

