java基础(六):RabbitMQ 入门
建议先了解为什么项目要使用 MQ 消息队列,MQ 消息队列有什么优点,如果在业务逻辑上没有此种需求,建议不要使用中间件。中间件对系统的性能做优化的同时,同时增加了系统的复杂性也维护难易度;其次,需要了解各种常见的 MQ 消息队列有什么区别,以便在相同的成本下选择一种最合适本系统的技术。
本文主要讨论 RabbitMQ,从3月底接触一个项目使用了 RabbitMQ,就开始着手学习,主要通过视频和博客学习了一个月,基本明白了 RabbitMQ 的应用,其它的 MQ 队列还不清楚,其底层技术还有待学习,以下是我目前的学习心得。
1.安装 Erlang
RabbitMQ 是基于 Erlang 语言写的,所以首先安装 Erlang,本例是在 Windows 上安装,也可以选择在 Linux 上安装,机器上没有虚拟机,直接在 Windows 上操作,建议在 Linux 上安装。官方下载 Erlang 软件,我下载最新版本 21.3。安装过程很简单,直接 Next 到底。 Linux 安装自行谷歌。如下图:

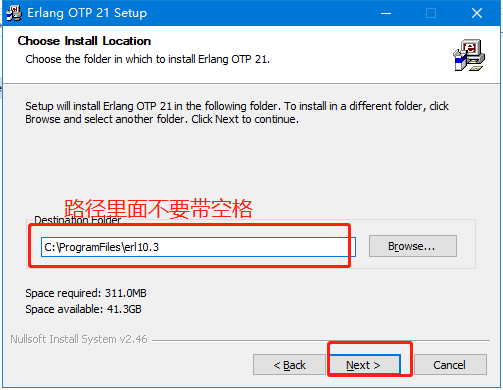
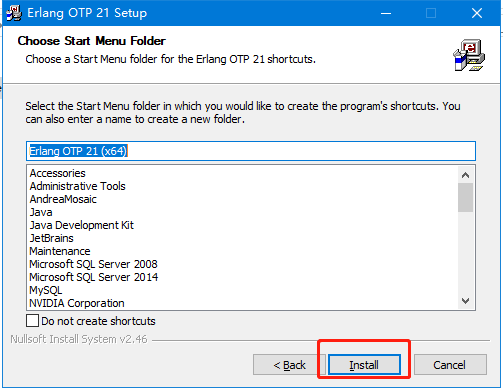
安装结束后,设置环境变量,如下图
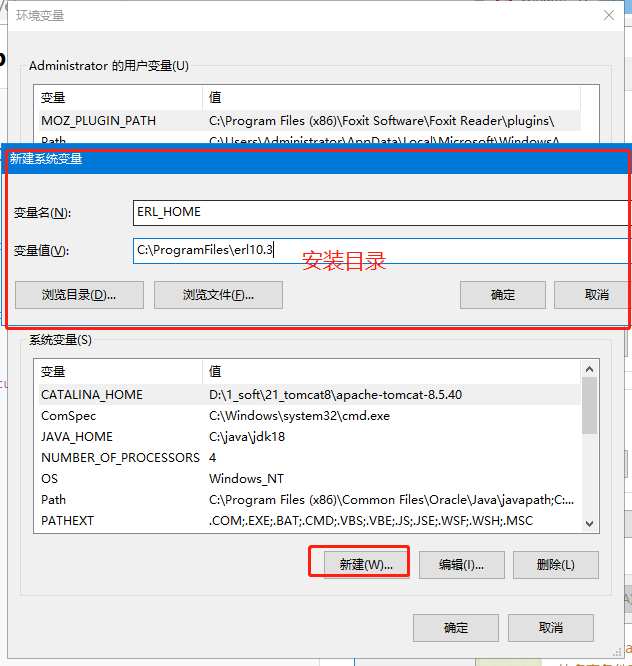
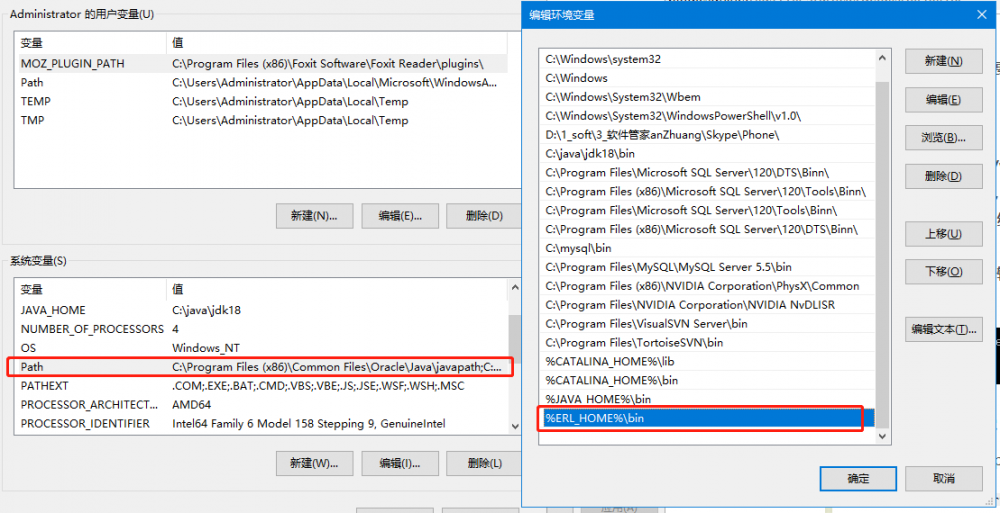
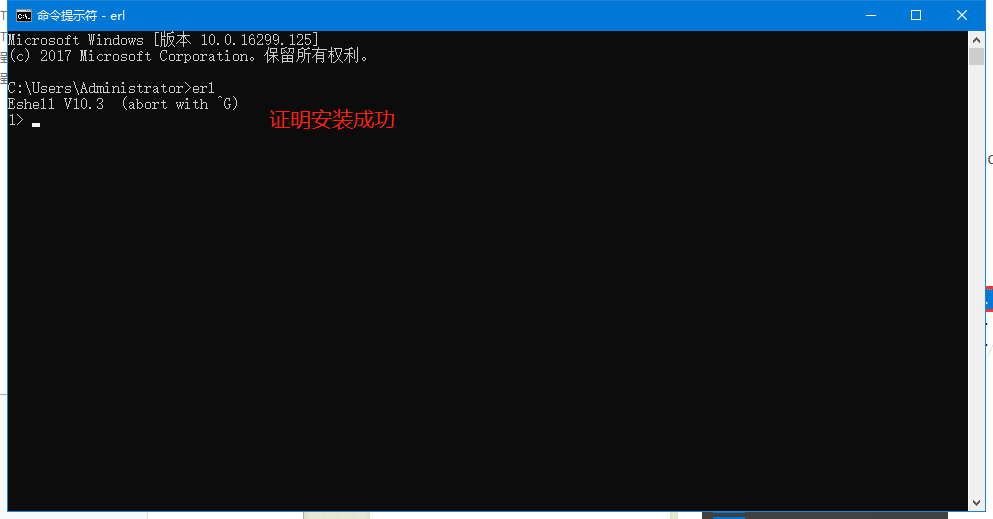
测试是否安装成功
2.安装 RabbitMQ
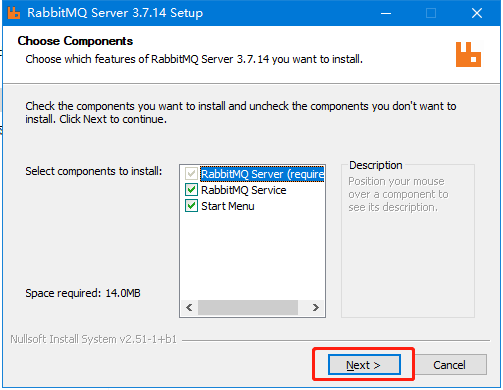
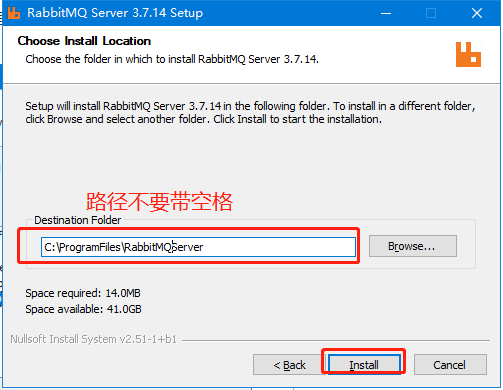
在官方下载,选择最新版本 3.7。安装过程很简单,直接 Next 到底。如下图:
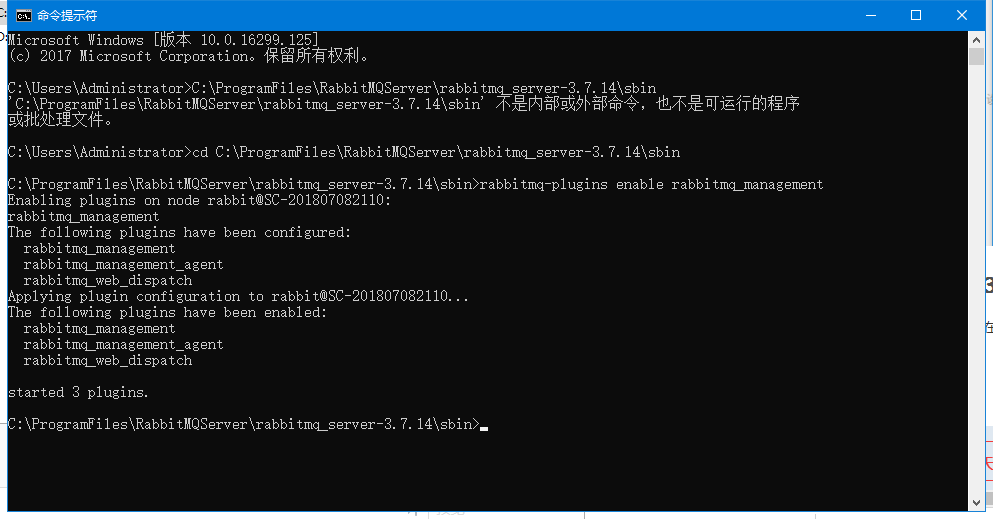
测试安装是否成功,进入安装目录 sbin,执行 rabbitmq-plugins enable rabbitmq_management 命令,出现下面界面,证明安装成功(建议以管理员方式打开 dos)。
执行 rabbitmq-server start 命令,启动服务。本地登陆并创建用户,如下图:

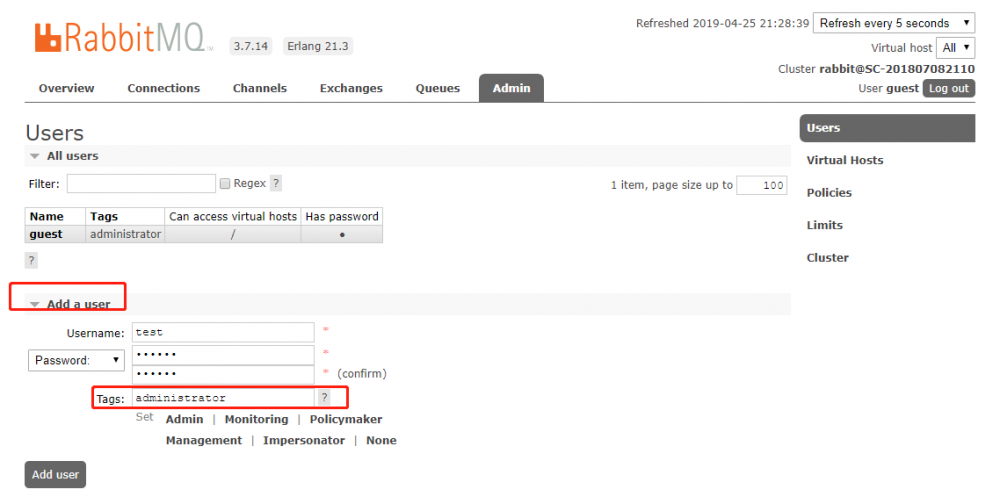
关于tags标签的解释:
1、 超级管理员(administrator)
可登陆管理控制台,可查看所有的信息,并且可以对用户,策略(policy)进行操作。
2、 监控者(monitoring)
可登陆管理控制台,同时可以查看rabbitmq节点的相关信息(进程数,内存使用情况,磁盘使用情况等)
3、 策略制定者(policymaker)
可登陆管理控制台, 同时可以对policy进行管理。但无法查看节点的相关信息(上图红框标识的部分)。
4、 普通管理者(management)
仅可登陆管理控制台,无法看到节点信息,也无法对策略进行管理。
5、 其他
无法登陆管理控制台,通常就是普通的生产者和消费者。
4.JAVA 操作RabbitMQ
参考 RabbitMQ 官网,一共分为6个模式
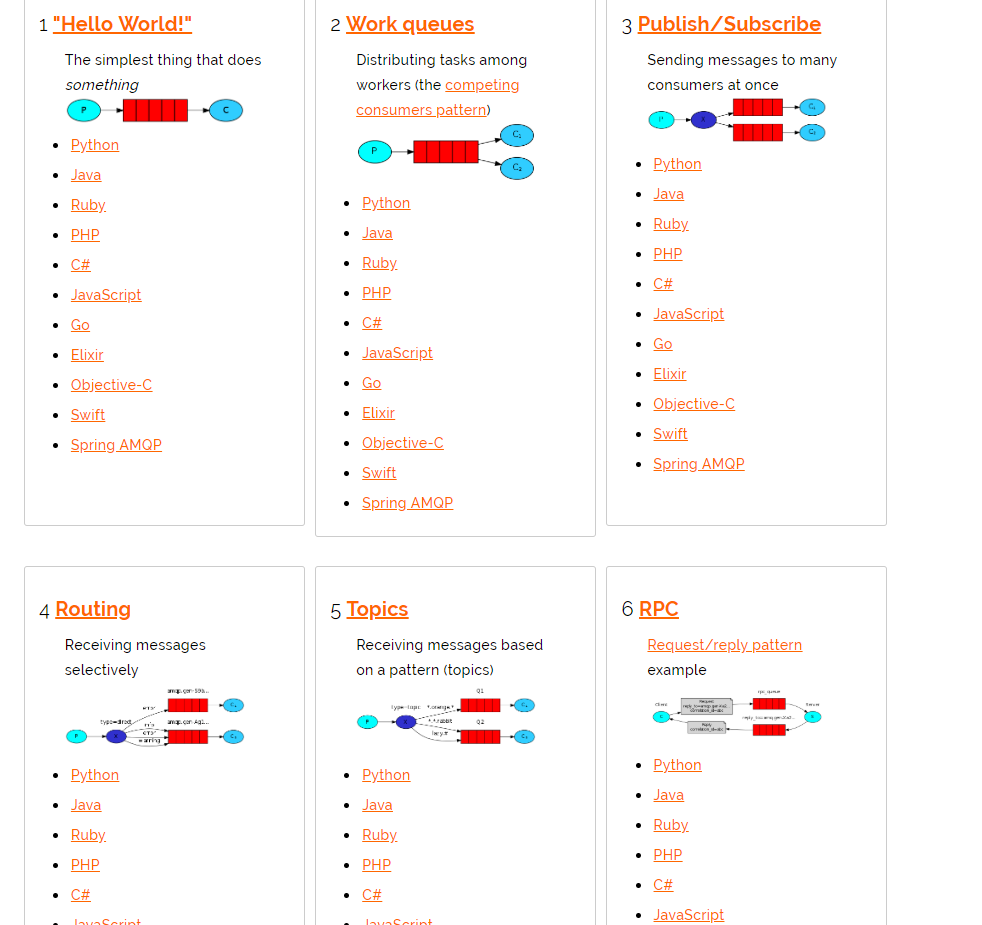
RabbitMQ 是一个消息代理,实际上,它接收生产者产生的消息,然后将消息传递给消费者。在这个过程中,它可以路由、缓冲、持久化等,在传输过程中,主要又三部分组成。
生产者:发送消息的一端

队列:它活动在 RabbitMQ 服务器中,消息存储的地方,队列本质上是一个缓冲对象,所以存储的消息不受限制

消费者:消息接收端

一般情况下,消息生产者、消费者和队列不在同一台服务器上,本地做测试,放在一台服务器上。 测试项目直接创建一个 maven 格式的项目,没必要创建网络格式。新建一个项目,如下图:
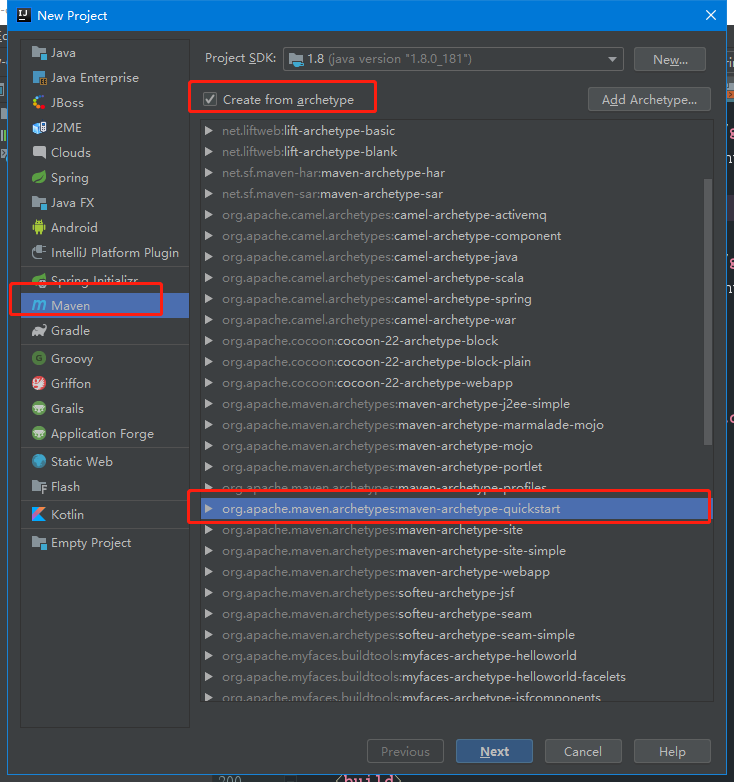
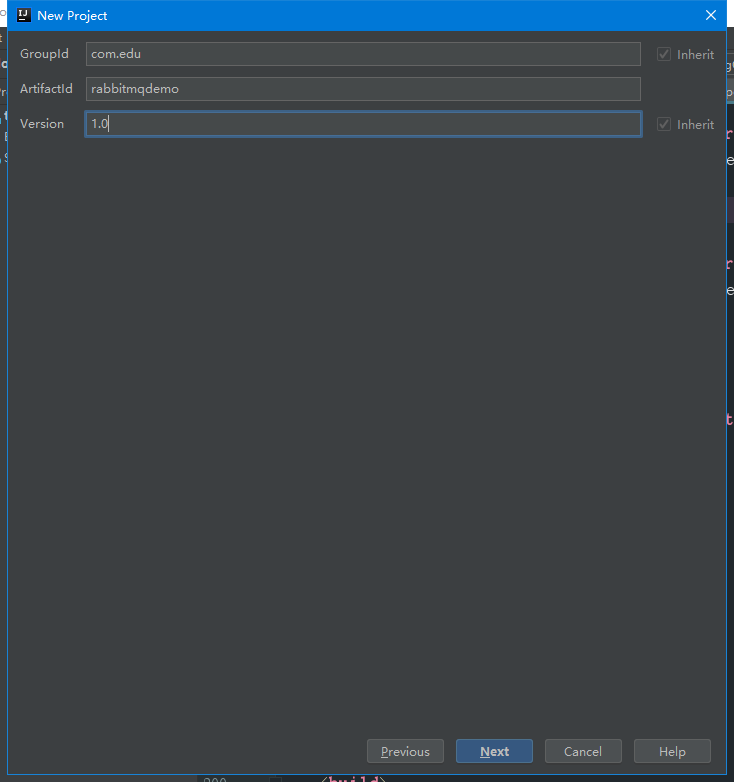
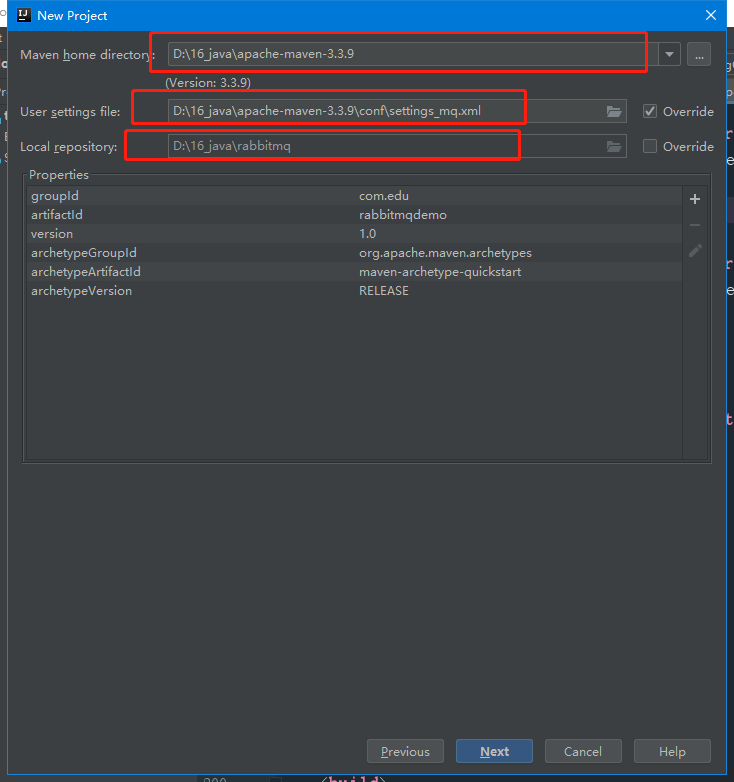
首先准备操作 MQ 的环境
(1): 准备必要的 Pom 文件,导入相应的 jar 包,
<!--mq客户端-->
    <dependency>
      <groupId>com.rabbitmq</groupId>
      <artifactId>amqp-client</artifactId>
      <version>4.5.0</version>
    </dependency>
    <!--日志-->
    <dependency>
      <groupId>org.slf4j</groupId>
      <artifactId>slf4j-log4j12</artifactId>
      <version>1.7.25</version>
    </dependency>
    <!--工具包-->
    <dependency>
      <groupId>org.apache.commons</groupId>
      <artifactId>commons-lang3</artifactId>
      <version>3.3.2</version>
    </dependency>
    <!--spring集成-->
    <dependency>
      <groupId>org.springframework.amqp</groupId>
      <artifactId>spring-rabbit</artifactId>
      <version>1.7.6.RELEASE</version>
    </dependency>
    <dependency>
      <groupId>org.springframework</groupId>
      <artifactId>spring-test</artifactId>
      <version>4.3.7.RELEASE</version>
    </dependency>
复制代码
(2): 建立日志配置文件,在 resources 下建立 log4j.properties,便于打印精确的日志信息
log4j.rootLogger=DEBUG,A1
log4j.logger.org.mybatis=DEBUG
log4j.appender.A1=org.apache.log4j.ConsoleAppender
log4j.appender.A1.layout=org.apache.log4j.PatternLayout
log4j.appender.A1.layout.ConversionPattern=%-d{yyyy-MM-dd HH:mm:ss,SSS} [%t] [%c]-%m%n
复制代码
(3): 编写一个工具类,主要用于连接 RabbitMQ
package com.edu.util;


import com.rabbitmq.client.Connection;
import com.rabbitmq.client.ConnectionFactory;

/**
 * @ClassName ConnectionUtil
 * @Deccription 穿件连接的工具类
 * @Author DZ
 * @Date 2019/5/4 12:27
 **/
public class ConnectionUtil {
    /**
     * 创建连接工具
     *
     * @return
     * @throws Exception
     */
    public static Connection getConnection() throws Exception {
        ConnectionFactory connectionFactory = new ConnectionFactory();
        connectionFactory.setHost("127.0.0.1");//MQ的服务器
        connectionFactory.setPort(5672);//默认端口号
        connectionFactory.setUsername("test");
        connectionFactory.setPassword("test");
        connectionFactory.setVirtualHost("/test");
        return connectionFactory.newConnection();
    }
}

复制代码
项目总体图如下:
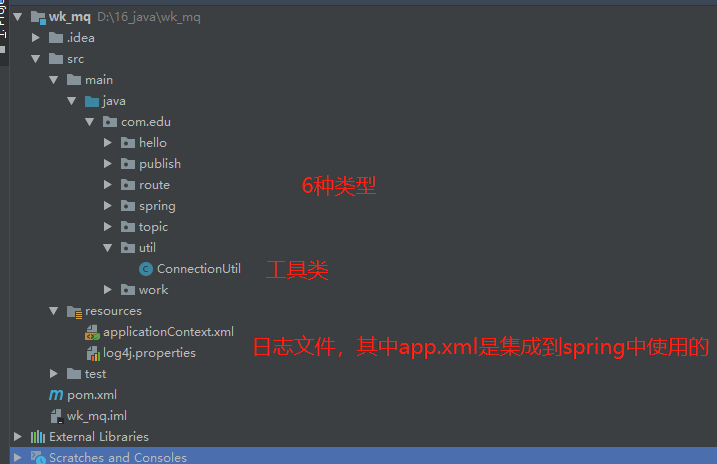
4.1.Hello World模式
此模式非常简单,一个生产者对应一个消费者

首先我们制造一个消息生产者,并发送消息:
package com.edu.hello;

import com.edu.util.ConnectionUtil;
import com.rabbitmq.client.Channel;
import com.rabbitmq.client.Connection;

/**
 * @ClassName Sender
 * @Deccription 创建发送者
 * @Author DZ
 * @Date 2019/5/4 12:45
 **/
public class Sender {
    private final static String QUEUE = "testhello"; //队列的名字

    public static void main(String[] srgs) throws Exception {
        //获取连接
        Connection connection = ConnectionUtil.getConnection();
        //创建连接
        Channel channel = connection.createChannel();
        //声明队列
        //参数1:队列的名字
        //参数2:是否持久化队列,我们的队列存在内存中,如果mq重启则丢失。如果为ture,则保存在erlang的数据库中,重启,依旧保存
        //参数3:是否排外,我们连接关闭后是否自动删除队列,是否私有当前队列,如果私有,其他队列不能访问
        //参数4:是否自动删除
        //参数5:我们传入的其他参数
        channel.queueDeclare(QUEUE, false, false, false, null);
        //发送内容
        channel.basicPublish("", QUEUE, null, "要发送的消息".getBytes());
        //关闭连接
        channel.close();
        connection.close();
    }
}

复制代码
定义一个消息接受者
package com.edu.hello;

import com.edu.util.ConnectionUtil;
import com.rabbitmq.client.Channel;
import com.rabbitmq.client.Connection;
import com.rabbitmq.client.QueueingConsumer;

/**
 * @ClassName Recver
 * @Deccription 消息接受者
 * @Author DZ
 * @Date 2019/5/4 12:58
 **/
public class Recver {
    private final static String QUEUE = "testhello";//消息队列的名称

    public static void main(String[] args) throws Exception {
        Connection connection = ConnectionUtil.getConnection();
        Channel channel = connection.createChannel();
        channel.queueDeclare(QUEUE, false, false, false, null);
        QueueingConsumer queueingConsumer = new QueueingConsumer(channel);
        //接受消息,参数2表示自动确认消息
        channel.basicConsume(QUEUE, true, queueingConsumer);
        while (true) {
            //获取消息
            QueueingConsumer.Delivery delivery = queueingConsumer.nextDelivery();//如果没有消息就等待,有消息就获取消息,并销毁,是一次性的
            String message = new String(delivery.getBody());
            System.out.println(message);
        }
    }
}

复制代码
此种模式属于“点对点”模式,一个生产者、一个队列、一个消费者,可以运用在聊天室(实际上真实的聊天室比这复杂很多,虽然是“点对点”模式,但是并不是一个生产者,一个队列,一个消费者)
4.2.work queues
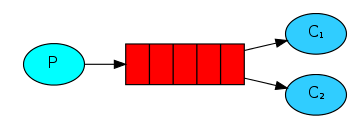
一个生产者对应多个消费者,但是只有一个消费者获得消息
定义消息制造者:
package com.edu.work;

import com.edu.util.ConnectionUtil;
import com.rabbitmq.client.Channel;
import com.rabbitmq.client.Connection;

/**
 * @ClassName Sender
 * @Deccription 创建发送者
 * @Author DZ
 * @Date 2019/5/4 12:45
 **/
public class Sender {
    private final static String QUEUE = "testhellowork"; //队列的名字

    public static void main(String[] srgs) throws Exception {
        //获取连接
        Connection connection = ConnectionUtil.getConnection();
        //创建连接
        Channel channel = connection.createChannel();
        //声明队列
        //参数1:队列的名字
        //参数2:是否持久化队列,我们的队列存在内存中,如果mq重启则丢失。如果为ture,则保存在erlang的数据库中,重启,依旧保存
        //参数3:是否排外,我们连接关闭后是否自动删除队列,是否私有当前队列,如果私有,其他队列不能访问
        //参数4:是否自动删除
        //参数5:我们传入的其他参数
        channel.queueDeclare(QUEUE, false, false, false, null);
        //发送内容
        for (int i = 0; i < 100; i++) {
            channel.basicPublish("", QUEUE, null, ("要发送的消息" + i).getBytes());
        }
        //关闭连接
        channel.close();
        connection.close();
    }
}

复制代码
定义2个消息消费者
package com.edu.work;

import com.edu.util.ConnectionUtil;
import com.rabbitmq.client.*;

import java.io.IOException;
import java.util.Queue;

/**
 * @ClassName Recver1
 * @Deccription 消息接受者
 * @Author DZ
 * @Date 2019/5/4 12:58
 **/
public class Recver1 {
    private final static String QUEUE = "testhellowork";//消息队列的名称

    public static void main(String[] args) throws Exception {
        Connection connection = ConnectionUtil.getConnection();
        final Channel channel = connection.createChannel();
        channel.queueDeclare(QUEUE, false, false, false, null);
        //channel.basicQos(1);//告诉服务器,当前消息没有确认之前,不要发送新消息,合理自动分配资源
        DefaultConsumer defaultConsumer = new DefaultConsumer(channel) {
            @Override
            public void handleDelivery(String consumerTag, Envelope envelope, AMQP.BasicProperties properties, byte[] body) throws IOException {
                //收到消息时候调用
                System.out.println("消费者1收到的消息:" + new String(body));
                /*super.handleDelivery(consumerTag, envelope, properties, body);*/
                //确认消息
                //参数2:false为确认收到消息,ture为拒绝收到消息
                channel.basicAck(envelope.getDeliveryTag(), false);
            }
        };
        //注册消费者
        // 参数2:手动确认,我们收到消息后,需要手动确认,告诉服务器,我们收到消息了
        channel.basicConsume(QUEUE, false, defaultConsumer);
    }
}

复制代码
package com.edu.work;

import com.edu.util.ConnectionUtil;
import com.rabbitmq.client.*;

import java.io.IOException;

/**
 * @ClassName Recver1
 * @Deccription 消息接受者
 * @Author DZ
 * @Date 2019/5/4 12:58
 **/
public class Recver2 {
    private final static String QUEUE = "testhellowork";//消息队列的名称

    public static void main(String[] args) throws Exception {
        Connection connection = ConnectionUtil.getConnection();
        final Channel channel = connection.createChannel();
        channel.queueDeclare(QUEUE, false, false, false, null);
        //channel.basicQos(1);//告诉服务器,当前消息没有确认之前,不要发送新消息
        DefaultConsumer defaultConsumer = new DefaultConsumer(channel) {
            @Override
            public void handleDelivery(String consumerTag, Envelope envelope, AMQP.BasicProperties properties, byte[] body) throws IOException {
                //收到消息时候调用
                System.out.println("消费者2收到的消息:" + new String(body));
                /*super.handleDelivery(consumerTag, envelope, properties, body);*/
                //确认消息
                //参数2:false为确认收到消息,ture为拒绝收到消息
                channel.basicAck(envelope.getDeliveryTag(), false);
            }
        };
        //注册消费者
        // 参数2:手动确认,我们收到消息后,需要手动确认,告诉服务器,我们收到消息了
        channel.basicConsume(QUEUE, false, defaultConsumer);
    }
}

复制代码
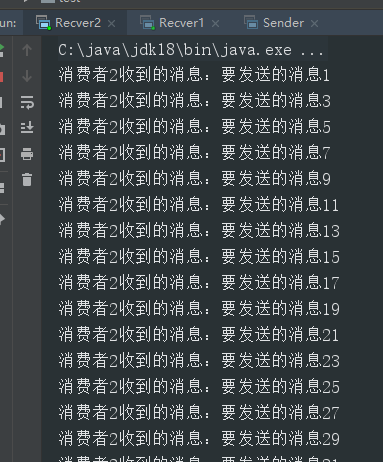
这种模式是最简单的 work 模式,消息发送者,循环发送了100次消息,打印结果如下:
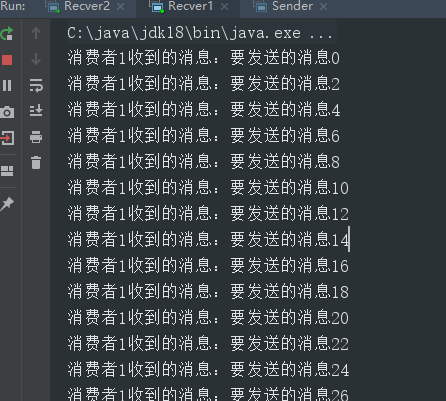
;
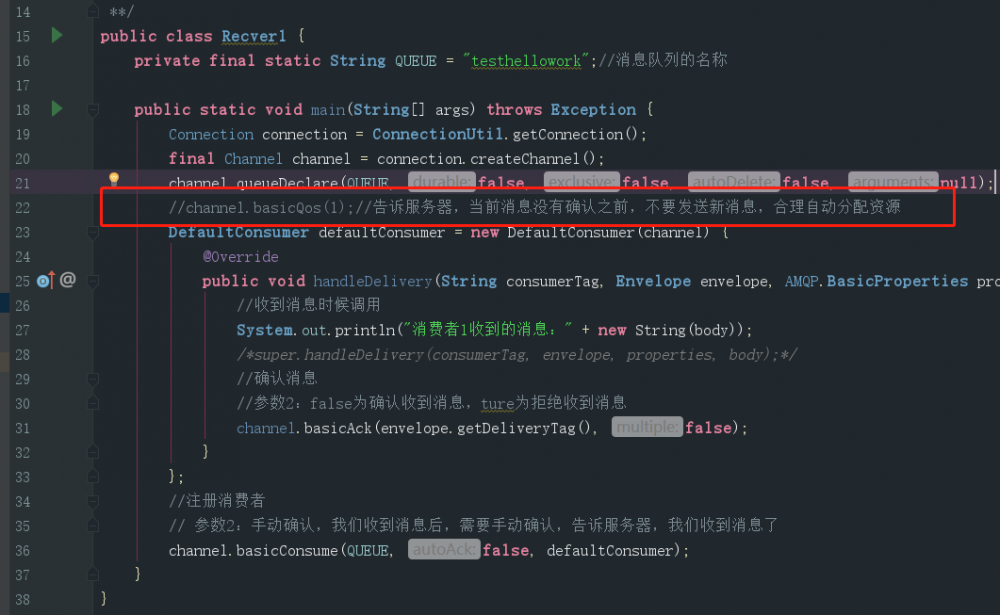
此方案可以用来进行负载均衡,抢红包等场景
4.3.public模式

。
定义消息发布者
package com.edu.publish;

import com.edu.util.ConnectionUtil;
import com.rabbitmq.client.Channel;
import com.rabbitmq.client.Connection;

/**
 * @ClassName Sender
 * @Deccription TODO
 * @Author DZ
 * @Date 2019/5/4 14:43
 **/
public class Sender {
    private final static String EXCHANGE_NAME = "testexchange";//定义交换机名字

    public static void main(String[] args) throws Exception {
        Connection connection = ConnectionUtil.getConnection();
        Channel channel = connection.createChannel();
        //声明交换机
        //定义一个交换机,类型为fanout,也就是发布订阅者模式
        channel.exchangeDeclare(EXCHANGE_NAME, "fanout");
        //发布订阅模式,因为消息是先发布到交换机中,而交换机是没有保存功能的,所以如果没有消费者,消息会丢失
        channel.basicPublish(EXCHANGE_NAME, "", null, "发布订阅模式的消息".getBytes());
        channel.close();
        connection.close();
    }
}

复制代码
定义2个消息消费者
package com.edu.publish;

import com.edu.util.ConnectionUtil;
import com.rabbitmq.client.*;

import java.io.IOException;

/**
 * @ClassName Recver1
 * @Deccription TODO
 * @Author DZ
 * @Date 2019/5/4 14:49
 **/
public class Recver1 {
    //定义交换机
    private final static String EXCHANGE_NAME = "testexchange";
    private final static String QUEUE = "testpubqueue1";

    public static void main(String[] args) throws Exception {
        Connection connection = ConnectionUtil.getConnection();
        final Channel channel = connection.createChannel();
        channel.queueDeclare(QUEUE, false, false, false, null);
        //绑定队列到交换机
        channel.queueBind(QUEUE, EXCHANGE_NAME, "");
        channel.basicQos(1);
        DefaultConsumer defaultConsumer = new DefaultConsumer(channel) {
            @Override
            public void handleDelivery(String consumerTag, Envelope envelope, AMQP.BasicProperties properties, byte[] body) throws IOException {
                /* super.handleDelivery(consumerTag, envelope, properties, body);*/
                System.out.println("消费者1:" + new String(body));
                channel.basicAck(envelope.getDeliveryTag(), false);
            }
        };
        channel.basicConsume(QUEUE, false, defaultConsumer);
    }
}

复制代码
package com.edu.publish;

import com.edu.util.ConnectionUtil;
import com.rabbitmq.client.*;

import java.io.IOException;

/**
 * @ClassName Recver1
 * @Deccription TODO
 * @Author DZ
 * @Date 2019/5/4 14:49
 **/
public class Recver2 {
    //定义交换机
    private final static String EXCHANGE_NAME = "testexchange";
    private final static String QUEUE = "testpubqueue2";

    public static void main(String[] args) throws Exception {
        Connection connection = ConnectionUtil.getConnection();
        final Channel channel = connection.createChannel();
        channel.queueDeclare(QUEUE, false, false, false, null);
        //绑定队列到交换机
        channel.queueBind(QUEUE, EXCHANGE_NAME, "");
        channel.basicQos(1);
        DefaultConsumer defaultConsumer = new DefaultConsumer(channel) {
            @Override
            public void handleDelivery(String consumerTag, Envelope envelope, AMQP.BasicProperties properties, byte[] body) throws IOException {
                /* super.handleDelivery(consumerTag, envelope, properties, body);*/
                System.out.println("消费者2:" + new String(body));
                channel.basicAck(envelope.getDeliveryTag(), false);
            }
        };
        channel.basicConsume(QUEUE, false, defaultConsumer);
    }
}

复制代码
消费者1 和消费者2 都监听了被同一个交换器绑定的队列,因此消息被同时消费到了。如果消息发送到没有队列绑定的交换器时,消息将丢失,因为交换器没有存储消息的能力,消息只能存储在队列中。
应用场景:比如一个商城系统需要在管理员上传商品新的图片时,前台系统必须更新图片,日志系统必须记录相应的日志,那么就可以将两个队列绑定到图片上传交换器上,一个用于前台系统更新图片,另一个用于日志系统记录日志。
4.4.routing

生产者将消息发送到 direct 交换器,在绑定队列和交换器的时候有一个路由 key,生产者发送的消息会指定一个路由 key,那么消息只会发送到相应 key 相同的队列,接着监听该队列的消费者消费消息。
定义消息发布者
package com.edu.route;

import com.edu.util.ConnectionUtil;
import com.rabbitmq.client.Channel;
import com.rabbitmq.client.Connection;

/**
 * @ClassName Sender
 * @Deccription TODO
 * @Author DZ
 * @Date 2019/5/4 15:05
 **/
public class Sender {
    private final static String EXCANGE_NAME = "testroute";

    public static void main(String[] args) throws Exception {
        Connection connection = ConnectionUtil.getConnection();
        Channel channel = connection.createChannel();
        //定义路由格式的交换机
        channel.exchangeDeclare(EXCANGE_NAME, "direct");
        channel.basicPublish(EXCANGE_NAME, "key2", null, "路由模式的消息".getBytes());
        channel.close();
        connection.close();
    }
}

复制代码
package com.edu.route;

import com.edu.util.ConnectionUtil;
import com.rabbitmq.client.*;

import java.io.IOException;

/**
 * @ClassName Recver1
 * @Deccription TODO
 * @Author DZ
 * @Date 2019/5/4 14:49
 **/
public class Recver1 {
    //定义交换机
    private final static String EXCHANGE_NAME = "testroute";
    private final static String QUEUE = "testroute1queue";

    public static void main(String[] args) throws Exception {
        Connection connection = ConnectionUtil.getConnection();
        final Channel channel = connection.createChannel();
        channel.queueDeclare(QUEUE, false, false, false, null);
        //绑定队列到交换机
        //参数3:绑定到交换机指定的路由的名字
        channel.queueBind(QUEUE, EXCHANGE_NAME, "key1");
        //如果需要绑定多个路由,再绑定一次即可
        channel.queueBind(QUEUE, EXCHANGE_NAME, "key2");
        channel.basicQos(1);
        DefaultConsumer defaultConsumer = new DefaultConsumer(channel) {
            @Override
            public void handleDelivery(String consumerTag, Envelope envelope, AMQP.BasicProperties properties, byte[] body) throws IOException {
                /* super.handleDelivery(consumerTag, envelope, properties, body);*/
                System.out.println("消费者1:" + new String(body));
                channel.basicAck(envelope.getDeliveryTag(), false);
            }
        };
        channel.basicConsume(QUEUE, false, defaultConsumer);
    }
}

复制代码
package com.edu.route;

import com.edu.util.ConnectionUtil;
import com.rabbitmq.client.*;

import java.io.IOException;

/**
 * @ClassName Recver1
 * @Deccription TODO
 * @Author DZ
 * @Date 2019/5/4 14:49
 **/
public class Recver2 {
    //定义交换机
    private final static String EXCHANGE_NAME = "testroute";
    private final static String QUEUE = "testroute2queue";

    public static void main(String[] args) throws Exception {
        Connection connection = ConnectionUtil.getConnection();
        final Channel channel = connection.createChannel();
        channel.queueDeclare(QUEUE, false, false, false, null);
        //绑定队列到交换机
        //参数3:绑定到交换机指定的路由的名字
        channel.queueBind(QUEUE, EXCHANGE_NAME, "key1");
        //如果需要绑定多个路由,再绑定一次即可
        channel.queueBind(QUEUE, EXCHANGE_NAME, "key3");
        channel.basicQos(1);
        DefaultConsumer defaultConsumer = new DefaultConsumer(channel) {
            @Override
            public void handleDelivery(String consumerTag, Envelope envelope, AMQP.BasicProperties properties, byte[] body) throws IOException {
                /* super.handleDelivery(consumerTag, envelope, properties, body);*/
                System.out.println("消费者2:" + new String(body));
                channel.basicAck(envelope.getDeliveryTag(), false);
            }
        };
        channel.basicConsume(QUEUE, false, defaultConsumer);
    }
}

复制代码
应用场景:利用消费者能够有选择性的接收消息的特性,比如我们商城系统的后台管理系统对于商品进行修改、删除、新增操作都需要更新前台系统的界面展示,而查询操作确不需要,那么这两个队列分开接收消息就比较好。
4.5.Topic

上面的路由模式是根据路由key进行完整的匹配(完全相等才发送消息),这里的通配符模式通俗的来讲就是模糊匹配。符号 “#” 表示匹配一个或多个词,符号 “*” 表示匹配一个词。实际上 Topic 模式是 routing 模式的扩展
package com.edu.topic;

import com.edu.util.ConnectionUtil;
import com.rabbitmq.client.Channel;
import com.rabbitmq.client.Connection;

/**
 * @ClassName Sender
 * @Deccription TODO
 * @Author DZ
 * @Date 2019/5/4 15:19
 **/
public class Sender {
    private final static String EXCANGE_NAME = "testtopexchange";

    public static void main(String[] args) throws Exception {
        Connection connection = ConnectionUtil.getConnection();
        Channel channel = connection.createChannel();
        channel.exchangeDeclare(EXCANGE_NAME, "topic");
        channel.basicPublish(EXCANGE_NAME, "abc.adb.1", null, "topic模式消息发送者:".getBytes());
        channel.close();
        connection.close();
    }
}

复制代码
package com.edu.topic;

import com.edu.util.ConnectionUtil;
import com.rabbitmq.client.*;

import java.io.IOException;

/**
 * @ClassName Recver1
 * @Deccription TODO
 * @Author DZ
 * @Date 2019/5/4 14:49
 **/
public class Recver1 {
    //定义交换机
    private final static String EXCHANGE_NAME = "testtopexchange";
    private final static String QUEUE = "testtopic1queue";

    public static void main(String[] args) throws Exception {
        Connection connection = ConnectionUtil.getConnection();
        final Channel channel = connection.createChannel();
        channel.queueDeclare(QUEUE, false, false, false, null);
        //绑定队列到交换机
        //参数3:绑定到交换机指定的路由的名字
        channel.queueBind(QUEUE, EXCHANGE_NAME, "key.*");
        //如果需要绑定多个路由,再绑定一次即可
        channel.queueBind(QUEUE, EXCHANGE_NAME, "abc.*");
        channel.basicQos(1);
        DefaultConsumer defaultConsumer = new DefaultConsumer(channel) {
            @Override
            public void handleDelivery(String consumerTag, Envelope envelope, AMQP.BasicProperties properties, byte[] body) throws IOException {
                /* super.handleDelivery(consumerTag, envelope, properties, body);*/
                System.out.println("消费者1:" + new String(body));
                channel.basicAck(envelope.getDeliveryTag(), false);
            }
        };
        channel.basicConsume(QUEUE, false, defaultConsumer);
    }
}

复制代码
package com.edu.topic;

import com.edu.util.ConnectionUtil;
import com.rabbitmq.client.*;

import java.io.IOException;

/**
 * @ClassName Recver1
 * @Deccription TODO
 * @Author DZ
 * @Date 2019/5/4 14:49
 **/
public class Recver2 {
    //定义交换机
    private final static String EXCHANGE_NAME = "testtopexchange";
    private final static String QUEUE = "testtopic2queue";

    public static void main(String[] args) throws Exception {
        Connection connection = ConnectionUtil.getConnection();
        final Channel channel = connection.createChannel();
        channel.queueDeclare(QUEUE, false, false, false, null);
        //绑定队列到交换机
        //参数3:绑定到交换机指定的路由的名字
        channel.queueBind(QUEUE, EXCHANGE_NAME, "key.*");
        //如果需要绑定多个路由,再绑定一次即可
        channel.queueBind(QUEUE, EXCHANGE_NAME, "abc.#");
        channel.basicQos(1);
        DefaultConsumer defaultConsumer = new DefaultConsumer(channel) {
            @Override
            public void handleDelivery(String consumerTag, Envelope envelope, AMQP.BasicProperties properties, byte[] body) throws IOException {
                /* super.handleDelivery(consumerTag, envelope, properties, body);*/
                System.out.println("消费者2:" + new String(body));
                channel.basicAck(envelope.getDeliveryTag(), false);
            }
        };
        channel.basicConsume(QUEUE, false, defaultConsumer);
    }
}

复制代码
第六种模式是将上述的模式集成其它的框架,进行远程访问,这里我们将集成 Spring 实现 RCP 远程模式的使用
5.Spring 集成 RabbitMQ
5.1.自动集成 Spring
编写spring的配置,此配置文件的目的是将 Spring 与 RabbitMQ 进行整合,实际上就是将 MQ 的相关信息(连接,队列,交换机……)通过XML配置的方式实现
<beans xmlns="http://www.springframework.org/schema/beans"
       xmlns:xsi="http://www.w3.org/2001/XMLSchema-instance"
       xmlns:rabbit="http://www.springframework.org/schema/rabbit"
       xsi:schemaLocation="http://www.springframework.org/schema/rabbit
       http://www.springframework.org/schema/rabbit/spring-rabbit-1.7.xsd
       http://www.springframework.org/schema/beans
       http://www.springframework.org/schema/beans/spring-beans-4.3.xsd">
    <!--定义连接工厂-->
    <rabbit:connection-factory id="connectionFactory" host="127.0.0.1" port="5672" username="test" password="test"
                               virtual-host="/test"/>
    <!--
     定义模板
     第三个参数,决定消息发送到哪里,如果为exchange,则发送到交换机;如果为queue,则发送到队列
    -->
    <rabbit:template id="template" connection-factory="connectionFactory" exchange="fanoutExchange"/>
    <rabbit:admin connection-factory="connectionFactory"/>
    <!--定义队列-->
    <rabbit:queue name="myQueue" auto-declare="true"/>
    <!--定义交换机-->
    <rabbit:fanout-exchange name="fanoutExange" auto-declare="true">
        <!--将消息绑定到交换机-->
        <rabbit:bindings>
            <rabbit:binding queue="myQueue">

            </rabbit:binding>
        </rabbit:bindings>
    </rabbit:fanout-exchange>
    <!--定义监听器,收到消息会执行-->
    <rabbit:listener-container connection-factory="connectionFactory">
       <!-- 定义监听的类和方法-->
        <rabbit:listener ref="consumer" method="test" queue-names="myQueue"/>
    </rabbit:listener-container>
    <!--定义消费者-->
    <bean id="consumer" class="com.edu.spring.MyConsumer"/>

</beans>
复制代码
生产者:
package com.edu.spring;

import org.springframework.amqp.rabbit.core.RabbitTemplate;
import org.springframework.context.ApplicationContext;
import org.springframework.context.support.ClassPathXmlApplicationContext;

/**
 * @ClassName SpringTest
 * @Deccription TODO
 * @Author DZ
 * @Date 2019/5/4 18:40
 **/
public class SpringTest {
    public static void main(String[] args) throws Exception {
        ApplicationContext applicationContext = new ClassPathXmlApplicationContext("classpath:applicationContext.xml");
        RabbitTemplate rabbitTemplate = applicationContext.getBean(RabbitTemplate.class);
        rabbitTemplate.convertAndSend("Spring的消息");
        ((ClassPathXmlApplicationContext) applicationContext).destroy();
    }
}

复制代码
消费者
package com.edu.spring;

/**
 * @ClassName MyConsumer
 * @Deccription TODO
 * @Author DZ
 * @Date 2019/5/4 18:35
 **/
public class MyConsumer {
    /*用于接收消息*/
    public void test(String message) {
        System.err.println(message);
    }
}

复制代码
集成Spring主要是在xml中实现了队列和交换机的创建。
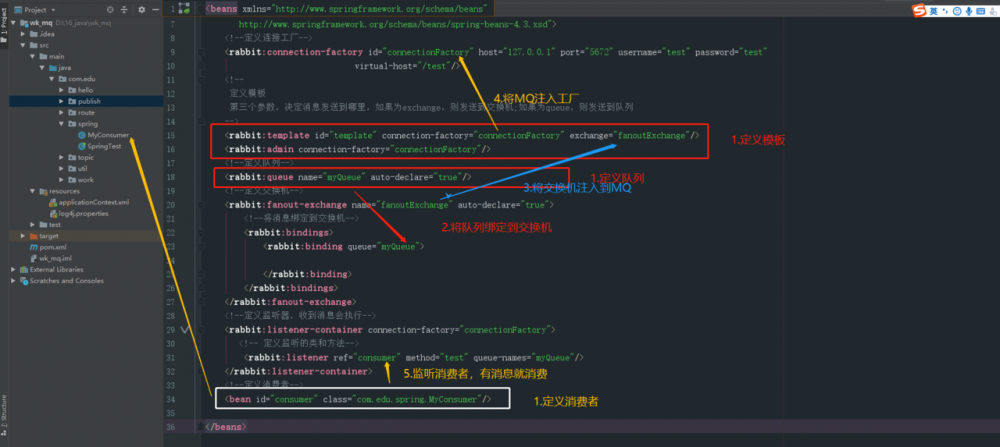
最好能理解上面的图。理解后,以后写相关的代码,直接去网上 copy 一份配置文件,然后根据自己项目的情况进行修改。如果不能理解,就不知道如何修改出现错误后不知道错误出现在什么地方。
5.2.手动模式
手动模式,主要增加MQ的回调操作,MQ消息失败或者成功就有相应的回调信息,增强系统的健壮性,一旦产生异常,很快就能定位到异常的位置,所以在实际开发中,一般都这种方式
创建xml配置文件
<beans xmlns="http://www.springframework.org/schema/beans"
       xmlns:xsi="http://www.w3.org/2001/XMLSchema-instance"
       xmlns:rabbit="http://www.springframework.org/schema/rabbit"
       xmlns:context="http://www.springframework.org/schema/context"
       xsi:schemaLocation="http://www.springframework.org/schema/rabbit
       http://www.springframework.org/schema/rabbit/spring-rabbit-1.7.xsd
       http://www.springframework.org/schema/beans
       http://www.springframework.org/schema/beans/spring-beans-4.3.xsd
       http://www.springframework.org/schema/context
       http://www.springframework.org/schema/context/spring-context-4.3.xsd">
    <context:component-scan base-package="com.edu"/>
    <bean id="jsonMessageConverter" class="org.springframework.amqp.support.converter.Jackson2JsonMessageConverter"/>

    <!--
    定义连接工厂
    publisher-confirms为ture,确认失败等回调才会执行
    -->
    <rabbit:connection-factory id="connectionFactory" host="127.0.0.1" port="5672" username="test" password="test"
                               virtual-host="/test" publisher-confirms="true"/>

    <rabbit:admin connection-factory="connectionFactory"/>
    <rabbit:template id="amqpTemplate" connection-factory="connectionFactory" confirm-callback="confirmCallBackListener"
                     return-callback="returnCallBackListener"
                     mandatory="true"/>
    <!--定义队列-->
    <rabbit:queue name="myQueue" auto-declare="true"/>
    <!--定义交换机-->
    <rabbit:direct-exchange name="DIRECT_EX" id="DIRECT_EX">
        <!--将消息绑定到交换机-->
        <rabbit:bindings>
            <rabbit:binding queue="myQueue">

            </rabbit:binding>
        </rabbit:bindings>
    </rabbit:direct-exchange>
    <!--定义监听器,收到消息会执行-->
    <rabbit:listener-container connection-factory="connectionFactory" acknowledge="manual">
        <!-- 定义监听的类和方法-->
        <rabbit:listener queues="myQueue" ref="receiveConfirmTestListener"/>
    </rabbit:listener-container>

</beans>
复制代码
创建回调监听函数
package com.edu.spring2;

import org.springframework.amqp.rabbit.core.RabbitTemplate;
import org.springframework.amqp.rabbit.support.CorrelationData;
import org.springframework.stereotype.Component;

/**
 * @ClassName ConfirmCallBackListener
 * @Deccription TODO
 * @Author DZ
 * @Date 2019/5/4 22:26
 **/
@Component("confirmCallBackListener")
public class ConfirmCallBackListener implements RabbitTemplate.ConfirmCallback {

    @Override
    public void confirm(CorrelationData correlationData, boolean ack, String cause) {
        System.out.println("确认回调 ack==" + ack + "回调原因==" + cause);
    }
}

复制代码
package com.edu.spring2;

import com.rabbitmq.client.Channel;
import org.springframework.amqp.core.Message;
import org.springframework.amqp.rabbit.core.ChannelAwareMessageListener;
import org.springframework.stereotype.Component;

/**
 * @ClassName ReceiveConfirmTestListener
 * @Deccription TODO
 * @Author DZ
 * @Date 2019/5/4 22:24
 **/
@Component("receiveConfirmTestListener")
public class ReceiveConfirmTestListener implements ChannelAwareMessageListener {
    /**
     * 收到消息时,执行的监听
     *
     * @param message
     * @param channel
     * @throws Exception
     */
    @Override
    public void onMessage(Message message, Channel channel) throws Exception {
        System.out.println(("消费者收到了消息" + message));
        channel.basicAck(message.getMessageProperties().getDeliveryTag(),false);
    }
}

复制代码
package com.edu.spring2;

import org.springframework.amqp.core.Message;
import org.springframework.amqp.rabbit.core.RabbitTemplate;
import org.springframework.stereotype.Component;

/**
 * @ClassName ReturnCallBackListener
 * @Deccription TODO
 * @Author DZ
 * @Date 2019/5/4 22:28
 **/
@Component("returnCallBackListener")
public class ReturnCallBackListener implements RabbitTemplate.ReturnCallback {
    @Override
    public void returnedMessage(Message message, int replyCode, String replyText, String exchange, String routingKey) {
        System.out.println("失败回调" + message);
    }
}

复制代码
回调函数的配置来自 XML
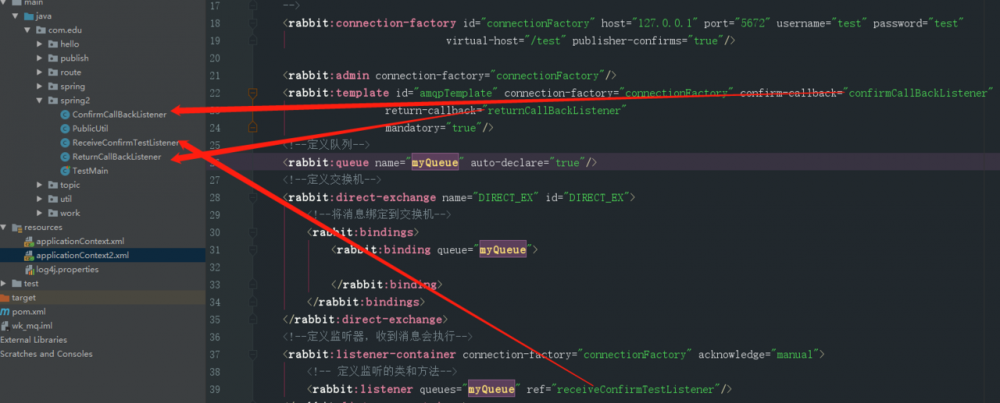
创建发送消息的工具类
package com.edu.spring2;

import org.springframework.amqp.core.AmqpTemplate;
import org.springframework.beans.factory.annotation.Autowired;
import org.springframework.stereotype.Component;

/**
 * @ClassName PublicUtil
 * @Deccription TODO
 * @Author DZ
 * @Date 2019/5/4 22:30
 **/
@Component("publicUtil")
public class PublicUtil {
    @Autowired
    private AmqpTemplate amqpTemplate;

    public void send(String excange, String routingkey, Object message) {
        amqpTemplate.convertAndSend(excange, routingkey, message);
    }
}

复制代码
创建测试类
package com.edu.spring2;

import org.junit.Test;
import org.junit.runner.RunWith;
import org.springframework.beans.factory.annotation.Autowired;
import org.springframework.test.context.ContextConfiguration;
import org.springframework.test.context.junit4.SpringJUnit4ClassRunner;

/**
 * @ClassName TestMain
 * @Deccription TODO
 * @Author DZ
 * @Date 2019/5/4 22:32
 **/
@RunWith(SpringJUnit4ClassRunner.class)
@ContextConfiguration(locations = {"classpath:applicationContext2.xml"})
public class TestMain {
    @Autowired
    private PublicUtil publicUtil;
    private static String exChange = "DIRECT_EX";//交换机
    private static String queue = "myQueue";

    /**
     * exChange和queue均正确
     * confirm会执行,ack = ture
     * 消息正常接收(接收消息确认方法正常执行)
     * @throws Exception
     */
    @Test
    public void test1() throws Exception {
        publicUtil.send(exChange, queue, "测试1,队列和交换机均正确");
    }
    /**
     * exChange错误,queue正确
     * confirm执行,ack=false
     * 消息无法接收(接收消息确认方法不能执行)
     * @throws Exception
     */
    @Test
    public void test2() throws Exception {
        publicUtil.send(exChange + "1", queue, "测试2,队列正确,交换机错误");
    }
    /**
     * exChange正常,queue错误
     * return执行
     * confirm执行,ack=ture
     * @throws Exception
     */
    @Test
    public void test3() throws Exception {
        publicUtil.send(exChange, queue + "1", "测试2,队列错误,交换机正确");
    }

    /**
     * exChange错误,queue错误
     * confirm执行,ack=false
     * @throws Exception
     */
    @Test
    public void test4() throws Exception {
        publicUtil.send(exChange + "1", queue + "1", "测试2,队列错误,交换机错误");
    }
}


复制代码
测试结果如下:
-
test1:exChange和queue均正确
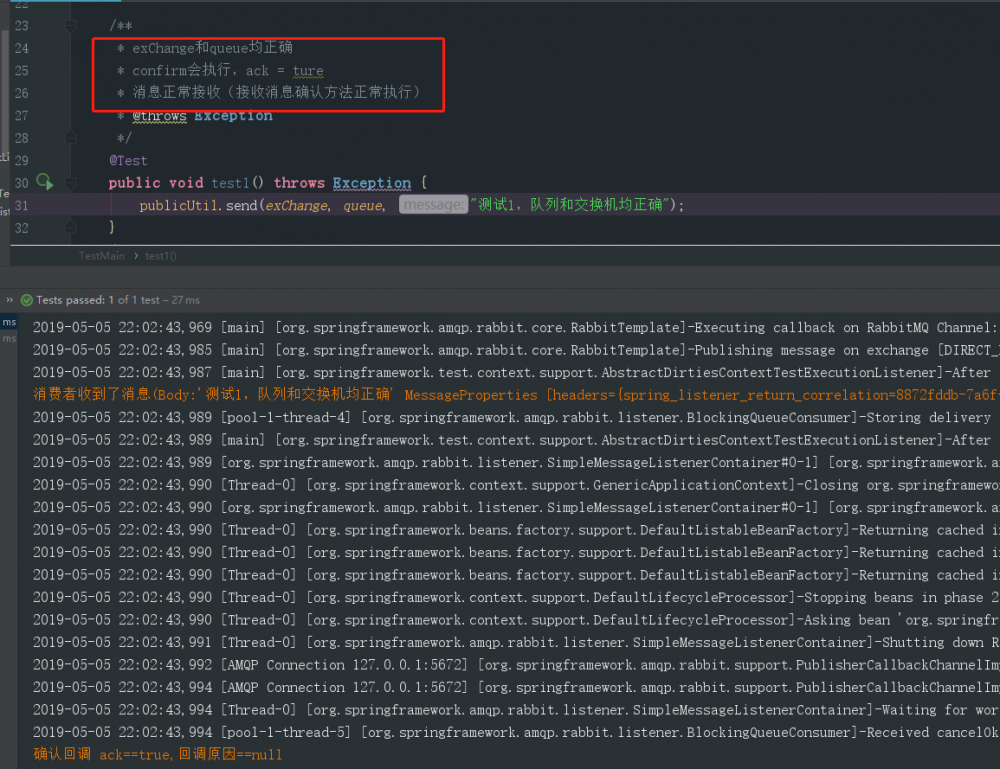
-
test2:exChange错误,queue正确
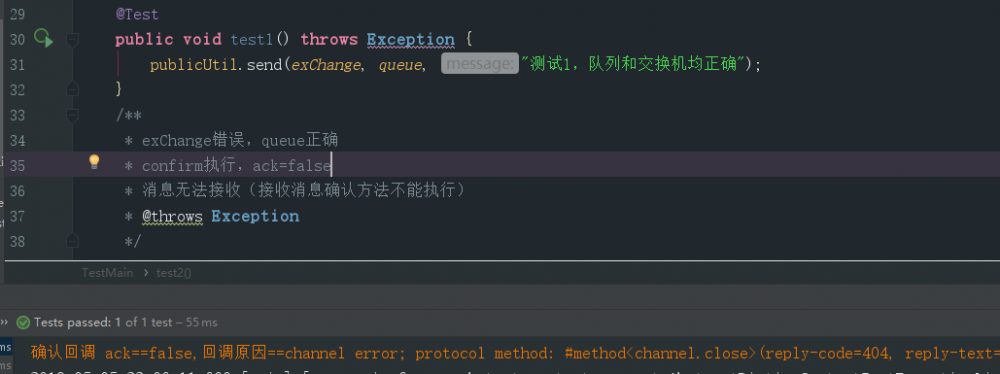
- test3:exChange正确,queue错误

- test4:exChange和queue均错误

上述结论及代码如下图:
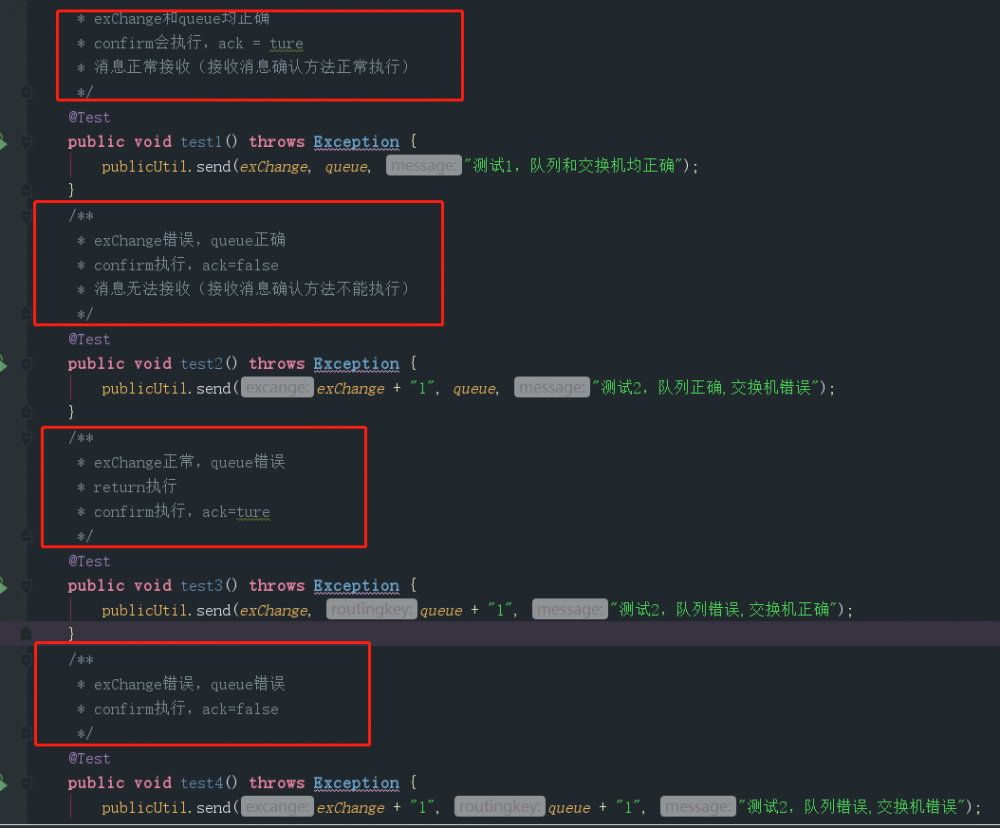
根据上述的测试结果,我们可以根据回调函数的返回结果,查看MQ的错误出现在那里。根据上述结论,我们可以对3个回调函数做如下处理:
-
类 ReceiveConfirmTestListener 中的onMessage方法主要用于接收从 RabbitMQ 推送过来的消息,并对消息做相应的逻辑处理
-
类 ConfirmCallBackListener 中的 confirm 方法主要用于检查交换机(exChange),当 ack=false,交换机可能错误
-
类 ReturnCallBackListener 中的 returnedMessage 方法用于检查队列(queue),当此方法执行时,队列可能错误
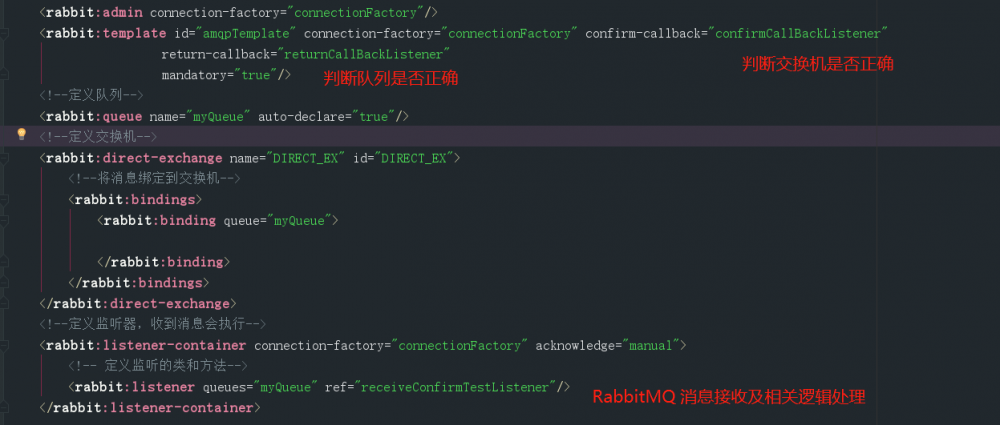
所以3个相应的方法可以做如下调整:


实际上,在真实项目中,上面3个方法也是按照这3个逻辑进行设计的。当然这3个方法中还可以加入更多的日志消息,和逻辑处理业务。
- 本文标签: cat 需求 谷歌 consumer 删除 connectionFactory bug linux 服务器 ip 进程 代码 list java基础 http queue rabbitmq root pom 数据库 管理 key final 进程数 message id 2019 VirtualHost maven tar IDE XML 开发 core 监听器 MQ tag apache db 数据 消息队列 spring集成 src 下载 IO 并发 远程访问 端口 负载均衡 UI json 参数 client 红包 图片 junit java windows js 配置 App mybatis schema Word plugin amqp spring classpath https 安装 CTO 软件 Connection 博客 bean 本质 目录 测试
- 版权声明: 本文为互联网转载文章,出处已在文章中说明(部分除外)。如果侵权,请联系本站长删除,谢谢。
- 本文海报: 生成海报一 生成海报二


![[HBLOG]公众号](http://www.liuhaihua.cn/img/qrcode_gzh.jpg)

