SpringBoot 中启动 Tomcat 流程
前面在一篇文章中介绍了 Spring 中的一些重要的 context。有一些在此文中提到的 context,可以参看上篇文章。
SpringBoot 项目之所以部署简单,其很大一部分原因就是因为不用自己折腾 Tomcat 相关配置,因为其本身内置了各种 Servlet 容器。一直好奇: SpringBoot 是怎么通过简单运行一个 main 函数,就能将容器启动起来,并将自身部署到其上 。此文想梳理清楚这个问题。
我们从SpringBoot的启动入口中分析:
Context 创建
1// Create, load, refresh and run the ApplicationContext
2context = createApplicationContext();
复制代码
在SpringBoot 的 run 方法中,我们发现其中很重要的一步就是上面的一行代码。注释也写的很清楚:
创建、加载、刷新、运行 ApplicationContext。
继续往里面走。
 1protected ConfigurableApplicationContext createApplicationContext() {
 2   Class<?> contextClass = this.applicationContextClass;
 3   if (contextClass == null) {
 4      try {
 5         contextClass = Class.forName(this.webEnvironment
 6               ? DEFAULT_WEB_CONTEXT_CLASS : DEFAULT_CONTEXT_CLASS);
 7      }
 8      catch (ClassNotFoundException ex) {
 9         throw new IllegalStateException(
10               "Unable create a default ApplicationContext, "
11                     + "please specify an ApplicationContextClass",
12               ex);
13      }
14   }
15   return (ConfigurableApplicationContext) BeanUtils.instantiate(contextClass);
16}
复制代码
逻辑很清楚:
先找到 context 类,然后利用工具方法将其实例化。
其中 第5行 有个判断:如果是 web 环境,则加载 DEFAULT _WEB_CONTEXT_CLASS类。参看成员变量定义,其类名为:
1AnnotationConfigEmbeddedWebApplicationContext
复制代码
此类的继承结构如图:
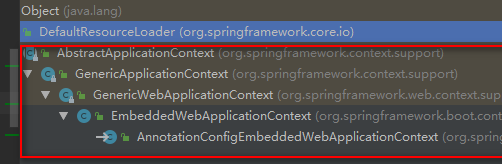
直接继承 GenericWebApplicationContext。关于该类前文已有介绍,只要记得它是专门为 web application提供context 的就好。
refresh
在经历过 Context 的创建以及Context的一些列初始化之后,调用 Context 的 refresh 方法,真正的好戏才开始上演。
从前面我们可以看到AnnotationConfigEmbeddedWebApplicationContext的继承结构,调用该类的refresh方法,最终会由其直接父类:EmbeddedWebApplicationContext 来执行。
 1@Override
 2protected void onRefresh() {
 3   super.onRefresh();
 4   try {
 5      createEmbeddedServletContainer();
 6   }
 7   catch (Throwable ex) {
 8      throw new ApplicationContextException("Unable to start embedded container",
 9            ex);
10   }
11}
复制代码
我们重点看第5行。
 1private void createEmbeddedServletContainer() {
 2   EmbeddedServletContainer localContainer = this.embeddedServletContainer;
 3   ServletContext localServletContext = getServletContext();
 4   if (localContainer == null && localServletContext == null) {
 5      EmbeddedServletContainerFactory containerFactory = getEmbeddedServletContainerFactory();
 6      this.embeddedServletContainer = containerFactory
 7            .getEmbeddedServletContainer(getSelfInitializer());
 8   }
 9   else if (localServletContext != null) {
10      try {
11         getSelfInitializer().onStartup(localServletContext);
12      }
13      catch (ServletException ex) {
14         throw new ApplicationContextException("Cannot initialize servlet context",
15               ex);
16      }
17   }
18   initPropertySources();
19}
复制代码
代码第5行,获取到了一个EmbeddedServletContainerFactory,顾名思义,其作用就是为了下一步创建一个嵌入式的 servlet 容器:EmbeddedServletContainer。
 1public interface EmbeddedServletContainerFactory {
 2
 3   /**
 4    * 创建一个配置完全的但是目前还处于“pause”状态的实例.
 5    * 只有其 start 方法被调用后,Client 才能与其建立连接。
 6    */
 7   EmbeddedServletContainer getEmbeddedServletContainer(
 8         ServletContextInitializer... initializers);
 9
10}
复制代码
第6、7行,在 containerFactory 获取EmbeddedServletContainer的时候,参数为 getSelfInitializer 函数的执行结果。暂时不管其内部机制如何,只要知道它会返回一个 ServletContextInitializer 用于容器初始化的对象即可,我们继续往下看。
由于 EmbeddedServletContainerFactory 是个抽象工厂,不同的容器有不同的实现,因为SpringBoot默认使用Tomcat,所以就以 Tomcat 的工厂实现类 TomcatEmbeddedServletContainerFactory 进行分析:
 1@Override
 2public EmbeddedServletContainer getEmbeddedServletContainer(
 3      ServletContextInitializer... initializers) {
 4   Tomcat tomcat = new Tomcat();
 5   File baseDir = (this.baseDirectory != null ? this.baseDirectory
 6         : createTempDir("tomcat"));
 7   tomcat.setBaseDir(baseDir.getAbsolutePath());
 8   Connector connector = new Connector(this.protocol);
 9   tomcat.getService().addConnector(connector);
10   customizeConnector(connector);
11   tomcat.setConnector(connector);
12   tomcat.getHost().setAutoDeploy(false);
13   tomcat.getEngine().setBackgroundProcessorDelay(-1);
14   for (Connector additionalConnector : this.additionalTomcatConnectors) {
15      tomcat.getService().addConnector(additionalConnector);
16   }
17   prepareContext(tomcat.getHost(), initializers);
18   return getTomcatEmbeddedServletContainer(tomcat);
19}
复制代码
从第8行一直到第16行完成了 tomcat 的 connector 的添加。tomcat 中的 connector 主要负责用来处理 http 请求,具体原理可以参看 Tomcat 的源码,此处暂且不提。
第17行的 方法有点长,重点看其中的几行:
 1if (isRegisterDefaultServlet()) {
 2   addDefaultServlet(context);
 3}
 4if (isRegisterJspServlet() && ClassUtils.isPresent(getJspServletClassName(),
 5      getClass().getClassLoader())) {
 6   addJspServlet(context);
 7   addJasperInitializer(context);
 8   context.addLifecycleListener(new StoreMergedWebXmlListener());
 9}
10ServletContextInitializer[] initializersToUse = mergeInitializers(initializers);
11configureContext(context, initializersToUse);
复制代码
前面两个分支判断添加了默认的 servlet类和与 jsp 相关的 servlet 类。
对所有的 ServletContextInitializer 进行合并后,利用合并后的初始化类对 context 进行配置。
第 18 行,顺着方法一直往下走,开始正式启动 Tomcat。
 1private synchronized void initialize() throws EmbeddedServletContainerException {
 2   TomcatEmbeddedServletContainer.logger
 3         .info("Tomcat initialized with port(s): " + getPortsDescription(false));
 4   try {
 5      addInstanceIdToEngineName();
 6
 7      // Remove service connectors to that protocol binding doesn't happen yet
 8      removeServiceConnectors();
 9
10      // Start the server to trigger initialization listeners
11      this.tomcat.start();
12
13      // We can re-throw failure exception directly in the main thread
14      rethrowDeferredStartupExceptions();
15
16      // Unlike Jetty, all Tomcat threads are daemon threads. We create a
17      // blocking non-daemon to stop immediate shutdown
18      startDaemonAwaitThread();
19   }
20   catch (Exception ex) {
21      throw new EmbeddedServletContainerException("Unable to start embedded Tomcat",
22            ex);
23   }
24}
复制代码
第11行正式启动 tomcat。
现在我们回过来看看之前的那个 getSelfInitializer 方法:
1private ServletContextInitializer getSelfInitializer() {
2   return new ServletContextInitializer() {
3      @Override
4      public void onStartup(ServletContext servletContext) throws ServletException {
5         selfInitialize(servletContext);
6      }
7   };
8}
复制代码
 1private void selfInitialize(ServletContext servletContext) throws ServletException {
 2   prepareEmbeddedWebApplicationContext(servletContext);
 3   ConfigurableListableBeanFactory beanFactory = getBeanFactory();
 4   ExistingWebApplicationScopes existingScopes = new ExistingWebApplicationScopes(
 5         beanFactory);
 6   WebApplicationContextUtils.registerWebApplicationScopes(beanFactory,
 7         getServletContext());
 8   existingScopes.restore();
 9   WebApplicationContextUtils.registerEnvironmentBeans(beanFactory,
10         getServletContext());
11   for (ServletContextInitializer beans : getServletContextInitializerBeans()) {
12      beans.onStartup(servletContext);
13   }
14}
复制代码
在第2行的prepareEmbeddedWebApplicationContext方法中主要是将 EmbeddedWebApplicationContext 设置为rootContext。
第4行允许用户存储自定义的 scope。
第6行主要是用来将web专用的scope注册到BeanFactory中,比如("request", "session", "globalSession", "application")。
第9行注册web专用的environment bean(比如 ("contextParameters", "contextAttributes"))到给定的 BeanFactory 中。
第11和12行,比较重要,主要用来配置 servlet、filters、listeners、context-param和一些初始化时的必要属性。
以其一个实现类ServletContextInitializer试举一例:
 1@Override
 2public void onStartup(ServletContext servletContext) throws ServletException {
 3   Assert.notNull(this.servlet, "Servlet must not be null");
 4   String name = getServletName();
 5   if (!isEnabled()) {
 6      logger.info("Servlet " + name + " was not registered (disabled)");
 7      return;
 8   }
 9   logger.info("Mapping servlet: '" + name + "' to " + this.urlMappings);
10   Dynamic added = servletContext.addServlet(name, this.servlet);
11   if (added == null) {
12      logger.info("Servlet " + name + " was not registered "
13            + "(possibly already registered?)");
14      return;
15   }
16   configure(added);
17}
复制代码
可以看第9行的打印: 正是在这里实现了 servlet 到 URLMapping的映射。
总结
这篇文章从主干脉络分析找到了为什么在SpringBoot中不用自己配置Tomcat,内置的容器是怎么启动起来的,顺便在分析的过程中找到了我们常用的 urlMapping 映射 Servlet 的实现。
正文到此结束
- 本文标签: ssl https IDE BeanUtils ACE id root ip UI list http IO web tomcat 配置 XML DDL bean spring servlet map 实例 src Service cat App client Property 部署 jetty description CTO 总结 Listeners synchronized tab tar 注释 参数 trigger session 源码 js 代码 REST 文章 springboot
- 版权声明: 本文为互联网转载文章,出处已在文章中说明(部分除外)。如果侵权,请联系本站长删除,谢谢。
- 本文海报: 生成海报一 生成海报二
热门推荐


相关文章

近期评论
-
你这基本没有更新呀,最近文章显示还是2019年的文章。不符合要求哈
-
关键词:慕云博客 链接:https://www.lilun.me 描述:分享原创文字的个人博客
-
-
-
可以提供一下源码吗
-
不是商业站,鸡娃学习笔记
-
-
-
-
听他们说很厉害的样子
Loading...
![[HBLOG]公众号](http://www.liuhaihua.cn/img/qrcode_gzh.jpg)

