死磕Tomcat系列(2)——EndPoint源码解析
死磕Tomcat系列(2)——EndPoint源码解析
在上一节中我们描述了Tomcat的整体架构,我们知道了Tomcat分为两个大组件,一个连接器和一个容器。而我们这次要讲的 EndPoint 的组件就是属于连接器里面的。它是一个通信的端点,就是负责对外实现TCP/IP协议。 EndPoint 是个接口,它的具体实现类就是 AbstractEndpoint ,而 AbstractEndpoint 具体的实现类就有 AprEndpoint 、 Nio2Endpoint 、 NioEndpoint 。
AprEndpoint
Nio2Endpoint
NioEndpoint
NioEndpoint中重要的组件
我们知道 NioEndpoint 的原理还是对于Linux的多路复用器的使用,而在多路复用器中简单来说就两个步骤。
- 创建一个Selector,在它身上注册各种Channel,然后调用select方法,等待通道中有感兴趣的事件发生。
- 如果有感兴趣的事情发生了,例如是读事件,那么就将信息从通道中读取出来。
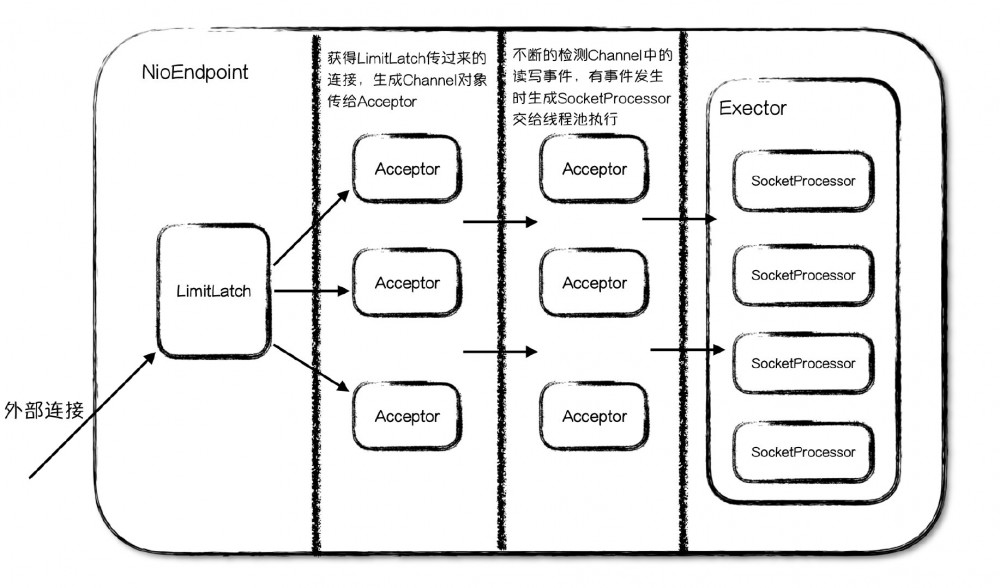
而 NioEndpoint 为了实现上面这两步,用了五个组件来。这五个组件是 LimitLatch 、 Acceptor 、 Poller 、 SocketProcessor 、 Executor
/**
 * Threads used to accept new connections and pass them to worker threads.
 */
protected List<Acceptor<U>> acceptors;

/**
 * counter for nr of connections handled by an endpoint
 */
private volatile LimitLatch connectionLimitLatch = null;
/**
 * The socket pollers.
 */
private Poller[] pollers = null;

内部类

SocketProcessor

/**
 * External Executor based thread pool.
 */
private Executor executor = null;
我们可以看到在代码中定义的这五个组件。具体这五个组件是干嘛的呢?
-
LimitLatch:连接控制器,负责控制最大的连接数 -
Acceptor:负责接收新的连接,然后返回一个Channel对象给Poller -
Poller:可以将其看成是NIO中Selector,负责监控Channel的状态 -
SocketProcessor:可以看成是一个被封装的任务类 -
Executor:Tomcat自己扩展的线程池,用来执行任务类
用图简单表示就是以下的关系
接下来我们就来分别的看一下每个组件里面关键的代码
LimitLatch
我们上面说了 LimitLatch 主要是用来控制Tomcat所能接收的最大数量连接,如果超过了此连接,那么Tomcat就会将此连接线程阻塞等待,等里面有其他连接释放了再消费此连接。那么 LimitLatch 是如何做到呢?我们可以看 LimitLatch 这个类
public class LimitLatch {

    private static final Log log = LogFactory.getLog(LimitLatch.class);

    private class Sync extends AbstractQueuedSynchronizer {
        private static final long serialVersionUID = 1L;

        public Sync() {
        }

        @Override
        protected int tryAcquireShared(int ignored) {
            long newCount = count.incrementAndGet();
            if (!released && newCount > limit) {
                // Limit exceeded
                count.decrementAndGet();
                return -1;
            } else {
                return 1;
            }
        }

        @Override
        protected boolean tryReleaseShared(int arg) {
            count.decrementAndGet();
            return true;
        }
    }

    private final Sync sync;
    //当前连接数
    private final AtomicLong count;
    //最大连接数
    private volatile long limit;
    private volatile boolean released = false;
}
我们可以看到它内部实现了 AbstractQueuedSynchronizer ,AQS其实就是一个框架,实现它的类可以自定义控制线程什么时候挂起什么时候释放。 limit 参数就是控制的最大连接数。我们可以看到 AbstractEndpoint 调用 LimitLatch 的 countUpOrAwait 方法来判断是否能获取连接。
public void countUpOrAwait() throws InterruptedException {
        if (log.isDebugEnabled()) {
            log.debug("Counting up["+Thread.currentThread().getName()+"] latch="+getCount());
        }
        sync.acquireSharedInterruptibly(1);
    }
AQS是如何知道什么时候阻塞线程呢?即不能获取连接呢?这些就靠用户自己实现 AbstractQueuedSynchronizer 自己来定义什么时候获取连接,什么时候释放连接了。可以看到Sync类重写了 tryAcquireShared 和 tryReleaseShared 方法。在 tryAcquireShared 方法中定义了一旦当前连接数大于了设置的最大连接数,那么就会返回 -1 表示将此线程放入AQS队列中等待。
Acceptor
Acceptor 是接收连接的,我们可以看到 Acceptor 实现了 Runnable 接口,那么在哪会新开启线程来执行 Acceptor 的run方法呢?在 AbstractEndpoint 的 startAcceptorThreads 方法中。
protected void startAcceptorThreads() {
    int count = getAcceptorThreadCount();
    acceptors = new ArrayList<>(count);

    for (int i = 0; i < count; i++) {
        Acceptor<U> acceptor = new Acceptor<>(this);
        String threadName = getName() + "-Acceptor-" + i;
        acceptor.setThreadName(threadName);
        acceptors.add(acceptor);
        Thread t = new Thread(acceptor, threadName);
        t.setPriority(getAcceptorThreadPriority());
        t.setDaemon(getDaemon());
        t.start();
    }
}
可以看到这里可以设置开启几个 Acceptor ,默认是一个。而一个端口只能对应一个 ServerSocketChannel ,那么这个 ServerSocketChannel 在哪初始化呢?我们可以看到在 Acceptor<U> acceptor = new Acceptor<>(this); 这句话中传入了this进去,那么应该是由 Endpoint 组件初始化的连接。在 NioEndpoint 的 initServerSocket 方法中初始化了连接。
// Separated out to make it easier for folks that extend NioEndpoint to
// implement custom [server]sockets
protected void initServerSocket() throws Exception {
    if (!getUseInheritedChannel()) {
        serverSock = ServerSocketChannel.open();
        socketProperties.setProperties(serverSock.socket());
        InetSocketAddress addr = new InetSocketAddress(getAddress(), getPortWithOffset());
        serverSock.socket().bind(addr,getAcceptCount());
    } else {
        // Retrieve the channel provided by the OS
        Channel ic = System.inheritedChannel();
        if (ic instanceof ServerSocketChannel) {
            serverSock = (ServerSocketChannel) ic;
        }
        if (serverSock == null) {
            throw new IllegalArgumentException(sm.getString("endpoint.init.bind.inherited"));
        }
    }
    serverSock.configureBlocking(true); //mimic APR behavior
}
这里面我们能够看到两点
- 在bind方法中的第二个参数表示操作系统的等待队列长度,即Tomcat不再接受连接时(达到了设置的最大连接数),但是在操作系统层面还是能够接受连接的,此时就将此连接信息放入等待队列,那么这个队列的大小就是此参数设置的。
-
ServerSocketChannel被设置成了阻塞的模式,也就是说是以阻塞方式接受连接的。或许会有疑问。在平时的NIO编程中Channel不是都要设置成非阻塞模式吗?这里解释一下,如果是设置成非阻塞模式那么就必须设置一个Selector不断的轮询,但是接受连接只需要阻塞一个通道即可。
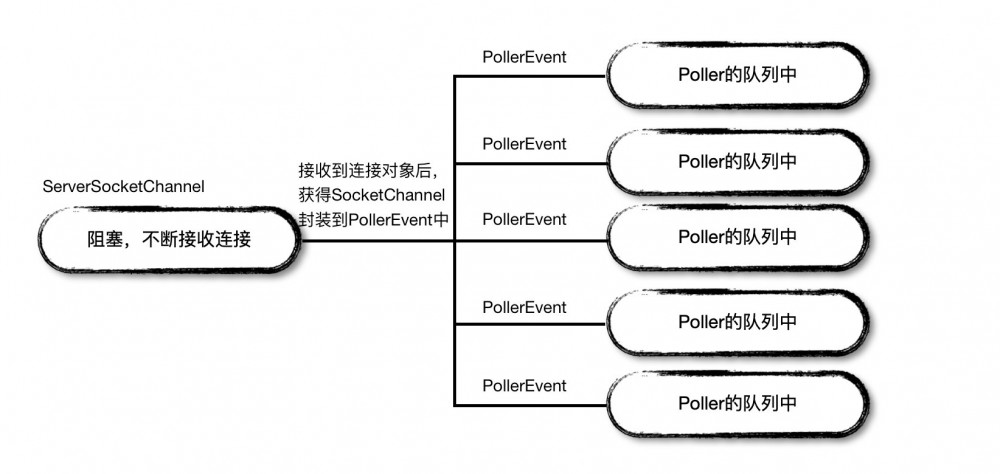
这里需要注意一点,每个 Acceptor 在生成 PollerEvent 对象放入 Poller 队列中时都是随机取出 Poller 对象的,具体代码可以看如下,所以 Poller 中的 Queue 对象设置成了 SynchronizedQueue<PollerEvent> ,因为可能有多个 Acceptor 同时向此 Poller 的队列中放入 PollerEvent 对象。
public Poller getPoller0() {
    if (pollerThreadCount == 1) {
        return pollers[0];
    } else {
        int idx = Math.abs(pollerRotater.incrementAndGet()) % pollers.length;
        return pollers[idx];
    }
}
什么是操作系统级别的连接呢?在TCP的三次握手中,系统通常会每一个LISTEN状态的Socket维护两个队列,一个是半连接队列(SYN):这些连接已经收到客户端SYN;另一个是全连接队列(ACCEPT):这些链接已经收到客户端的ACK,完成了三次握手,等待被应用调用accept方法取走使用。
所有的 Acceptor 共用这一个连接,在 Acceptor 的 run 方法中,放一些重要的代码。
@Override
    public void run() {
        // Loop until we receive a shutdown command
        while (endpoint.isRunning()) {
            try {
                //如果到了最大连接数,线程等待
                endpoint.countUpOrAwaitConnection();
                U socket = null;
                try {
                    //调用accept方法获得一个连接
                    socket = endpoint.serverSocketAccept();
                } catch (Exception ioe) {
                    // 出异常以后当前连接数减掉1
                    endpoint.countDownConnection();
                }
                // 配置Socket
                if (endpoint.isRunning() && !endpoint.isPaused()) {
                    // setSocketOptions() will hand the socket off to
                    // an appropriate processor if successful
                    if (!endpoint.setSocketOptions(socket)) {
                        endpoint.closeSocket(socket);
                    }
                } else {
                    endpoint.destroySocket(socket);
                }
    }
里面我们可以得到两点
LimitLatch
endpoint.setSocketOptions(socket)
protected boolean setSocketOptions(SocketChannel socket) {
        // Process the connection
        try {
            // 设置Socket为非阻塞模式,供Poller调用
            socket.configureBlocking(false);
            Socket sock = socket.socket();
            socketProperties.setProperties(sock);

            NioChannel channel = null;
            if (nioChannels != null) {
                channel = nioChannels.pop();
            }
            if (channel == null) {
                SocketBufferHandler bufhandler = new SocketBufferHandler(
                        socketProperties.getAppReadBufSize(),
                        socketProperties.getAppWriteBufSize(),
                        socketProperties.getDirectBuffer());
                if (isSSLEnabled()) {
                    channel = new SecureNioChannel(socket, bufhandler, selectorPool, this);
                } else {
                    channel = new NioChannel(socket, bufhandler);
                }
            } else {
                channel.setIOChannel(socket);
                channel.reset();
            }
            //注册ChannelEvent,其实是将ChannelEvent放入到队列中,然后Poller从队列中取
            getPoller0().register(channel);
        } catch (Throwable t) {
            ExceptionUtils.handleThrowable(t);
            try {
                log.error(sm.getString("endpoint.socketOptionsError"), t);
            } catch (Throwable tt) {
                ExceptionUtils.handleThrowable(tt);
            }
            // Tell to close the socket
            return false;
        }
        return true;
    }
其实里面重要的就是将 Acceptor 与一个 Poller 绑定起来,然后两个组件通过队列通信,每个Poller都维护着一个 SynchronizedQueue 队列, ChannelEvent 放入到队列中,然后 Poller 从队列中取出事件进行消费。
Poller
我们可以看到 Poller 是 NioEndpoint 的内部类,而它也是实现了 Runnable 接口,可以看到在其类中维护了一个Quene和Selector,定义如下。所以本质上 Poller 就是 Selector 。
private Selector selector;
private final SynchronizedQueue<PollerEvent> events = new SynchronizedQueue<>();
重点在其run方法中,这里删减了一些代码,只展示重要的。
@Override
        public void run() {
            // Loop until destroy() is called
            while (true) {
                boolean hasEvents = false;
                try {
                    if (!close) {
                        //查看是否有连接进来,如果有就将Channel注册进Selector中
                        hasEvents = events();
                    }
                    if (close) {
                        events();
                        timeout(0, false);
                        try {
                            selector.close();
                        } catch (IOException ioe) {
                            log.error(sm.getString("endpoint.nio.selectorCloseFail"), ioe);
                        }
                        break;
                    }
                } catch (Throwable x) {
                    ExceptionUtils.handleThrowable(x);
                    log.error(sm.getString("endpoint.nio.selectorLoopError"), x);
                    continue;
                }
                if (keyCount == 0) {
                    hasEvents = (hasEvents | events());
                }
                Iterator<SelectionKey> iterator =
                    keyCount > 0 ? selector.selectedKeys().iterator() : null;
                // Walk through the collection of ready keys and dispatch
                // any active event.
                while (iterator != null && iterator.hasNext()) {
                    SelectionKey sk = iterator.next();
                    NioSocketWrapper socketWrapper = (NioSocketWrapper) sk.attachment();
                    // Attachment may be null if another thread has called
                    // cancelledKey()
                    if (socketWrapper == null) {
                        iterator.remove();
                    } else {
                        iterator.remove();
                        processKey(sk, socketWrapper);
                    }
                }

                // Process timeouts
                timeout(keyCount,hasEvents);
            }

            getStopLatch().countDown();
        }
其中主要的就是调用了 events() 方法,就是不断的查看队列中是否有 Pollerevent 事件,如果有的话就将其取出然后把里面的 Channel 取出来注册到该 Selector 中,然后不断轮询所有注册过的 Channel 查看是否有事件发生。
SocketProcessor
我们知道 Poller 在轮询 Channel 有事件发生时,就会调用将此事件封装起来,然后交给线程池去执行。那么这个包装类就是 SocketProcessor 。而我们打开此类,能够看到它也实现了 Runnable 接口,用来定义线程池 Executor 中线程所执行的任务。那么这里是如何将 Channel 中的字节流转换为Tomcat需要的 ServletRequest 对象呢?其实就是调用了 Http11Processor 来进行字节流与对象的转换的。
Executor
Executor 其实是Tomcat定制版的线程池。我们可以看它的类的定义,可以发现它其实是扩展了Java的线程池。
public interface Executor extends java.util.concurrent.Executor, Lifecycle
在线程池中最重要的两个参数就是核心线程数和最大线程数,正常的Java线程池的执行流程是这样的。
- 如果当前线程小于核心线程数,那么来一个任务就创建一个线程。
- 如果当前线程大于核心线程数,那么就再来任务就将任务放入到任务队列中。所有线程抢任务。
- 如果队列满了,那么就开始创建临时线程。
- 如果总线程数到了最大的线程数并且队列也满了,那么就抛出异常。
但是在Tomcat自定义的线程池中是不一样的,通过重写了 execute 方法实现了自己的任务处理逻辑。
- 如果当前线程小于核心线程数,那么来一个任务就创建一个线程。
- 如果当前线程大于核心线程数,那么就再来任务就将任务放入到任务队列中。所有线程抢任务。
- 如果队列满了,那么就开始创建临时线程。
- 如果总线程数到了最大的线程数,再次获得任务队列,再尝试一次将任务加入队列中。
- 如果此时还是满的,就抛异常。
差别就在于第四步的差别,原生线程池的处理策略是只要当前线程数大于最大线程数,那么就抛异常,而Tomcat的则是如果当前线程数大于最大线程数,就再尝试一次,如果还是满的才会抛异常。下面是定制化线程池 execute 的执行逻辑。
public void execute(Runnable command, long timeout, TimeUnit unit) {
    submittedCount.incrementAndGet();
    try {
        super.execute(command);
    } catch (RejectedExecutionException rx) {
        if (super.getQueue() instanceof TaskQueue) {
            //获得任务队列
            final TaskQueue queue = (TaskQueue)super.getQueue();
            try {
                if (!queue.force(command, timeout, unit)) {
                    submittedCount.decrementAndGet();
                    throw new RejectedExecutionException(sm.getString("threadPoolExecutor.queueFull"));
                }
            } catch (InterruptedException x) {
                submittedCount.decrementAndGet();
                throw new RejectedExecutionException(x);
            }
        } else {
            submittedCount.decrementAndGet();
            throw rx;
        }

    }
}
在代码中,我们可以看到有这么一句 submittedCount.incrementAndGet(); ,为什么会有这句呢?我们可以看看这个参数的定义。简单来说这个参数就是定义了任务已经提交到了线程池中,但是还没有执行的任务个数。
/**
 * The number of tasks submitted but not yet finished. This includes tasks
 * in the queue and tasks that have been handed to a worker thread but the
 * latter did not start executing the task yet.
 * This number is always greater or equal to {@link #getActiveCount()}.
 */
private final AtomicInteger submittedCount = new AtomicInteger(0);
为什么会有这么一个参数呢?我们知道定制的队列是继承了 LinkedBlockingQueue ,而 LinkedBlockingQueue 队列默认是没有边界的。于是我们就传入了一个参数, maxQueueSize 给构造的队列。但是在Tomcat的任务队列默认情况下是无限制的,那么这样就会出一个问题,如果当前线程达到了核心线程数,则开始向队列中添加任务,那么就会一直是添加成功的。那么就不会再创建新的线程。那么在什么情况下要新建线程呢?
线程池中创建新线程会有两个地方,一个是小于核心线程时,来一个任务创建一个线程。另一个是超过核心线程并且任务队列已满,则会创建临时线程。
那么如何规定任务队列是否已满呢?如果设置了队列的最大长度当然好了,但是Tomcat默认情况下是没有设置,所以默认是无限的。所以Tomcat的 TaskQueue 继承了 LinkedBlockingQueue ,重写了 offer 方法,在里面定义了什么时候返回false。
@Override
public boolean offer(Runnable o) {
    if (parent==null) return super.offer(o);
    //如果当前线程数等于最大线程数,此时不能创建新线程,只能添加进任务队列中
    if (parent.getPoolSize() == parent.getMaximumPoolSize()) return super.offer(o);
    //如果已提交但是未完成的任务数小于等于当前线程数,说明能处理过来,就放入队列中
    if (parent.getSubmittedCount()<=(parent.getPoolSize())) return super.offer(o);
    //到这一步说明,已提交但是未完成的任务数大于当前线程数,如果当前线程数小于最大线程数,就返回false新建线程
    if (parent.getPoolSize()<parent.getMaximumPoolSize()) return false;
    return super.offer(o);
}
这就是 submittedCount 的意义,目的就是为了在任务队列长度无限的情况下,让线程池有机会创建新的线程。
总结
上面的知识有部分是看着李号双老师的深入拆解Tomcat总结的,又结合着源码深入了解了一下,当时刚看文章的时候觉得自己都懂了,但是再深入源码的时候又会发现自己不懂。所以知识如果只是看了而不运用,那么知识永远都不会是自己的。通过Tomcat连接器这一小块的源码学习,除了一些常用知识的实际运用,例如AQS、锁的应用、自定义线程池需要考虑的点、NIO的应用等等。还有总体上的设计思维的学习,模块化设计,和如今的微服务感觉很相似,将一个功能点内部分为多种模块,这样无论是在以后替换或者是升级时都能游刃有余。
正文到此结束
- 本文标签: IOS Collection 微服务 ssl ip UI Select 总结 文章 IO synchronized java tomcat 配置 解析 final ACE NIO ArrayList linux servlet apr App 锁 http executor java线程 db cat CTO volatile ask ioc Thread pool 端口 线程 CEO 操作系统 Atom 本质 源码 tar TCP 参数 src queue bug 定制 代码 list Connection 线程池 id 2019 协议 https IDE key ThreadPoolExecutor
- 版权声明: 本文为互联网转载文章,出处已在文章中说明(部分除外)。如果侵权,请联系本站长删除,谢谢。
- 本文海报: 生成海报一 生成海报二
热门推荐


相关文章


Loading...
![[HBLOG]公众号](http://www.liuhaihua.cn/img/qrcode_gzh.jpg)

