Spring getBean实例化Bean的过程
前面一章关于
refresh()方法的调用过程中提到最终会实例化非懒加载的单例bean,今天就来看一下bean初始化的整个过程。
对
refresh()方法感兴趣的可以去看下前面一章内容: juejin.im/post/5cef2e…1.首先 refresh()方法最后调用 finishBeanFactoryInitialization(beanFactory) 执行初始化bean工作,然后会调用 DefaultListableBeanFactory .preInstantiateSingletons()。部分源码如下:
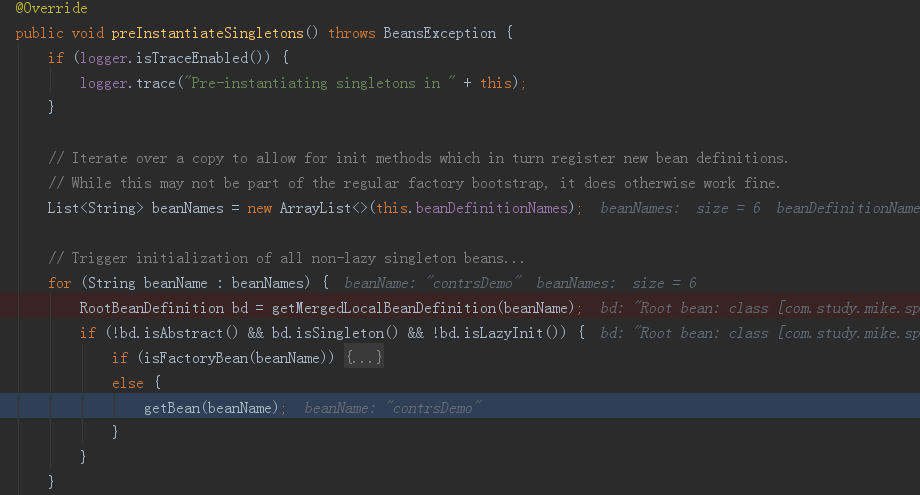
这里会获取所有的单例的非懒加载的Beandefinition遍历执AbstractBeanFactory.getBean()。
2.doGetBean方法执行过程:
2.1 先调用getSingleton()先去缓存中查询有没有,如果存在就获取缓存中的对象。这里有三个缓存对象,分别是:singletonObjects(单例对象的cache)、earlySingletonObjects(提前暴光的单例对象的Cache)、singletonFactories(单例对象工厂的cache)。
Object sharedInstance = getSingleton(beanName);
@Nullable
protected Object getSingleton(String beanName, boolean allowEarlyReference) {
	Object singletonObject = this.singletonObjects.get(beanName);
	if (singletonObject == null && isSingletonCurrentlyInCreation(beanName)) {
		synchronized (this.singletonObjects) {
			singletonObject = this.earlySingletonObjects.get(beanName);
			if (singletonObject == null && allowEarlyReference) {
				ObjectFactory<?> singletonFactory = this.singletonFactories.get(beanName);
				if (singletonFactory != null) {
					singletonObject = singletonFactory.getObject();
					this.earlySingletonObjects.put(beanName, singletonObject);
					this.singletonFactories.remove(beanName);
				}
			}
		}
	}
	return singletonObject;
}
复制代码
2.2 调用父容器的getBean如果存在直接返回。

2.3 判断是否配置了depends-on属性,如果有先创建依赖的bean。

2.4 判断是单例还是原型,调用createBean()创建Bean实例。
3.createBean的处理过程:
3.1 校验 override方法
// Prepare method overrides.
try {
	mbdToUse.prepareMethodOverrides();
}

复制代码
3.2 这里最关键的代码代理类的生成。
try {
	// Give BeanPostProcessors a chance to return a proxy instead of the target bean instance.
	//处理实现了InstantiationAwareBeanPostProcessor接口的类。
        //扩展点:如果想要对Bean做代理可以实现该接口并返回代理类对象,AOP中创建动态代理对象的基础
        Object bean = resolveBeforeInstantiation(beanName, mbdToUse);
	if (bean != null) {
		return bean;
	}
}复制代码
3.3 继续调用 doCreateBean方法创建bean实例
4. AbstractAutowireCapableBeanFactory类的 doCreateBean 方法
4.1 创建bean实例
if (instanceWrapper == null) {
	instanceWrapper = createBeanInstance(beanName, mbd, args);
}

复制代码
//createBeanInstance的主要实现
// Candidate constructors for autowiring?
//获取所有构造器,匹配构造器,反射调用构造器生成实例
Constructor<?>[] ctors = determineConstructorsFromBeanPostProcessors(beanClass, beanName);
if (ctors != null || mbd.getResolvedAutowireMode() == AUTOWIRE_CONSTRUCTOR ||
		mbd.hasConstructorArgumentValues() || !ObjectUtils.isEmpty(args)) {
	return autowireConstructor(beanName, mbd, ctors, args);
}

// Preferred constructors for default construction? 这个还不清楚怎么用
ctors = mbd.getPreferredConstructors();
if (ctors != null) {
	return autowireConstructor(beanName, mbd, ctors, null);
}
//调用无参构造器
// No special handling: simply use no-arg constructor.
return instantiateBean(beanName, mbd);复制代码
无参构造器 :调用SimpleInstantiationStrategy的方法instantiate进行校验,
如果没有构造器抛出异常;
throw new BeanInstantiationException(clazz, "No default constructor found", ex);复制代码
如果是接口抛出异常。
throw new BeanInstantiationException(clazz, "Specified class is an interface");复制代码
最后反射调用无参构造器初始化Bean实例。
BeanUtils
public static <T> T instantiateClass(Constructor<T> ctor, Object... args) throws BeanInstantiationException {
	Assert.notNull(ctor, "Constructor must not be null");
	try {
		ReflectionUtils.makeAccessible(ctor);
		return (KotlinDetector.isKotlinReflectPresent() && KotlinDetector.isKotlinType(ctor.getDeclaringClass()) ?
				KotlinDelegate.instantiateClass(ctor, args) : ctor.newInstance(args));
	}
	catch (InstantiationException ex) {
		throw new BeanInstantiationException(ctor, "Is it an abstract class?", ex);
	}
	catch (IllegalAccessException ex) {
		throw new BeanInstantiationException(ctor, "Is the constructor accessible?", ex);
	}
	catch (IllegalArgumentException ex) {
		throw new BeanInstantiationException(ctor, "Illegal arguments for constructor", ex);
	}
	catch (InvocationTargetException ex) {
		throw new BeanInstantiationException(ctor, "Constructor threw exception", ex.getTargetException());
	}
}复制代码
有参数的构造器: 这里代码就不贴了比较多就简单介绍下。主要是对参数的校验,如果有引用就通过getBean获取引用对象(也就是重新走一遍流程)。最终调用SimpleInstantiationStrategy的重载方法instantiate实例化Bean。
4.2 到此为止Bean实例已经创建完毕,接下来就是设置属性,初始化等工作。
①:解决属性循环依赖问题,为循环引用依赖提前缓存单例Bean
//是否提早暴露单例bean实例
boolean earlySingletonExposure = (mbd.isSingleton() && this.allowCircularReferences &&
		isSingletonCurrentlyInCreation(beanName));
if (earlySingletonExposure) {
	if (logger.isTraceEnabled()) {
		logger.trace("Eagerly caching bean '" + beanName +
				"' to allow for resolving potential circular references");
	}
        //放到singletonFactories中
	addSingletonFactory(beanName, () -> getEarlyBeanReference(beanName, mbd, bean));
}复制代码
②:populateBean方法
执行所有实现了InstantiationAwareBeanPostProcessor接口的实例,实例化Bean的后置处理
boolean continueWithPropertyPopulation = true;
//实现了InstantiationAwareBeanPostProcessor的实例将被在Bean实例化之后被执行
//postProcessAfterInstantiation方法。
if (!mbd.isSynthetic() && hasInstantiationAwareBeanPostProcessors()) {
	for (BeanPostProcessor bp : getBeanPostProcessors()) {
		if (bp instanceof InstantiationAwareBeanPostProcessor) {
			InstantiationAwareBeanPostProcessor ibp = (InstantiationAwareBeanPostProcessor) bp;
			if (!ibp.postProcessAfterInstantiation(bw.getWrappedInstance(), beanName)) {
				continueWithPropertyPopulation = false;
				break;
			}
		}
	}
}复制代码
设置属性
//获取配置的的属性列表<property>PropertyValues pvs = (mbd.hasPropertyValues() ? mbd.getPropertyValues() : null);
//对设置了autowire的处理,根据类型和名称重新获取属性列表
if (mbd.getResolvedAutowireMode() == AUTOWIRE_BY_NAME || mbd.getResolvedAutowireMode() == AUTOWIRE_BY_TYPE) {
	MutablePropertyValues newPvs = new MutablePropertyValues(pvs);
	// Add property values based on autowire by name if applicable.
	if (mbd.getResolvedAutowireMode() == AUTOWIRE_BY_NAME) {
		autowireByName(beanName, mbd, bw, newPvs);
	}
	// Add property values based on autowire by type if applicable.
	if (mbd.getResolvedAutowireMode() == AUTOWIRE_BY_TYPE) {
		autowireByType(beanName, mbd, bw, newPvs);
	}
	pvs = newPvs;
}

boolean hasInstAwareBpps = hasInstantiationAwareBeanPostProcessors();
boolean needsDepCheck = (mbd.getDependencyCheck() != AbstractBeanDefinition.DEPENDENCY_CHECK_NONE);

PropertyDescriptor[] filteredPds = null;
if (hasInstAwareBpps) {
	if (pvs == null) {
		pvs = mbd.getPropertyValues();
	}
    // 设置属性之前对属性经行前置处理
	for (BeanPostProcessor bp : getBeanPostProcessors()) {
		if (bp instanceof InstantiationAwareBeanPostProcessor) {
			InstantiationAwareBeanPostProcessor ibp = (InstantiationAwareBeanPostProcessor) bp;
			PropertyValues pvsToUse = ibp.postProcessProperties(pvs, bw.getWrappedInstance(), beanName);
			if (pvsToUse == null) {
				if (filteredPds == null) {
					filteredPds = filterPropertyDescriptorsForDependencyCheck(bw, mbd.allowCaching);
				}
				pvsToUse = ibp.postProcessPropertyValues(pvs, filteredPds, bw.getWrappedInstance(), beanName);
				if (pvsToUse == null) {
					return;
				}
			}
			pvs = pvsToUse;
		}
	}
}

if (needsDepCheck) {//是否开启依赖校验,默认false
	if (filteredPds == null) {
                //排除在忽略的依赖接口上定义的忽略的依赖类型或属性
		filteredPds = filterPropertyDescriptorsForDependencyCheck(bw, mbd.allowCaching);
	}
        //检查是否所有属性已被设置
	checkDependencies(beanName, mbd, filteredPds, pvs);
}

if (pvs != null) {
        //设置属性
	applyPropertyValues(beanName, mbd, bw, pvs);
}复制代码
③:initializeBean方法
执行织入方法invokeAwareMethods
if (bean instanceof Aware) {
	if (bean instanceof BeanNameAware) {
		((BeanNameAware) bean).setBeanName(beanName);
	}
	if (bean instanceof BeanClassLoaderAware) {
		ClassLoader bcl = getBeanClassLoader();
		if (bcl != null) {
			((BeanClassLoaderAware) bean).setBeanClassLoader(bcl);
		}
	}
	if (bean instanceof BeanFactoryAware) {
		((BeanFactoryAware) bean).setBeanFactory(AbstractAutowireCapableBeanFactory.this);
	}
}复制代码
执行BeanPostProcessor的postProcessBeforeInitialization方法,执行init-method之前对进行Bean处理。
if (mbd == null || !mbd.isSynthetic()) {
	wrappedBean = applyBeanPostProcessorsBeforeInitialization(wrappedBean, beanName);
}复制代码
执行配置的初始化方法(init-method)
try {
       //invokeInitMethods方法执行配置的初始化方法,
        //如果bean是InitializingBean实例还会执行afterPropertiesSet方法。
	invokeInitMethods(beanName, wrappedBean, mbd);
}复制代码
执行BeanPostProcessor的postProcessAfterInitialization方法,执行init-method之后对bean进行处理。
if (mbd == null || !mbd.isSynthetic()) {
	wrappedBean = applyBeanPostProcessorsAfterInitialization(wrappedBean, beanName);
}复制代码
对scope进行处理(这部分代码没有去研究,有兴趣的可以自己设置不同的scope,然后debug跟一下)。
registerDisposableBeanIfNecessary(beanName, bean, mbd);复制代码
5.小结
上面就是getBean的整个过程。下面盗用别人的图来看一下整个过程的流程:
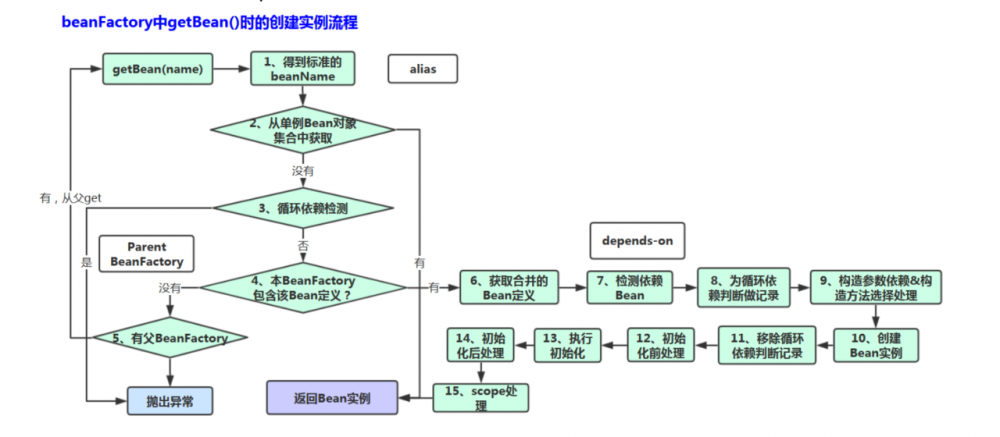
其中有些没讲有些只是简单带过,感兴趣的自己看跟源码的时候可以去仔细看看。
还有一点就是BeanFactoryPostProcessor和BeanPostProcessor这两个接口的实现类贯穿整个容器初始化的各个过程,了解不同实现在容器初始化过程中的作用对于自己扩展Spring会有很大的帮助,强烈建议去了解一下不同子类的作用。
正文到此结束
热门推荐


相关文章


Loading...
![[HBLOG]公众号](http://www.liuhaihua.cn/img/qrcode_gzh.jpg)

