一、整体认识mybatis和mybatis的体系结构
MyBatis 是一款优秀的持久层框架,它支持定制化 SQL、存储过程以及高级映射。MyBatis 避免了几乎所有的 JDBC 代码和手动设置参数以及获取结果集。MyBatis 可以使用简单的 XML 或注解来配置和映射原生类型、接口和 Java 的 POJO(Plain Old Java Objects,普通老式 Java 对象)为数据库中的记录.
###1.2 核心对象的作用域与生命周期
简单示例:
- UserMapper.xml
<?xml version="1.0" encoding="UTF-8" ?>
<!DOCTYPE mapper
        PUBLIC "-//mybatis.org//DTD Mapper 3.0//EN"
        "http://mybatis.org/dtd/mybatis-3-mapper.dtd">
<mapper namespace="com.niuh.mybatis.dao.UserMapper">
    <select id="selectUser" resultType="com.niuh.mybatis.dao.User">
    select * from User where id = #{id}
  </select>
</mapper>
复制代码
- mybatis-config.xml
<?xml version="1.0" encoding="UTF-8" ?>
<!DOCTYPE configuration
        PUBLIC "-//mybatis.org//DTD Config 3.0//EN"
        "http://mybatis.org/dtd/mybatis-3-config.dtd">
<configuration>
    <environments default="development">
        <environment id="development">
            <transactionManager type="JDBC"/>
            <dataSource type="POOLED">
                <property name="driver" value="com.mysql.jdbc.Driver"/>
                <property name="url" value="jdbc:mysql://192.168.0.147/niuhDB"/>
                <property name="username" value="root"/>
                <property name="password" value="123456"/>
            </dataSource>
        </environment>
    </environments>
    <mappers>
        <!--<mapper resource="com/niuh/mybatis/dao/xml/UserMapper.xml"/>-->
        <mapper class="com.niuh.mybatis.dao.UserMapper"></mapper>
    </mappers>
</configuration>
复制代码
示例:
String resource = "mybatis-config.xml";
InputStream inputStream = Resources.getResourceAsStream(resource);
SqlSessionFactory sqlSessionFactory = new SqlSessionFactoryBuilder().build(inputStream);
SqlSession session = sqlSessionFactory.openSession();
User result = session.selectOne("com.niuh.mybatis.dao.UserMapper.selectUser", 1);
System.out.println(result.toString());
复制代码
- SqlSessionFactoryBuilder
用于构建会话工厂,基于 config.xml environment 、props 构建会话工厂,构建完成后即可丢弃。
- SqlSessionFactory
用于生成会话的工厂,作用于整个应用运行期间,一般不需要构造多个工厂对像
- SqlSession
作用于单次会话,如WEB一次请求期间,不能用作于某个对像属性,也不能在多个线程间共享,因为它是线程不安全的。
1.3 接口式编程
由于每次调用时都去找对应用 statement 以及拼装参数,使用上不是特别友好,myBatis 引入了接口的机制,将接口与mapper.xml 的namespace 名称绑定,MyBatis就可以根据ASM工具动态构建该接口的实例。
mapper 映射器接口实例 通过 session.getMapper(Class type) 就可以获取mapper 实例,该实例一般作用于方法域。
2 全局的configuration配置
2.1 属性
properties 元素可以通过 resource 或url 加载外部 properties文件中的属性,也可以直接设置property 属性。然后在xml 中就可以通过${属性名}进行引用替换。
<properties resource="app.properties" url="">
    <property name="jdbc.driver" value="com.oracle.jdbc.Driver"/>
</properties>
复制代码
resource= app.properties 从class path中加载 url=[file:///G:/git/niuh-mybatis/src/main/resources/app.properties](file:///G:/git/tuling-mybatis/src/main/resources/app.properties) 基于url加载
引用属性方式: {jdbc.user:root}
2.2 环境配置
一个项目经常需要在例如开发坏境、测试环境、预演环境、生产环境中等不同环境中进行部署,每个环境所对应的参数是不一样的,myBatis 中可以通过 environment 来设置不同环境的属性。
<environments default="${default.environment}">
        <environment id="test">
            <!--type=JDBC|MANAGED-->
            <transactionManager type="JDBC"></transactionManager>
            <!-- type=UNPOOLED|POOLED|JNDI-->
            <dataSource type="UNPOOLED">
                <property name="driver" value="${jdbc.driver}"/>
            </dataSource>
        </environment>
        <environment id="dev">
            <transactionManager type="JDBC"/>
            <dataSource type="POOLED">
                <property name="driver" value="${jdbc.driver}"/>
            </dataSource>
        </environment>
    </environments>
复制代码
可通过 SqlSessionFactoryBuilder.build( environment) 来指定初始化哪套环境。
2.3 设置
设置MyBatis 全局参数,约定myBatis 的全局行为
<settings>
<!-- 开启二级缓存-->
  <setting name="cacheEnabled" value="true"/>
  <!-- 开启驼峰命名适配-->
  <setting name="mapUnderscoreToCamelCase" value="true"/>
<settings>
复制代码
示例驼峰命名开启与关闭:尝试开关 mapUnderscoreToCamelCase 属性 来观察Account 数据查询情况。
2.4 别名
在myBatis 中经常会用到 java 中类型,如sql 块中中 parameterType 参数引用中 javaType 结果集映射的javaType ,都要使用java 全路径名,可以通过
<typeAliases>
    <typeAlias type="com.niuh.mybatis.dao.Account" alias="account"/>
    <package name="com.niuh.mybatis.dao"  />
</typeAliases>
复制代码
提示:建议不要设置。因为常用的类 mybatis 已经内置别名,而自定义的类设置别反而不好去找,影响阅读。
2.5 类型处理器
持久层框架其中比较重要的工作就是处理数据的映射转换,把java 类型转换成jdbc 类型的参数,又需要把jdbc 类型的结果集转换成java 类型。在mybatis 中是通过 TypeHandler 接口来实现的。
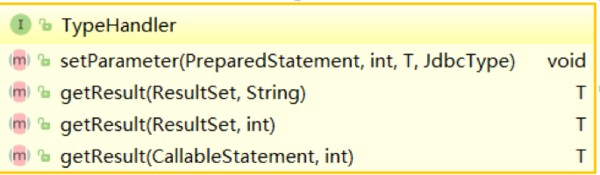
可以看到 typeHandler 就是两个作用 设置参数 与获取结果。 你可以设置自定义处理器
<typeHandlers>
  <typeHandler handler="org.mybatis.example.ExampleTypeHandler"  />
</typeHandlers>
复制代码
可以通过以下两种方式指定处理的范围
- javaType="long", jdbcType="Date"
- @MappedJdbcTypes( jdbc类型) @MappedTypes java类型
示例: long 类型时间戳转换成 日期类型 添加算定义处理类:
@MappedJdbcTypes(JdbcType.TIMESTAMP)
@MappedTypes(Long.class)
public class LongTimeHandler extends BaseTypeHandler<Long> {
    @Override
    public void setNonNullParameter(PreparedStatement ps, int i, Long parameter, JdbcType jdbcType) throws SQLException {
        ps.setDate(i, new Date(parameter));
    }

    @Override
    public Long getNullableResult(ResultSet rs, String columnName) throws SQLException {
        return rs.getDate(columnName).getTime();
    }

    @Override
    public Long getNullableResult(ResultSet rs, int columnIndex) throws SQLException {
        return rs.getDate(columnIndex).getTime();
    }

    @Override
    public Long getNullableResult(CallableStatement cs, int columnIndex) throws SQLException {
        return cs.getDate(columnIndex).getTime();
    }
}
复制代码
在resultMap中指定 typeHandler:
<resultMap id="account2" type="com.niuh.mybatis.dao.Account">
   <result property="createTimestamp" column="createTimestamp" typeHandler="com.niuh.mybatis.dao.LongTimeHandler"/>
</resultMap>
<select id="selectById2" resultMap="account2">
  select a.*,a.createTime as createTimestamp from account a where id = #{id}
</select>
复制代码
2.6 mappers映谢器
<mappers>
  <mapper resource="org/mybatis/builder/AuthorMapper.xml"/>
  <mapper  url="http://www.xxx.com/xml/BlogMapper.xml"/>
  <mapper class="org.mybatis.builder.BlogMapper"/>
 <package name="org.mybatis.builder"/>
</mappers>
复制代码
加载方式:
- resource 基于classPath 加载xml文件
- url:基于资源定位加载xml 文件
- class:基于接口加载
- package :扫描包下所有class 然后进行加载
- 约定规则:
- mapper 中的 namespace必须与对应的接口名称对应。
- 通过 class 或package 中加载时 .xml 文件必须与接口在同一级目录。
3 mapper 文件
3.1 sql语句块statement
通过原生JDBC写DAO的年代 ,程序员最怕莫过于 拼接SQL语句,拼接参数与设置返回结果集,Hibernate 将拼接SQL时代成为过去,通过ORM映谢,完全不需要处理任何SQL,但这又带来了新的问题就是。无法编写自定义SQL从而丧失了灵活活及更好的性能。MyBatis 通过 mapper 映射SQL很好解决了这一点。它无需在JAVA代码中拼接SQL,而是将其移至mapper 文件集中处理SQL节约了大量的开发时间。
Mapper中的元素:
- cache – 对给定命名空间的缓存配置。
- resultMap – 结果集映射。
- sql – 可被其他语句引用的可重用语句块。
- insert – 插入语句
- update – 更新语句
- delete –删除语句
- select – 查询语句
select 用法及属性
示例:
<select id="selectById" resultType="com.niuh.mybatis.dao.Account">
  select * from account where id = #{id}
</select>
复制代码
属性:
<select
  id="selectById"        <!-- 语句块的唯一标识 与接口中方法名称对应 -->
  parameterType="User"   <!--参数java类型-->
  resultType="hashmap"   <!--返回结果java类型-->
  resultMap="userResultMap" <!--返回结果映射-->
  flushCache="false"      <!--true 每次调用都会刷新 一二级缓存-->
  useCache="true"         <!--true 是否保存至二级缓存当中去-->
  timeout="10"
  statementType= PREPARED">
复制代码
insert&update&delete 用法
示例:
<insert id="addUser" keyColumn="id" keyProperty="id" useGeneratedKeys="true"
        parameterType="com.niuh.mybatis.dao.User">
    insert into  user (name,updateTime,createTime) values (#{name},#{updateTime},#{createTime})
</insert>
复制代码
属性:
<insert
  id="addUser"   <!-- 语句块的唯一标识 与接口中方法名称对应 -->
  parameterType="User"   <!--参数java类型-->
  flushCache="true"  <!--true 每次调用都会刷新 一二级缓存-->
  statementType="PREPARED" <执行类型>
  keyProperty=""      <!--主键对应的java 属性,多个用 逗号分割-->
  keyColumn=""        <!--主键列,多个用 逗号分割-->
  useGeneratedKeys=""  <!--插入成功后将 将值回设至 原参数->
  timeout="20">
复制代码
3.2 参数映射
参数映射引用
参数映射是最强大功能之一,基可以通过以下方式进行引用
- 单个简单参数引用 :如果方法中只有一个参数可通过任意名称 进行引用
- 多个简单参数引用:通过参数下标引用 #{arg0} #{arg1} 或 #{param1} ,#{param2}
- 对像属性引用: 直接通过对象属性名称引用,嵌套对像通过. 号进行引用
- map key值引用:
- 变量名称引用(需要jdk1.8支持) :通过方法中参数名称引用,需要jdk1.8支持,且在编译时必须加上 -parameters 编译命令
在idea 中添加 编译参数

在maven中添加 编译参数
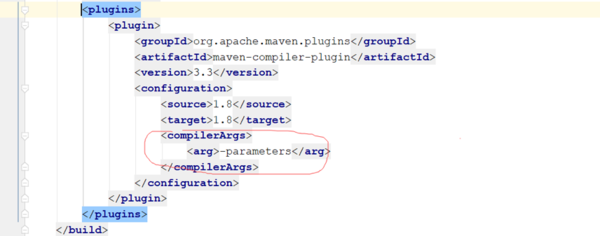
注:一但可通过变量名称引入不在支持arg0获取! 参数引用 相关属性 javaType=int, #参数java类型 jdbcType=NUMERIC,# jdbc类型 typeHandler=MyTypeHandler# 指定类型处理器
参数拼接${}
基于#的参数引用 其原理是通过 ?占位其通过预处理能获得更好的性能 和安全性(防止SQL注入)但有些需求是通过?占位无法实现的,比如在一些分库分表的场景中我们需要 动态的拼接表结构。比如某系统日志表是按年进行切割的 2018_systemlog,2019_systemlog这时就可以通过
示例:
@Select("SELECT * FROM ${table} WHERE id = #{id}")
User selectByTable(String table, int id);
复制代码
3.3 结果集映射
结果集映射是指 将resultSet 中内容封装转换成java对像,在纯jdbc时代全部都是用调用resultSet的getXXX(columnName) 来获取属性并封装。代码量大,编程效率低尤其当数据模型是1对多,或多对多这种复杂关系,这种封装代码将会变得非常复杂。结果集映射就是为解决这个问题 通过resultMap 集中处理 结果集与JAVA对像的关系。
结果集自动映射
在select 中指定 resultType=“” 后无需要任何配置 myBatis 会基于 resultType中的JAV类型及属性自动推断生成 一个隐示的resultMap 从而完成结果映射
resultMap
但有时jdbc 并不是与java Bean 完全贴合这时就需要手动设置resultMap
<resultMap id="account2" type="com.niuh.mybatis.dao.Account">
    <id property="id"/>
    <result property="createTimestamp" column="createTimestamp"
            typeHandler="com.niuh.mybatis.dao.LongTimeHandler"/>
</resultMap>
复制代码
这时在select元素中用 resultMap ="account2" 即可引用该map映射。
基本元素与属性
- ID:用于结果集中的唯一标识
- result:设置一个某通过字段
property: jdbcType: javaType: column: typeHandler:
嵌套结果映射
关联 association 示例:
<resultMap id="accountAndUser" type="com.niuh.mybatis.dao.Account">
    <id property="id" column="id"/>
    <association property="user" javaType="com.niuh.mybatis.dao.User">
        <id property="id" column="user_id"/>
        <result property="name" column="userName"/>
    </association>
</resultMap>
<select id="selectAccountAndUser" resultMap="accountAndUser">
    SELECT a.*, b.name userName from account a,user b where a.user_id=b.id
</select>
复制代码
引入外部Select
<!--基于多次查询拼装引入 -->
<resultMap id="accountAndUser2" type="com.niuh.mybatis.dao.Account">
    <id property="id" column="id"/>
    <association property="user" javaType="com.niuh.mybatis.dao.User" select="selectUser" column="user_id">
    </association>
</resultMap>

<select id="selectUser" resultType="com.niuh.mybatis.dao.User">
    select * from user  where id = #{id}
</select>
复制代码
集合collection
1、直接将collection集合元素的属性写为collection的字标签
<resultMap type="com.niuh.mybatis.dao.User" id="userMap">
    <id property="id" column="uid"/>
    <result property="username" column="username"/>
    <result property="password" column="password"/>
    <collection property="roles" ofType="com.niuh.mybatis.dao.Role">
        <id property="id" column="rid"/>
        <result property="name" column="rname"/>
        <collection property="permissions" ofType="com.niuh.mybatis.dao.Permissions">
            <id property="id" column="pid"/>
            <result property="name" column="pname"/>
       </collection>
   </collection>
</resultMap>
复制代码
它们的关系是这样的: User里有一个Set roles Role里有一个Set permissions 通过这样的配置,我们在执行查询User时,通过多表联查,就可以将这些级联属性全部关联查出。
下面是查询语句:
<select id="queryUserName" parameterType="string" resultMap="userMap">
        SELECT u.*,r.*,p.* FROM user u inner join user_role ur on ur.uid=u.uid
        inner join role r on r.rid=ur.rid
        inner join permissions_role pr on pr.rid=r.rid
        inner join permissions p on pr.pid=p.pid
        WHERE username=#{username};
</select>
复制代码
2、通过在collection标签中引用别的mapper的查询方法
<resultMap id="BaseResultMap" type="com.niuh.mybatis.dao.SysUser" >
        <id column="user_id" property="id" jdbcType="BIGINT" />
        <result column="username" property="username" jdbcType="VARCHAR" />
        <result column="password" property="password" jdbcType="VARCHAR" />
        <collection property="sysRoles" column="user_id"
                    select="com.niuh.mybatis.dao.SysRoleMapper.selectRoleListByUserId">
        </collection>
</resultMap>
复制代码
在SysUser中有Set sysRoles 我们不需要再在collection中配置SysRole的属性,只需要将SysRole中的selectRoleListByUserId方法引入就可以了。
以下是查询语句:我们只需要查询SysUser就行了
<select id="findByUsername" resultMap="BaseResultMap">
        SELECT
            us.id as user_id,
            us.username,
            us.password
        FROM t_sys_user us  WHERE us.username = #{username}
</select>
复制代码
当然,在SysRole的mapper中,我们是需要有selectRoleListByUserId方法的:
<resultMap id="roleResult" type="com.niuh.mybatis.dao.SysRole">
        <id property="id" column="role_id" jdbcType="BIGINT"/>
        <result property="name" column="name" jdbcType="VARCHAR"/>
        <result property="desc" column="desc" jdbcType="VARCHAR"/>
        <collection property="permissions" column="role_id"
                    select="com.niuh.mybatis.dao.SysPermissionMapper.selectPermissionByRoleId">
        </collection>
    </resultMap>

    <select id="selectRoleListByUserId" resultMap="roleResult">
        SELECT
            ro.id as role_id,
            ro.name,
            ro.desc
        FROM  t_sys_user_role ur
         LEFT JOIN t_sys_role  ro
        ON  ur.`role_id` = ro.`id` WHERE ur.user_id = #{userId}
    </select>
复制代码
同理,SysRole中的permissions也是一样的。 两种方式的实现都可以,第二种方式不需要写过于复杂的sql,同时,每个mapper中的方法都是独立可以使用的,其适用性更强。
正文到此结束
- 本文标签: 模型 stream mysql 定制 配置 空间 value example ACE SqlSessionFactory id 测试环境 编译 https map 时间 key dataSource Word SqlSessionFactoryBuilder 缓存 root git sql 需求 XML Java类 生命 ORM Collection ResultSet web maven 安全 代码 实例 开发 删除 bean IO Statement update db 线程 NSA Select 参数 http Action 二级缓存 JDBC java tab 数据库 IDE 程序员 mybatis core Property cache session 2019 rmi classpath Oracle 数据 App BaseResultMap src 处理器 sqlsession HashMap 部署 目录 测试 find UI CTO list build 数据模型 mapper
- 版权声明: 本文为互联网转载文章,出处已在文章中说明(部分除外)。如果侵权,请联系本站长删除,谢谢。
- 本文海报: 生成海报一 生成海报二
热门推荐


相关文章

近期评论
-
你这基本没有更新呀,最近文章显示还是2019年的文章。不符合要求哈
-
关键词:慕云博客 链接:https://www.lilun.me 描述:分享原创文字的个人博客
-
-
-
可以提供一下源码吗
-
不是商业站,鸡娃学习笔记
-
-
-
-
听他们说很厉害的样子
Loading...
![[HBLOG]公众号](http://www.liuhaihua.cn/img/qrcode_gzh.jpg)

