springboot-starter中的SPI 机制
SPI的全称是Service Provider Interface, 直译过来就是"服务提供接口", 听起来挺别扭的, 所以我试着去就将它翻译为"服务提供商接口"吧.
我们都知道, 一个接口是可以有很多种实现的. 例如搜索,可以是搜索系统的硬盘,也可以是搜索数据库.系统的设计者为了降低耦合,并不想在硬编码里面写死具体的搜索方式,而是希望由服务提供者来选择使用哪种搜索方式, 这个时候就可以选择使用SPI机制.
SPI机制被大量应用在各种开源框架中,例如:
- 大家都熟悉的dubbo中的ExtensionLoader,可以通过这些拓展点增加一些自定义的插件功能,比如增加filter实现白名单访问, 实现接口限流等功能;或者还可以直接替换它原生的protocol, transport等
- 在进行idea intellij的插件开发的时候,需要定义一个/META-INF/plugin.xml文件, 这个plugin.xml中有很多地方可以配置serviceInterface和 serviceImplementation,这也是一种SPI机制,通过这种机制, idea能使得插件开发者既能使用到它底层SDK提供的api,又能让开发者具备定制化的功能,耦合相当的低.intellij的插件开发的时候直接用了JDK中的ServiceLoader
- spring中也是大量用到了SPI机制,本文要分析的就是其中的一部分.
JDK中的SPI
SPI估计大家都有所了解,让我们通过一个非常简单的例子,来温习一下java里面的SPI机制吧.
- 定义一个搜索接口Search
package com.north.spilat.service;
 import java.util.List;
 public interface Search {
     List<String> search(String keyword);
 }
复制代码
- 实现接口从数据库查询
package com.north.spilat.service.impl;
    import com.north.spilat.service.Search;
    import java.util.List;
    /**
     * @author lhh
     */
    public class DatabaseSearch implements Search {
        @Override
        public List<String> search(String keyword) {
            System.out.println("now use database search. keyword:" + keyword);
            return null;
        }

    }
复制代码
- 实现接口从文件系统查询
package com.north.spilat.service.impl;
 import com.north.spilat.service.Search;
 import java.util.List;
 /**
  * @author lhh
  */
 public class FileSearch implements Search {

     @Override
     public List<String> search(String keyword) {
         System.out.println("now use file system search. keyword:" + keyword);
         return null;
     }

 }
复制代码
-
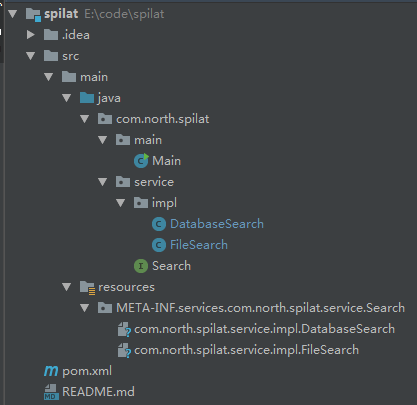
在src/main/resources创建一个目录 META-INF/services/com.north.spilat.service.Search,然后在com.north.spilat.service.Search下面创建两个文件,以上面接口的具体实现类的全限定名称为文件名,即:
com.north.spilat.service.impl.DatabaseSearch
com.north.spilat.service.impl.FileSearch
整个工程目录如下:
-
新建一个main方法测试一下
package com.north.spilat.main;
 import com.north.spilat.service.Search;
 import java.util.Iterator;
 import java.util.ServiceLoader;
 public class Main {
     public static void main(String[] args) {
         System.out.println("Hello World!");
         ServiceLoader<Search> s = ServiceLoader.load(Search.class);
         Iterator<Search> searchList = s.iterator();
         while (searchList.hasNext()) {
             Search curSearch = searchList.next();
             curSearch.search("test");
         }
     }
 }

复制代码
运行一下,输出如下:
Hello World!
now use database search. keyword:test
now use file system search. keyword:test
复制代码
如你所见, SPI机制已经定义好了加载服务的流程框架, 你只需要按照约定, 在META-INF/services目录下面, 以接口的全限定名称为名创建一个文件夹(com.north.spilat.service.Search), 文件夹下再放具体的实现类的全限定名称(com.north.spilat.service.impl.DatabaseSearch), 系统就能根据这些文件,加载不同的实现类.这就是SPI的大体流程.
ServiceLoader类分析
回到上面的main方法,其实没有什么特别的,除了一句
ServiceLoader.load(Search.class);
ServiceLoader.class是一个工具类,根据META-INF/services/xxxInterfaceName下面的文件名,加载具体的实现类.
从load(Search.class)进去,我们来扒一下这个类,下面主要是贴代码,分析都在代码注释内.
- 可以看到,里面并没有很多逻辑,主要逻辑都交给了LazyIterator这类
/*
 *入口, 获取一下当前类的类加载器,然后调用下一个静态方法
 */
 public static <S> ServiceLoader<S> load(Class<S> service) {
     ClassLoader cl = Thread.currentThread().getContextClassLoader();
     return ServiceLoader.load(service, cl);
 }
 /*
 *这个也没有什么逻辑,直接调用构造方法
 */
 public static <S> ServiceLoader<S> load(Class<S> service, ClassLoader loader)
 {
     return new ServiceLoader<>(service, loader);
 }
 /**
 * 也没有什么逻辑,直接调用reload
 */
 private ServiceLoader(Class<S> svc, ClassLoader cl) {
     service = Objects.requireNonNull(svc, "Service interface cannot be null");
     loader = (cl == null) ? ClassLoader.getSystemClassLoader() : cl;
     acc = (System.getSecurityManager() != null) ? AccessController.getContext() : null;
     reload();
 }
 /**
 * 直接实例化一个懒加载的迭代器
 */
 public void reload() {
     providers.clear();
     lookupIterator = new LazyIterator(service, loader);
 }
复制代码
- LazyIterator这个迭代器只需要关心hasNext()和next(), hasNext()里面又只是单纯地调用hasNextService(). 不用说, next()里面肯定也只是单纯地调用了nextService();
private boolean hasNextService() {
     if (nextName != null) {
         // nextName不为空,说明加载过了,而且服务不为空
         return true;
     }
     // configs就是所有名字为PREFIX + service.getName()的资源
     if (configs == null) {
         try {
             // PREFIX是 /META-INF/services
             // service.getName() 是接口的全限定名称
             String fullName = PREFIX + service.getName();
             // loader == null, 说明是bootstrap类加载器
             if (loader == null)
                 configs = ClassLoader.getSystemResources(fullName);
             else
                 // 通过名字加载所有文件资源
                 configs = loader.getResources(fullName);
             } catch (IOException x) {
                 fail(service, "Error locating configuration files", x);
             }
     }
     //遍历所有的资源,pending用于存放加载到的实现类
     while ((pending == null) || !pending.hasNext()) {
             if (!configs.hasMoreElements()) {
                 //遍历完所有的文件了,直接返回
                 return false;
             }

             // parse方法主要调用了parseLine,功能:
             // 1. 分析每个PREFIX + service.getName() 目录下面的所有文件
             // 2. 判断每个文件是否是合法的java类的全限定名称,如果是就add到pending变量中
             pending = parse(service, configs.nextElement());
     }
     // 除了第一次进来,后面每次调用都是直接到这一步了
     nextName = pending.next();
     return true;
 }
复制代码
- 再来看看nextService干了啥
private S nextService() {
     // 校验一下
     if (!hasNextService())
             throw new NoSuchElementException();
     String cn = nextName;
     nextName = null;
     Class<?> c = null;
     try {
         // 尝试一下是否能加载该类
         c = Class.forName(cn, false, loader);
     } catch (ClassNotFoundException x) {
         fail(service,"Provider " + cn + " not found");
     }
     // 是不是service的子类,或者同一个类
     if (!service.isAssignableFrom(c)) {
         fail(service,"Provider " + cn  + " not a subtype");
     }
     try {
         // 实例化这个类, 然后向上转一下
         S p = service.cast(c.newInstance());
         // 缓存起来,避免重复加载
         providers.put(cn, p);
         return p;
     } catch (Throwable x) {
         fail(service,"Provider " + cn + " could not be instantiated",x);
     }
     throw new Error();          // This cannot happen
 }
复制代码
从上面的代码就可以看出来, 所谓的懒加载,就是等到调用hasNext()再查找服务, 调用next()才实例化服务类.
JDK的SPI大概就是这么一个逻辑了, 服务提供商按照约定,将具体的实现类名称放到/META-INF/services/xxx下, ServiceLoader就可以根据服务提供者的意愿, 加载不同的实现了, 避免硬编码写死逻辑, 从而达到解耦的目的.
当然, 从上面这个简单的例子可能大家会看不出来,SPI是如何达到解耦的效果的. 所以下面, 我们一起来看看,开源框架中是怎么利用SPI机制来解耦的. 体会一下SPI的魅力.
springboot 中的SPI
作为一个程序员,没事可以多点研究开源框架,因为这些开源代码每天都不知道被人撸几遍,所以他们的代码从设计到实现,都是非常优秀的,我们可以从中学到不少东西.
而spring框架这些年来,基本上可以说是开源界扛把子,江湖上无人不知无人不晓.其源码的设计也是出了名的优雅,超高拓展性超低耦合性.
那它是怎么解耦的呢? 拓展点机制便是其中法宝之一
从神奇的starter说起
刚刚接触springboot的时候, 真的觉得各种spring-xx-starter和xx-spring-starter非常的神奇. 为什么在pom文件添加一个依赖就能引入一个复杂的插件了呢? 带着这个疑问,我开始了我的走进科学之旅.
dubbo框架在国内用的公司挺多的,所以这里, 我们就以dubbo-spring-boot-starter为例,来看看springboot中是如何高效解耦的.
回想一下, 如果我们要在springboot工程里面引入dubbo模块, 需要怎么做.
- 在pom文件引入dubbo-spring-boot-starter的依赖.
<dependency>
            <groupId>com.alibaba.spring.boot</groupId>
            <artifactId>dubbo-spring-boot-starter</artifactId>
            <version>2.0.0</version>
        </dependency>
复制代码
- 在application.properties文件配置好dubbo相关参数
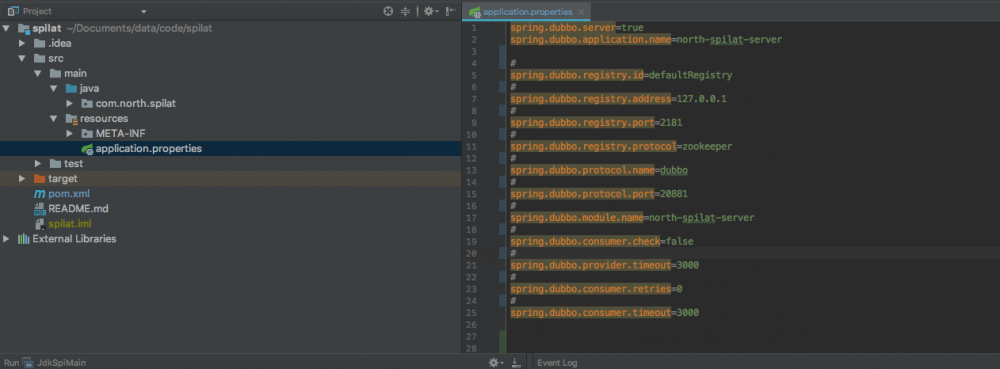
spring.dubbo.server=true
spring.dubbo.application.name=north-spilat-server

#
spring.dubbo.registry.id=defaultRegistry
#
spring.dubbo.registry.address=127.0.0.1
#
spring.dubbo.registry.port=2181
#
spring.dubbo.registry.protocol=zookeeper
#
spring.dubbo.protocol.name=dubbo
#
spring.dubbo.protocol.port=20881
#
spring.dubbo.module.name=north-spilat-server
#
spring.dubbo.consumer.check=false
#
spring.dubbo.provider.timeout=3000
#
spring.dubbo.consumer.retries=0
#
spring.dubbo.consumer.timeout=3000
复制代码
- 在spring-boot的启动类加上对应的注解
package com.north.spilat.main;

import com.alibaba.dubbo.spring.boot.annotation.EnableDubboConfiguration;
import org.springframework.boot.SpringApplication;
import org.springframework.boot.autoconfigure.SpringBootApplication;
import org.springframework.context.annotation.ComponentScan;

/**
 * @author lhh
 */
@SpringBootApplication
@ComponentScan(basePackages = {"com.north.*"})
@EnableDubboConfiguration
public class SpringBootMain {

    public static void main(String[] args) {
        SpringApplication.run(SpringBootMain.class, args);
    }
}
复制代码
- 定义接口, 实现并调用
接口
package com.north.spilat.service;
/**
 * @author lhh
 */
public interface DubboDemoService {
    String test(String params);
}
复制代码
实现接口
package com.north.spilat.service.impl;

import com.alibaba.dubbo.config.annotation.Service;
import com.north.spilat.service.DubboDemoService;
import org.springframework.stereotype.Repository;

/**
 * @author lhh
 */
@Service
@Repository("dubboDemoService")
public class DubboDemoServiceImpl implements DubboDemoService {
    @Override
    public String test(String params) {
        return System.currentTimeMillis() + "-" + params ;
    }
}
复制代码
写个controller调用dubbo接口
package com.north.spilat.controller;

import com.north.spilat.service.DubboDemoService;
import org.springframework.web.bind.annotation.RequestMapping;
import org.springframework.web.bind.annotation.RestController;

import javax.annotation.Resource;

/**
 * @author lhh
 */
@RestController
public class HelloWorldController {
    @Resource
    private DubboDemoService dubboDemoService;

    @RequestMapping("/saveTheWorld")
    public String index(String name) {
        return   dubboDemoService.test(name);
    }
}
复制代码
做完以上4步(zookeeper等环境自己装一下)后, 启动SpringBootMain类, 一个带有dubbo模块的springboot工程就这样搭好了, 真的就这么简单.
然而, 世界上哪有什么岁月静好,只不过是有人替你负重前行而已, 这个替你负重的人就是"dubbo-spring-boot-starter"
dubbo-spring-boot-starter的奥秘

上图是dubbo-spring-boot-starter.jar包的结构. 内容还真不少, 但是聪明的你肯定想到了, 既然我们上一节说到了SPI是跟META-INF息息相关的,那我们这一节也必然是这样.
因此, 这里我们先看一下META-INF目录下面有什么.
dubbo/com.alibaba.dubbo.rpc.InvokerListener
dubbosubscribe=com.alibaba.dubbo.spring.boot.listener.ConsumerSubscribeListener
复制代码
这个目录下的文件只有一行,看着和上面的jdk的SPI真的是像.没错, 这的确是一种拓展点, 是dubbo里面的一种拓展点约定, 就是我们开篇说的ExtensionLoader啦
- spring.factories
org.springframework.boot.autoconfigure.EnableAutoConfiguration=/
com.alibaba.dubbo.spring.boot.DubboAutoConfiguration,/
com.alibaba.dubbo.spring.boot.DubboProviderAutoConfiguration,/
com.alibaba.dubbo.spring.boot.DubboConsumerAutoConfiguration

org.springframework.context.ApplicationListener=/
com.alibaba.dubbo.spring.boot.context.event.DubboBannerApplicationListener

复制代码
哇哇哇,文件就是以spring命名,文件内容还涉及到这么多spring类. 确认过眼神, 我遇上对的...文件. 但是别急, 下面还有一个spring.providers文件
- spring.providers
provides: dubbo-spring-boot-starter
复制代码
spring.providers就这么简单的一句, 有点失望了.所以我们还是来关注一下spring.factories吧.
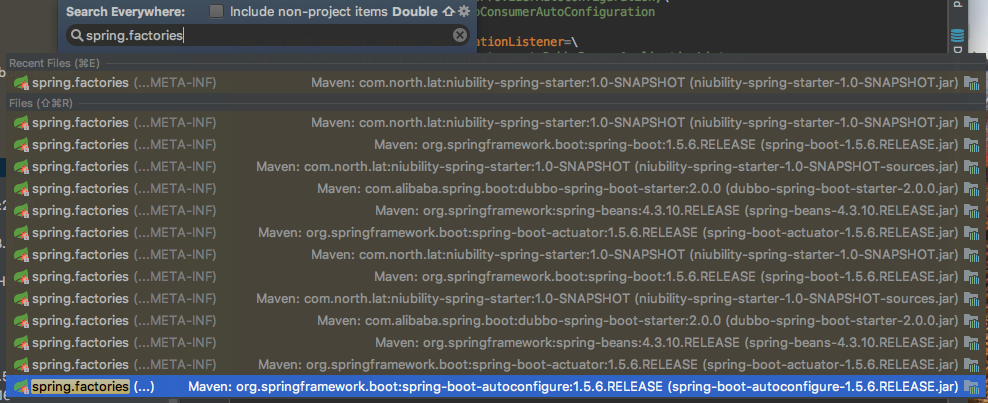
在IDEA里面搜一下spring.factories这个文件. 不搜不知道, 一搜吓一跳. 原来基本上每一个springboot相关的jar包里面都会有一个这样的文件.
物理学家在做实验之前, 总是喜欢推理一番, 得到一个预测的结论, 然后再通过实验结果来证实或推翻预测的结论.
因此, 基于JDK里面的SPI机制, 在这里我们也可以做一个大胆的预测:spring框架里面一定是有一个类似于ServiceLoader的类, 专门从META-INF/spring.factories里面的配置,加载特定接口的实现.
结果不用说, 这个预测肯定是准确, 不然我上面这么多字不就白写啦. 但是怎么证明我们的预测是准确的呢. 让我们也来做一次"实验".
springboot的启动过程
要弄清楚springboot的启动过程, 最好的办法就研读它的源码了.
而springboot的代码还是非常"人性化"的,springboot明明确确地告诉你了, 它的入口就是main方法.因此, 读springboot的代码, 还算是比较惬意的,从main方法一路看下去就可以了.
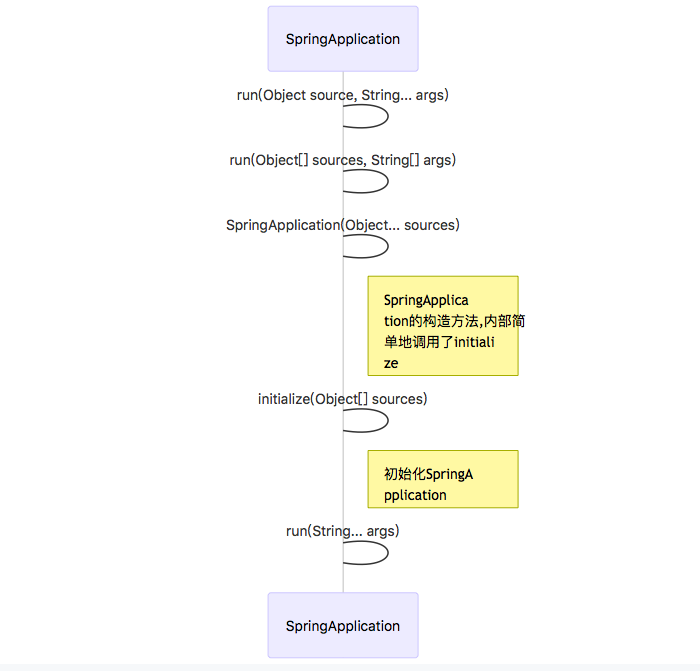
上图就是一个springboot工程的启动过程.首先是连续两个重载的静态run方法, 静态run方法内部会调用构造方法实例化SpringApplication对象, 构造方法内部是调用initialiaze()进行初始化的,实例化,再调用一个成员方法run()来正式启动.
可见,整个启动过程主要的逻辑都在initialiaze方法和成员run方法内部了.
看一下initialiaze()的逻辑, 下面也是老规矩,主要贴代码,分析都在代码注释中
@SuppressWarnings({ "unchecked", "rawtypes" })
   private void initialize(Object[] sources) {
       // sources一般是Configuration类或main方法所在类
       // 可以有多个
   	if (sources != null && sources.length > 0) {
   		this.sources.addAll(Arrays.asList(sources));
   	}
   	// 判断是否是web环境
   	// classLoader能加载到
   	// "javax.servlet.Servlet",
   	//	"org.springframework.web.context.ConfigurableWebApplicationContext"
   	// 这两个类就是web环境
   	this.webEnvironment = deduceWebEnvironment();
   	// 加载initializers 和listeners
   	// getSpringFactoriesInstances顾名思义,
   	// 就是加载某个接口的工厂实例,
   	// 看起来像是我们要找的"ServiceLoader"了
   	setInitializers((Collection) getSpringFactoriesInstances(
   			ApplicationContextInitializer.class));
   	setListeners((Collection) getSpringFactoriesInstances(ApplicationListener.class));
   	// 找到main方法所在的类
   	this.mainApplicationClass = deduceMainApplicationClass();
   }
复制代码
运气还算不错,"嫌疑犯"getSpringFactoriesInstances就露出水面了, 来看看它的逻辑
/**
    * 参数type就是要加载的接口的class
    */
    private <T> Collection<? extends T>
    getSpringFactoriesInstances(Class<T> type) {
        // 直接调用重载方法getSpringFactoriesInstances
		return getSpringFactoriesInstances(type, new Class<?>[] {});
	}

	private <T> Collection<? extends T>
	        getSpringFactoriesInstances(Class<T> type,
			Class<?>[] parameterTypes,
			Object... args) {
		// 获取当前线程的classLoader
		ClassLoader classLoader = Thread.currentThread().getContextClassLoader();
		// Use names and ensure unique to protect against duplicates
		// 翻译一下原文注释就是用names来去重
		// 注意这里, 我们寻找的"ServiceLoader"终于出现了
		// 就是SpringFactoriesLoader
		Set<String> names = new LinkedHashSet<String>(
				SpringFactoriesLoader.loadFactoryNames(type, classLoader));
		// 是用java反射来实例化
		List<T> instances = createSpringFactoriesInstances(type, parameterTypes,
				classLoader, args, names);
		// 根据@Order注解来排一下序
		AnnotationAwareOrderComparator.sort(instances);
		// 返回这个接口的所有实现实例
		return instances;
	}
复制代码
然后很快就找到了我们想找的SpringFactoriesLoader, 而且这个类非常小, 代码比JDK的ServiceLoader还少. 那我们仔细看一下他里面都有啥.
- FACTORIES_RESOURCE_LOCATION 正是指向我们上面所说的META-INF/spring.factories
- loadFactories, 从META-INF/spring.factories查找指定的接口实现类并实例化, 其中查找是通过调用loadFactoryNames
- loadFactoryNames从指定的位置查找特定接口的实现类的全限定名称
- instantiateFactory 实例化
这个类就是springboot里面的"ServiceLoader",它提供了一种机制,可以让服务提供商指定某种接口的实现(可以是多个),例如上面的ApplicationContextInitializer.class和ApplicationListener.class接口, 如果我们想在我们的模块里面指定我们的实现,或者想在现有的代码上加上我们的某个实现,就可以在/META-INF/spring.factories里面指定. 等一下下面我会写一个具体的例子, 可以让大家更好的理解一下.
/**
* 省略import
**/
public abstract class SpringFactoriesLoader {

	private static final Log logger = LogFactory.getLog(SpringFactoriesLoader.class);

	/**
	 * The location to look for factories.
	 *  查找工厂实现类的位置
	 * <p>Can be present in multiple JAR files.
	 *   可以在多个jar包中
	 * 这不就是我们一直在寻找的META-INF/spring.factories嘛
	 * 终于找到了
	 */
	public static final String FACTORIES_RESOURCE_LOCATION =
	"META-INF/spring.factories";


	/**
	 * 查找并实例化指定的工厂类实现
	 */
	public static <T> List<T> loadFactories(Class<T>
	factoryClass, ClassLoader classLoader) {
		Assert.notNull(factoryClass, "'factoryClass'
		must not be null");
		ClassLoader classLoaderToUse = classLoader;
		if (classLoaderToUse == null) {
			classLoaderToUse =
			SpringFactoriesLoader.class.getClassLoader();
		}
		// 最终是调用loadFactoryNames
		List<String> factoryNames = loadFactoryNames(factoryClass, classLoaderToUse);
		if (logger.isTraceEnabled()) {
			logger.trace("Loaded [" + factoryClass.getName() + "] names: " + factoryNames);
		}
		List<T> result = new ArrayList<T>(factoryNames.size());
		for (String factoryName : factoryNames) {
		    // 一个个的实例化
			result.add(instantiateFactory(factoryName, factoryClass, classLoaderToUse));
		}
		// 排序
		AnnotationAwareOrderComparator.sort(result);
		return result;
	}

	/**
	 * 从META-INF/spring.factories查找指定接口的实现类的
	 * 全限定类名称
	 */
	public static List<String> loadFactoryNames(
	Class<?> factoryClass, ClassLoader classLoader) {
	    // 接口的类名称
		String factoryClassName = factoryClass.getName();
		try {
		    //加载所有的META-INF/spring.factories文件资源
			Enumeration<URL> urls =
			(classLoader != null ? classLoader.getResources(FACTORIES_RESOURCE_LOCATION) :
			ClassLoader.getSystemResources(FACTORIES_RESOURCE_LOCATION));
			List<String> result = new ArrayList<String>();
			while (urls.hasMoreElements()) {
			    // 一个url代表一个spring.factories文件
				URL url = urls.nextElement();
				// 加载所有的属性, 一般是 xxx接口=impl1,impl2 这种形式的
				Properties properties = PropertiesLoaderUtils.loadProperties(new UrlResource(url));
				// 根据接口名获取的类似"impl1,impl2"的字符串
				String factoryClassNames = properties.getProperty(factoryClassName)
				// 以逗号分隔,转化成列表
				result.addAll(Arrays.asList(StringUtils.commaDelimitedListToStringArray(factoryClassNames)));
			}
			// 返回实现类名的列表
			return result;
		}
		catch (IOException ex) {
			throw new IllegalArgumentException("Unable to load [" + factoryClass.getName() +
					"] factories from location [" + FACTORIES_RESOURCE_LOCATION + "]", ex);
		}
	}

    /**
    * 根据类名的全限定名称实例化
    */
	@SuppressWarnings("unchecked")
	private static <T> T instantiateFactory(String instanceClassName, Class<T> factoryClass, ClassLoader classLoader) {
		try {
		    // 查找类
			Class<?> instanceClass = ClassUtils.forName(instanceClassName, classLoader);
			// 校验是不是该接口类或该接口类的实现类
			if (!factoryClass.isAssignableFrom(instanceClass)) {
				throw new IllegalArgumentException(
						"Class [" + instanceClassName + "] is not assignable to [" + factoryClass.getName() + "]");
			}
			Constructor<?> constructor = instanceClass.getDeclaredConstructor();
			ReflectionUtils.makeAccessible(constructor);
			// 反射实例化
			return (T) constructor.newInstance();
		}
		catch (Throwable ex) {
			throw new IllegalArgumentException("Unable to instantiate factory class: " + factoryClass.getName(), ex);
		}
	}

}

复制代码
看完SpringFactoriesLoader这个类, initialize()方法的逻辑也就看完了. 接着再看另外一个重要方法run(String... args)
/**
	 * Run the Spring application, creating and refreshing a new
	 * {@link ApplicationContext}.
	 * @param args the application arguments (usually passed from a Java main method)
	 * @return a running {@link ApplicationContext}
	 */
	public ConfigurableApplicationContext run(String... args) {
	    // 用于监测启动时长等等
		StopWatch stopWatch = new StopWatch();
		stopWatch.start();
		// springboot的上下文
		ConfigurableApplicationContext context = null;
		FailureAnalyzers analyzers = null;
		// 配置headless模式
		configureHeadlessProperty();
		// 启动监听器, 可以配置到spring.factories中去
		SpringApplicationRunListeners listeners = getRunListeners(args);
		listeners.starting();
		try {
		    // 封装参数
			ApplicationArguments applicationArguments = new DefaultApplicationArguments(
					args);
			// 	配置environment
			ConfigurableEnvironment environment = prepareEnvironment(listeners,
					applicationArguments);
			// 打印banner
			Banner printedBanner = printBanner(environment);
			// 创建上下文
			context = createApplicationContext();
			analyzers = new FailureAnalyzers(context);
			// 先初始化上下文
			prepareContext(context, environment, listeners, applicationArguments,
					printedBanner);
			// spring 经典的refresh()过程, 大部分的逻辑都在里面
			// 这里不再深入, 读者可以自行研读代码或搜索引擎
			refreshContext(context);
			afterRefresh(context, applicationArguments);
			listeners.finished(context, null);
			stopWatch.stop();
			if (this.logStartupInfo) {
				new StartupInfoLogger(this.mainApplicationClass)
						.logStarted(getApplicationLog(), stopWatch);
			}
			return context;
		}
		catch (Throwable ex) {
			handleRunFailure(context, listeners, analyzers, ex);
			throw new IllegalStateException(ex);
		}
	}
复制代码
这个方法就是springboot启动的主要逻辑了,内容很多,如果要全部说清楚的话, 恐怕再写几遍文章也说不完(给人家springboot一点最起码的尊重好不好, 想一篇文章就理解透彻人家整个框架,人家不要面子的呀).所以这里就不会再深入,对于本文,只要知道这个run()方法是启动的主要逻辑就可以了, 另外记住
context = createApplicationContext();
refreshContext(context);
这两行代码,等下我们还会看到它的.
dubbo-spring-boot-starter的原理
上面说了很多, 但是为什么springboot引入一个starter的依赖,就能引入一个复杂的模块. 这里通过dubbo-spring-boot-starter来研究一下.
我们查看一下dubbo-spring-boot-starter里面spring.factories. 可以发现里面配置了两个接口, 一个是EnableAutoConfiguration,一个是ApplicationListener.
org.springframework.boot.autoconfigure.EnableAutoConfiguration=/
com.alibaba.dubbo.spring.boot.DubboAutoConfiguration,/
com.alibaba.dubbo.spring.boot.DubboProviderAutoConfiguration,/
com.alibaba.dubbo.spring.boot.DubboConsumerAutoConfiguration

org.springframework.context.ApplicationListener=/
com.alibaba.dubbo.spring.boot.context.event.DubboBannerApplicationListener
复制代码
监听器看名称就知道了是用于启动的时候打印banner, 所以这里暂时不看, 我们先来看一下EnableAutoConfiguration是哪里用到的.
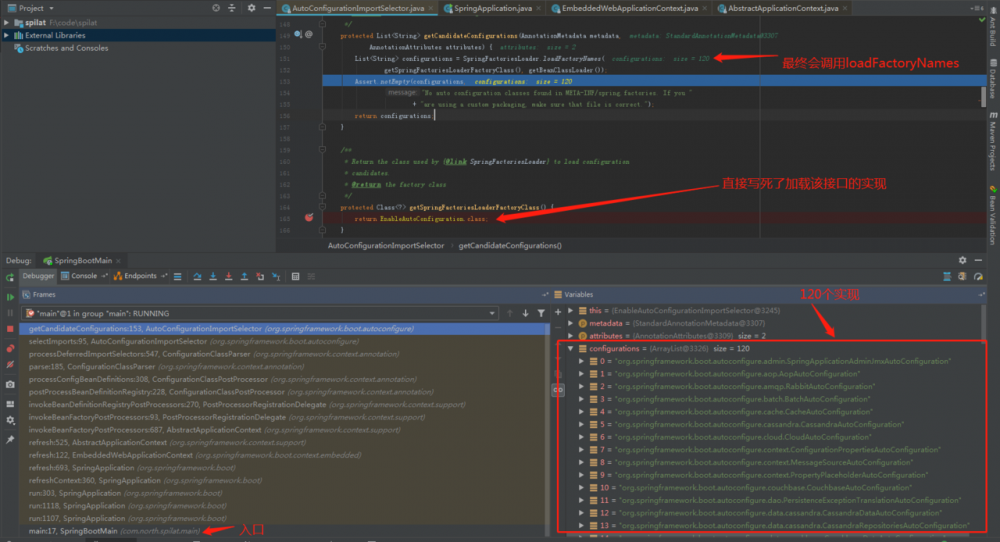
从main方法开始一路debug,终于在AutoConfigurationImportSelector类中发现了一行代码:
SpringFactoriesLoader.loadFactoryNames( getSpringFactoriesLoaderFactoryClass(), getBeanClassLoader())
其中getSpringFactoriesLoaderFactoryClass()就是写死了返回EnableAutoConfiguration.class
protected List<String> getCandidateConfigurations(AnnotationMetadata metadata,
 		AnnotationAttributes attributes) {
 	List<String> configurations = SpringFactoriesLoader.loadFactoryNames(
 			getSpringFactoriesLoaderFactoryClass(), getBeanClassLoader());
 	Assert.notEmpty(configurations,
 			"No auto configuration classes found in META-INF/spring.factories. If you "
 					+ "are using a custom packaging, make sure that file is correct.");
 	return configurations;
 }

 /**
  * Return the class used by {@link SpringFactoriesLoader} to load configuration
  * candidates.
  * @return the factory class
  */
 protected Class<?> getSpringFactoriesLoaderFactoryClass() {
 	return EnableAutoConfiguration.class;
 }
复制代码
如下图可以发现,EnableAutoConfiguration.class的实现会有很多, 只要你在spring.fatories配置了,它都会给你加载进来
加载了之后,又干嘛呢, 往下看,可以发现大概流程是这样:
- this.reader.loadBeanDefinitions(configClasses); configClasses就是所有的实现类,把这些类读进来准备解析
- registerBeanDefinition注册到beanDefinitionNames
- spring的refresh()操作中,最后有一步是finishBeanFactoryInitialization(beanFactory), 这一步时会初始化所有的单例对象, 最后会从beanDefinitionNames读取所有的BeanDefinition,也包括了上面的所有EnableAutoConfiguration实现, 然后进行实例化
- 实例化EnableAutoConfiguration的具体实现的时候,会执行这些实现类里面的具体逻辑, 以Dubbo为例,会初始化com.alibaba.dubbo.spring.boot.DubboAutoConfiguration,
com.alibaba.dubbo.spring.boot.DubboProviderAutoConfiguration,
com.alibaba.dubbo.spring.boot.DubboConsumerAutoConfiguration 这三个实现类, 就把dubbo启动并注册到spring容器中去了.
实现一个spring-boot-starter
清楚了原理之后, 要实现一个自己的starter就很简单了.
假设我有一个组件,非常牛逼,具有拯救世界的能力, 你的系统接入后,也就具有了拯救世界的能力了. 那怎么让你的spring-boot系统可以快速接入这个牛逼的组件呢. 我来实现一个starter, 你依赖我这个starter就可以了
首先定义一个拯救世界的接口
package com.north.lat.service;

/**
* @author lhh
*/
public interface SaveTheWorldService {
 /**
  *  拯救世界
  * @param name 留名
  * @return
  */
 String saveTheWorld(String name);
}
复制代码
抽象类
package com.north.lat.service;

import lombok.extern.log4j.Log4j;

import java.util.Random;

/**
 * @author lhh
 */
@Log4j
public abstract  class AbstractSaveTheWorldService implements SaveTheWorldService {
    private final static Random RANDOM = new Random();
    private final static String SUCCESS_MSG = "WAOOOOOOO! 大英雄";
    private final static String FAIL_MSG = "拯救世界是个高风险行业";

    @Override
    public String saveTheWorld(String name) {
        int randomInt = RANDOM.nextInt(100);
        String msg;
        if((randomInt +  1) > getDieRate()){
            msg = SUCCESS_MSG +"," + name + "拯救了这个世界!";
        }else{
            msg = FAIL_MSG + "," + name + ",你失败了,下辈子再来吧";

        }
        log.info(msg);
        return msg;
    }

    /**
     * 指定死亡率
     * @return
     */
    public abstract int getDieRate();
}
复制代码
普通人去拯救世界,一般失败率是99%
package com.north.lat.service.impl;


import com.north.lat.service.AbstractSaveTheWorldService;

/**
 * 普通人拯救世界
 * @author lhh
 */
public class CommonSaveTheWorldServiceImpl extends AbstractSaveTheWorldService {
    private final static int DIE_RATE = 99;

    @Override
    public int getDieRate() {
        return DIE_RATE;
    }
}

复制代码
以英雄角色去拯救世界,成功率是99%
package com.north.lat.service.impl;

import com.north.lat.service.AbstractSaveTheWorldService;

/**
 * 英雄拯救世界
 * @author lhh
 */
public class HeroSaveTheWorldImpl extends AbstractSaveTheWorldService {
    private final static int DIE_RATE = 1;
    @Override
    public int getDieRate() {
        return DIE_RATE;
    }
}

复制代码
好, 我们这个超级牛逼的组件就诞生了, 下面为接入springboot准备一下, 实现一个NbAutoConfiguration如下:
package com.north.lat;

import com.north.lat.service.SaveTheWorldService;
import org.springframework.beans.BeansException;
import org.springframework.beans.factory.config.ConfigurableListableBeanFactory;
import org.springframework.beans.factory.support.BeanDefinitionRegistry;
import org.springframework.beans.factory.support.BeanDefinitionRegistryPostProcessor;
import org.springframework.beans.factory.support.GenericBeanDefinition;
import org.springframework.boot.autoconfigure.condition.ConditionalOnClass;
import org.springframework.context.ApplicationContext;
import org.springframework.context.ApplicationContextAware;
import org.springframework.context.EnvironmentAware;
import org.springframework.context.annotation.Configuration;
import org.springframework.core.env.Environment;
import org.springframework.core.io.support.SpringFactoriesLoader;

import java.util.List;

/**
 * @author lhh
 * 注入environment和applicationContext 以便做一些后续操作
 */
@Configuration
@ConditionalOnClass(SaveTheWorldService.class)
public class NbAutoConfiguration implements EnvironmentAware,ApplicationContextAware,BeanDefinitionRegistryPostProcessor {
    private Environment environment;
    private ApplicationContext applicationContext;

    @Override
    public void setEnvironment(Environment environment) {
            this.environment = environment;
    }

    @Override
    public void setApplicationContext(ApplicationContext applicationContext) throws BeansException {
           this.applicationContext = applicationContext;
    }

    @Override
    public void postProcessBeanDefinitionRegistry(BeanDefinitionRegistry registry) throws BeansException {
        // 我这里是从spring.factories加载了SaveTheWorldService的所有实现,
        List<SaveTheWorldService> saveTheWorldServices = SpringFactoriesLoader.loadFactories(SaveTheWorldService.class, this.getClass().getClassLoader());
        // 然后用BeanDefinitionRegistry 注册到BeanDefinitions
        saveTheWorldServices.forEach(saveTheWorldService->{
            GenericBeanDefinition beanDefinition = new GenericBeanDefinition();
            beanDefinition.setBeanClass(saveTheWorldService.getClass());
            beanDefinition.setLazyInit(false);
            beanDefinition.setAbstract(false);
            beanDefinition.setAutowireCandidate(true);
            beanDefinition.setScope("singleton");
            registry.registerBeanDefinition(saveTheWorldService.getClass().getSimpleName(), beanDefinition);
        });
    }

    @Override
    public void postProcessBeanFactory(ConfigurableListableBeanFactory beanFactory) throws BeansException {

    }
}
复制代码
再配置一下spring.factories
在组件开发初期,英雄还没找到,只能派个普通人去,所以niubility-spring-starter-1.0-SNAPSHOT.jar的spring.factories是这样的
org.springframework.boot.autoconfigure.EnableAutoConfiguration=/
com.north.lat.NbAutoConfiguration
com.north.lat.service.SaveTheWorldService=/
com.north.lat.service.impl.CommonSaveTheWorldServiceImpl
复制代码
后来经过开发人员无数个日日夜夜的加班,终于找到了英雄,所以niubility-spring-starter-2.0-SNAPSHOT.jar的spring.factories变成了这样
org.springframework.boot.autoconfigure.EnableAutoConfiguration=/
com.north.lat.NbAutoConfiguration
com.north.lat.service.SaveTheWorldService=/
com.north.lat.service.impl.HeroSaveTheWorldImpl
复制代码
这样就完成了,项目结构如下图所示:

那该怎么接入呢? 我们在刚刚的spilat工程接入一下试试:
依赖jar包,这个时候是接入1.0版本的;这样就完成接入了
<dependency>
            <groupId>com.north.lat</groupId>
            <artifactId>niubility-spring-starter</artifactId>
            <version>1.0-SNAPSHOT</version>
        </dependency>
复制代码
所谓的完成接入是指, spring中已经注册了SaveTheWorldService的所有实现, 即CommonSaveTheWorldServiceImpl(1.0版本)或HeroSaveTheWorldImpl(2.0版本).
我们在controller中注入调用一下
package com.north.spilat.controller;

import com.north.lat.service.SaveTheWorldService;
import org.springframework.web.bind.annotation.RequestMapping;
import org.springframework.web.bind.annotation.RestController;

import javax.annotation.Resource;

/**
 * @author lhh
 */
@RestController
public class HelloWorldController {
    @Resource
    private SaveTheWorldService saveTheWorldService;


    @RequestMapping("/saveTheWorld")
    public String index(String name) {
        return  saveTheWorldService.saveTheWorld(name);
    }
}
复制代码
使用1.0版本的时候,果然是失败率99%,运行结果如下:

等2.0版本出来后, 赶紧换上2.0版本, 在pom.xml更新一下版本号:
复制代码
<dependency>
        <groupId>com.north.lat</groupId>
        <artifactId>niubility-spring-starter</artifactId>
        <version>2.0-SNAPSHOT</version>
    </dependency>
复制代码
再看看运行结果, 就非常完美啦
复制代码

在上面的例子中, 不管是我们接入还是升级组件, 都是简单的依赖jar包就可以了,真正的实现了可拔插,低耦合. 当然, 实际的应用场景中, 可能还需要我们增加少许的配置,例如上面的spring-boot-starter-dubbo, 以及我们经常用的druid-spring-boot-starter,spring-boot-starter-disconf等等
总结
解耦,可以说是数代程序员都穷极一生都在追求的东西, 这些年来提出和实现了无数的工具和思想, SPI便是沉淀出来的一种。
SPI机制在各种开源框架中都是非常常见的,而各种框架的SPI机制又各有不同, 或多或少都有一些演变;但是其实背后的原理都是大同小异.
因此, 了解一下这些机制, 一方面可以让我们更清楚开源框架的运行原理,少走弯路; 另一方面,也可以作为我们日常写代码和系统设计的一种参考,从而写出更加优雅的代码.
正文到此结束
- 本文标签: struct zookeeper NSA 解析 key 开源 http Transport Collection ArrayList spring HashSet 启动过程 ip 搜索引擎 Bootstrap 代码注释 XML 总结 core 监听器 IO 索引 目录 druid 插件开发 servlet cat IDE 程序员 实例 final src Listeners plugin EnableAutoConfiguration 限流 测试 线程 数据 App URLs 开发 lib 文章 bean bug 缓存 定制 数据库 开发者 CTO Select 参数 Java类 ACE Service springboot 类加载器 翻译 pom 人性 UI 注释 DOM REST consumer Word Property id java反射 ssl db tar 配置 代码 parse 插件 provider strace BeanDefinition 希望 构造方法 web tab https map API 遍历 list dubbo 加班 Security 文件系统 静态方法 java rand 源码
- 版权声明: 本文为互联网转载文章,出处已在文章中说明(部分除外)。如果侵权,请联系本站长删除,谢谢。
- 本文海报: 生成海报一 生成海报二
热门推荐


相关文章


Loading...
![[HBLOG]公众号](http://www.liuhaihua.cn/img/qrcode_gzh.jpg)

