单点登录系列(2) - Spring OAuth2项目搭建
概述
在第一篇中,我们已经讲过了OAuth2单点登录的实际应用场景和技术方案,那么这一篇就具体讲解如何搭建OAuth2的服务。OAuth2只是一个协议,实现该协议的技术产品有很多,比如:微软的ADFS,Oracle的OAM(12c),等等。但这些产品都是大厂研发出来的,基本都是收费的,那么如果我们需要基于开源的技术,自己搭建基于OAuth2的服务该怎么做呢?你可以试试“Spring Cloud全家桶”里面的Spring Security OAuth2。
本文将讲解Spring Security OAuth2的项目实战搭建,由于篇幅有限,文章中只会摘录核心代码,完整代码请上 github地址 查看。
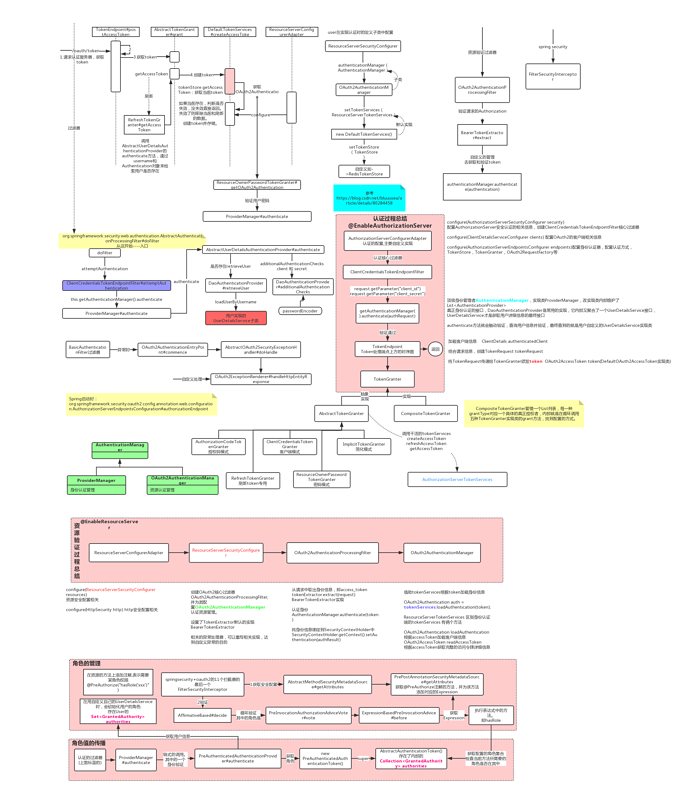
最近看过一个非常复杂Spring Security OAuth2技术架构图,虽然很多功能点我自己也没有用到过,但是这里还是附上吧。
项目搭建
首先是创建一个SpringBoot项目,要在启动类加上 @EnableResourceServer 的注解。
pom.xml
<parent>
        <groupId>org.springframework.boot</groupId>
        <artifactId>spring-boot-starter-parent</artifactId>
        <version>2.0.4.RELEASE</version>
        <relativePath/> <!-- lookup parent from repository -->
    </parent>
    <dependencies>
        <dependency>
            <groupId>org.springframework.boot</groupId>
            <artifactId>spring-boot-starter-web</artifactId>
        </dependency>
        <!--oauth2-->
        <dependency>
            <groupId>org.springframework.security.oauth</groupId>
            <artifactId>spring-security-oauth2</artifactId>
            <version>2.0.15.RELEASE</version>
        </dependency>
        <!--freemarker,自定义登录页使用-->
        <dependency>
            <groupId>org.springframework.boot</groupId>
            <artifactId>spring-boot-starter-freemarker</artifactId>
        </dependency>
        <!--jwt,生成jwt token-->
        <dependency>
            <groupId>org.springframework.security</groupId>
            <artifactId>spring-security-jwt</artifactId>
            <version>1.0.9.RELEASE</version>
        </dependency>
        <dependency>
            <groupId>io.jsonwebtoken</groupId>
            <artifactId>jjwt</artifactId>
            <version>0.6.0</version>
        </dependency>
        <!-- feign,非必需 -->
        <dependency>
            <groupId>org.springframework.cloud</groupId>
            <artifactId>spring-cloud-starter-openfeign</artifactId>
            <version>2.0.2.RELEASE</version>
        </dependency>
    </dependencies>
核心的实现类主要只有两个,一个实现接口 WebSecurityConfigurerAdapter,另一个实现AuthorizationServerConfigurerAdapter接口。
WebSecurityConfigurerAdapter主要用来定义Web请求的路由控制,比如:哪些路由受security控制;自定义登录页;登录成功或失败的处理;注销的处理,等等。包括还有 web.ignoring() 的方法,可以对指定url路径放行,不受单点登录控制。
WebSecurityCA.java
@Configuration
@Order(1)
public class WebSecurityCA extends WebSecurityConfigurerAdapter {
    @Autowired
    private AuthenticationFailureHandler appLoginFailureHandler;


    @Override
    protected void configure(HttpSecurity http) throws Exception {
        http.requestMatchers()
                .antMatchers("/login")
                .antMatchers("/oauth/authorize")
                .antMatchers("/oauth/token")
                .antMatchers("/logout")
                .and()
                .authorizeRequests()
                .anyRequest().authenticated()
                .and()
                // 自定义登录页面,这里配置了 loginPage, 就会通过 LoginController 的 login 接口加载登录页面
                .formLogin()
                .loginPage("/login")
                .permitAll()
                .failureHandler(appLoginFailureHandler)
                .failureUrl("/login?error=true")
                //注销
                .and()
                .logout()
                .addLogoutHandler(new MyLogoutHandler())
                .and()
                .csrf().disable();
    }

    /**
     * web ignore比较适合配置前端相关的静态资源,它是完全绕过spring security的所有filter的
     * ingore是完全绕过了spring security的所有filter,相当于不走spring security
     * permitall没有绕过spring security,其中包含了登录的以及匿名的
     *
     * @param web
     * @throws Exception
     */
    @Override
    public void configure(WebSecurity web) throws Exception {
        web.ignoring().antMatchers("/oauth/logout");
    }

    /**
     * 创建该实例,为了保证 密码模式中可以实现AuthenticationManager
     *
     * @return
     * @throws Exception
     */
    @Bean(name = BeanIds.AUTHENTICATION_MANAGER)
    @Override
    public AuthenticationManager authenticationManagerBean() throws Exception {
        return super.authenticationManagerBean();
    }
}
AuthorizationServerConfigurerAdapter接口则是实现OAuth2的核心代码,实现功能包括:开放OAuth2的验证模式;开放的clientId和clientSecret;token按照jwt协议生成;等等。
AuthorizationServerCA.java
@Configuration
@EnableAuthorizationServer
public class AuthorizationServerCA extends AuthorizationServerConfigurerAdapter {

    @Autowired
    private BCryptPasswordEncoder passwordEncoder;
    @Autowired
    private AuthenticationManager authenticationManager;
    @Autowired
    private UserDetailsService userDetailsService;
    @Autowired
    private TokenStore tokenStore;
    @Autowired(required = false)
    private JwtAccessTokenConverter jwtAccessTokenConverter;
    @Autowired(required = false)
    private TokenEnhancer jwtTokenEnhancer;
    @Autowired
    private WebResponseExceptionTranslator customWebResponseExceptionTranslator;
    @Autowired
    private OAuth2Properties oAuth2Properties;

    @Override
    public void configure(final AuthorizationServerSecurityConfigurer oauthServer) throws Exception {
        oauthServer.tokenKeyAccess("permitAll()").checkTokenAccess("isAuthenticated()");
    }

    @Override
    public void configure(final ClientDetailsServiceConfigurer clients) throws Exception {
        InMemoryClientDetailsServiceBuilder build = clients.inMemory();
            for (OAuth2ClientsProperties config : oAuth2Properties.getClients()) {
                build.withClient(config.getClientId())
                        .secret(passwordEncoder.encode(config.getClientSecret()))
                        .accessTokenValiditySeconds(config.getAccessTokenValiditySeconds())
                        .authorizedGrantTypes("refresh_token", "password", "authorization_code")//OAuth2支持的验证模式
                        .scopes("user_info")
                        .autoApprove(true);
            }


    }


    /**
     * 密码password模式,需要实现该方法 authenticationManager
     * @param endpoints
     * @throws Exception
     */
    @Override
    public void configure(AuthorizationServerEndpointsConfigurer endpoints) throws Exception {
        endpoints.tokenStore(tokenStore)
                .authenticationManager(authenticationManager)
                .userDetailsService(userDetailsService);

        //扩展token返回结果
        if (jwtAccessTokenConverter != null && jwtTokenEnhancer != null) {
            TokenEnhancerChain tokenEnhancerChain = new TokenEnhancerChain();
            List<TokenEnhancer> enhancerList = new ArrayList();
            enhancerList.add(jwtTokenEnhancer);
            enhancerList.add(jwtAccessTokenConverter);
            tokenEnhancerChain.setTokenEnhancers(enhancerList);
            //jwt
            endpoints.tokenEnhancer(tokenEnhancerChain)
                    .accessTokenConverter(jwtAccessTokenConverter);
        }
        endpoints.exceptionTranslator(customWebResponseExceptionTranslator);
    }
}
自定义模块
1、自定义登录/注销
1.1、登录页
首先自定义开发一个登录页,并开发接口保证访问url能访问到登录页,例如:/login 。
其次在WebSecurityConfigurerAdapter实现类的configure(HttpSecurity http)方法中,指明自定义登录页页路径 .formLogin().loginPage("/login")
1.2、注销
在登录成功后会生成认证通过的cookie,保证下次跳转到登录页时无需登录就能通过。而注销的操作就是清除该cookie,Spring OAuth2默认的注销地址是:/logout,并且注销成功后会自动重定向到登录页。
修改方式同样也是在WebSecurityConfigurerAdapter实现类的configure(HttpSecurity http)方法中,.logout().addLogoutHandler(new MyLogoutHandler())方法可以自定义注销的实现逻辑,例如MyLogoutHandler()就是我自己实现的处理逻辑,注销成功后会跳转到上一页。
MyLogoutHandler.java
@Component
public class MyLogoutHandler implements LogoutHandler {
    @Override
    public void logout(HttpServletRequest request, HttpServletResponse response, Authentication authentication) {
        try {
            final String refererUrl = request.getHeader("Referer");
            response.sendRedirect(refererUrl);//实现自定义重定向
        } catch (IOException e) {
            e.printStackTrace();
        }
    }
}
2、自定义token
Spring OAuth2 在登录成功后会生成access_token和refresh_token,但这些token默认是类似于uuid的字符串,我们怎么把他们换成 jwt的token呢?
在之前AuthorizationServerCA.java 类中我们能看到使用jwt方式发放token的配置,包括其中有用到自定义的JwtTokenEnhancer类,可以通过.setAdditionalInformation拓展更多的自定义参数。
public class JwtTokenEnhancer implements TokenEnhancer {

    @Override
    public OAuth2AccessToken enhance(OAuth2AccessToken accessToken, OAuth2Authentication authentication) {
        Map<String, Object> info = new HashMap<>();
        info.put("name","吴晨瑞");
        ((DefaultOAuth2AccessToken) accessToken).setAdditionalInformation(info);
        return accessToken;
    }
}
3、自定义用户验证
在用户输入用户名和密码后,校验是否正常的程序在哪里定义呢?我们一般要自定义类来实现UserDetailsService接口。这个接口里面只有一个方法 loadUserByUsername(String username),传入参数是 用户名,你可以自定义方法获取数据库中该用户名对应的密码,然后Spring Auth2服务会将你数据库中获取的密码和页面上输入的密码比对,判断你是否登录成功。
MyUserDetailsService.java
@Component
public class MyUserDetailsService implements UserDetailsService {
@Resource
private UserFeign userFeign;

    @Override
    public UserDetails loadUserByUsername(String username) throws BadCredentialsException {
        //enable :用户已失效
        //accountNonExpired:用户帐号已过期
        //credentialsNonExpired:坏的凭证
        //accountNonLocked:用户账号已锁定
        // return new User("dd", "1", true, true, false, true, AuthorityUtils.commaSeparatedStringToAuthorityList("ROLE_USER"));
        String password= userFeign.loadUserByUsername(username);
        return new User(username, passwordEncoder().encode(password), AuthorityUtils.commaSeparatedStringToAuthorityList("ROLE_USER"));
    }

    @Bean
    public BCryptPasswordEncoder passwordEncoder(){
        return new BCryptPasswordEncoder();
    }
}
4、其他
还有一些自定义的登录异常处理、权限异常处理,这里就不一一附上了,可以在github上参考相关代码。Spring OAuth2 有自己一套非常完整的体系,各个接口都可以自定义实现,就像文章开头我附上的那张图一样。如果各位看客感兴趣并且有时间,可以一一实习这些接口,打造一个自己OAuth2单点登录系统。
正文到此结束
- 本文标签: 时间 dependencies DDL Service Spring cloud java git map 代码 参数 src Freemarker token spring servlet cat GitHub list client Security springboot rmi 产品 微软 key build Authorization Spring Security logo pom 数据库 IDE XML 开源 文章 id authenticate Oracle 数据 json final ACE IO ArrayList 认证 tar UI 实例 锁 Word ORM HashMap 协议 js App 开发 http bean Feign web https 配置
- 版权声明: 本文为互联网转载文章,出处已在文章中说明(部分除外)。如果侵权,请联系本站长删除,谢谢。
- 本文海报: 生成海报一 生成海报二
热门推荐


相关文章

近期评论
-
你这基本没有更新呀,最近文章显示还是2019年的文章。不符合要求哈
-
关键词:慕云博客 链接:https://www.lilun.me 描述:分享原创文字的个人博客
-
-
-
可以提供一下源码吗
-
不是商业站,鸡娃学习笔记
-
-
-
-
听他们说很厉害的样子
Loading...
![[HBLOG]公众号](http://www.liuhaihua.cn/img/qrcode_gzh.jpg)

