通用文件服务组件(HTTP实现版本)
上篇文章介绍了 通用文件服务组件(Netty实现版本) ,本文介绍基于HTTP与Apache FileUpload的方式实现。
代码地址: https://github.com/landy8530/...
1. 实现原理及功能简介
1.1 服务端实现原理
服务端采用了Spring MVC文件上传的方式,其底层采用了Apache FileUpload组件。
1.1.1 Apache FileUpload
根据 Apache FileUpload 官网信息可知,它是一个高性能,可为我们的web应用提供文件上传服务的组件。
The Commons FileUpload
package makes it easy to add robust, high-performance, file upload capability to your servlets and web applications.
FileUpload parses HTTP requests which conform to RFC 1867 , "Form-based File Upload in HTML". That is, if an HTTP request is submitted using the POST method, and with a content type of "multipart/form-data", then FileUpload can parse that request, and make the results available in a manner easily used by the caller.
Starting with version 1.3 , FileUpload handles RFC 2047 encoded header values.
Apache Commons FileUpload主要依赖Commons-io组件,详情可参考 Apache FileUpload Dependencies 。
使用Commons FileUpload需要注意以下几点:
- Form表单内,需要添加控件 <input type="file" name="myfile">
- Form表单的内容格式需要定义成 multipart/form-data
-
需要类库
- commons-io
- commons-fileupload
通过阅读Apache Commons FileUpload官方文档,可以发现以下几个常见的对象,
- 文件解析对象
DiskFileUpload diskFileUpload = new DiskFileUpload();//磁盘中读取
ServletFileUpload servletFileUpload = new ServletFileUpload();//web servlet中读取
- 进行文件解析后放在List中,因为这个类库支持多个文件上传,因此把结果会存在List中
List<FileItem> list = diskFileUpload.parseRequest(request);
- 获取上传文件,进行分析(不是必须)
File remoteFile = new File(new String(fileItem.getName().getBytes(),"UTF-8"));
- 创建新对象,进行流拷贝
file1 = new File(this.getServletContext().getRealPath("attachment"),remoteFile.getName());
file1.getParentFile().mkdirs();
file1.createNewFile();

InputStream ins = fileItem.getInputStream();
OutputStream ous = new FileOutputStream(file1);

try{
    byte[] buffer = new byte[1024];
    int len = 0;
    while((len = ins.read(buffer)) > -1)
    ous.write(buffer,0,len);
    out.println("以保存文件"+file1.getAbsolutePath()+"<br/>");
}finally{
    ous.close();
    ins.close();
}
关于其他问题可以自行Google或者参考官方文档。
1.1.2 Spring MVC文件上传原理
1.1.2.1 初始化MultipartFile相关对象
我们大家都知道Spring MVC的入口类为 org.springframework.web.servlet.DispatcherServlet
,入口方法为 doDispatch
。通过这个方法可以找到文件处理相关的方法 checkMultipart
,如下所示:
protected void doDispatch(HttpServletRequest request, HttpServletResponse response) throws Exception {
        ...
            processedRequest = checkMultipart(request);
            multipartRequestParsed = (processedRequest != request);
        ...
}
该方法定义如下:
/**
     * Convert the request into a multipart request, and make multipart resolver available.
     * <p>If no multipart resolver is set, simply use the existing request.
     * @param request current HTTP request
     * @return the processed request (multipart wrapper if necessary)
     * @see MultipartResolver#resolveMultipart
     */
    protected HttpServletRequest checkMultipart(HttpServletRequest request) throws MultipartException {
        if (this.multipartResolver != null && this.multipartResolver.isMultipart(request)) {
            ......
            try {
                return this.multipartResolver.resolveMultipart(request);
            }
            catch (MultipartException ex) {
                ......
            }
        }
        // If not returned before: return original request.
        return request;
    }
上述方法中定义的multipartResolver对象即为 org.springframework.web.multipart.MultipartResolver
类型,其中一个实现类为 org.springframework.web.multipart.commons.CommonsMultipartResolver
,需要在配置类 org.fortune.doc.server.conf.web.SpringWebMvcConfiguration
加入Bean定义。如下所示:
@Bean
public CommonsMultipartResolver multipartResolver() {
    CommonsMultipartResolver multipartResolver = new CommonsMultipartResolver();
    return multipartResolver;
}
我们进入到 CommonsMultipartResolver
中可以发现其底层就是利用了Apache FileUpload组件。
Servlet-based {@link MultipartResolver} implementation for Servlet-based {@link MultipartResolver} implementation for 1.2 or above.
通过 this.multipartResolver.resolveMultipart(request)
方法我们可以知道,这个方法就是对 MultipartHttpServletRequest
类的一系列初始化操作。 MultipartHttpServletRequest
接口具有两个实现类( DefaultMultipartHttpServletRequest
和 StandardMultipartHttpServletRequest
),此处使用 DefaultMultipartHttpServletRequest
,两种加载方法, 一种是即时加载(初始化),一种是懒加载(初始化),通过变量resolveLazily实现自由切换,默认为即时加载(初始化),实现方法如下:
@Override
    public MultipartHttpServletRequest resolveMultipart(final HttpServletRequest request) throws MultipartException {
        Assert.notNull(request, "Request must not be null");
        if (this.resolveLazily) {
            return new DefaultMultipartHttpServletRequest(request) {
                @Override
                protected void initializeMultipart() {
                    MultipartParsingResult parsingResult = parseRequest(request);
                    setMultipartFiles(parsingResult.getMultipartFiles());
                    setMultipartParameters(parsingResult.getMultipartParameters());
                    setMultipartParameterContentTypes(parsingResult.getMultipartParameterContentTypes());
                }
            };
        }
        else {
            MultipartParsingResult parsingResult = parseRequest(request);
            return new DefaultMultipartHttpServletRequest(request, parsingResult.getMultipartFiles(),
                    parsingResult.getMultipartParameters(), parsingResult.getMultipartParameterContentTypes());
        }
    }
上述方法我们可以发现方法 MultipartParsingResult parsingResult = parseRequest(request);
,这个方法其实就是读取文件上传相关的对象,比如文件列表List<FileItem>, MultipartFile
, FileUpload
对象等。
* Parse the given servlet request, resolving its multipart elements.
     * @param request the request to parse
     * @return the parsing result
     * @throws MultipartException if multipart resolution failed.
     */
    protected MultipartParsingResult parseRequest(HttpServletRequest request) throws MultipartException {
        String encoding = determineEncoding(request);
        FileUpload fileUpload = prepareFileUpload(encoding);
        try {
            List<FileItem> fileItems = ((ServletFileUpload) fileUpload).parseRequest(request);
            return parseFileItems(fileItems, encoding);
        }
        ......
    }
上述代码很清晰的说明了我们在前一小节讲到的Apache FileUpload中的用法。
1.1.2.2 获取MultipartFile相关对象
通过上述介绍,我们已经得到了上传文件需要的一系列依赖对象,这时候我们就可以利用这些对象进行文件上传相关的操作了,比如本组件中文件上传时候需要得到request中的文件对象,就可以通过以下方法很方便的得到文件对象。
if (request instanceof MultipartHttpServletRequest) {
    MultipartHttpServletRequest mreqeust = (MultipartHttpServletRequest)request;
    String fileName = mreqeust.getParameter(Constants.FILE_NAME_KEY);
    MultipartFile file = mreqeust.getFile(Constants.FILE_DATA_KEY);
    .....
}
然后利用方法 org.springframework.web.multipart.MultipartFile#transferTo(java.io.File)
就可以获取到客户端传过来的真正的文件内容了。
1.2 客户端实现原理
为了能够使客户端发送Http请求变得容易,而且也方便开发人员测试接口(基于Http协议的),即提高了开发的效率,也方便提高代码的健壮性,这时候我们自然就想到了Apache的一个基于Http的客户端组件,它在3.x之前称为 Apache HttpClient ,在4.x之后成为 Apache HttpComponents 。
关于Apache HttpClient组件的官方说明如下:
The Commons HttpClient project is now end of life, and is no longer being developed. It has been replaced by the Apache HttpComponents project in its HttpClient and HttpCore modules, which offer better performance and more flexibility.
关于Apache HttpComponents组件的官方说明如下:
The Apache HttpComponents™ project is responsible for creating and maintaining a toolset of low level Java components focused on HTTP and associated protocols.
1.2.1 HttpComponents 介绍
通过其官网可知,HttpComponents组件具有以下几个主要的modules,
- HttpComponents Core:核心包
- HttpComponents Client:客户端处理包
- HttpComponents AsyncClient:具有异步功能的客户端处理包
1.2.2 HttpCore
HttpCore组件就是整个Http客户端组件的核心包,它包括两种I/O模型,阻塞I/O模型(Java IO)和非阻塞,事件驱动的I/O模型(Java NIO)。
HttpCore is a set of low level HTTP transport components that can be used to build custom client and server side HTTP services with a minimal footprint. HttpCore supports two I/O models: blocking I/O model based on the classic Java I/O and non-blocking, event driven I/O model based on Java NIO.
1.2.3 HttpClient
HttpClient组件是基于Http协议的一个组件,它依赖于HttpCore组件,它提供了可重用的在客户端权限验证,HTTP状态管理,HTTP连接管理等功能。
HttpClient is a HTTP/1.1 compliant HTTP agent implementation based on HttpCore. It also provides reusable components for client-side authentication, HTTP state management, and HTTP connection management. HttpComponents Client is a successor of and replacement for Commons HttpClient 3.x . Users of Commons HttpClient are strongly encouraged to upgrade.
使用HttpClient发送请求、接收响应很简单,一般需要如下几步即可:
- 创建HttpClient对象,HttpClients.createDefault()。
-
创建请求方法的实例,并指定请求URL。如果需要发送GET请求,创建HttpGet对象;如果需要发送POST请求,创建HttpPost对象,
HttpPost httpPost = new HttpPost(url)。 -
如果需要发送请求参数,可调用HttpGet、HttpPost共同的setParams(HetpParams params)方法来添加请求参数;对于HttpPost对象而言,也可调用setEntity(HttpEntity entity)方法来设置请求参数。
List<NameValuePair> valuePairs = new LinkedList<NameValuePair>();
valuePairs.add(new BasicNameValuePair(entry.getKey(),entry.getValue()));httpPost.setEntity(formEntity)
- 调用HttpClient对象的execute(HttpUriRequest request)发送请求,该方法返回一个HttpResponse。
- 调用HttpResponse的getAllHeaders()、getHeaders(String name)等方法可获取服务器的响应头;调用HttpResponse的getEntity()方法可获取HttpEntity对象,该对象包装了服务器的响应内容。程序可通过该对象获取服务器的响应内容。
- 释放连接。无论执行方法是否成功,都必须释放连接。
1.3 组件功能介绍
该组件基于Apache HTTPComponents组件实现,具有如下功能:文件上传,文件替换,文件删除,如果是图片的话,还可以生成缩略图等功能。使用简单,只需要引入commons-doc-client-http,即可以实现文件的以上操作。
本组件分为三个module,分别为:
- commons-doc-server-http:Http实现文件服务组件的服务端
- commons-doc-common:Http文件服务组件公共组件
- commons-doc-client-http:Http文件服务组件的客户端
2. 服务端
2.1 功能简介
服务端组件实现功能与Netty实现版本一致,具有以下功能:文件上传,文件替换,文件删除,如果是图片的话,还可以生成缩略图等功能。
2.2 实现步骤
同样的,不管是普通文件,还是图片处理,他们都有一个共同的基类 org.fortune.doc.server.handler.DocServerHandler
,然后文件处理基类 org.fortune.doc.server.handler.attachment.AttachmentServerHandler
继承自 DocServerHandler
,同理,图片处理基类 org.fortune.doc.server.handler.image.ImageServerHandler
也继承它。以文件处理为例,主要有以下几个实现类:
UploadAttachmentServerHandler
ReplaceAttachmentServerHandler
DeleteAttachmentServerHandler
实现以图片上传为例。
实现方法如下:
public ImageDocResult doUpload(HttpServletRequest request) {
        ImageDocResult result = new ImageDocResult();
        DocAccountBean accountBean = super.getAccount(request);
        if (accountBean == null) {
            result.buildFailed();
            result.buildCustomMsg("账号信息不对,请重新确认");
            return result;
        } else {
            if (request instanceof MultipartHttpServletRequest) {
                MultipartHttpServletRequest mreqeust = (MultipartHttpServletRequest)request;
                String fileName = mreqeust.getParameter(Constants.FILE_NAME_KEY);
                MultipartFile file = mreqeust.getFile(Constants.FILE_DATA_KEY);
                if (!file.isEmpty()) {
                    try {
                        String rootPath = super.getImageRootPath();
                        LOGGER.info("图片上传的根目录:{}",rootPath);
                        this.checkRootPath(rootPath);
                        String fileExt = fileName.substring(fileName.lastIndexOf(".") + 1).toLowerCase();
                        String savePath = super.getImageBasePath() + File.separator + FileUtil.generateFileSavePath(accountBean);
                        LOGGER.info("图片上传需要保存到数据库的目录:{}",savePath);
                        String dirPath = super.getRootPath() + File.separator + savePath;
                        LOGGER.info("图片上传绝对路径:{}",dirPath);
                        String newFileName = FileUtil.generateFileNameOfTime(fileName);
                        LOGGER.info("图片上传动态生成的图片文件名称:{}",newFileName);
                        String newFileName0 = newFileName.substring(0, newFileName.lastIndexOf("."));
                        this.checkStorePath(dirPath);
                        File uploadedFile3 = new File(dirPath, newFileName);
                        file.transferTo(uploadedFile3);
                        String thumbMark = request.getParameter(Constants.THUMB_MARK_KEY);
                        if (Constants.THUMB_MARK_VAL.equals(thumbMark)) {
                            List<ImageDocThumbBean> thumbBeans = accountBean.getThumbConfig();
                            if (thumbBeans != null) {
                                Iterator thumbBean = thumbBeans.iterator();
                                while(thumbBean.hasNext()) {
                                    ImageDocThumbBean thumb = (ImageDocThumbBean)thumbBean.next();
                                    File uploadedFile1 = new File(dirPath, newFileName0 + thumb.getSuffix() + "." + fileExt);
                                    LOGGER.info("图片上传动态生成的缩略图图片文件:{}",uploadedFile1);
                                    ImageUtils.ratioZoom2(uploadedFile3, uploadedFile1, thumb.getRatio());
                                }
                            }
                        }
                        result.setFilePath(savePath + File.separator + newFileName);
                        result.buildSuccess();
                        LOGGER.info("图片上传成功,路径为{}",result.getFilePath());
                    } catch (Exception ex) {
                        result.buildFailed();
                        LOGGER.error("图片上传失败", ex);
                    }
                } else {
                    result.buildFailed();
                    LOGGER.error("图片上传失败,上传的文件未提供");
                }
            }
            return result;
        }
    }
由上述代码可知,其核心逻辑就是判断当前的request是否是 MultipartHttpServletRequest
类型,如果是,则说明当前是文件处理逻辑,根据前面章节的说明,我们可以根据此对象获取到相应的 MultipartFile
对象进行相应的文件操作,如 file.transferTo(uploadedFile3);
这句代码即为文件上传核心代码。
3. 客户端
3.1 功能简介
客户端组件也是跟Netty实现版本一致,主要提供对外访问服务端组件的接口,提供以下接口:文件上传,文件替换,文件删除,如果是图片的话,还可以生成缩略图等功能。
3.2 实现步骤
不管是普通的文件处理,还是图片处理,他们都有一个抽象类 org.fortune.doc.client.handler.AbstractDocClientHandler
该类主要是一些参数配置等公共方法,然后其有三个子抽象类,分别如下:
AbstractUploadDocClientHandler
AbstractReplaceDocClientHandler
AbstractDeleteDocClientHandler
然后文件处理和图片处理分别有对应的实现类,大家可以参考Github实现,在此说明一下,不管是哪个实现类,最后都会调用一个包装类 org.fortune.doc.client.support.DocClientWrapper
,该类封装了Apache HttpClient的基本配置和基本操作。核心方法doPost实现如下:
public DocResponseContent doPost(String uri, String urlEncoding) throws HttpException, IOException {
        HttpEntity entity = null;
        HttpRequestBase request = null;
        CloseableHttpResponse response = null;

        try {
            String url = this.buildUrl(uri);
            HttpPost httpPost = new HttpPost(url);
            MultipartEntityBuilder entityBuilder = MultipartEntityBuilder.create();
            entityBuilder.setMode(HttpMultipartMode.BROWSER_COMPATIBLE);
            Iterator<NameValuePair> nameValuePairIterator = this.getNVBodies().iterator();

            while(nameValuePairIterator.hasNext()) {
                NameValuePair nameValuePair = nameValuePairIterator.next();
                entityBuilder.addPart(nameValuePair.getName(), new StringBody(nameValuePair.getValue(), ContentType.create("text/plain", urlEncoding)));
            }

            Iterator it = this.getContentBodies().entrySet().iterator();

            while(it.hasNext()) {
                Map.Entry<String, ContentBody> item = (Map.Entry)it.next();
                entityBuilder.addPart(item.getKey(), item.getValue());
            }

            entityBuilder.setCharset(CharsetUtils.get(urlEncoding));
            httpPost.setEntity(entityBuilder.build());
            request = httpPost;
            response = this.client.execute(httpPost);
            StatusLine statusLine = response.getStatusLine();
            entity = response.getEntity();
            DocResponseContent ret = new DocResponseContent();
            ret.setStatusCode(statusLine.getStatusCode());
            this.getResponseContent(entity, ret);
            DocResponseContent var12 = ret;
            return var12;
        } finally {
            this.close(entity, request, response);
        }
    }
以上方法其实就是我们前面讲解的客户端实现原理章节中的内容了。
4. 操作指引
该文件服务组件的使用需要分为两个部分,一个是服务端配置与启动,一个是客户端的配置与启动。
配置基本上与Netty实现版本是一致的,只是细微的差别。
4.1 服务端配置与启动
4.1.1 配置
服务端的配置采用yml文件的配置,更加的简洁明了,主要的注意点是文件存放位置的配置,在开发过程中,可以有两种方式配置:
-
Idea自启动方式:如果采用此种方式则需要把rootPath配置到工程路径下(target目录),如下所示:
# 在idea中执行的话,需要配置target目录下的打包文件 rootPath: C:/03_code/idea_workspace/fortune-commons/commons-doc-server-http/target/commons-doc-server-http/ #上传文件的根目录,实际工作环境按照实际情况更改即可 -
打包后在tomcat独立启动方式
# 也可以单独把打包后的war包拷贝到tomcat webapp目录下直接运行也可以
    rootPath: C:/05_webserver/apache-tomcat-8.5.42/webapps/doc-server #上传文件的根目录,实际工作环境按照实际情况更改即可
4.1.2 启动
本文采用的是idea自启动方式,则需要配置一下tomcat路径,以及引入相应的module即可,如下图所示:
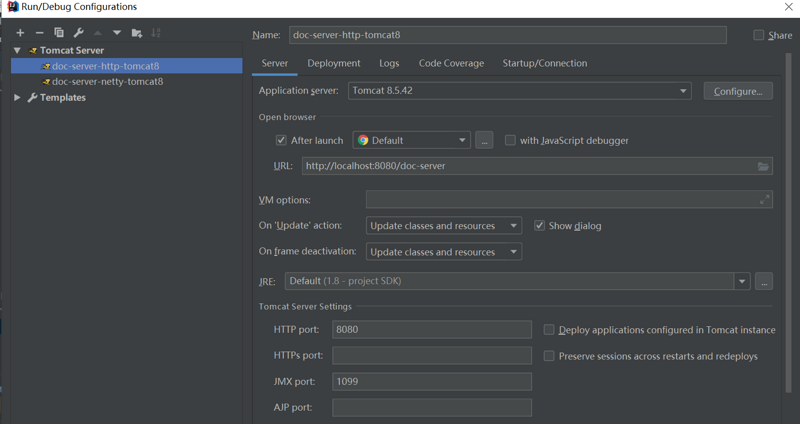
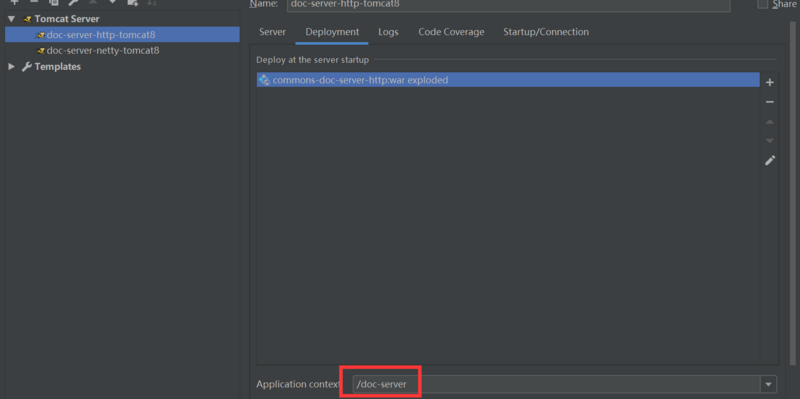
需要注意的是,在Deployment页签,需要配置该项目访问的Application Context,否则有可能启动后出现404的情况。如下图所示:
配置完成即可启动文件服务组件,如下图即为启动信息日志:
2019-08-04  22:07:17.484 [RMI TCP Connection(5)-127.0.0.1] INFO  org.springframework.web.context.ContextLoader - Root WebApplicationContext: initialization started
2019-08-04  22:07:19.211 [RMI TCP Connection(5)-127.0.0.1] INFO  org.fortune.commons.core.cglib.BeanCopierContainer - 创建模型的BeanCopier,start...
2019-08-04  22:07:19.214 [RMI TCP Connection(5)-127.0.0.1] INFO  org.fortune.commons.core.cglib.BeanCopierContainer - 创建模型的BeanCopier,end;size=0
2019-08-04  22:07:20.158 [RMI TCP Connection(5)-127.0.0.1] INFO  org.fortune.commons.core.help.BeanInitializeCompletedListener - spring conf 容器初始化完毕..处理启动之后事件--start
2019-08-04  22:07:20.164 [RMI TCP Connection(5)-127.0.0.1] INFO  org.fortune.doc.server.DocServerContainer - 加入账户:fortune
2019-08-04  22:07:20.164 [RMI TCP Connection(5)-127.0.0.1] INFO  org.fortune.doc.server.DocServerContainer - 加入账户:fortune0
2019-08-04  22:07:20.166 [RMI TCP Connection(5)-127.0.0.1] INFO  org.fortune.doc.server.DocServerContainer - 加入默认账户:Account{userName='default_account', password='lyx', rootPath='C:/05_webserver/apache-tomcat-8.5.42/bin/', level=1, thumbHeight=20, thumbWidth=20}
2019-08-04  22:07:20.166 [RMI TCP Connection(5)-127.0.0.1] INFO  org.fortune.commons.core.help.BeanInitializeCompletedListener - spring conf 容器初始化完毕..处理启动之后事件--end
2019-08-04  22:07:20.182 [RMI TCP Connection(5)-127.0.0.1] INFO  org.springframework.web.context.ContextLoader - Root WebApplicationContext initialized in 2690 ms
2019-08-04  22:07:20.198 [RMI TCP Connection(5)-127.0.0.1] INFO  org.springframework.web.servlet.DispatcherServlet - Initializing Servlet 'doc-server'
2019-08-04  22:07:20.337 [RMI TCP Connection(5)-127.0.0.1] INFO  org.springframework.web.servlet.DispatcherServlet - Completed initialization in 138 ms
[2019-08-04 10:07:20,366] Artifact commons-doc-server-http:war exploded: Artifact is deployed successfully
[2019-08-04 10:07:20,366] Artifact commons-doc-server-http:war exploded: Deploy took 6,004 milliseconds
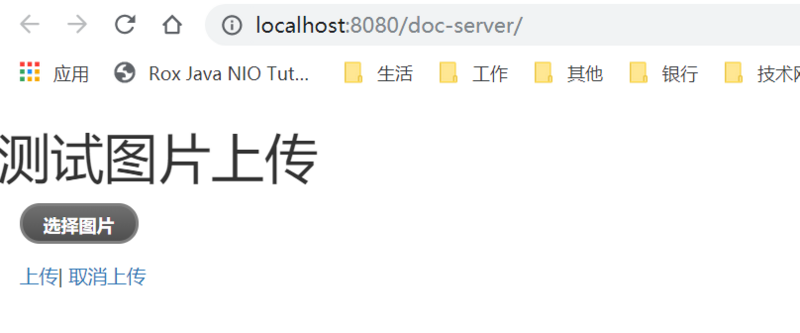
然后就可以访问如下页面,显示如下:

如果是初次启动上述服务,并且当前浏览器未安装Flash控件,则可能会出现上述截图所示的情况,点击安装即可。安装完成不出意外的话,则是如下画面,
选择图
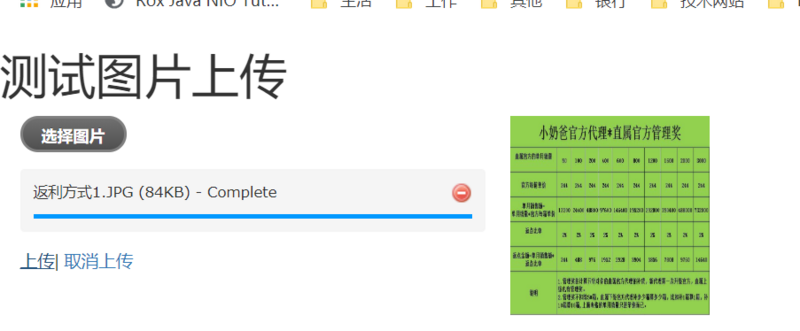
下结果,
![图片上传中...]
并且在控制台打印出的日志如下:
2019-08-04  22:10:28.207 [http-nio-8080-exec-10] INFO  org.fortune.doc.server.handler.image.UploadImageServerHandler - 图片上传的根目录:C:/03_code/idea_workspace/fortune-commons/commons-doc-server-http/target/commons-doc-server-http///images
2019-08-04  22:10:28.210 [http-nio-8080-exec-10] INFO  org.fortune.doc.server.handler.image.UploadImageServerHandler - 图片上传需要保存到数据库的目录:images/fortune/0/
2019-08-04  22:10:28.210 [http-nio-8080-exec-10] INFO  org.fortune.doc.server.handler.image.UploadImageServerHandler - 图片上传绝对路径:C:/03_code/idea_workspace/fortune-commons/commons-doc-server-http/target/commons-doc-server-http///images/fortune/0/
2019-08-04  22:10:28.210 [http-nio-8080-exec-10] INFO  org.fortune.doc.server.handler.image.UploadImageServerHandler - 图片上传动态生成的图片文件名称:190804221028_9605.JPG
2019-08-04  22:10:28.212 [http-nio-8080-exec-10] INFO  org.fortune.doc.server.handler.image.UploadImageServerHandler - 图片上传成功,路径为images/fortune/0//190804221028_9605.JPG
可以看出,我们的图片保存到相对路径为 images/fortune/0//190804221028_9605.JPG
的地方,在idea的target目录下也可以看到该图片,如下所示:
我们可以通过如下地址进行访问,
http://localhost:8080/doc-server/images/fortune/0/190804221028_9605.JPG
,关于如何得到图片地址,则在客户端工具类中有相应的方法获取。
4.2 客户端配置与启动
4.2.1 配置
客户端的配置比较简单,也是采用yml文件方式配置如下:
#上传成功后,访问文件的正确方式为:
# ${host}:${port}/${domainName}/${type}/${path}
# appName为远程文件服务app名称,比如doc-server
# type 为images/attaches
# path为文件上传后服务端返回的文件相对路径
#http://localhost:8080/doc-server/images/fortune/20190629/1561769031017.jpg
upload:
  server:
    port: 8080 #需要配置的是远程文件服务器的tomcat的端口号,非远程文件服务netty端口号
    host: 127.0.0.1
    domainName: doc-server
  userName: fortune
  password: fortune
需要注意的是,文件访问的端口号跟远程文件服务器netty对应的端口是不一样的,这点需要特别注意。在调用文件服务返回的路径的时候,需要用到服务端访问文件的地址,进而访问相应的文件内容。可通过方法 org.fortune.doc.client.DocClientContainer#getDocServerUrl
得到相应的服务端地址,再拼接上返回的相对路径,即可得到文件的完整地址了。
4.2.2 启动/调用
客户端单元测试用例如下:
package org.fortune.doc.client;

import org.fortune.commons.core.conf.ApplicationContextHelperConfiguration;
import org.fortune.commons.core.conf.SettingsConfiguration;
import org.fortune.doc.client.conf.DocClientConfiguration;
import org.junit.Test;
import org.junit.runner.RunWith;
import org.springframework.test.context.ContextConfiguration;
import org.springframework.test.context.junit4.SpringJUnit4ClassRunner;

import java.io.File;

/**
 * @author: landy
 * @date: 2019/5/30 23:37
 * @description:
 */
@RunWith(SpringJUnit4ClassRunner.class) //调用Spring单元测试类
@ContextConfiguration(classes = {
        SettingsConfiguration.class,  // common settings configuration
        DocClientConfiguration.class,
        ApplicationContextHelperConfiguration.class
}) //加载Spring配置文件
public class DocClientTest {

    @Test
    public void test() {
        //DocClient.doImageUpload("psb.jpg", new File("C://06_temp//psb.jpg"));
        //DocClient.doImageDelete("images//fortune//b//190707114835_9573.jpg");
        DocClient.doImageReplace("images//fortune//f////190707114616_3742.JPG", new File("C://06_temp//psb.jpg"));
    }

    @Test
    public void docServerUrl() {
        System.out.println(DocClientContainer.getInstance().getDocServerUrl());
    }

}
同样的服务端也会显示出上述相似的日志信息。
正文到此结束
- 本文标签: Connection 删除 ORM bus tk apache remote description IDE App list Webapps http bean 模型 stream java 端口 tar 数据 CEO value core constant id junit spring tab UI TCP key final entity Service 服务端 单元测试 rmi 测试 https 配置 代码 实例 开发 src Transport HTTP协议 Agent 目录 协议 git 安装 GitHub DOM 缩略图 lib 文章 IO cglib 服务器 ip map Google parse dependencies client ACE NIO equals root tomcat cat Netty 解析 参数 build Word 图片 LinkedList 2019 web servlet 数据库 管理 HTML 文件上传
- 版权声明: 本文为互联网转载文章,出处已在文章中说明(部分除外)。如果侵权,请联系本站长删除,谢谢。
- 本文海报: 生成海报一 生成海报二
热门推荐


相关文章


Loading...
![[HBLOG]公众号](http://www.liuhaihua.cn/img/qrcode_gzh.jpg)

