一看就会,编写自己的SpringBoot-Starter
开发自己的starter
starter的好处是,集成众多依赖,提供一个一站式的依赖项。 Starter相当于模块,它能将模块所需的依赖整合起来并对模块内的Bean根据环境( 条件)进行自动配置。 使用者只需要依赖相应功能的Starter,无需做过多的配置和依赖, Spring Boot就能自动扫描并加载相应的模块。
命名
spring官方的starter命令为spring-boot-starter-xxx,所以我们开发的项目不要以spring-boot开头。 建议写成:xxx公司组织-spring-boot-starter-yyy模块
开发步骤
1.新建Maven项目,在项目的POM文件中定义使用的依赖;
2.新建配置类,写好配置项和默认的配置值,指明配置项前缀;
3.新建自动装配类,使用@Configuration和@Bean来进行自动装配;
4.新建spring.factories文件,指定Starter的自动装配类;
具体代码
1,新建一个springboot项目,在pom文件中增加以下依赖:
<dependency>
 <groupId>org.springframework.boot</groupId>
 <artifactId>spring-boot-configuration-processor</artifactId>
 <optional>true</optional>
</dependency>
主要的作用是在编译时在META-INF下生成spring-configuration-metadata.json 文件,该文件主要为IDE使用。 即可以通过在application.properties文件中通过ctrl + 点击进入配置属性所在的类中
2,配置类
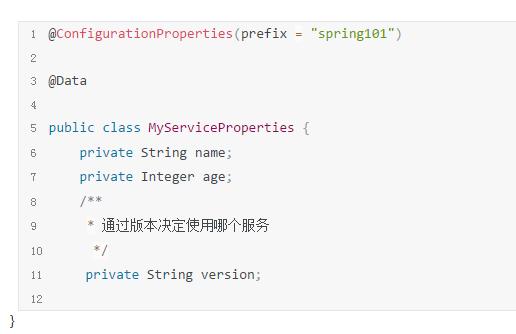
关键是要指定配置项的前缀。这些配置项,也可以设置默认值。
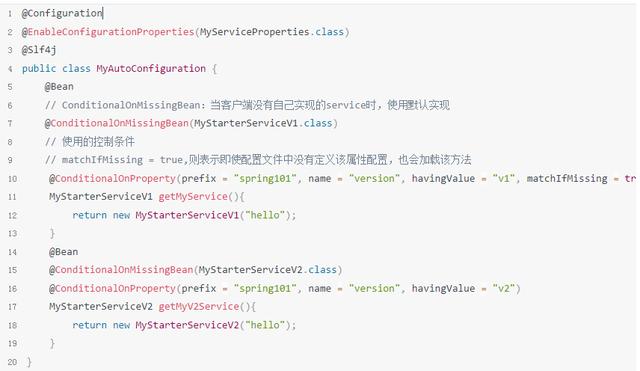
3,自动装配类
自动装配类是整个starter的逻辑核心。根据配置项的值,自动注入合适的bean。
在这个项目中,有一个抽象的AbstractMyService,代表客户端会使用的服务bean。
MyStarterServiceV1和MyStarterServiceV2是根据条件注入的具体实现类。
也就是客户端在配置spring101.version=v1会使用MyStarterServiceV1,
配置spring101.version=v2会使用MyStarterServiceV2
4,新建spring.factories文件,指定Starter的自动装配类。
在resources下新建META-INF文件夹,新建spring.factories文件。内容为:
#指定autoconfigure加载的自动装配类是哪个
org.springframework.boot.autoconfigure.EnableAutoConfiguration=com.uncley.MyAutoConfiguration
5,打包测试
maven clean install
先install到本地仓库测试
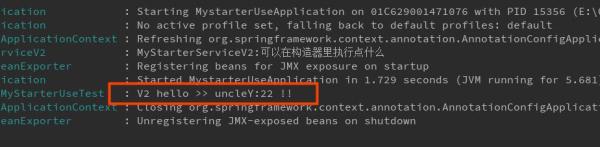
新创建一个普通的springboot工程:mystarter-use 依赖 在application.properties增加配置
spring101.age=22
spring101.name=uncleY
spring101.version=v2
写一个测试类
@Component
@Slf4j
public class MyStarterUseTest implements CommandLineRunner {
 @Autowired
 private AbstractMyService myService;
 @Override
 public void run(String... args) throws Exception {
 log.info(myService.hello());
 }
}
通过修改spring101.version的值可以观察到,实例化了不同的service
正文到此结束
热门推荐


相关文章


Loading...
![[HBLOG]公众号](http://www.liuhaihua.cn/img/qrcode_gzh.jpg)

