走进JavaWeb技术世界5:初探Tomcat的HTTP请求过程
微信公众号【Java技术江湖】一位阿里 Java 工程师的技术小站。(关注公众号后回复”Java“即可领取 Java基础、进阶、项目和架构师等免费学习资料,更有数据库、分布式、微服务等热门技术学习视频,内容丰富,兼顾原理和实践,另外也将赠送作者原创的Java学习指南、Java程序员面试指南等干货资源)


初探Tomcat的HTTP请求过程

前言:
1.作为Java开发人员,大多都对Tomcat不陌生,由Apache基金会提供技术支持与维护,因为其免费开源且易用,作为Web服务器深受市场欢迎,所以有必要对其进行深入的研究,本系列皆以Tomcat 8.5为研究课题,下载地址: https://tomcat.apache.org/download-80.cgi
2.下图为 apache-tomcat-8.5.23.zip 在windows解压后的目录。
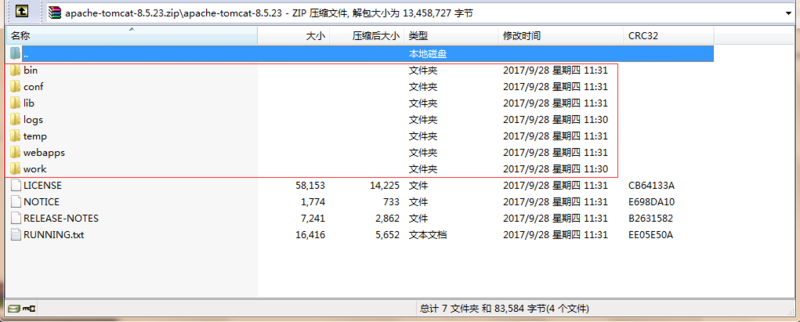
下面是解压后的一些关键目录:
* /bin - 启动和停止服务等批处理文件. ( *.sh) 文件 (为Unix系统)、 (*.bat) 文件 (for Windows系统)是一个功能性的复制文件. 自从Win32 command-line 开始是一些单一的,缺乏功能的组件, 现在有一些拓展性的功能
* /conf - 配置文件和一些相关的DTD文件. 最重要的是 server.xml. 它是这个容器最主要的配置文件.
* /logs - 日志文件会打印到这里
* /webapps - 这里是你的应用程序部署的地方.
3.从最本质上讲,tomcat为一个servlet容器,首先研究一下Tomcat的架构,如下图:
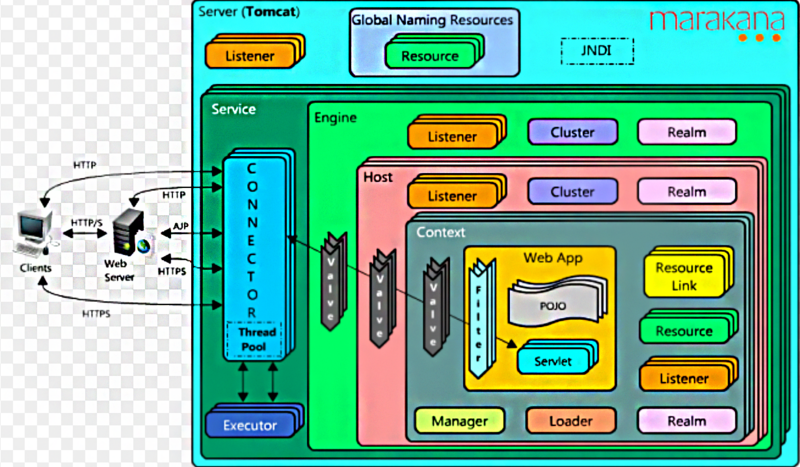
架构诠释:
1.Server(服务器)是Tomcat构成的顶级构成元素,所有一切均包含在Server中,Server的实现类StandardServer可以包含一个到多个Services,Service的实现类为StandardService调用了容器(Container)接口,其实是调用了Servlet Engine(引擎),而且StandardService类中也指明了该Service归属的Server;
2.Container: 引擎(Engine)、主机(Host)、上下文(Context)和Wraper均继承自Container接口,所以它们都是容器。但是,它们是有父子关系的,在主机(Host)、上下文(Context)和引擎(Engine)这三类容器中,引擎是顶级容器,直接包含是主机容器,而主机容器又包含上下文容器,所以引擎、主机和上下文从大小上来说又构成父子关系,虽然它们都继承自Container接口。
3.连接器(Connector)将Service和Container连接起来,首先它需要注册到一个Service,它的作用就是把来自客户端的请求转发到Container(容器),这就是它为什么称作连接器的原因。
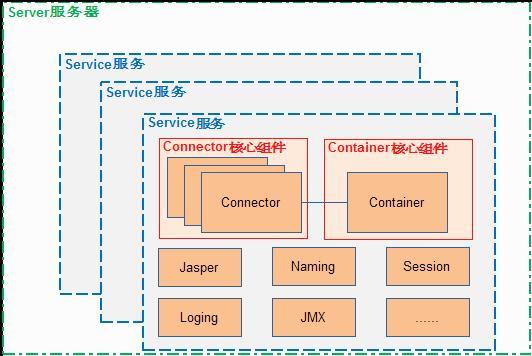
从功能的角度将Tomcat源代码分成5个子模块,分别是:
Jsper模块: 这个子模块负责jsp页面的解析、jsp属性的验证,同时也负责将jsp页面动态转换为java代码并编译成class文件。在Tomcat源代码中,凡是属于org.apache.jasper包及其子包中的源代码都属于这个子模块;
Servlet和Jsp模块: 这个子模块的源代码属于javax.servlet包及其子包,如我们非常熟悉的javax.servlet.Servlet接口、javax.servet.http.HttpServlet类及javax.servlet.jsp.HttpJspPage就位于这个子模块中;
Catalina模块: 这个子模块包含了所有以org.apache.catalina开头的java源代码。该子模块的任务是规范了Tomcat的总体架构,定义了Server、Service、Host、Connector、Context、Session及Cluster等关键组件及这些组件的实现,这个子模块大量运用了Composite设计模式。同时也规范了Catalina的启动及停止等事件的执行流程。从代码阅读的角度看,这个子模块应该是我们阅读和学习的重点。
Connector模块: 如果说上面三个子模块实现了Tomcat应用服务器的话,那么这个子模块就是Web服务器的实现。所谓连接器(Connector)就是一个连接客户和应用服务器的桥梁,它接收用户的请求,并把用户请求包装成标准的Http请求(包含协议名称,请求头Head,请求方法是Get还是Post等等)。同时,这个子模块还按照标准的Http协议,负责给客户端发送响应页面,比如在请求页面未发现时,connector就会给客户端浏览器发送标准的Http 404错误响应页面。
Resource模块: 这个子模块包含一些资源文件,如Server.xml及Web.xml配置文件。严格说来,这个子模块不包含java源代码,但是它还是Tomcat编译运行所必需的。
Tomcat的组织结构
-
Tomcat是一个基于组件的服务器,它的构成组件都是可配置的,其中最外层的是Catalina servlet容器,其他组件按照一定的格式要求配置在这个顶层容器中。
Tomcat的各种组件都是在Tomcat安装目录下的/conf/server.xml文件中配置的。
由Server.xml的结构看Tomcat的体系结构
| 123456789101112 | < `Server > //顶层类元素,可以包括多个Service < Service > //顶层类元素,可包含一个Engine,多个Connecter < Connector > //连接器类元素,代表通信接口 < Engine > //容器类元素,为特定的Service组件处理客户请求,要包含多个Host < Host > //容器类元素,为特定的虚拟主机组件处理客户请求,可包含多个Context < Context > //容器类元素,为特定的Web应用处理所有的客户请求 </ Context > </ Host > </ Engine > </ Connector > </ Service > </ Server >` |
|---|
实际源码如下:
| 123456789101112131415161718192021222324252627282930313233343536373839404142434445464748495051525354555657585960616263646566676869707172737475767778798081828384858687888990919293949596979899100101102103104105106107108109 | <? `xml version='1.0' encoding='utf-8'?> < Server port="8005" shutdown="SHUTDOWN"> < Listener className="org.apache.catalina.startup.VersionLoggerListener" /> <!-- Security listener. Documentation at /docs/config/listeners.html <Listener className="org.apache.catalina.security.SecurityListener" /> --> <!--APR library loader. Documentation at /docs/apr.html --> < Listener className="org.apache.catalina.core.AprLifecycleListener" SSLEngine="on" /> <!--Initialize Jasper prior to webapps are loaded. Documentation at /docs/jasper-howto.html --> < Listener` `className="org.apache.catalina.core.JasperListener" /> <!-- Prevent memory leaks due to use of particular java/javax APIs--> < Listener className="org.apache.catalina.core.JreMemoryLeakPreventionListener" /> < Listener className="org.apache.catalina.mbeans.GlobalResourcesLifecycleListener" /> < Listener className="org.apache.catalina.core.ThreadLocalLeakPreventionListener" /> <!-- Global JNDI resources Documentation at /docs/jndi-resources-howto.html --> < GlobalNamingResources > <!-- Editable user database that can also be used by UserDatabaseRealm to authenticate users --> < Resource` `name="UserDatabase" auth="Container" type="org.apache.catalina.UserDatabase" description="User database that can be updated and saved" factory="org.apache.catalina.users.MemoryUserDatabaseFactory" pathname="conf/tomcat-users.xml" /> </ GlobalNamingResources > <!-- A "Service" is a collection of one or more "Connectors" that share a single "Container" Note: A "Service" is not itself a "Container", so you may not define subcomponents such as "Valves" at this level. Documentation at /docs/config/service.html --> < Service` `name="Catalina"> <!--The connectors can use a shared executor, you can define one or more named thread pools--> <!-- <Executor name="tomcatThreadPool" namePrefix="catalina-exec-" maxThreads="150" minSpareThreads="4"/> --> <!-- A "Connector" represents an endpoint by which requests are received and responses are returned. Documentation at : Java HTTP Connector: /docs/config/http.html (blocking & non-blocking) Java AJP Connector: /docs/config/ajp.html APR (HTTP/AJP) Connector: /docs/apr.html Define a non-SSL HTTP/1.1 Connector on port 8080 --> < Connector` `port="8080" protocol="HTTP/1.1" connectionTimeout="20000" redirectPort="8443" /> <!-- A "Connector" using the shared thread pool--> <!-- <Connector executor="tomcatThreadPool" port="8080" protocol="HTTP/1.1" connectionTimeout="20000" redirectPort="8443" /> --> <!-- Define a SSL HTTP/1.1 Connector on port 8443 This connector uses the BIO implementation that requires the JSSE style configuration. When using the APR/native implementation, the OpenSSL style configuration is required as described in the APR/native documentation --> <!-- <Connector port="8443" protocol="org.apache.coyote.http11.Http11Protocol" maxThreads="150" SSLEnabled="true" scheme="https" secure="true" clientAuth="false" sslProtocol="TLS" /> --> <!-- Define an AJP 1.3 Connector on port 8009 --> < Connector` `port="8009" protocol="AJP/1.3" redirectPort="8443" /> <!-- An Engine represents the entry point (within Catalina) that processes every request. The Engine implementation for Tomcat stand alone analyzes the HTTP headers included with the request, and passes them on to the appropriate Host (virtual host). Documentation at /docs/config/engine.html --> <!-- You should set jvmRoute to support load-balancing via AJP ie : <Engine name="Catalina" defaultHost="localhost" jvmRoute="jvm1"> --> < Engine` `name="Catalina" defaultHost="localhost"> <!--For clustering, please take a look at documentation at: /docs/cluster-howto.html (simple how to) /docs/config/cluster.html (reference documentation) --> <!-- <Cluster className="org.apache.catalina.ha.tcp.SimpleTcpCluster"/> --> <!-- Use the LockOutRealm to prevent attempts to guess user passwords via a brute-force attack --> < Realm` `className="org.apache.catalina.realm.LockOutRealm"> <!-- This Realm uses the UserDatabase configured in the global JNDI resources under the key "UserDatabase". Any edits that are performed against this UserDatabase are immediately available for use by the Realm. --> < Realm` `className="org.apache.catalina.realm.UserDatabaseRealm" resourceName="UserDatabase"/> </ Realm > < Host` `name="localhost" appBase="webapps" unpackWARs="true" autoDeploy="true"> <!-- SingleSignOn valve, share authentication between web applications Documentation at: /docs/config/valve.html --> <!-- <Valve className="org.apache.catalina.authenticator.SingleSignOn" /> --> <!-- Access log processes all example. Documentation at: /docs/config/valve.html Note: The pattern used is equivalent to using pattern="common" --> < Valve className="org.apache.catalina.valves.AccessLogValve" directory="logs" prefix="localhost_access_log." suffix=".txt" pattern="%h %l %u %t "%r" %s %b" /> </ Host > </ Engine > </ Service > </ Server >` |
|---|
由上可得出Tomcat的体系结构:
图一:Tomcat的体系结构
由上图可看出Tomca的心脏是两个组件:Connecter和Container。一个Container可以选择多个Connecter,多个Connector和一个Container就形成了一个Service。Service可以对外提供服务,而Server服务器控制整个Tomcat的生命周期。
Tomcat Server处理一个HTTP请求的过程
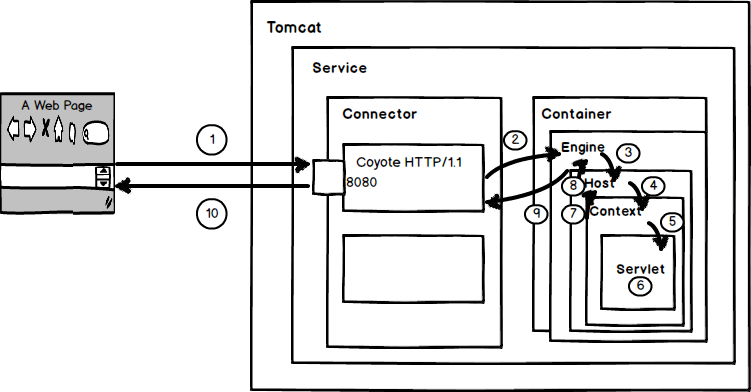
图三:Tomcat Server处理一个HTTP请求的过程
Tomcat Server处理一个HTTP请求的过程
1、用户点击网页内容,请求被发送到本机端口8080,被在那里监听的Coyote HTTP/1.1 Connector获得。
2、Connector把该请求交给它所在的Service的Engine来处理,并等待Engine的回应。
3、Engine获得请求localhost/test/index.jsp,匹配所有的虚拟主机Host。
4、Engine匹配到名为localhost的Host(即使匹配不到也把请求交给该Host处理,因为该Host被定义为该Engine的默认主机),名为localhost的Host获得请求/test/index.jsp,匹配它所拥有的所有的Context。Host匹配到路径为/test的Context(如果匹配不到就把该请求交给路径名为“ ”的Context去处理)。
5、path=“/test”的Context获得请求/index.jsp,在它的mapping table中寻找出对应的Servlet。Context匹配到URL PATTERN为*.jsp的Servlet,对应于JspServlet类。
6、构造HttpServletRequest对象和HttpServletResponse对象,作为参数调用JspServlet的doGet()或doPost().执行业务逻辑、数据存储等程序。
7、Context把执行完之后的HttpServletResponse对象返回给Host。
8、Host把HttpServletResponse对象返回给Engine。
9、Engine把HttpServletResponse对象返回Connector。
10、Connector把HttpServletResponse对象返回给客户Browser。
正文到此结束
- 本文标签: 目录 编译 remote description UI 程序员 参数 lib 免费 executor 本质 部署 ssl 端口 tar 基金 App 组织 client 下载 ORM 工程师 微服务 服务器 windows 配置 CTO list example Word bean 分布式 BIO web tab js 安装 TCP key Connection 生命 Service id JVM apache unix https map 设计模式 XML Webapps http Clustering MQ session zip authenticate ip apr 代码 Document java基础 主机 Security HTTP协议 update 源码 tomcat cat API 解析 开源 core 微信公众号 Collection 架构师 java 协议 servlet 数据库 数据 HTML 开发 src Listeners IO Thread pool
- 版权声明: 本文为互联网转载文章,出处已在文章中说明(部分除外)。如果侵权,请联系本站长删除,谢谢。
- 本文海报: 生成海报一 生成海报二
热门推荐


相关文章

近期评论
-
你这基本没有更新呀,最近文章显示还是2019年的文章。不符合要求哈
-
关键词:慕云博客 链接:https://www.lilun.me 描述:分享原创文字的个人博客
-
-
-
可以提供一下源码吗
-
不是商业站,鸡娃学习笔记
-
-
-
-
听他们说很厉害的样子
Loading...
![[HBLOG]公众号](http://www.liuhaihua.cn/img/qrcode_gzh.jpg)

