Spring Boot实战(二):Spring Boot连接MySQL数据库
上篇 Spring Boot实战(一):只需两步!Eclipse+Maven快速构建第一个Spring Boot项目 已经构建了一个Spring Boot项目,本文在此基础上使用Hibernate进行连接MySQL数据库的操作。
1. pom.xml添加依赖
<dependency>
            <groupId>org.springframework.boot</groupId>
            <artifactId>spring-boot-starter-data-jpa</artifactId>
        </dependency>

        <dependency>
            <groupId>mysql</groupId>
            <artifactId>mysql-connector-java</artifactId>
        </dependency>
复制代码
2. application.properties添加数据库配置
spring.datasource.url=jdbc:mysql://localhost:3306/spring_boot?serverTimezone=GMT%2B8
spring.datasource.username=root
spring.datasource.password=123456
spring.datasource.driver-class-name=com.mysql.cj.jdbc.Driver

spring.jpa.properties.hibernate.hbm2ddl.auto=update
spring.jpa.properties.hibernate.dialect=org.hibernate.dialect.MySQL5InnoDBDialect
spring.jpa.show-sql= true
复制代码
如果数据库连接写成spring.datasource.url=jdbc: mysql://localhost:3306/spring_boot ,由于MySQL版本的问题,可能会有以下的错误,在后面加上“?serverTimezone=GMT%2B8”,设置下时区,解决。

设置驱动,spring.datasource.driver-class-name=com.mysql.jdbc.Driver会有下面红色的警告信息。说的是 com.mysql.jdbc.Driver 被弃用了,要使用新的驱动 com.mysql.cj.jdbc.Driver1 ,改成 com.mysql.cj.jdbc.Driver 以后一切正常。
Loading class com.mysql.jdbc.Driver'. This is deprecated. The new driver class is `com.mysql.cj.jdbc.Driver'. The driver is automatically registered via the SPI and manual loading of the driver class is generally unnecessary.

3. 添加实体类
@Entity代表这是一个实体类,@Table(name=”user”)用来对应数据库中的use表,@Id用来表达主键,@Column(name=”id”)表明一个id属性。
@GeneratedValue使主键自增,如果还有疑问,可参考 @GeneratedValue源码解析 。
package com.example.demo.domain;

import java.io.Serializable;

import javax.persistence.Column;
import javax.persistence.Entity;
import javax.persistence.GeneratedValue;
import javax.persistence.Id;
import javax.persistence.Table;

@Entity
@Table(name = "user")
public class User implements Serializable {

    private static final long serialVersionUID = 1L;

    @Id
    @GeneratedValue
    private Long id;
    @Column(name = "username")
    private String userName;
    @Column(name = "password")
    private String passWord;

    public User() {
        super();
    }

    public User(String userName, String passWord) {
        super();
        this.userName = userName;
        this.passWord = passWord;
    }

    public Long getId() {
        return id;
    }

    public void setId(Long id) {
        this.id = id;
    }

    public String getUserName() {
        return userName;
    }

    public void setUserName(String userName) {
        this.userName = userName;
    }

    public String getPassWord() {
        return passWord;
    }

    public void setPassWord(String passWord) {
        this.passWord = passWord;
    }

}
复制代码
4. 添加Dao
Dao层主要用来实现对数据库的增、删、查、改。 dao只要继承JpaRepository类就可以,几乎可以不用写方法,可以根据方法名来自动的生产SQL,比如findByUserName 会自动生产一个以 userName 为参数的查询方法。
package com.example.demo.dao;

import org.springframework.data.jpa.repository.JpaRepository;
import com.example.demo.domain.User;

public interface UserRepository extends JpaRepository<User, Long> {
    User findByUserName(String userName);

}
复制代码
5. 添加Controller
package com.example.demo.controller;

import java.util.ArrayList;
import java.util.List;

import org.springframework.beans.factory.annotation.Autowired;
import org.springframework.web.bind.annotation.RequestMapping;
import org.springframework.web.bind.annotation.ResponseBody;
import org.springframework.web.bind.annotation.RestController;

import com.example.demo.dao.UserRepository;
import com.example.demo.domain.User;

@RestController
@RequestMapping("user")
public class UserController {

   @Autowired
   private UserRepository userRepository;

   @RequestMapping("/getAllUser")
   @ResponseBody
   public List<User> findAll() {
       List<User> list = new ArrayList<User>();
       list = userRepository.findAll();
       return list;
   }

   @RequestMapping("/getByUserName")
   @ResponseBody
   public User getByUserName(String userName) {
       User user = userRepository.findByUserName(userName);
       return user;
   }

}
复制代码
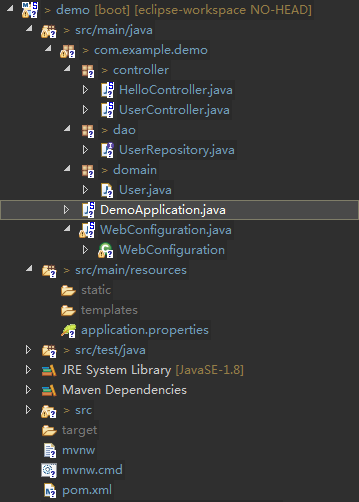
工程添加文件后工程结构图:
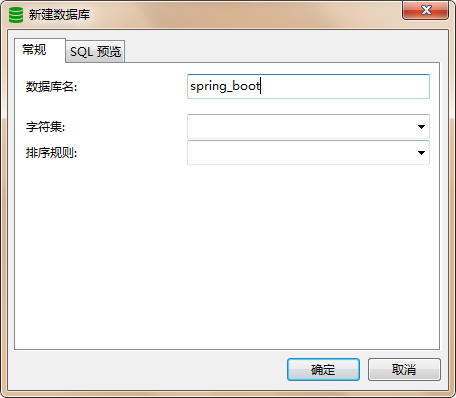
6. 新建数据库
新建数据库 mysql://localhost:3306/spring_boot ,必须的一个步骤。hibernate虽然会自动新建表,但是数据库还是要手动建好的。
使用Navicat新建本地数据库,连接名上面右键- >新建数据库 ->填写数据库信息 - > 确定。
在user表中,插入两条测试数据:

正文到此结束
- 本文标签: spring db find 代码 REST DDL id mysql tab tar 数据 list entity IO 源码 https UI value src bean GMT 测试 ip 配置 XML example Persistence zab root map DOM MySQL5 JPA JDBC web eclipse sql 解析 dataSource ACE ArrayList update pom cat App final Word Mysql数据库 java maven 数据库 CTO 参数 http Spring Boot
- 版权声明: 本文为互联网转载文章,出处已在文章中说明(部分除外)。如果侵权,请联系本站长删除,谢谢。
- 本文海报: 生成海报一 生成海报二
热门推荐


相关文章


Loading...
![[HBLOG]公众号](http://www.liuhaihua.cn/img/qrcode_gzh.jpg)

