Spring 复盘 | IOC

全面进入复习模式,从 Spring 开始。
1、关于 Spring
Spring 是一个轻量级的开源框架,是为解决企业应用开发的复杂性而创建的。我很不喜欢这种略显官方的说辞。千人千面,每个人对技术的理解都不一样。而在我的理解中,Spring 的主要就解决了两件事情(当然它还解决了数据访问、远程调用、单元测试等问题),分别对应 Spring 的两个设计思想 IOC 和 AOP:
- IOC 容器(解耦合):解决各种 new 对象的问题
- AOP (切面编程):把非业务范畴的功能,提取成一个切面,统一实现
2、Spring 概览
Spring 框架分为 6 个模块, 20+ 个 jar 包。为此我做了一张思维导图,如下:
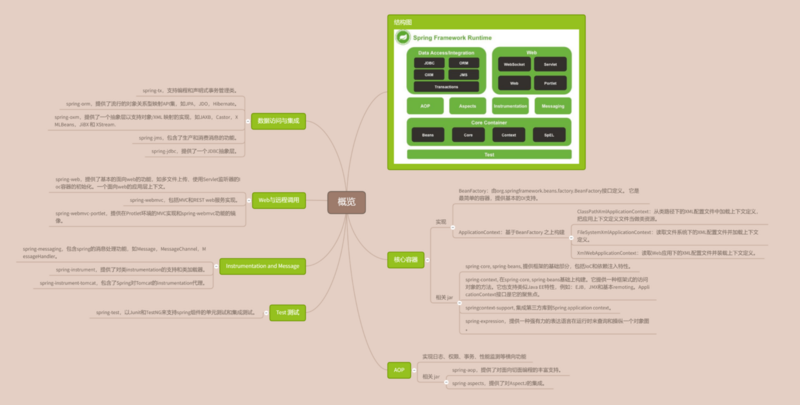
图片可能不太清晰,1080 高清无码 Spring 思维导图获取地址: Spring概览
3、什么是 IOC ?
IoC 全称为 Inversion of Control,翻译为 “控制反转”,它还有一个别名为 DI(Dependency Injection),即依赖注入。说白了,IOC 就是由 Spring IOC 容器来负责对象的生命周期和对象之间的关系。
4、什么是控制反转?
来自: https://www.cnblogs.com/chenssy/p/9576769.html 的解释,我觉得说的非常通透,这里引用过来:
- 谁控制谁:在传统的开发模式下,我们都是采用直接 new 一个对象的方式来创建对象,也就是说你依赖的对象直接由你自己控制,但是有了 IOC 容器后,则直接由 IoC 容器来控制。所以“谁控制谁”,当然是 IoC 容器控制对象。
- 控制什么:控制对象。
- 为何是反转:没有 IoC 的时候我们都是在自己对象中主动去创建被依赖的对象,这是正转。但是有了 IoC 后,所依赖的对象直接由 IoC 容器创建后注入到被注入的对象中,依赖的对象由原来的主动获取变成被动接受,所以是反转。
- 哪些方面反转了:所依赖对象的获取被反转了。
5、直接 new 对象
public class StudentService {

    public static void main(String args[]) {

        StudentDao studentDao = new StudentDao();
        System.out.println(studentDao.save());

    }

}
在没有 ioc 之前,我们都是直接 new 所依赖的对象,这是的控制权在于程序员。
6、IOC 依赖注入
IOC 依赖注入,分以下 3 种方式注入:
- 构造器注入
- setter 方法注入
- 接口方式注入
其中接口方式注入用的很少,此文不再讨论。首先创建两个类,StudentService、StudentDao 。其中 StudentService 依赖 StudentDao。
xml 构造器注入
StudentDao 代码:
public class StudentDao {

    public String save(){
        return"保存学生信息";
    }

}
StudentService 代码:
public class StudentService {

    private StudentDao studentDao;

    public StudentService(StudentDao studentDao) {
        this.studentDao = studentDao;
    }

    public String save(){
       return studentDao.save();
    }

}
xml 配置
<?xml version="1.0" encoding="UTF-8"?>
<beans xmlns="http://www.springframework.org/schema/beans"
       xmlns:xsi="http://www.w3.org/2001/XMLSchema-instance"
       xsi:schemaLocation="http://www.springframework.org/schema/beans http://www.springframework.org/schema/beans/spring-beans.xsd">

    <bean id="studentService" class="StudentService">
            <constructor-arg ref="studentDao"/>
    </bean>
    <bean id="studentDao" class="StudentDao"/>

</beans>
测试方法:
public static void main(String srgs[]) {
        ApplicationContext applicationContext = new ClassPathXmlApplicationContext("xmlConfig.xml");
        StudentService studentService = (StudentService) applicationContext.getBean("studentService");
        System.out.println(studentService.save());
}
resource 目录下新建 xmlConfig.xml 文件,引入 Spring xsd 规范,不了解 xsd 的自行百度。配置两个 bean :StudentService、StudentDao 前者依赖后者,依赖方式是构造函数, 注意到 xml 中的 constructor-arg 标签,表明了这一点。同时,它的属性 ref 指向了 StudentDao 中的 id 。意思就是把 StudentDao 当做参数传给 StudentService 的构造方法。
xml set 方法注入
StudentDao 代码不变,StudentService 代码如下:注入 StudentDao 方式变成 set 方法
public class StudentService {

    private StudentDao studentDao;

    public void setStudentDao(StudentDao studentDao) {
        this.studentDao = studentDao;
    }

    public String save(){
       return studentDao.save();
    }

}
xml 配置
<?xml version="1.0" encoding="UTF-8"?>
<beans xmlns="http://www.springframework.org/schema/beans"
       xmlns:xsi="http://www.w3.org/2001/XMLSchema-instance"
       xsi:schemaLocation="http://www.springframework.org/schema/beans http://www.springframework.org/schema/beans/spring-beans.xsd">

    <bean id="studentService" class="StudentService">
            <property name="studentDao" ref="studentDao"/>
    </bean>
    <bean id="studentDao" class="StudentDao"/>
</beans>
测试方法:
public static void main(String srgs[]) {
        ApplicationContext applicationContext = new ClassPathXmlApplicationContext("xmlConfig.xml");
        StudentService studentService = (StudentService) applicationContext.getBean("studentService");
        System.out.println(studentService.save());
}
resource 目录下新建 xmlConfig.xml 文件,引入 Spring xsd 规范,不了解 xsd 的自行百度。配置两个 bean :StudentService、StudentDao 前者依赖后者,依赖方式是set 方法, 注意到 xml 中的 property 标签,表明了这一点。同时,它的属性 ref 指向了 StudentDao 中的 id 。意思就是把 StudentDao 当做参数传给 StudentService 的 set 方法。
javaConfig 注入
StudentDao 不变,StudentService 代码如下:
public class StudentService {

    private StudentDao studentDao;

    @Autowired
    public StudentService(StudentDao studentDao) {
        this.studentDao = studentDao;
    }

    public String save() {

        return studentDao.save();

    }
}
配置类:
/**
 * 声明这是一个配置类,程序运行时初始化这个类,把 @Bean 注解的 bean 加载到 ioc 容器备用
 */
@Configuration
public class StudentConfig {

    @Bean
    public StudentDao studentDao() {
        return new StudentDao();
    }

    @Bean
    public StudentService studentService(StudentDao studentDao) {
        return new StudentService(studentDao);
    }

}
测试方法:
public class App {

    public static void main(String srgs[]) {
        AnnotationConfigApplicationContext applicationContext = new AnnotationConfigApplicationContext(StudentConfig.class);
        StudentService studentService = (StudentService) applicationContext.getBean("studentService");
        System.out.println(studentService.save());
    }

}
注意到这里新增了个 StudentConfig 这个类是一个配置类,加上 @Configuration 注解之后,程序启动时就会把带 @Bean 注解的 bean 加载到 ioc 容器中备用。StudentService 类的 set 方法上加了一个 @Autowired 注解,意思是按照类名加载 StudentDao 。
自动装配
xml 配置
<?xml version="1.0" encoding="UTF-8"?>
<beans xmlns="http://www.springframework.org/schema/beans"
       xmlns:xsi="http://www.w3.org/2001/XMLSchema-instance"
       xmlns:context="http://www.springframework.org/schema/context"
       xsi:schemaLocation="http://www.springframework.org/schema/beans
        http://www.springframework.org/schema/beans/spring-beans.xsd
        http://www.springframework.org/schema/context
        http://www.springframework.org/schema/context/spring-context-4.2.xsd">

    <!-- base-package 指定扫描包 -->
    <context:component-scan base-package="student" />

</beans>
StudentDao 加上 @Component 让自动扫描发现
@Component
public class StudentDao {

    public String save(){
        return"保存学生信息";
    }

}
StudentService 加上 @Component 让自动扫描发现
@Component
public class StudentService {

    private StudentDao studentDao;

    @Autowired
    public StudentService(StudentDao studentDao) {
        this.studentDao = studentDao;
    }

    public String save() {

        return studentDao.save();

    }
}
测试方法
public class StudentTest {

    @Test
    public void testSave() {

        ApplicationContext context = new ClassPathXmlApplicationContext("autoConfig.xml");
        StudentService studentService = (StudentService) context.getBean("studentService", StudentService.class);
        Assert.assertNotNull(studentService.save());

    }
}
注意到 xml 的头部声明多了一些 url ,那是因为自动扫描标签是在 context 包下管理的。使用他,必须加入 context 命名空间。
7、源码地址
https://github.com/turoDog/review_spring
正文到此结束
热门推荐


相关文章

近期评论
-
你这基本没有更新呀,最近文章显示还是2019年的文章。不符合要求哈
-
关键词:慕云博客 链接:https://www.lilun.me 描述:分享原创文字的个人博客
-
-
-
可以提供一下源码吗
-
不是商业站,鸡娃学习笔记
-
-
-
-
听他们说很厉害的样子
Loading...
![[HBLOG]公众号](http://www.liuhaihua.cn/img/qrcode_gzh.jpg)

