系列教程javao2o商城之(二)项目配置
本系列为自己学习《Java主流技术栈SSM+SpringBoot商铺系统》这个课程的一个记录和分享。
1.为什么学习java
现在是前端,一直想成为全栈,学过node和python之类的后台语言,也写过一些小项目 egg Django之类的框架也都可以使用,但是发现不能系统的入门,也加上感觉自己写的代码不是特别好,不能很好的使用面向对象语言的特性,所以就来学习java。同时对下一步上typescript有帮助。
2.计划(同一个项目不同的语言去完成)
1.打算做三版不同语言的后台:java、 node、 python
2.如果有需要做4款不同框架的前台:vue、react、react-native、angular
3.项目配置
1.补全文件夹
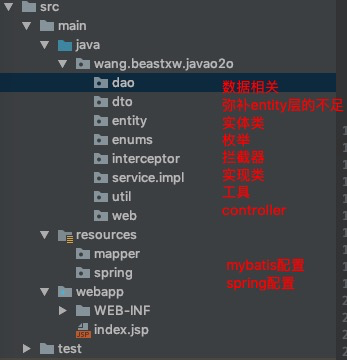
2.剩余各项配置
1.创建jdbc.properties
//目录 src/main/resources/jdbc.properties

jdbc.driver=com.mysql.cj.jdbc.Driver
jdbc.url=jdbc:mysql://localhost:3306/javao2o?userUnicode=true&characterEncoding=utf8
jdbc.username=root
jdbc.password=pp123456
2.创建mybatis-config.xml
// src/main/resources/mybatis-config.xml

<?xml version="1.0" encoding="UTF-8"?>
<!DOCTYPE configuration
        PUBLIC "-//mybatis.org//DTD Config 3.0//EN"
        "http://mybatis.org/dtd/mybatis-3-config.dtd">
<configuration>
    <!-- 配置全局属性 -->
    <settings>
        <!-- 使用jdbc的getGeneratedKeys获取数据库自增主键值 -->
        <setting name="useGeneratedKeys" value="true" />

        <!-- 使用列标签替换列别名 默认:true -->
        <setting name="useColumnLabel" value="true" />

        <!-- 开启驼峰命名转换:Table{create_time} -> Entity{createTime} -->
        <setting name="mapUnderscoreToCamelCase" value="true" />
    </settings>
</configuration>
3.创建spring-dao.xml
//src/main/resources/spring/spring-dao.xml

<?xml version="1.0" encoding="UTF-8"?>
<beans xmlns="http://www.springframework.org/schema/beans"
       xmlns:xsi="http://www.w3.org/2001/XMLSchema-instance"
       xmlns:context="http://www.springframework.org/schema/context"
       xsi:schemaLocation="http://www.springframework.org/schema/beans
        http://www.springframework.org/schema/beans/spring-beans.xsd
        http://www.springframework.org/schema/context
        http://www.springframework.org/schema/context/spring-context.xsd">
    <!--配置整合mybatis过程-->
    <!--1:配置数据库相关参数-->
    <context:property-placeholder location="classpath:jdbc.properties"/>
    <!--2.数据库连接池-->
    <bean id="dataSource" class="com.mchange.v2.c3p0.ComboPooledDataSource">

        <!--配置连接池属性-->
        <property name="driverClass" value="${jdbc.driver}"/>
        <property name="jdbcUrl" value="${jdbc.url}"/>
        <property name="user" value="${jdbc.username}"/>
        <property name="password" value="${jdbc.password}"/>

        <!--c3p0连接池的私有属性-->
        <property name="maxPoolSize" value="30"/>
        <property name="minPoolSize" value="10"/>
        <!--关闭连接不自动commit-->
        <property name="autoCommitOnClose" value="false"/>
        <!--获取连接超时时间-->
        <property name="checkoutTimeout" value="3000"/>
        <!--当获取链接失败重试次数-->
        <property name="acquireRetryAttempts" value="2"/>
    </bean>
    <!--3.配置SqlSessionFactory对象-->
    <bean id="sqlSessionFactory" class="org.mybatis.spring.SqlSessionFactoryBean">
        <!--注入数据库连接池-->
        <property name="dataSource" ref="dataSource"/>
        <!--配置mybatis全局配置文件-->
        <property name="configLocation" value="classpath:mybatis-config.xml"/>
        <!--扫描entity包 使用别名 可以简化书写 多个包时用;隔开-->
        <property name="typeAliasesPackage" value="wang.beastxw.javao2o.entity"/>
        <!--扫描sql配置文件:mapper需要的xml文件-->
        <property name="mapperLocations" value="classpath:mapper/*.xml"/>
    </bean>
    <!--4.配置扫描Dao接口包,动态实现dao接口,注入到spring容器中-->
    <bean class="org.mybatis.spring.mapper.MapperScannerConfigurer">
        <!--注入sqlSessionFactory-->
        <property name="sqlSessionFactoryBeanName" value="sqlSessionFactory"/>
        <!--给出需要扫描dao接口包-->
        <property name="basePackage" value="wang.beastxw.javao2o.dao"/>
    </bean>
</beans>
4.创建spring-service.xml
// src/main/resources/spring/spring-service.xml

<?xml version="1.0" encoding="UTF-8"?>
<beans xmlns="http://www.springframework.org/schema/beans"
       xmlns:xsi="http://www.w3.org/2001/XMLSchema-instance"
       xmlns:context="http://www.springframework.org/schema/context"
       xmlns:tx="http://www.springframework.org/schema/tx"
       xsi:schemaLocation="http://www.springframework.org/schema/beans
    http://www.springframework.org/schema/beans/spring-beans.xsd
    http://www.springframework.org/schema/context
    http://www.springframework.org/schema/context/spring-context.xsd
    http://www.springframework.org/schema/tx
    http://www.springframework.org/schema/tx/spring-tx.xsd">
    <!-- 扫描service包下所有使用注解的类型 -->
    <context:component-scan base-package="wang.beastxw.javao2o.service" />

    <!-- 配置事务管理器 -->
    <bean id="transactionManager"
          class="org.springframework.jdbc.datasource.DataSourceTransactionManager">
        <!-- 注入数据库连接池 -->
        <property name="dataSource" ref="dataSource" />
    </bean>

    <!-- 配置基于注解的声明式事务 -->
    <tx:annotation-driven transaction-manager="transactionManager" />
</beans>
5.创建spring-web.xml
// src/main/resources/spring/spring-web.xml

<?xml version="1.0" encoding="UTF-8"?>
<beans xmlns="http://www.springframework.org/schema/beans"
       xmlns:xsi="http://www.w3.org/2001/XMLSchema-instance" xmlns:context="http://www.springframework.org/schema/context"
       xmlns:mvc="http://www.springframework.org/schema/mvc"
       xsi:schemaLocation="http://www.springframework.org/schema/beans
    http://www.springframework.org/schema/beans/spring-beans.xsd
    http://www.springframework.org/schema/context
    http://www.springframework.org/schema/context/spring-context.xsd
    http://www.springframework.org/schema/mvc
    http://www.springframework.org/schema/mvc/spring-mvc-3.2.xsd">
    <!-- 配置SpringMVC -->
    <!-- 1.开启SpringMVC注解模式 -->
    <mvc:annotation-driven />

    <!-- 2.静态资源默认servlet配置 (1)加入对静态资源的处理:js,gif,png (2)允许使用"/"做整体映射 -->
    <mvc:resources mapping="/resources/**" location="/resources/" />
    <mvc:default-servlet-handler />

    <!-- 3.定义视图解析器 -->
    <!-- 不用jsp,通过结果返回数据,所以是.html -->
    <bean id="viewResolver"
          class="org.springframework.web.servlet.view.InternalResourceViewResolver">
        <property name="prefix" value="/WEB-INF/html/"></property>
        <property name="suffix" value=".html"></property>
    </bean>

    <!-- 4.扫描web相关的bean -->
    <context:component-scan base-package="wang.beastxw.javao2o.web" />
</beans>
6.修改web.xml
// 修改web.xml

<web-app xmlns="http://xmlns.jcp.org/xml/ns/javaee" xmlns:xsi="http://www.w3.org/2001/XMLSchema-instance"
         xsi:schemaLocation="http://xmlns.jcp.org/xml/ns/javaee
                      http://xmlns.jcp.org/xml/ns/javaee/web-app_3_1.xsd"
         version="3.1" metadata-complete="true">
    <display-name>Archetype Created Web Application</display-name>
    <welcome-file-list>
        <welcome-file>index.jsp</welcome-file>
    </welcome-file-list>
    <servlet>
        <servlet-name>spring-dispatcher</servlet-name>
        <servlet-class>org.springframework.web.servlet.DispatcherServlet</servlet-class>
        <init-param>
            <param-name>contextConfigLocation</param-name>
            <param-value>classpath:spring/spring-*.xml</param-value>
        </init-param>
    </servlet>
    <servlet-mapping>
        <servlet-name>spring-dispatcher</servlet-name>
        <!-- 默认匹配所有的请求 -->
        <url-pattern>/</url-pattern>
    </servlet-mapping>
</web-app>
4.源码
uri: https://github.com/Hericium/j...
分支: feature/startmvc
5.添加群聊一起学习(698615299)!

正文到此结束
- 本文标签: App mybatis entity Action springboot mysql tab UI CTO SpringMVC src Property id 源码 js 配置 时间 list schema autocommit IO classpath https map 代码 value dataSource python sqlsession root git sql GitHub key C3P0 ACE mapper retry web ip cat 管理 XML TypeScript Word SqlSessionFactory JDBC java servlet O2O NSA 解析 主键值 http bean 连接池 spring db 数据库 数据 HTML 参数 core Service session 目录 node tar
- 版权声明: 本文为互联网转载文章,出处已在文章中说明(部分除外)。如果侵权,请联系本站长删除,谢谢。
- 本文海报: 生成海报一 生成海报二
热门推荐


相关文章

近期评论
-
你这基本没有更新呀,最近文章显示还是2019年的文章。不符合要求哈
-
关键词:慕云博客 链接:https://www.lilun.me 描述:分享原创文字的个人博客
-
-
-
可以提供一下源码吗
-
不是商业站,鸡娃学习笔记
-
-
-
-
听他们说很厉害的样子
Loading...
![[HBLOG]公众号](http://www.liuhaihua.cn/img/qrcode_gzh.jpg)

