SpringCloud微服务笔记-Nginx实现网关反向代理
背景
当前在SpringCloud微服务架构下,网关作为服务的入口尤为重要,一旦网关发生单点故障会导致整个服务集群瘫痪,为了保证网关的高可用可以通过Nginx的反向代理功能实现网关的高可用。
项目源码: https://github.com/taoweidong/Micro-service-learning/tree/SpringCloud-branch
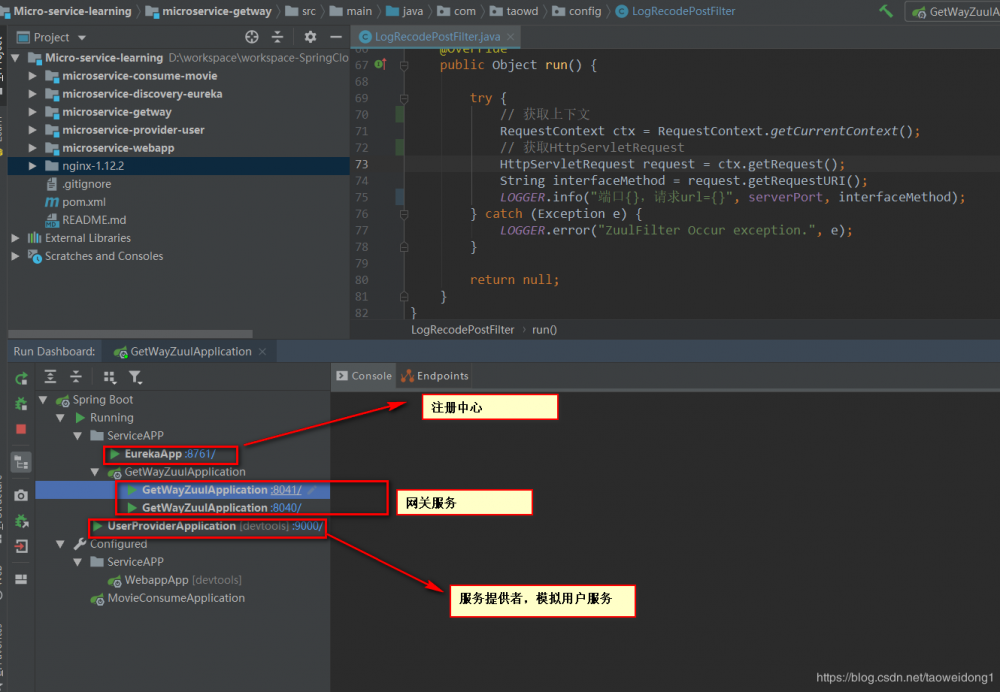
项目架构图
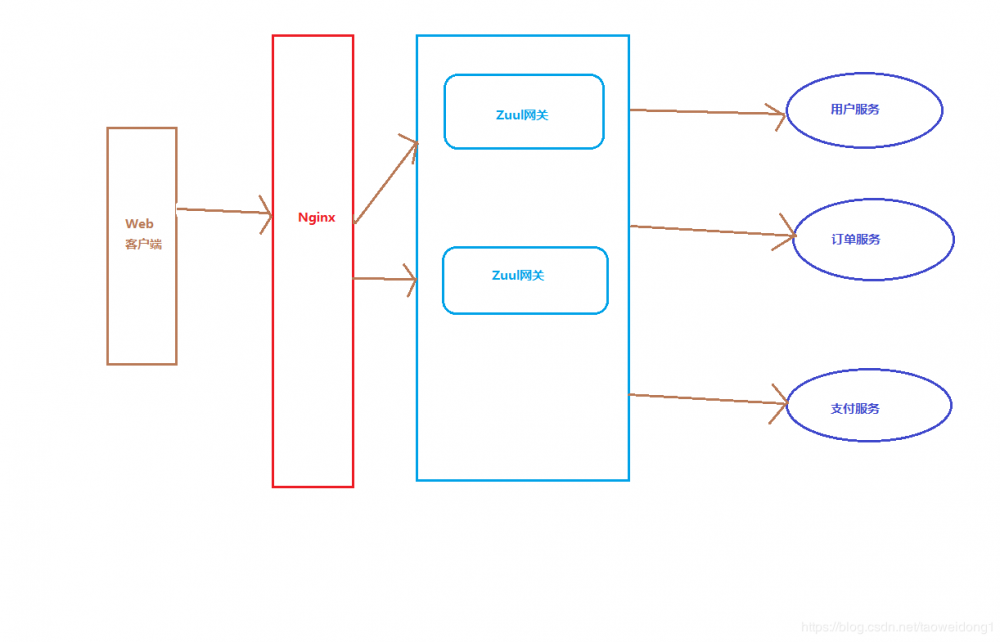
- Nginx作为反向代理服务器,代理后端网关服务,通过Nginx自带的负载均衡算法进行转发
- Zull网关部署集群时,如果一台服务器发生故障,就会转发到另外一台机器上,服务正常访问,保证网关的高可用
具体部署
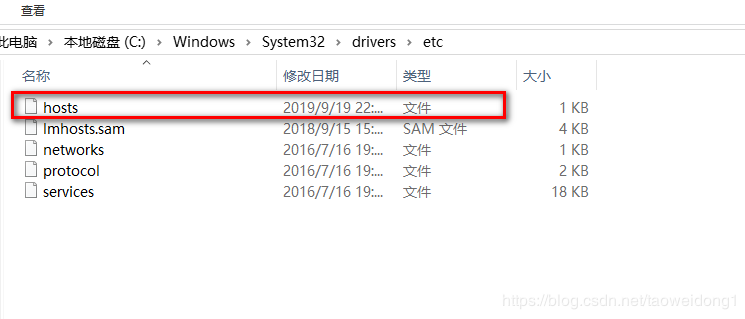
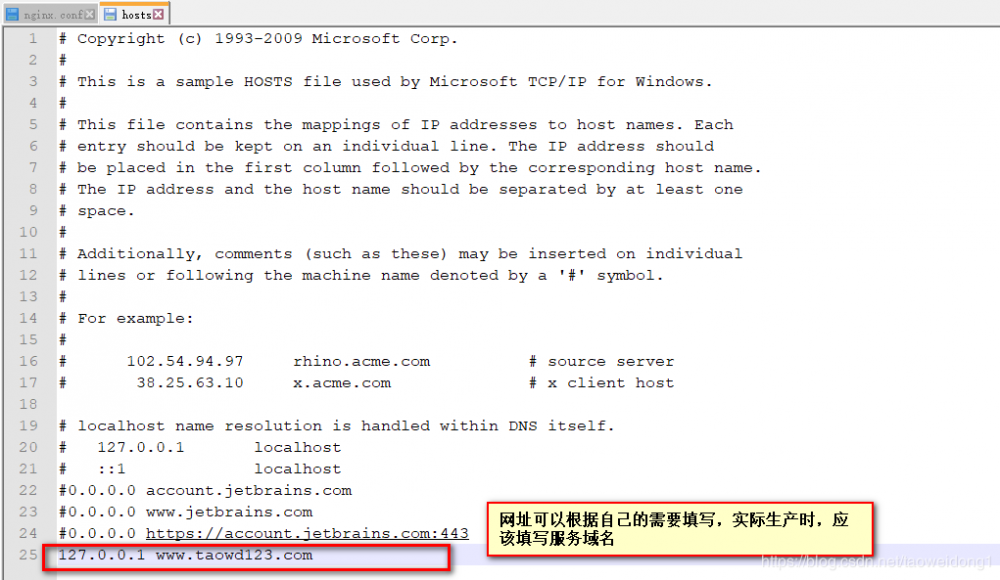
修改本地Host文件
(C:/Windows/System32/drivers/etc)编辑下面这个文件,修改里面ip对应的地址,因为要使用域名的不同来实现反向代理.
Nginx配置
下载
Nginx下载地址(Windows和Linux的配置一样): http://nginx.org/en/download.html
配置
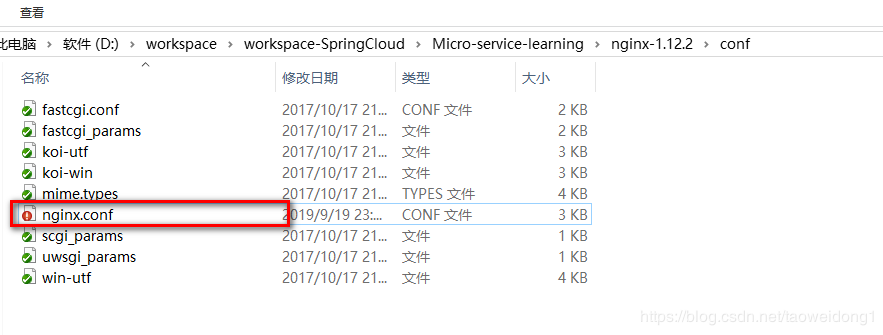
解压后,找到配置文件/nginx-1.12.2/conf/nginx.conf
详细配置
#user  nobody;
worker_processes  1;

#error_log  logs/error.log;
#error_log  logs/error.log  notice;
#error_log  logs/error.log  info;

#pid        logs/nginx.pid;


events {
    worker_connections  1024;
}


http {
    include       mime.types;
    default_type  application/octet-stream;

    #log_format  main  '$remote_addr - $remote_user [$time_local] "$request" '
    #                  '$status $body_bytes_sent "$http_referer" '
    #                  '"$http_user_agent" "$http_x_forwarded_for"';

    #access_log  logs/access.log  main;

    sendfile        on;
    #tcp_nopush     on;

    #keepalive_timeout  0;
    keepalive_timeout  65;

    #gzip  on;

    #配置上游服务器网关端口集群
    upstream  backServer{
        # weight 权重:谁的的权重多,访问到哪个服务的几率就大
        server 127.0.0.1:8040 weight=1;
        server 127.0.0.1:8041 weight=1;
    }

    server {
        # 注意:如果使用域名进行反向代理的话,Nginx的端口必须是80
        listen       80;
        # 入口地址-对应域名地址
        server_name  www.taowd123.com;

        location /ms {
            ### 指定上游服务器负载均衡服务器
            proxy_pass http://backServer/;
            index  index.html index.htm;
        }

        #error_page  404              /404.html;

        # redirect server error pages to the static page /50x.html
        # 错误页面
        error_page   500 502 503 504  /50x.html;
        location = /50x.html {
            root   html;
        }

    }
    # another virtual host using mix of IP-, name-, and port-based configuration
    #
    #server {
    #    listen       8000;
    #    listen       somename:8080;
    #    server_name  somename  alias  another.alias;

    #    location / {
    #        root   html;
    #        index  index.html index.htm;
    #    }
    #}


    # HTTPS server
    #
    #server {
    #    listen       443 ssl;
    #    server_name  localhost;

    #    ssl_certificate      cert.pem;
    #    ssl_certificate_key  cert.key;

    #    ssl_session_cache    shared:SSL:1m;
    #    ssl_session_timeout  5m;

    #    ssl_ciphers  HIGH:!aNULL:!MD5;
    #    ssl_prefer_server_ciphers  on;

    #    location / {
    #        root   html;
    #        index  index.html index.htm;
    #    }
    #}

}
测试
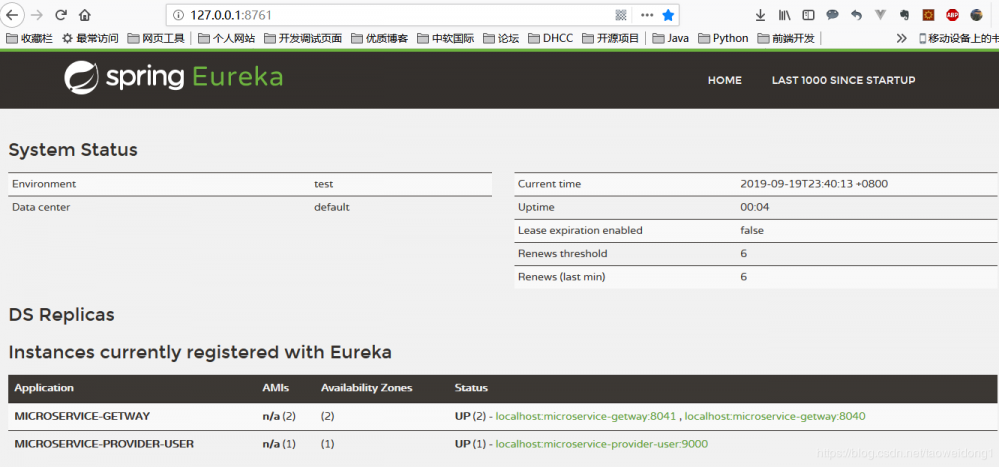
- 启动注册中心服务: http://127.0.0.1:8761/
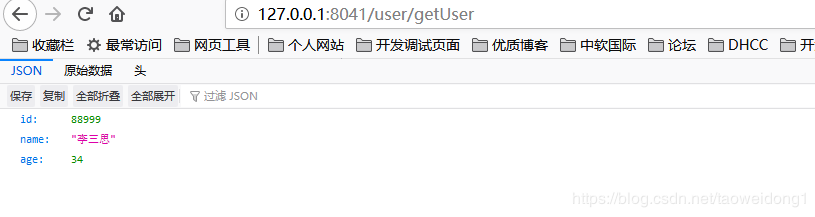
- 启动两个网关,端口分别为:8041,8040
- 启动服务提供者,端口为:9000 已经在Zuul中配置
- 启动Nginx服务
- 访问注册中心检查服务
- 使用网关端口直接访问正常
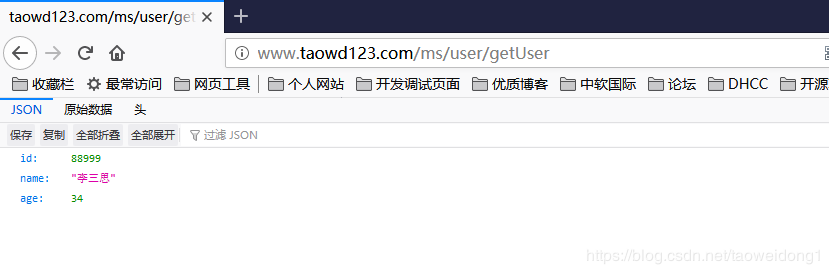
- 使用host中配置的域名直接访问,测试反向代理功能
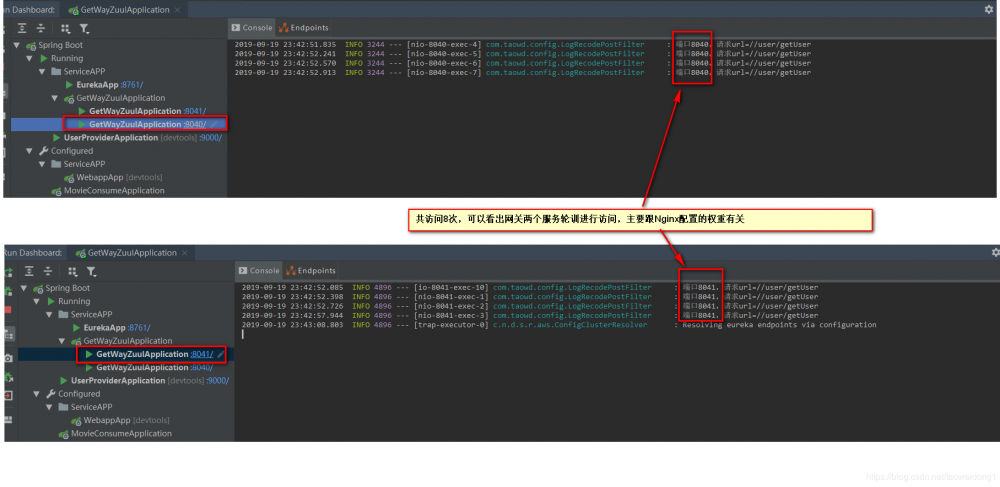
 访问多次,检查网关后台输出结果
参考
https://blog.csdn.net/kxj19980524/article/details/87868108
欢迎访问个人博客: http://www.taoweidong.com/
正文到此结束
- 本文标签: zip 端口 集群 HTML Service 注册中心 部署 spring windows cat App 下载 zuul linux 源码 域名 博客 springcloud stream 测试 负载均衡 TCP http 高可用 微服务 ssl https GitHub src id Agent 服务器 git SDN Connection IO 反向代理 Nginx ip UI list cache Proxy root remote 配置 key ORM session
- 版权声明: 本文为互联网转载文章,出处已在文章中说明(部分除外)。如果侵权,请联系本站长删除,谢谢。
- 本文海报: 生成海报一 生成海报二
热门推荐


相关文章

近期评论
-
你这基本没有更新呀,最近文章显示还是2019年的文章。不符合要求哈
-
关键词:慕云博客 链接:https://www.lilun.me 描述:分享原创文字的个人博客
-
-
-
可以提供一下源码吗
-
不是商业站,鸡娃学习笔记
-
-
-
-
听他们说很厉害的样子
Loading...
![[HBLOG]公众号](http://www.liuhaihua.cn/img/qrcode_gzh.jpg)

