查漏补缺:连接器在Tomcat中是如何设计的
从连接器(Connector)源码说起

既然是来解析连接器(Connector),那么我们直接从源码入手,后面所有源码我会剔除不重要部分,所以会忽略大部分源码细节,只关注流程。源码如下(高能预警,大量代码):
public class Connector extends LifecycleMBeanBase {
 public Connector() {
 this("org.apache.coyote.http11.Http11NioProtocol");
 }
 public Connector(String protocol) {
 boolean aprConnector = AprLifecycleListener.isAprAvailable() &&
 AprLifecycleListener.getUseAprConnector();
 if ("HTTP/1.1".equals(protocol) || protocol == null) {
 if (aprConnector) {
 protocolHandlerClassName = "org.apache.coyote.http11.Http11AprProtocol";
 } else {
 protocolHandlerClassName = "org.apache.coyote.http11.Http11NioProtocol";
 }
 } else if ("AJP/1.3".equals(protocol)) {
 if (aprConnector) {
 protocolHandlerClassName = "org.apache.coyote.ajp.AjpAprProtocol";
 } else {
 protocolHandlerClassName = "org.apache.coyote.ajp.AjpNioProtocol";
 }
 } else {
 protocolHandlerClassName = protocol;
 }
 // Instantiate protocol handler
 ProtocolHandler p = null;
 try {
 Class<?> clazz = Class.forName(protocolHandlerClassName);
 p = (ProtocolHandler) clazz.getConstructor().newInstance();
 } catch (Exception e) {
 log.error(sm.getString(
 "coyoteConnector.protocolHandlerInstantiationFailed"), e);
 } finally {
 this.protocolHandler = p;
 }
 // Default for Connector depends on this system property
 setThrowOnFailure(Boolean.getBoolean("org.apache.catalina.startup.EXIT_ON_INIT_FAILURE"));
 }
我们来看看Connector的构造方法,其实只做了一件事情,就是根据协议设置对应的ProtocolHandler,根据名称我们知道,这是协议处理类,所以连接器内部的一个重要子模块就是ProtocolHandler。
关于生命周期
我们看到Connector继承了LifecycleMBeanBase,我们来看看Connector的最终继承关系:

我们看到最终实现的是Lifecycle接口,我们看看这个接口是何方神圣。我把其接口的注释拿下来解释下
/**
 * Common interface for component life cycle methods. Catalina components
 * may implement this interface (as well as the appropriate interface(s) for
 * the functionality they support) in order to provide a consistent mechanism
 * to start and stop the component.
 * start()
 * -----------------------------
 * | |
 * | init() |
 * NEW -»-- INITIALIZING |
 * | | | | ------------------«-----------------------
 * | | |auto | | |
 * | | /|/ start() /|/ /|/ auto auto stop() |
 * | | INITIALIZED --»-- STARTING_PREP --»- STARTING --»- STARTED --»--- |
 * | | | | |
 * | |destroy()| | |
 * | --»-----«-- ------------------------«-------------------------------- ^
 * | | | |
 * | | /|/ auto auto start() |
 * | | STOPPING_PREP ----»---- STOPPING ------»----- STOPPED -----»-----
 * | /|/ ^ | ^
 * | | stop() | | |
 * | | -------------------------- | |
 * | | | | |
 * | | | destroy() destroy() | |
 * | | FAILED ----»------ DESTROYING ---«----------------- |
 * | | ^ | |
 * | | destroy() | |auto |
 * | --------»----------------- /|/ |
 * | DESTROYED |
 * | |
 * | stop() |
 * ----»-----------------------------»------------------------------
 *
 * Any state can transition to FAILED.
 *
 * Calling start() while a component is in states STARTING_PREP, STARTING or
 * STARTED has no effect.
 *
 * Calling start() while a component is in state NEW will cause init() to be
 * called immediately after the start() method is entered.
 *
 * Calling stop() while a component is in states STOPPING_PREP, STOPPING or
 * STOPPED has no effect.
 *
 * Calling stop() while a component is in state NEW transitions the component
 * to STOPPED. This is typically encountered when a component fails to start and
 * does not start all its sub-components. When the component is stopped, it will
 * try to stop all sub-components - even those it didn't start.
 *
 * Attempting any other transition will throw {@link LifecycleException}.
 *
 * </pre>
 * The {@link LifecycleEvent}s fired during state changes are defined in the
 * methods that trigger the changed. No {@link LifecycleEvent}s are fired if the
 * attempted transition is not valid.
这段注释翻译就是,这个接口是提供给组件声明周期管理的,并且提供了声明周期流转图。这里我们只需要知道正常流程即可:
New--->Init()---->Start()---->Stop()--->Destory()
从生命周期探索连接器
根据上面的生命周期说明,我们可以知道连接器(Connector)就是按照如此的声明周期管理的,所以我们找到了线索,所以连接器肯定会先初始化然后再启动。我们查看其initInternal()方法可以知道连接器初始化做了什么事情,源码如下:
@Override
 protected void initInternal() throws LifecycleException {
 super.initInternal();
 if (protocolHandler == null) {
 throw new LifecycleException(
 sm.getString("coyoteConnector.protocolHandlerInstantiationFailed"));
 }
 // Initialize adapter
 adapter = new CoyoteAdapter(this);
 protocolHandler.setAdapter(adapter);
 if (service != null) {
 protocolHandler.setUtilityExecutor(service.getServer().getUtilityExecutor());
 }
 // Make sure parseBodyMethodsSet has a default
 if (null == parseBodyMethodsSet) {
 setParseBodyMethods(getParseBodyMethods());
 }
 if (protocolHandler.isAprRequired() && !AprLifecycleListener.isInstanceCreated()) {
 throw new LifecycleException(sm.getString("coyoteConnector.protocolHandlerNoAprListener",
 getProtocolHandlerClassName()));
 }
 if (protocolHandler.isAprRequired() && !AprLifecycleListener.isAprAvailable()) {
 throw new LifecycleException(sm.getString("coyoteConnector.protocolHandlerNoAprLibrary",
 getProtocolHandlerClassName()));
 }
 if (AprLifecycleListener.isAprAvailable() && AprLifecycleListener.getUseOpenSSL() &&
 protocolHandler instanceof AbstractHttp11JsseProtocol) {
 AbstractHttp11JsseProtocol<?> jsseProtocolHandler =
 (AbstractHttp11JsseProtocol<?>) protocolHandler;
 if (jsseProtocolHandler.isSSLEnabled() &&
 jsseProtocolHandler.getSslImplementationName() == null) {
 // OpenSSL is compatible with the JSSE configuration, so use it if APR is available
 jsseProtocolHandler.setSslImplementationName(OpenSSLImplementation.class.getName());
 }
 }
 try {
 protocolHandler.init();
 } catch (Exception e) {
 throw new LifecycleException(
 sm.getString("coyoteConnector.protocolHandlerInitializationFailed"), e);
 }
 }
}
根据上面源码,我们发现主要是处理protocolHandler并初始化它,同时我们注意到了protocolHandler 设置了一个适配器,我们看看这个适配器是做啥的,跟踪源码如下:
/**
 * The adapter, used to call the connector.
 *
 * @param adapter The adapter to associate
 */
 public void setAdapter(Adapter adapter);
这个注释已经说的很直白了,这个适配器就是用来调用连接器的。我们再继续看看protocolHandler的初始化方法
 /**
 * Endpoint that provides low-level network I/O - must be matched to the
 * ProtocolHandler implementation (ProtocolHandler using NIO, requires NIO
 * Endpoint etc.).
 */
private final AbstractEndpoint<S,?> endpoint;
public void init() throws Exception {
 if (getLog().isInfoEnabled()) {
 getLog().info(sm.getString("abstractProtocolHandler.init", getName()));
 logPortOffset();
 }
 if (oname == null) {
 // Component not pre-registered so register it
 oname = createObjectName();
 if (oname != null) {
 Registry.getRegistry(null, null).registerComponent(this, oname, null);
 }
 }
 if (this.domain != null) {
 rgOname = new ObjectName(domain + ":type=GlobalRequestProcessor,name=" + getName());
 Registry.getRegistry(null, null).registerComponent(
 getHandler().getGlobal(), rgOname, null);
 }
 String endpointName = getName();
 endpoint.setName(endpointName.substring(1, endpointName.length()-1));
 endpoint.setDomain(domain);
 endpoint.init();
 }
这里出现了一个新的对象,endpoint,根据注释我们可以知道endpoint是用来处理网络IO的,而且必须匹配到指定的子类(比如Nio,就是NioEndPoint处理)。endpoint.init()实际上就是做一些网络的配置,然后就是初始化完毕了。根据我们上面的周期管理,我们知道init()后就是start(),所以我们查看Connector的start()源码:
protected void startInternal() throws LifecycleException {
// Validate settings before starting
if (getPortWithOffset() < 0) {
throw new LifecycleException(sm.getString(
"coyoteConnector.invalidPort", Integer.valueOf(getPortWithOffset())));
}
setState(LifecycleState.STARTING);
try {
protocolHandler.start();
} catch (Exception e) {
throw new LifecycleException(
sm.getString("coyoteConnector.protocolHandlerStartFailed"), e);
}
}
其实就是主要调用 protocolHandler.start()方法,继续跟踪,为了方便表述,我会把接下来的代码统一放在一起说明,代码如下:
//1.类:AbstractProtocol implements ProtocolHandler,
 MBeanRegistration
 public void start() throws Exception {
 // 省略部分代码
 endpoint.start();
 }
//2. 类:AbstractEndPoint
public final void start() throws Exception {
 // 省略部分代码
 startInternal();
 }
 /**3.类:NioEndPoint extends AbstractJsseEndpoint<NioChannel,SocketChannel>
 * Start the NIO endpoint, creating acceptor, poller threads.
 */
 @Override
 public void startInternal() throws Exception {
 //省略部分代码

 // Start poller thread
 poller = new Poller();
 Thread pollerThread = new Thread(poller, getName() + "-ClientPoller");
 pollerThread.setPriority(threadPriority);
 pollerThread.setDaemon(true);
 pollerThread.start();
 startAcceptorThread();
 }
 }
到这里,其实整个启动代码就完成了,我们看到最后是在NioEndPoint创建了一个Poller,并且启动它,这里需要补充说明下,这里只是以NioEndPoint为示列,其实Tomcat 主要提供了三种实现,分别是AprEndPoint,NioEndPoint,Nio2EndPoint,这里表示了tomcat支持的I/O模型:
- APR:采用 Apache 可移植运行库实现,它根据不同操作系统,分别用c重写了大部分IO和系统线程操作模块,据说性能要比其他模式要好(未实测)。
- NIO:非阻塞 I/O
- NIO.2:异步 I/O
上述代码主要是开启两个线程,一个是Poller,一个是开启Acceptor,既然是线程,核心的代码肯定是run方法,我们来查看源码,代码如下:
//4.类:Acceptor<U> implements Runnable
 public void run() {
 //省略了部分代码
 U socket = null;
 socket = endpoint.serverSocketAccept();
 // Configure the socket
 if (endpoint.isRunning() && !endpoint.isPaused()) {
 // setSocketOptions() will hand the socket off to
 // an appropriate processor if successful
 //核心逻辑
 if (!endpoint.setSocketOptions(socket)) {
 endpoint.closeSocket(socket);
 }
 } else {
 endpoint.destroySocket(socket);
 }

 state = AcceptorState.ENDED;
}
//5.类:NioEndpoint
protected boolean setSocketOptions(SocketChannel socket) {
 // Process the connection
 //省略部分代码
 try {
 // Disable blocking, polling will be used
 socket.configureBlocking(false);
 Socket sock = socket.socket();
 socketProperties.setProperties(sock);
 NioSocketWrapper socketWrapper = new NioSocketWrapper(channel, this);
 channel.setSocketWrapper(socketWrapper);
 socketWrapper.setReadTimeout(getConnectionTimeout());
 socketWrapper.setWriteTimeout(getConnectionTimeout());
 socketWrapper.setKeepAliveLeft(NioEndpoint.this.getMaxKeepAliveRequests());
 socketWrapper.setSecure(isSSLEnabled());
 //核心逻辑
 poller.register(channel, socketWrapper);
 return true;

 }
这里可以发现Acceptor主要就是接受socket,然后把它注册到poller中,我们继续看看是如何注册的。
/**6.类NioEndpoint
 * Registers a newly created socket with the poller.
 *
 * @param socket The newly created socket
 * @param socketWrapper The socket wrapper
 */
 public void register(final NioChannel socket, final NioSocketWrapper socketWrapper) {
 socketWrapper.interestOps(SelectionKey.OP_READ);//this is what OP_REGISTER turns into.
 PollerEvent r = null;
 if (eventCache != null) {
 r = eventCache.pop();
 }
 if (r == null) {
 r = new PollerEvent(socket, OP_REGISTER);
 } else {
 r.reset(socket, OP_REGISTER);
 }
 addEvent(r);
 }
/** 7.类:PollerEvent implements Runnable
 public void run() {
 //省略部分代码
 socket.getIOChannel().register(socket.getSocketWrapper().getPoller().getSelector(), SelectionKey.OP_READ, socket.getSocketWrapper());
 }
这里发现最终就是采用NIO模型把其注册到通道中。(这里涉及NIO网络编程知识,不了解的同学可以传送这里)。那么注册完毕后,我们看看Poller做了什么事情。
*/
 /**8.类:NioEndPoint内部类 Poller implements Runnable
 **/
 @Override
 public void run() {
 // Loop until destroy() is called
 while (true) {
 //省略部分代码
 Iterator<SelectionKey> iterator =
 keyCount > 0 ? selector.selectedKeys().iterator() : null;
 // Walk through the collection of ready keys and dispatch
 // any active event.
 while (iterator != null && iterator.hasNext()) {
 SelectionKey sk = iterator.next();
 NioSocketWrapper socketWrapper = (NioSocketWrapper) sk.attachment();
 // Attachment may be null if another thread has called
 // cancelledKey()
 if (socketWrapper == null) {
 iterator.remove();
 } else {
 iterator.remove();
 //sock处理
 processKey(sk, socketWrapper);
 }
 }
 //省略部分代码
 }
这个就是通过selector把之前注册的事件取出来,从而完成了调用。
//9.类: NioEndPoint内部类 Poller implements Runnable
protected void processKey(SelectionKey sk, NioSocketWrapper socketWrapper) {
 //省略大部分代码
 processSocket(socketWrapper, SocketEvent.OPEN_WRITE, true)

}

//10.类:AbstractEndPoint
public boolean processSocket(SocketWrapperBase<S> socketWrapper,
 SocketEvent event, boolean dispatch) {
 //省略部分代码
 Executor executor = getExecutor();
 if (dispatch && executor != null) {
 executor.execute(sc);
 } else {
 sc.run();
 }

 return true;
 }
//11.类:SocketProcessorBase implements Runnable
public final void run() {
 synchronized (socketWrapper) {
 // It is possible that processing may be triggered for read and
 // write at the same time. The sync above makes sure that processing
 // does not occur in parallel. The test below ensures that if the
 // first event to be processed results in the socket being closed,
 // the subsequent events are not processed.
 if (socketWrapper.isClosed()) {
 return;
 }
 doRun();
 }
 }

//类:12.NioEndPoint extends AbstractJsseEndpoint<NioChannel,SocketChannel>
protected void doRun() {
 //省略部分代码
 if (handshake == 0) {
 SocketState state = SocketState.OPEN;
 // Process the request from this socket
 if (event == null) {
 state = getHandler().process(socketWrapper, SocketEvent.OPEN_READ);
 } else {
 state = getHandler().process(socketWrapper, event);
 }
 if (state == SocketState.CLOSED) {
 poller.cancelledKey(key, socketWrapper);
 }
 }
 }
Poller调用的run方法或者用Executor线程池去执行run(),最终调用都是各个子EndPoint中的doRun()方法,最终会取一个Handler去处理socketWrapper。继续看源码:
//类:13.AbstractProtocol内部类ConnectionHandler implements AbstractEndpoint.Handler<S>
 public SocketState process(SocketWrapperBase<S> wrapper, SocketEvent status) {
 //省略部分代码

 state = processor.process(wrapper, status);

 return SocketState.CLOSED;
 }

//类:14.AbstractProcessorLight implements Processor
public SocketState process(SocketWrapperBase<?> socketWrapper, SocketEvent status)
 throws IOException {
 //省略部分代码

 state = service(socketWrapper);

 return state;
 }
这部分源码表明最终调用的process是通过一个Processor接口的实现类来完成的,这里最终也是会调用到各个子类中,那么这里的处理器其实就是处理应用协议,我们可以查看AbstractProcessorLight的实现类,分别有AjpProcessor、Http11Processor、StreamProcessor,分别代表tomcat支持三种应用层协议,分别是:
- AJP协议
- HTTP.1协议
- HTTP2.0协议
这里我们以常用的HTTP1.1为例,继续看源码:
//类:15. Http11Processor extends AbstractProcessor
public SocketState service(SocketWrapperBase<?> socketWrapper)
 throws IOException {
 //省略大部分代码
 getAdapter().service(request, response);
 //省略大部分代码
 }
//类:16 CoyoteAdapter implements Adapter
public void service(org.apache.coyote.Request req, org.apache.coyote.Response res)
 throws Exception {
 Request request = (Request) req.getNote(ADAPTER_NOTES);
 Response response = (Response) res.getNote(ADAPTER_NOTES);
 postParseSuccess = postParseRequest(req, request, res, response);
 if (postParseSuccess) {
 //check valves if we support async
 request.setAsyncSupported(
 connector.getService().getContainer().getPipeline().isAsyncSupported());
 // Calling the container
 connector.getService().getContainer().getPipeline().getFirst().invoke(
 request, response);
 }

 }
这里我们发现协议处理器最终会调用适配器(CoyoteAdapter),而适配器最终的工作是转换Request和Response对象为HttpServletRequest和HttpServletResponse,从而可以去调用容器,到这里整个连接器的流程和作用我们就已经分析完了。
小结
那么我们来回忆下整个流程,我画了一张时序图来说明:
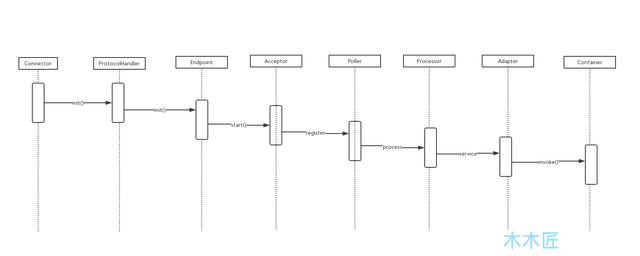
这张图包含了两个流程,一个是组件的初始化,一个是调用的流程。连接器(Connector)主要初始化了两个组件,ProtcoHandler和EndPoint,但是我们从代码结构发现,他们两个是父子关系,也就是说ProtcoHandler包含了EndPoint。后面的流程就是各个子组件的调用链关系,总结来说就是Acceptor负责接收请求,然后注册到Poller,Poller负责处理请求,然后调用processor处理器来处理,最后把请求转成符合Servlet规范的request和response去调用容器(Container)。点击免费“领取Java架构资料”
我们流程梳理清楚了,接下来我们来结构化的梳理下:
回到连接器(Connector)是源码,我们发现,上述说的模块只有ProtocolHandler和Adapter两个属于连接器中,也就是说,连接器只包含了这两大子模块,那么后续的EndPoint、Acceptor、Poller、Processor都是ProtocolHandler的子模块。 而Acceptor和Poller两个模块的核心功能都是在EndPoint 中完成的,所以是其子模块,而Processor比较独立,所以它和EndPoint是一个级别的子模块。
我们用图来说明下上述的关系:
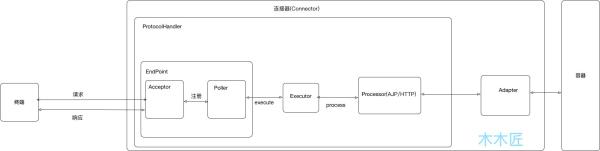
根据上图我们可以知道,连接器主要负责处理连接请求,然后通过适配器调用容器。那么具体流程细化可以如下:
- Acceptor监听网络请求,获取请求。
- Poller获取到监听的请求提交线程池进行处理。
- Processor根据具体的应用协议(HTTP/AJP)来生成Tomcat Request对象。
- Adapter把Request对象转换成Servlet标准的Request对象,调用容器。
总结
我们从连接器的源码,一步一步解析,分析了连接器主要包含了两大模块,ProtocolHandler和Adapter。ProtocolHandler主要包含了Endpoint模块和Processor模块。Endpoint模块主要的作用是连接的处理,它委托了Acceptor子模块进行连接的监听和注册,委托子模块Poller进行连接的处理;而Processor模块主要是应用协议的处理,最后提交给Adapter进行对象的转换,以便可以调用容器(Container)。另外我们也在分析源码的过程中补充了一些额外知识点:
- 当前Tomcat版本支持的IO模型为:APR模型、NIO模型、NIO.2模型
- Tomcat支持的协议是AJP和HTTP,其中HTTP又分为HTTP1.1和HTTP2.0
正文到此结束
- 本文标签: 处理器 IO stream ssl https UI 解析 操作系统 生命 线程池 NIO 适配器 apache struct 配置 App REST http trigger executor synchronized java ip apr CTO list src IOS cache 构造方法 tomcat cat CEO value lib JPA ioc equals servlet 线程 注释 key client JAVA架构 bean 模型 源码 tar 代码 Select Connection 免费 Service id 翻译 管理 DOM 总结 Property Collection tk 协议 js IDE parse final ACE
- 版权声明: 本文为互联网转载文章,出处已在文章中说明(部分除外)。如果侵权,请联系本站长删除,谢谢。
- 本文海报: 生成海报一 生成海报二
热门推荐


相关文章


Loading...
![[HBLOG]公众号](http://www.liuhaihua.cn/img/qrcode_gzh.jpg)

