MyBatis之启动分析(一)

前言
MyBatis
作为目前最常用的持久层框架之一,分析其源码,对我们的使用过程中可更好的运用它。本系列基于 mybatis-3.4.6
进行分析。
MyBatis 的初始化工作就是解析主配置文件,映射配置文件以及注解信息。然后保存在 org.apache.ibatis.session.Configuration
,供后期执行数据请求的相关调用。 Configuration
里有大量配置信息,在后面每涉及到一个相关配置,会进行详细的分析。
启动
public static void main(String[] args) throws IOException {
        // 获取配置文件
        Reader reader = Resources.getResourceAsReader("mybatis-config.xml");
        // 通过 SqlSessionFactoryBuilder 构建 sqlSession 工厂
        SqlSessionFactory sqlSessionFactory = new SqlSessionFactoryBuilder().build(reader);
        // 获取 sqlSession 实例
        SqlSession sqlSession = sqlSessionFactory.openSession();

        reader.close();
        sqlSession.close();
    }
复制代码
分析
SqlSessionFactoryBuilder 类
SqlSessionFactoryBuilder 的 build()
是Mybatis启动的初始化入口,使用builder模式加载配置文件。
通过查看该类,使用方法重载,有以下9个方法:
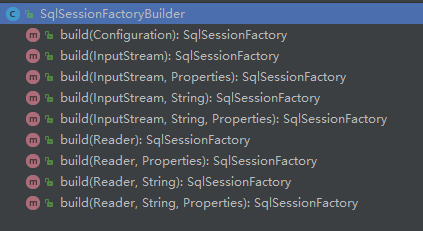
方法重载最终实现处理的方法源码如下:
public SqlSessionFactory build(Reader reader, String environment, Properties properties) {
        try {
          // 实例化 XMLConfigBuilder,用于读取配置文件信息
          XMLConfigBuilder parser = new XMLConfigBuilder(reader, environment, properties);
          // 解析配置信息,保存到 Configuration
          return build(parser.parse());
        } catch (Exception e) {
          throw ExceptionFactory.wrapException("Error building SqlSession.", e);
        } finally {
          ErrorContext.instance().reset();
          try {
            reader.close();
          } catch (IOException e) {
            // Intentionally ignore. Prefer previous error.
          }
        }
      }
复制代码
- environment 是指定加载环境,默认值为 null。
- properties 是属性配置文件,默认值为 null。 同时读取配置文件既可字符流读取,也支持字节流读取。
public SqlSessionFactory build(InputStream inputStream, String environment, Properties properties) {
        try {
          XMLConfigBuilder parser = new XMLConfigBuilder(inputStream, environment, properties);
          return build(parser.parse());
        } catch (Exception e) {
          throw ExceptionFactory.wrapException("Error building SqlSession.", e);
        } finally {
          ErrorContext.instance().reset();
          try {
            inputStream.close();
          } catch (IOException e) {
            // Intentionally ignore. Prefer previous error.
          }
        }
      }
复制代码
实例化 XMLConfigBuilder 类
通过 SqlSessionFactoryBuilder 中 XMLConfigBuilder parser = new XMLConfigBuilder(reader, environment, properties)
, 分析 XMLConfigBuilder实例化过程。
该类中有四个变量:
private boolean parsed;
    private final XPathParser parser;
    private String environment;
    private final ReflectorFactory localReflectorFactory = new DefaultReflectorFactory();
复制代码
-
parsed 是否解析,一次解析即可。用于标志配置文件只解析一次,
true为已解析过。 - parser 解析配置的解析器
-
environment 加载环境,即
SqlSessionFactoryBuilder中的environment -
localReflectorFactory 用于创建和缓存
Reflector对象,一个类对应一个Reflector。因为参数处理、结果映射等操作时,会涉及大量的反射操作。DefaultReflectorFactory实现类比较简单,这里不再进行讲解。
XMLConfigBuilder构建函数实现:
public XMLConfigBuilder(Reader reader, String environment, Properties props) {
        this(new XPathParser(reader, true, props, new XMLMapperEntityResolver()), environment, props);
    }
复制代码
实例化 XPathParser
对象
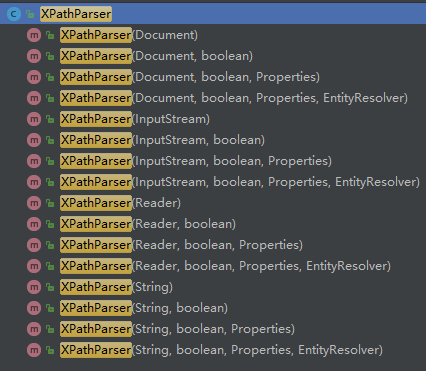
首先实例化 XPathParser
对象,里面定义了5个变量:
private final Document document;
    private boolean validation;
    private EntityResolver entityResolver;
    private Properties variables;
    private XPath xpath;
复制代码
- document 保存document对象
- validation xml解析时是否验证文档
- entityResolver 加载dtd文件
- variables 配置文件定义的值
- xpath Xpath对象,用于对XML文件节点的操作
XPathParser
对象构造函数有:
函数里面都处理了两件事:
public XPathParser(Reader reader, boolean validation, Properties variables, EntityResolver entityResolver) {
        commonConstructor(validation, variables, entityResolver);
        this.document = createDocument(new InputSource(reader));
    }
复制代码
-
初始化赋值,和创建
XPath对象,用于对XML文件节点的操作。
private void commonConstructor(boolean validation, Properties variables, EntityResolver entityResolver) {
        this.validation = validation;
        this.entityResolver = entityResolver;
        this.variables = variables;
        // 创建Xpath对象,用于对XML文件节点的操作
        XPathFactory factory = XPathFactory.newInstance();
        this.xpath = factory.newXPath();
    }
复制代码
-
创建
Document对象并赋值到document变量, 这里属于Document创建的操作,不再详细讲述,不懂可以点击这里查看API
private Document createDocument(InputSource inputSource) {
        // important: this must only be called AFTER common constructor
        try {
          // 实例化 DocumentBuilderFactory 对象,用于创建 DocumentBuilder 对象
          DocumentBuilderFactory factory = DocumentBuilderFactory.newInstance();
          // 是否校验文档
          factory.setValidating(validation);
          // 设置 DocumentBuilderFactory 的配置
          factory.setNamespaceAware(false);
          factory.setIgnoringComments(true);
          factory.setIgnoringElementContentWhitespace(false);
          factory.setCoalescing(false);
          factory.setExpandEntityReferences(true);
          // 创建 DocumentBuilder
          DocumentBuilder builder = factory.newDocumentBuilder();
          builder.setEntityResolver(entityResolver);
          builder.setErrorHandler(new ErrorHandler() {
            @Override
            public void error(SAXParseException exception) throws SAXException {
              throw exception;
            }

            @Override
            public void fatalError(SAXParseException exception) throws SAXException {
              throw exception;
            }

            @Override
            public void warning(SAXParseException exception) throws SAXException {
            }
          });
          // 加载文件
          return builder.parse(inputSource);
        } catch (Exception e) {
          throw new BuilderException("Error creating document instance.  Cause: " + e, e);
        }
    }
复制代码
XMLConfigBuilder
构造函数赋值
private XMLConfigBuilder(XPathParser parser, String environment, Properties props) {
        super(new Configuration());
        ErrorContext.instance().resource("SQL Mapper Configuration");
        this.configuration.setVariables(props);
        this.parsed = false;
        this.environment = environment;
        this.parser = parser;
    }
复制代码
-
初始化父类
BaseBuilder的值。 - 将外部值赋值给对象。
-
将实例化的
XPathParser赋值给parser。
最后返回 XMLConfigBuilder
对象。
解析 XMLConfigBuilder 对象
通过 XMLConfigBuilder.parse()
解析配置信息,保存至 Configuration
。解析详解在后面文章中进行分析。
public Configuration parse() {
        // 是否解析过配置文件
        if (parsed) {
          throw new BuilderException("Each XMLConfigBuilder can only be used once.");
        }
        // 标志解析过,定义为 true
        parsed = true;
        // 解析 configuration 节点中的信息
        parseConfiguration(parser.evalNode("/configuration"));
        return configuration;
    }
复制代码
创建 SqlSessionFactory
DefaultSqlSessionFactory
实现了 SqlSessionFactory
接口。
通过上面解析得到的 Configuration
,调用 SqlSessionFactoryBuilder.build(Configuration config)
创建一个 DefaultSqlSessionFactory
。
public SqlSessionFactory build(Configuration config) {
        return new DefaultSqlSessionFactory(config);
    }
复制代码
实例化 DefaultSqlSessionFactory
的过程,就是将 Configuration
传递给 DefaultSqlSessionFactory
成员变量 configuration
。
public DefaultSqlSessionFactory(Configuration configuration) {
        this.configuration = configuration;
    }
复制代码
创建 SqlSession
通过调用 SqlSessionFactory.openSession()
创建 SqlSession
。
public interface SqlSessionFactory {
      // 默认创建
      SqlSession openSession();

      SqlSession openSession(boolean autoCommit);
      SqlSession openSession(Connection connection);
      SqlSession openSession(TransactionIsolationLevel level);

      SqlSession openSession(ExecutorType execType);
      SqlSession openSession(ExecutorType execType, boolean autoCommit);
      SqlSession openSession(ExecutorType execType, TransactionIsolationLevel level);
      SqlSession openSession(ExecutorType execType, Connection connection);

      Configuration getConfiguration();

    }
复制代码
- autoCommit 是否自动提交事务,
- level 事务隔离级别(共5个级别), 可查看相关源码
- connection 连接
-
execType 执行器的类型:
SIMPLE(不做特殊处理),REUSE(复用预处理语句),BATCH(会批量执行)
因为上面 DefaultSqlSessionFactory
实现了 SqlSessionFactory
接口,所以进入到 DefaultSqlSessionFactory
查看 openSession()
。
public SqlSession openSession() {
        return openSessionFromDataSource(configuration.getDefaultExecutorType(), null, false);
    }
复制代码
openSession()
方法最终实现代码如下:
private SqlSession openSessionFromDataSource(ExecutorType execType, TransactionIsolationLevel level, boolean autoCommit) {
        Transaction tx = null;
        try {
          // 获取configuration中的加载环境
          final Environment environment = configuration.getEnvironment();
          // 获取事务工厂
          final TransactionFactory transactionFactory = getTransactionFactoryFromEnvironment(environment);
          // 创建一个事务
          tx = transactionFactory.newTransaction(environment.getDataSource(), level, autoCommit);
          // 生成一个处理器,事务保存在处理器 BaseExecutor 中
          final Executor executor = configuration.newExecutor(tx, execType);
          // 实例化一个 DefaultSqlSession,DefaultSqlSession实现了SqlSession接口
          return new DefaultSqlSession(configuration, executor, autoCommit);
        } catch (Exception e) {
          // 异常情况下关闭事务
          closeTransaction(tx); // may have fetched a connection so lets call close()
          throw ExceptionFactory.wrapException("Error opening session.  Cause: " + e, e);
        } finally {
          // 重置错误实例上下文
          ErrorContext.instance().reset();
        }
    }
复制代码
生成处理器 Configuration.newExecutor(Transaction transaction, ExecutorType executorType)
:
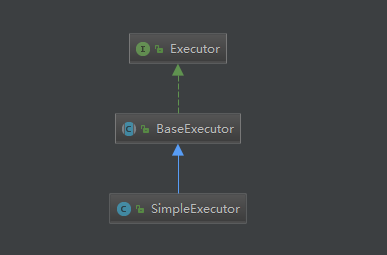
public Executor newExecutor(Transaction transaction, ExecutorType executorType) {
        // 默认为 ExecutorType.SIMPLE
        executorType = executorType == null ? defaultExecutorType : executorType;
        executorType = executorType == null ? ExecutorType.SIMPLE : executorType;
        Executor executor;
        if (ExecutorType.BATCH == executorType) {
          executor = new BatchExecutor(this, transaction);
        } else if (ExecutorType.REUSE == executorType) {
          executor = new ReuseExecutor(this, transaction);
        } else {
          executor = new SimpleExecutor(this, transaction);
        }
        if (cacheEnabled) {
          executor = new CachingExecutor(executor);
        }
        executor = (Executor) interceptorChain.pluginAll(executor);
        return executor;
    }
复制代码
以 ExecutorType.SIMPLE
为例, BatchExecutor
, ReuseExecutor
同理:
至此,mybatis的启动流程大致简单的介绍到这里,对mybatis的启动初始化有个大致了解。接下将会针对单独模块进行详细分析。
我的公众号 ytao

正文到此结束
- 本文标签: tar NSA Document 详细分析 处理器 executor IDE parse Connection autocommit cache https 数据 解析 dataSource 文章 plugin stream struct UI HTML final ACE sqlsession 缓存 node 配置 App 参数 http mapper session 源码 map CTO mybatis entity SqlSessionFactory id apache sql 代码 XML src SqlSessionFactoryBuilder iBATIS cat API 实例 build Action IO
- 版权声明: 本文为互联网转载文章,出处已在文章中说明(部分除外)。如果侵权,请联系本站长删除,谢谢。
- 本文海报: 生成海报一 生成海报二
热门推荐


相关文章


Loading...
![[HBLOG]公众号](http://www.liuhaihua.cn/img/qrcode_gzh.jpg)

