SpringCloud 微服务实战笔记
这是很早以前在我的博客上写的关于 SpringCloud 的一些实战笔记,现在我把这些实战笔记集合起来贴到这里,可能会对一些刚刚接触 SpringCloud 微服务的小伙伴有帮助。
SpringBoot 构建项目
在我们使用传统的 spring 开发一个 web 应用程序通常会想到一些基本的需要:
-
web.xml 文件(配置 springMVC 的 DispatcherServlet,各种过滤器等等);
-
启用了 springMVC 的 spring 配置文件;
-
mybatis 等数据库配置文件等。
以上的这些仅仅只是基本的需求,无论是开发一个大型项目或者只是一个 hello word 程序,都需要配置几乎同等的配置文件,既然这些都是通用的东西,那有什么东西可以把这些给自动配置了呢?这时候 springboot 的自动配置功能就派上用场了,springboot 会为这些常用的配置进行自动配置。这些自动配置涉及很多方面,比如:java 持久化 api,各种 web 模板,springMVC 等等。
1. 起步依赖
平时我们使用 maven 创建一个 web 项目的时候,常常需要想项目需要哪些包,以及包的版本。但是在 springboot 创建 web 应用的时候,你只需你只需添加 springboot 的 Web 起步依赖(org.springframework.boot:spring-boot-starter-web)。它会根据依赖传递把其他所需依赖引入项目里面。
而其它你需要的功能,你只需要引入相关的的起步依赖即可。
2. 内嵌 Servlet 容器
其实 springboot 并不是一个应用服务器,它之所以可以运行 web 应用程序,是因为其内部已经内嵌了一个 Servlet 容器(Tomcat、Jetty 或 Undertow),其运行原理是把 web 应用直接打包成为一个 jar/war,然后这个 jar/war 是可以直接启动的,不需要另外配置一个 Web Server。相关的 embed 类就是它的依赖包。
3. Spring Initializr 构建 springboot 应用程序
本文使用的是 intellij idea 中的 Spring Initializr 工具创建 springboot 应用程序。
菜单栏中选择 File => New => Project.. ,步骤大概是选择构建的工程类型,如:maven,Gradle;language 的选择;选择 Spring Boot 版本和起步依赖包等等。具体创建步骤这里就省略了。

spring boot 项目结构如图所示,整个项目结构遵循了 maven 项目的布局,主要的应用程序代码位于 src/main/java 目录里,资源都在 src/main/resources 目录里,测试代码则在 src/test/java 目录里。不同的是,web 页面模板移到 templates 了,我的项目现在主要用 thymeleaf 模板作为 web 页面。
在结构图你会发现一些与 springboot 密切项目的文件:
-
WebGatewayApplication.java:应用程序的启动引导类(bootstrap class),也是主要的 Spring 配置类;
-
application.properties:用于配置应用程序和 Spring Boot 的属性;
-
ReadingListApplicationTests.java:一个基本的集成测试类。
-
banner.txt:spring boot 应用程序启动时加载的文件。
3.1 启动引导 Spring
前面我们看到的 WebGatewayApplication.java 在 springboot 应用程序中主要有两个作用:配置和启动引导。而也是 Spring 的主要配置类。虽然 springboot 的自动配置免除了很多 Spring 配置,但你还需要进行少量配置来启用自动配置。
程序清单:
package com.crm;
import org.springframework.boot.SpringApplication;
import org.springframework.boot.autoconfigure.SpringBootApplication;

@SpringBootApplication  // 开启组件扫描和自动配置
public class WebGatewayApplication {
    public static void main(String[] args) {
    	SpringApplication.run(WebGatewayApplication.class, args);// 启动引导应用程序
    }
}
3.2 配置应用程序属性
用 Spring Initializr 生成的 application.properties 文件只是一个空文件,它可以删除完全不影响应用程序的运行,但是,如果你想修改应用程序的属性,你就得在里面配置相关属性了,比如你在里面配置了 server.port=9010,嵌入式的 tomcat 服务器的监听端口就不是默认的 8080 了,变成了 9010。而且这个属性文件是自动被加载的。
这是我的项目 application.properties 属性配置:
###### MySQL配置
spring.datasource.name=test
spring.datasource.url=jdbc:mysql://localhost:3306/crm?characterEncoding=UTF8
spring.datasource.username=zch
spring.datasource.password=123456
spring.datasource.driver-class-name=com.mysql.jdbc.Driver
spring.datasource.filters=stat
spring.datasource.maxActive=20
spring.datasource.initialSize=1
spring.datasource.maxWait=60000
spring.datasource.minIdle=1
spring.datasource.timeBetweenEvictionRunsMillis=60000
spring.datasource.minEvictableIdleTimeMillis=300000
spring.datasource.validationQuery=select 'x'
spring.datasource.testWhileIdle=true
spring.datasource.testOnBorrow=false
spring.datasource.testOnReturn=false
spring.datasource.poolPreparedStatements=true
spring.datasource.maxOpenPreparedStatements=20
###### mybatis
mybatis.typeAliasesPackage=com.joosure.integral.cloud.pojo.cloud
mybatis.mapperLocations=classpath:mapper/*.xml
####### thymeleaf
spring.thymeleaf.cache=false
spring.thymeleaf.check-template-location=true
spring.thymeleaf.content-type=text/html
spring.thymeleaf.enabled=true
spring.thymeleaf.encoding=UTF-8
spring.thymeleaf.excluded-view-names=
spring.thymeleaf.mode=HTML5
spring.thymeleaf.prefix=classpath:/templates/
spring.thymeleaf.suffix=.html
spring.thymeleaf.template-resolver-order=
3.3 构建过程解释
我的项目用的是 maven 作为构建工具,因此用 Spring Initializr 会生成 pom.xml 文件,这与创建普通的 maven 项目一样,代码清单如下:
<version>0.0.1-SNAPSHOT</version>
	<packaging>jar</packaging>

	<name>crm</name>
	<description>crm-system</description>

	<parent> <!-- 从spring-boot-starterparent继承版本号 -->
		<groupId>org.springframework.boot</groupId>
		<artifactId>spring-boot-starter-parent</artifactId>
		<version>1.5.3.RELEASE</version>
		<relativePath/> <!-- lookup parent from repository -->
	</parent>

	<properties>
		<project.build.sourceEncoding>UTF-8</project.build.sourceEncoding>
		<project.reporting.outputEncoding>UTF-8</project.reporting.outputEncoding>
		<java.version>1.8</java.version>
	</properties>

	<dependencies><!-- 起步依赖 -->
		<dependency>
			<groupId>org.springframework.boot</groupId>
			<artifactId>spring-boot-starter-aop</artifactId>
		</dependency>

		<!--web及模板引擎-->
		<dependency>
			<groupId>org.springframework.boot</groupId>
			<artifactId>spring-boot-starter-thymeleaf</artifactId>
		</dependency>
		<dependency>
			<groupId>org.springframework.boot</groupId>
			<artifactId>spring-boot-starter-web</artifactId>
		</dependency>

		<!--数据库-->
		<dependency>
			<groupId>mysql</groupId>
			<artifactId>mysql-connector-java</artifactId>
			<scope>runtime</scope>
		</dependency>
		<dependency>
			<groupId>org.springframework.boot</groupId>
			<artifactId>spring-boot-starter-jdbc</artifactId>
		</dependency>
		<dependency>
			<groupId>org.mybatis.spring.boot</groupId>
			<artifactId>mybatis-spring-boot-starter</artifactId>
			<version>1.3.0</version>
		</dependency>

		<!--测试-->
		<dependency>
			<groupId>org.springframework.boot</groupId>
			<artifactId>spring-boot-starter-test</artifactId>
			<scope>test</scope>
		</dependency>
	</dependencies>

	<build><!-- 运行spring boot插件 -->
		<plugins>
			<plugin>
				<groupId>org.springframework.boot</groupId>
				<artifactId>spring-boot-maven-plugin</artifactId>
			</plugin>
		</plugins>
	</build>

</project>
-
其中 Artifact ID 为 spring-boot-starter-xxx 的都是 spring boot 起步依赖;
-
构建插件的主要功能是把项目打包成一个可执行的超级 JAR(uber-JAR),包括把应用程序的所有依赖打入 JAR 文件内,并为 JAR 添加一个描述文件,其中的内容能让你用 java -jar 来运行应用程序;
-
Maven 构建说明中还将 spring-boot-starter-parent 作为上一级,这样一来就能利用 Maven 的依赖管理功能,继承很多常用库的依赖版本,在你声明依赖时就不用再去指定版本号了。
服务注册与发现
现在公司的积分联盟平台系统构建于公司内部的第 4 代架构中,而第 4 代就是 基于 SpringCloud 的微服务架构,趁着项目上手,花了几天研究了一下。
SpringCloud 是一个庞大的分布式系统,它包含了众多模块,其中主要有:服务发现(Eureka),断路器(Hystrix),智能路由(Zuul),客户端负载均衡(Ribbon)等。也就是说微服务架构就是将一个完整的应用从数据存储开始垂直拆分成多个不同的服务,每个服务都能独立部署、独立维护、独立扩展,服务与服务间通过诸如 RESTful API 的方式互相调用。
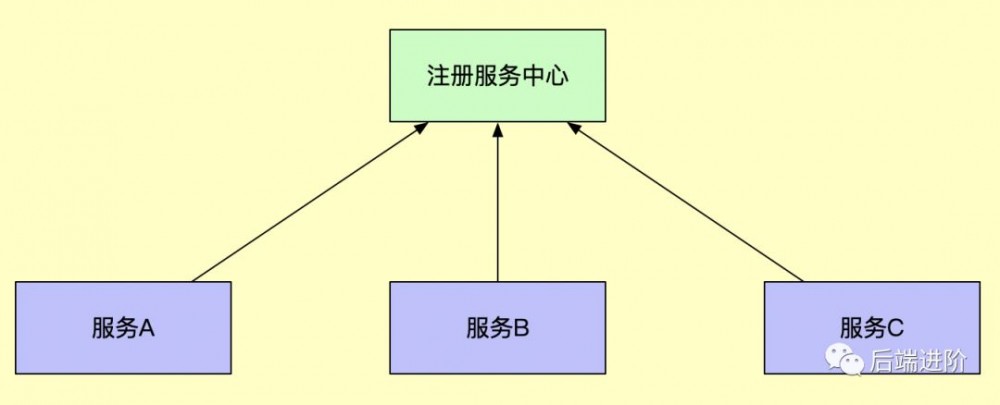
1. 创建服务注册中心
-
在搭建 SpringCloud 分布式系统前我们需要创建一个注册服务中心,以便监控其余模块的状况。这里需要在 pom.xml 中引入:
<dependency>
  <groupId>org.springframework.cloud</groupId>
  <artifactId>spring-cloud-starter-eureka-server</artifactId>
</dependency>
-
并且在 SpringBoot 主程序中加入@EnableEurekaServer 注解:
@EnableEurekaServer
@SpringCloudApplication
public class EurekaServerApplication {

    public static void main(String[] args) {
        SpringApplication.run(EurekaServerApplication.class, args);
    }
}
-
接下来在 SpringBoot 的属性配置文件 application.properties 中如下配置:
server.port=9100
eureka.client.register-with-eureka=false
eureka.client.fetch-registry=false
eureka.client.serviceUrl.defaultZone=http://localhost:${server.port}/eureka/
server.port 就是你指定注册服务中心的端口号,在启动服务后,可以通过访问http://localhost:9100服务发现页面,如下:
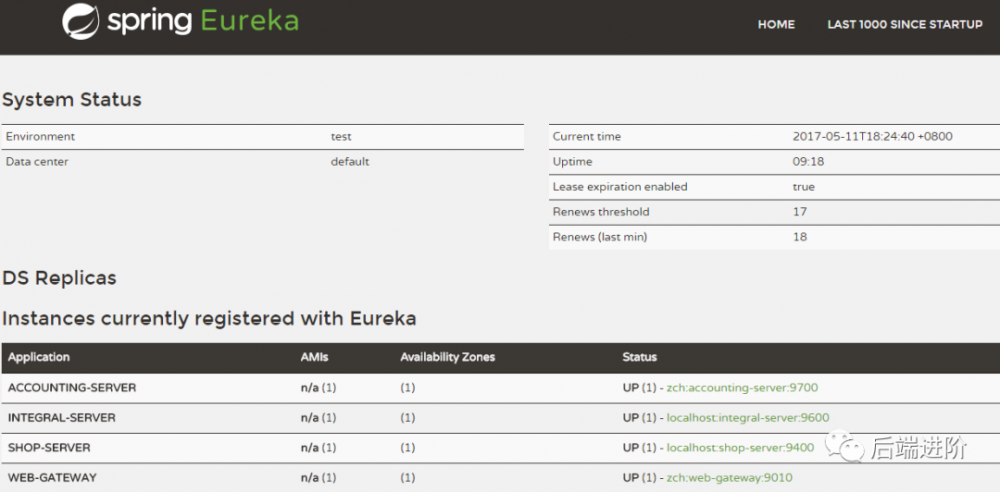
2. 创建服务方
我们可以发现其它系统在这里注册并显示在页面上了,想要注册到服务中心,需要在系统上做一些配置,步骤跟创建服务注册中心类似,这里 web-gateway 系统做例子:
-
首先在 pom.xml 中加入:
<dependency>
   <groupId>org.springframework.cloud</groupId>
   <artifactId>spring-cloud-starter-eureka</artifactId>
 </dependency>
-
在 SpringBoot 主程序中加入@EnableDiscoveryClient 注解,该注解能激活 Eureka 中的
DiscoveryClient实现,才能实现 Controller 中对服务信息的输出:
@EnableDiscoveryClient
@SpringBootApplication
public class WebGatewayApplication {
	public static void main(String[] args) {
		SpringApplication.run(WebGatewayApplication.class, args);
	}
}
-
在 SpringBoot 的属性配置文件 application.properties 中如下配置:
spring.application.name=web-gateway
server.port=9010
eureka.client.serviceUrl.defaultZone=http://localhost:9100/eureka/
eureka.instance.leaseRenewalIntervalInSeconds=5
再次启动服务中心,打开链接:http://localhost:9100/,就可以看到刚刚创建的服务了。
服务消费者
在系统与系统之间,如何进行相互间的调用呢?也就是说怎么去调用服务提供的接口内容呢?这里就要说一下 Ribbon 了,Ribbon 是一个基于 http 和 tcp 客户端的负载均衡器。
下面我来简单介绍如何在 SpringCloud 分布式系统下使用 Ribbon 来实现负载均衡。
-
首先在 pom.xml 中引入一下依赖:
<dependency>
  <groupId>org.springframework.cloud</groupId>
  <artifactId>spring-cloud-starter-ribbon</artifactId>
</dependency>
-
然后在 spring boot 主程序中创建 RestTemplate 类,并为它加上@LoadBalanced 注解开启负载均衡的能力:
@EnableDiscoveryClient
@SpringBootApplication
public class WebGatewayApplication {

	@Bean
	@LoadBalanced
	RestTemplate restTemplate() {
		return new RestTemplate();
	}

	public static void main(String[] args) {
		SpringApplication.run(WebGatewayApplication.class, args);
	}
}
RestTemplate 类是 Spring 用于构建 Restful 服务而提供的一种 Rest 服务可客户端,RestTemplate 提供了多种便捷访问远程 Http 服务的方法。
在 apllication.properties 配置文件中配置 eureka 服务,并注册到服务中心:
spring.application.name=integral-server
server.port=9600
eureka.client.serviceUrl.defaultZone=http://localhost:9100/eureka/
-
在公司项目中正是通过 RestTemplate 来访问各个微服务提供的接口,比如在项目中要访问积分系统 integral-server,添加积分用户:
JSONObject integralServerResult = restTemplate.postForObject("http://integral-server/shop/add", RequestHandler.getRestRawRequestEntity(integralShopJson), JSONObject.class);
这样就可以调用 integral-server 系统的添加用户的接口实现在别的系统中添加用户了。
-
我们也可以在 application.properties 配置文件中加入:
###### Ribbon
ribbon.ReadTimeout=60000
这个是设置负载均衡的超时时间的。
断路器
微服务架构中,各个 系统被拆 分成一个个服务单 元,链路调用可能包括很多个服务单元,而每个单元又会个 N 个服务单元提供服务,因此如果有一个服务单元出现故障,就可能导致其它依赖此服务的服务单元出现延迟,导致整个微服务系统出现雪崩效应。
在 SpringCloud 模块中有一个叫 Netflix Hystrix 的断路器模块,就是专门解决这个问题而生的,Hystrix 是 Netflix 开源的微服务框架套件之一,该框架目标在于通过控制那些访问远程系统、服务和第三方库的节点,从而对延迟和故障提供更强大的容错能力。
下面来说一下 Hystrix 在微服务系统中的具体用法:
-
首先还是在 pom.xml 中加入以下依赖:
<dependency>
    <groupId>org.springframework.cloud</groupId>
    <artifactId>spring-cloud-starter-hystrix</artifactId>
</dependency>
-
在 spring boot 主程序中加入@EnableCircuitBreaker 注解开启断路器模式:
@EnableEurekaClient
@EnableCircuitBreaker
@EnableDiscoveryClient
@SpringBootApplication
public class WebGatewayApplication {

	@Bean
	@LoadBalanced
	RestTemplate restTemplate() {
		return new RestTemplate();
	}

	public static void main(String[] args) {
		SpringApplication.run(WebGatewayApplication.class, args);
	}
如果在调用过程中返回类似这样的响应:
Whitelabel Error Page

This application has no explicit mapping for /error, so you are seeing this as a fallback.

Sat May 13 00:10:22 CST 2017
There was an unexpected error (type=Internal Server Error, status=500).
400 null
断路器也就开启了。
-
我们也可以在 application.properties 配置文件中加入:
## hystrix
hystrix.commond.default.execution.isolation.thread.timeoutInMilliseconds=60000
这个设置可以更改返回错误响应的超时时间。
-
如果不想返回默认的错误响应信息,我们还可以通过自定义来更改错误响应信息,我们需要一个类中注入一个 RestTemplate 类:
@Autowired
 RestTemplate restTemplate;
这个类在上面已经通过 Spring 创建好了,这里直接注入在类中即可,接下来我们在类中写一个方法:
@HystrixCommand(fallbackMethod = "addServiceFallback")
    public String addService() {
        return restTemplate.postForObject("http://integral-server/shop/add", RequestHandler.getRestRawRequestEntity(integralShopJson), JSONObject.class);
    }
    public String addServiceFallback() {
        return "error";
    }
当调用 integral-server 系统的添加接口超出延时的时间时,就会返回“error”。
服务网关
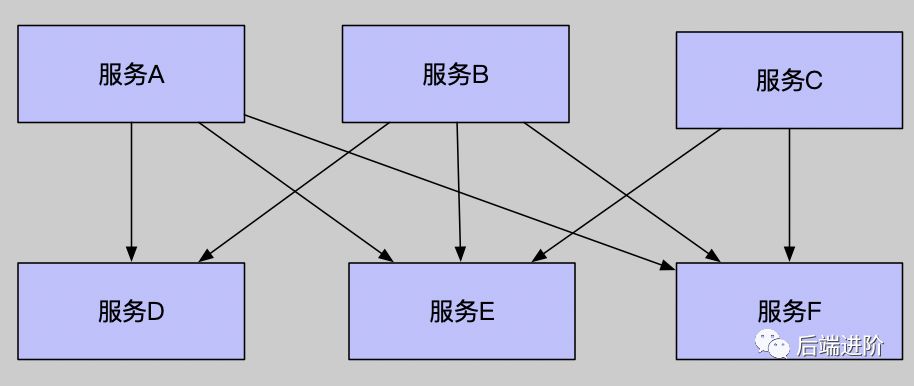
前面我们通过 Ribbon 实现服务的消费和负载均衡,但还有些不足的地方,举个例子,服务 A 和服务 B,他们都注册到服务注册中心,这里还有个对外提供的一个服务,这个服务通过负载均衡提供调用服务 A 和服务 B 的方法,那么问题来了,每个服务都变得有状态了,即每个服务都需要维护一套校验逻辑,这样会带来对外接口有污染。而且权限等不好集中管理,整个集群处于混乱之中。
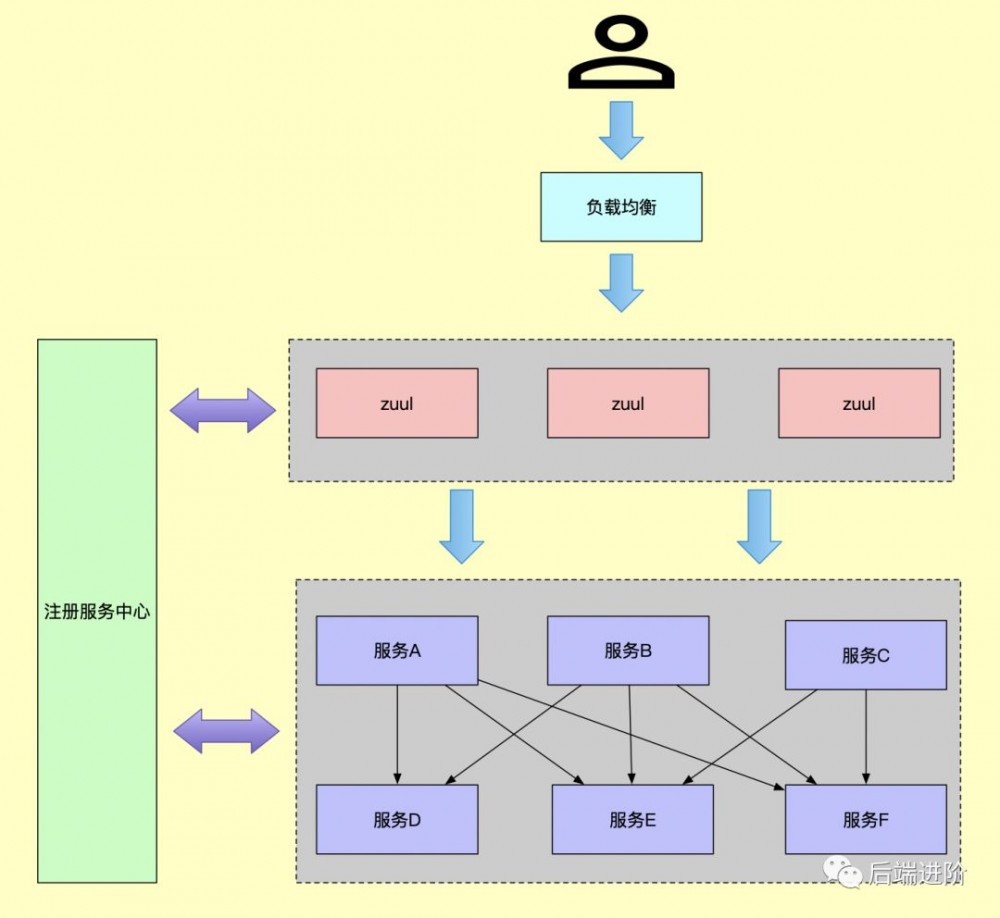
最好的方法就是把所有请求都集中在最前端的地方,这地方就是 zuul 服务网关。
服务网关是微服务架构组件中处于最外一层,通过服务网关统一,可以将链路前端集中管理起来,除了具备服务路由、均衡负载功能之外,它还需要具备权限控制等功能。Spring Cloud Netflix 中的 Zuul 就担任了这样的一个角色,为微服务披上了一层保护层,也方便了权限校验集中管理,增加了接口的通用性。
1. 配置服务路由
-
要使用 zuul,就要引入它的依赖:
<dependency>
    <groupId>org.springframework.cloud</groupId>
    <artifactId>spring-cloud-starter-zuul</artifactId>
</dependency>
-
在 spring boot 主程序中加入@EnableZuulProxy 注解开启 zuul:
@EnableEurekaClient
@EnableZuulProxy
@EnableDiscoveryClient
@SpringBootApplication
public class WebGatewayApplication {

	@Bean
	@LoadBalanced
	RestTemplate restTemplate() {
		return new RestTemplate();
	}

	public static void main(String[] args) {
		SpringApplication.run(WebGatewayApplication.class, args);
	}
}
-
在 application.properties 配置文件中配置 zuul 路由 url:
spring.application.name=web-gateway
server.port=9010
到这里,一个微服务 zuul 服务网关系统已经可以运行了,接下来就是如何配置访问其它微服务系统的 url,zuul 提供了两种配置方式,一种是通过 url 直接映射,另一种是利用注册到 eureka server 中的服务 id 作映射:
-
url 直接映射:
zuul.routes.api-integral.path=/api-integral-url/**
zuul.routes.api-integral.url=http://localhost:8080/
以上规则意思是 / api -integral - u rl/ ** 的访问都会被路由到 http://localhost:8080/ 上。
-
但是这么做必须得知道所有的微服务的地址,才能完成配置,这时我们可以利用注册到 eureka server 中的服务 id 作映射:
###### Zuul配置
zuul.routes.api-integral.path=/integral/**
zuul.routes.api-integral.serviceId=integral-server

zuul.routes.api-member.path=/member/**
zuul.routes.api-member.serviceId=member-server
integral-server 和 member-server 是这俩微服务系统注册到微服务中心的一个 serverId,我们通过配置,访问 http://localhost:9010/integual/add?a=1&b=2 ,该请求就会访问 integral-server 系统中的 add 服务。
2. 服务过滤
在定义 zuul 网关服务过滤只需要创建一个继承 ZuulFilter 抽象类并重写四个方法即可,下面是 ZuulFilter 的一些解释:
-
filterType:过滤类型,具体如下:
pre:请求路由之前执行;
routing:请求路由时执行;
post:在 routing 和 error 过滤器之后执行;
error:在请求发生错误的时候执行;
-
filterOrder:定义过滤器的执行顺序
-
shouldFilter:判断该过滤器是否要执行,
-
run:过滤器的具体逻辑。
标准实例程序:
public class ErrFilter extends ZuulFilter {
    @Override
    public String filterType() {
        return "pre";
    }

    @Override
    public int filterOrder() {
        return 0;
    }

    @Override
    public boolean shouldFilter() {
        return true;
    }

    @Override
    public Object run() {
        RequestContext ctx = RequestContext.getCurrentContext();
        HttpServletRequest request = ctx.getRequest();

        Object accessToken = request.getParameter("accessToken");
        if(accessToken == null) {
            log.warn("access token is empty");
            ctx.setSendZuulResponse(false);
            ctx.setResponseStatusCode(401);
            return null;
        }
        return null;
    }
}
在自定过滤器之后,我们还需要在 SpringBoot 主程序中加入@EnableZuulProxy 注解来开启 zuul 路由的服务过滤:
@EnableZuulProxy
@EnableEurekaClient
@RibbonClients
@SpringCloudApplication
public class ApiGatewayApplication {

	public static void main(String[] args) {
		SpringApplication.run(ApiGatewayApplication.class, args);
	}

	@Bean
	PosPreFilter posPreFilter(){
		return new PosPreFilter();
	}
到这里,微服务系统的 zuul 路由功能基本搭建完成。

Feign
之前说过了微服务间,我是通过 Spring 的 RestTemplate 类来相互调用的,它可通过整合 Ribbon 实现负载均衡,但发现了这样写不够优雅,且不够模板化,因此本篇介绍一下 Feign。
Feign 是一种声明式、模板化的 HTTP 客户端,在 Spring Cloud 中使用 Feign 其实就是创建一个接口类,它跟普通接口没啥两样,因此通过 Feign 调用 HTTP 请求,开发者完全感知不到这是远程方法。
2. 整合 Feign
-
添加 Feign 依赖:
<dependency>
  <groupId>org.springframework.cloud</groupId>
  <artifactId>spring-cloud-starter-feign</artifactId>
</dependency>
-
创建 一个 Feign 接口:
@FeignClient(value = FeignConst.COUPON_PROVIDER, url = "${feign.coupon.url:}")
public interface CouponClient {

  @GetMapping(value = "/coupon/list/page", headers = LocalsEncoder.CONTENT_TYPE_LOCALS_GET)
  RestResponse couponList(@ModelAttribute CouponCriteria criteria);

}
-
启动 Feign 类
@EnableFeignClients(basePackages = {"com.objcoding"})
@SpringCloudApplication
public class ProviderApplication {

}
2. 服务降级
当网络不稳定时,一个接口响应非常慢,就会一直占用这个连接资源,如果长时间不做处理,会导致系统雪崩,幸好,Feign 已经继承了熔断器 Hystrix
@FeignClient(value = FeignConst.COUPON_PROVIDER, url = "${feign.coupon.url:}", fallback = CouponClient.CouponClientFallBack.class)
public interface CouponClient {

  @GetMapping(value = "/coupon/list/page", headers = LocalsEncoder.CONTENT_TYPE_LOCALS_GET)
  RestResponse couponList(@ModelAttribute CouponCriteria criteria);

  @Component
  class CouponClientFallBack implements CouponClient {
    @Override
    public RestResponse couponList(CouponCriteria criteria) {
      return RestResponse.failed("网络超时");
    }
  }

}
3. 拦截器
有时候微服务间的调用,需要传递权限信息,这些信息都包含在请求头了,这时我们可以通过 Feign 拦截器实现权限穿透:
@Configuration
public class WebRequestInterceptor {

  @Bean
  public RequestInterceptor headerInterceptor() {
    return template -> {
      ServletRequestAttributes attributes = (ServletRequestAttributes) RequestContextHolder.getRequestAttributes();
      if (attributes == null) {
        return;
      }
      HttpServletRequest request = attributes.getRequest();
      Enumeration<String> headerNames = request.getHeaderNames();
      if (headerNames != null) {
        while (headerNames.hasMoreElements()) {
          String name = headerNames.nextElement();
          String values = request.getHeader(name);
          template.header(name, values);
        }
      }
    };
  }
}
近期热文
我对支付平台架构设计的一些思考
分布式事务中间件Seata的设计原理
聊聊Tomcat的架构设计
基于Jenkins Pipeline自动化部署
图解: Kafka 水印备份机制
记一次 Kafka 集群线上扩容
Kafka重平衡机制
Kafka消息体大小设置的一些细节
RocketMQ为什么要保证订阅关系的一致性?
RocketMQ消息发送的高可用设计
深度解析RocketMQ Topic的创建机制
mybatis-plus源码分析之sql注入器
Mybatis源码分析之Mapper注册与绑定
Mybatis-spring源码分析之注册Mapper Bean
从源码的角度解析线程池运行原理
关于线程池你不得不知道的一些设置
你都理解创建线程池的参数吗?
Java并发之AQS源码分析(二)
Java并发之AQS源码分析(一)

长按可以订阅
正文到此结束
- 本文标签: API App value dependencies client CRM AOP 目录 分布式系统 源码 ribbon jetty Proxy tar 配置 RESTful 智能 XML 参数 build ACE IO mysql springboot classpath Spring cloud pom Statement map 管理 CTO 分布式事务 mybatis dataSource Word cache 高可用 测试 springcloud maven JDBC 负载均衡 sql Bootstrap TCP json REST Uber 博客 plugin RocketMQ 服务器 架构设计 jenkins 服务注册 js 集群 IDE 时间 实例 Eureka provider 删除 mapper 分布式 备份 权限控制 自动化 注册中心 https 部署 cat 数据 需求 Select 插件 http bean Spring Boot web token db zuul ip CST 线程 开发者 代码 解析 SpringMVC 开源 entity Service id java Hystrix 端口 Netflix tomcat 并发 数据库 HTML5 HTML list 开发 src 线程池 MQ spring 一致性 tab Feign servlet 微服务 description UI
- 版权声明: 本文为互联网转载文章,出处已在文章中说明(部分除外)。如果侵权,请联系本站长删除,谢谢。
- 本文海报: 生成海报一 生成海报二
热门推荐


相关文章

近期评论
-
你这基本没有更新呀,最近文章显示还是2019年的文章。不符合要求哈
-
关键词:慕云博客 链接:https://www.lilun.me 描述:分享原创文字的个人博客
-
-
-
可以提供一下源码吗
-
不是商业站,鸡娃学习笔记
-
-
-
-
听他们说很厉害的样子
Loading...
![[HBLOG]公众号](http://www.liuhaihua.cn/img/qrcode_gzh.jpg)

