Spring Boot2 系列教程(三十)Spring Boot 整合 Ehcache
号外号外:公号后台回复 2TB 获取超 2TB 免费 Java 学习资源。
用惯了 Redis ,很多人已经忘记了还有另一个缓存方案 Ehcache ,是的,在 Redis 一统江湖的时代,Ehcache 渐渐有点没落了,不过,我们还是有必要了解下 Ehcache ,在有的场景下,我们还是会用到 Ehcache。
今天松哥就来和大家聊聊 Spring Boot 中使用 Ehcache 的情况。相信看完本文,大家对于[ Spring Boot2 系列教程(二十六)Spring Boot 整合 Redis ]一文中的第二种方案会有更加深刻的理解。
Ehcache 也是 Java 领域比较优秀的缓存方案之一,Ehcache 这个缓存的名字很有意思,正着念反着念,都是 Ehcache,Spring Boot 中对此也提供了很好的支持,这个支持主要是通过 Spring Cache 来实现的。
Spring Cache 可以整合 Redis,当然也可以整合 Ehcache,两种缓存方案的整合还是比较相似,主要是配置的差异,具体的用法是一模一样的,就类似于 JDBC 和 数据库驱动的关系一样。前面配置完成后,后面具体使用的 API 都是一样的。
和 Spring Cache + Redis 相比,Spring Cache + Ehcache 主要是配置有所差异,具体的用法是一模一样的。我们来看下使用步骤。
项目创建
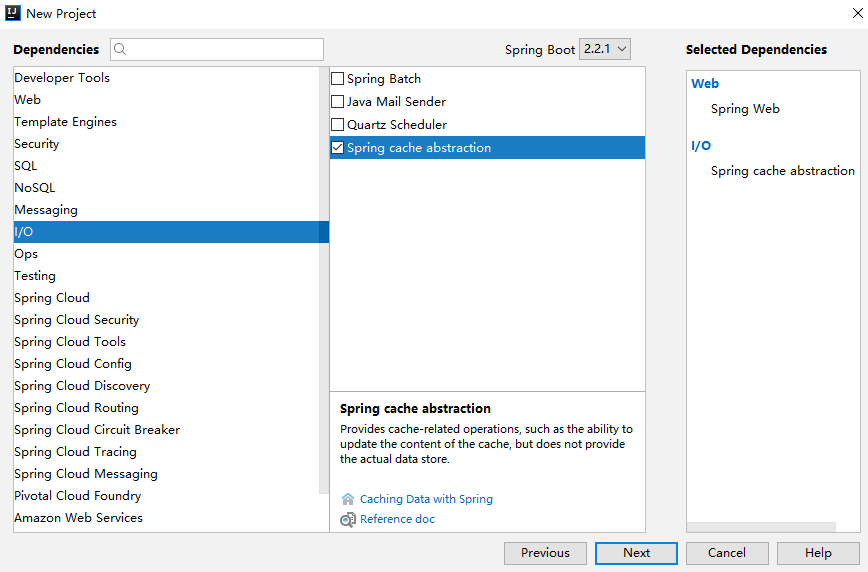
首先,来创建一个 Spring Boot 项目,引入 Cache 依赖:
工程创建完成后,引入 Ehcache 的依赖,Ehcache 目前有两个版本:
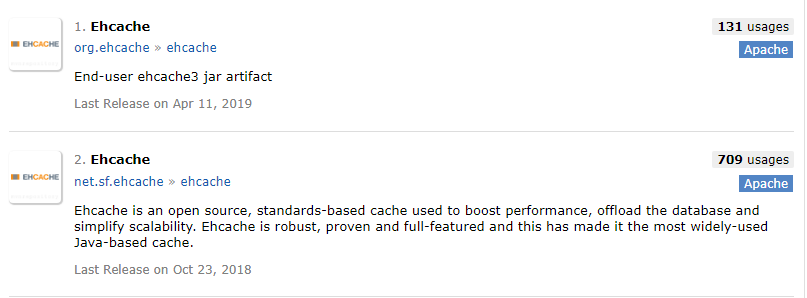
这里采用第二个,在 pom.xml 文件中,引入 Ehcache 依赖:
<dependencies>
    <dependency>
        <groupId>org.springframework.boot</groupId>
        <artifactId>spring-boot-starter-cache</artifactId>
    </dependency>
    <dependency>
        <groupId>org.springframework.boot</groupId>
        <artifactId>spring-boot-starter-web</artifactId>
    </dependency>
    <dependency>
        <groupId>net.sf.ehcache</groupId>
        <artifactId>ehcache</artifactId>
        <version>2.10.6</version>
    </dependency>
</dependencies>
添加 Ehcache 配置
在 resources 目录下,添加 ehcache 的配置文件 ehcache.xml ,文件内容如下:
<ehcache>
    <diskStore path="java.io.tmpdir/shiro-spring-sample"/>
    <defaultCache
            maxElementsInMemory="10000"
            eternal="false"
            timeToIdleSeconds="120"
            timeToLiveSeconds="120"
            overflowToDisk="false"
            diskPersistent="false"
            diskExpiryThreadIntervalSeconds="120"
    />
    <cache name="user"
            maxElementsInMemory="10000"
            eternal="true"
            overflowToDisk="true"
            diskPersistent="true"
            diskExpiryThreadIntervalSeconds="600"/>
</ehcache>
配置含义:
-
name:缓存名称。
-
maxElementsInMemory:缓存最大个数。
-
eternal:对象是否永久有效,一但设置了,timeout将不起作用。
-
timeToIdleSeconds:设置对象在失效前的允许闲置时间(单位:秒)。仅当eternal=false对象不是永久有效时使用,可选属性,默认值是0,也就是可闲置时间无穷大。
-
timeToLiveSeconds:设置对象在失效前允许存活时间(单位:秒)。最大时间介于创建时间和失效时间之间。仅当eternal=false对象不是永久有效时使用,默认是0.,也就是对象存活时间无穷大。
-
overflowToDisk:当内存中对象数量达到maxElementsInMemory时,Ehcache将会对象写到磁盘中。
-
diskSpoolBufferSizeMB:这个参数设置DiskStore(磁盘缓存)的缓存区大小。默认是30MB。每个Cache都应该有自己的一个缓冲区。
-
maxElementsOnDisk:硬盘最大缓存个数。
-
diskPersistent:是否缓存虚拟机重启期数据。
-
diskExpiryThreadIntervalSeconds:磁盘失效线程运行时间间隔,默认是120秒。
-
memoryStoreEvictionPolicy:当达到maxElementsInMemory限制时,Ehcache将会根据指定的策略去清理内存。默认策略是LRU(最近最少使用)。你可以设置为FIFO(先进先出)或是LFU(较少使用)。
-
clearOnFlush:内存数量最大时是否清除。
-
diskStore 则表示临时缓存的硬盘目录。
注意
默认情况下,这个文件名是固定的,必须叫 ehcache.xml ,如果一定要换一个名字,那么需要在 application.properties 中明确指定配置文件名,配置方式如下:
spring.cache.ehcache.config=classpath:aaa.xml
开启缓存
开启缓存的方式,也和 Redis 中一样,如下添加 @EnableCaching 依赖即可:
@SpringBootApplication
@EnableCaching
public class EhcacheApplication {
    public static void main(String[] args) {
        SpringApplication.run(EhcacheApplication.class, args);
    }
}
其实到这一步,Ehcache 就算配置完成了,接下来的用法,和松哥之前讲 Redis 的文章一模一样。不过这里松哥还是带大家使用下。
使用缓存
这里主要向小伙伴们介绍缓存中几个核心的注解使用。
@CacheConfig
这个注解在类上使用,用来描述该类中所有方法使用的缓存名称,当然也可以不使用该注解,直接在具体的缓存注解上配置名称,示例代码如下:
@Service
@CacheConfig(cacheNames = "user")
public class UserService {
}
@Cacheable
这个注解一般加在查询方法上,表示将一个方法的返回值缓存起来,默认情况下,缓存的 key 就是方法的参数,缓存的 value 就是方法的返回值。示例代码如下:
@Cacheable(key = "#id")
public User getUserById(Integer id,String username) {
    System.out.println("getUserById");
    return getUserFromDBById(id);
}
当有多个参数时,默认就使用多个参数来做 key ,如果只需要其中某一个参数做 key ,则可以在 @Cacheable 注解中,通过 key 属性来指定 key ,如上代码就表示只使用 id 作为缓存的 key ,如果对 key 有复杂的要求,可以自定义 keyGenerator 。当然,Spring Cache 中提供了root对象,可以在不定义 keyGenerator 的情况下实现一些复杂的效果,root 对象有如下属性:
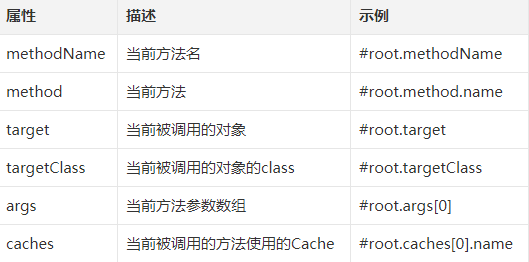
也可以通过 keyGenerator 自定义 key ,方式如下:
@Component
public class MyKeyGenerator implements KeyGenerator {
    @Override
    public Object generate(Object target, Method method, Object... params) {
        return method.getName()+Arrays.toString(params);
    }
}
然后在方法上使用该 keyGenerator :
@Cacheable(keyGenerator = "myKeyGenerator")
public User getUserById(Long id) {
    User user = new User();
    user.setId(id);
    user.setUsername("lisi");
    System.out.println(user);
    return user;
}
@CachePut
这个注解一般加在更新方法上,当数据库中的数据更新后,缓存中的数据也要跟着更新,使用该注解,可以将方法的返回值自动更新到已经存在的 key 上,示例代码如下:
@CachePut(key = "#user.id")
public User updateUserById(User user) {
    return user;
}
@CacheEvict
这个注解一般加在删除方法上,当数据库中的数据删除后,相关的缓存数据也要自动清除,该注解在使用的时候也可以配置按照某种条件删除( condition 属性)或者或者配置清除所有缓存( allEntries 属性),示例代码如下:
@CacheEvict()
public void deleteUserById(Integer id) {
    //在这里执行删除操作, 删除是去数据库中删除
}
总结
本文主要向大家了 Spring Boot 整合 Ehcache 的用法,其实说白了还是 Spring Cache 的用法。相信读完本文,大家对于 Redis + Spring Cache 的用法会有更深的认识。
本文案例我已上传到 GitHub ,欢迎大家 star:https://github.com/lenve/javaboy-code-samples
关于本文,有问题欢迎留言讨论。


1 、 Spring Boot2 系列教程(一)纯 Java 搭建 SSM 项目
2、 Spring Boot2 系列教程(二)创建 Spring Boot 项目的三种方式
3、 Spring Boot2 系列教程(三)理解 spring-boot-starter-parent
4、 Spring Boot2 系列教程(四)理解配置文件 application.properties !
5、 Spring Boot2 系列教程(五)Spring Boot中的 yaml 配置
6、 Spring Boot2 系列教程(六)自定义 Spring Boot 中的 starter
7、 Spring Boot2 系列教程(七)理解自动化配置的原理
14、 Spring Boot2 系列教程(十四)CORS 解决跨域问题
16、 Spring Boot2 系列教程(十六)定时任务的两种实现方式
21、 Spring Boot2 系列教程(二十一)整合 MyBatis
23、 Spring Boot2 系列教程(二十三)理解 Spring Data Jpa
27、 Spring Boot2 系列教程(二十七)Nginx 极简扫盲入门

喜欢就点个 "在看" 呗^_^
正文到此结束
- 本文标签: java pom cat 代码 dependencies Service tk spring 自动化 文案 GitHub 参数 JPA 缓存 目录 db 线程 API mybatis 免费 JDBC classpath 数据库 IDE value 文章 springboot Nginx tar redis key 删除 Spring Boot root 数据 XML http id web https UI App src IO update git 配置 时间 总结 cache
- 版权声明: 本文为互联网转载文章,出处已在文章中说明(部分除外)。如果侵权,请联系本站长删除,谢谢。
- 本文海报: 生成海报一 生成海报二
热门推荐


相关文章


Loading...
![[HBLOG]公众号](http://www.liuhaihua.cn/img/qrcode_gzh.jpg)

