Spring通过IOC帮我们做火鸡
一、IOC——setter注入
1、准备dmo
首先准备一只火鸡
public class Turkey {
    private int id;
    private String name;

    public int getId() {
        return id;
    }

    public void setId(int id) {
        this.id = id;
    }

    public String getName() {
        return name;
    }

    public void setName(String name) {
        this.name = name;
    }
}
然后准备一个厨房, 属性包含火鸡
public class Cookhouse {
    private int id;
    private String name;
    private Turkey turkey;

    public int getId() {
        return id;
    }

    public void setId(int id) {
        this.id = id;
    }

    public String getName() {
        return name;
    }

    public void setName(String name) {
        this.name = name;
    }

    public Turkey getTurkey() {
        return turkey;
    }

    public void setTurkey(Turkey turkey) {
        this.turkey = turkey;
    }

    @Override
    public String toString() {
        return "Cookhouse{" +
                "id=" + id +
                ", name='" + name + '/'' +
                '}';
    }
}
2、applicationContext.xml配置
给bean起个名字,class就是dmo类,property name是属性名,value和ref是属性值, 如果属性是对象要使用"ref="
<?xml version="1.0" encoding="UTF-8"?>
<beans xmlns="http://www.springframework.org/schema/beans"
       xmlns:xsi="http://www.w3.org/2001/XMLSchema-instance"
       xmlns:aop="http://www.springframework.org/schema/aop"
       xmlns:tx="http://www.springframework.org/schema/tx"
       xmlns:context="http://www.springframework.org/schema/context"
       xsi:schemaLocation="
   http://www.springframework.org/schema/beans
   http://www.springframework.org/schema/beans/spring-beans-3.0.xsd
   http://www.springframework.org/schema/aop
   http://www.springframework.org/schema/aop/spring-aop-3.0.xsd
   http://www.springframework.org/schema/tx
   http://www.springframework.org/schema/tx/spring-tx-3.0.xsd
   http://www.springframework.org/schema/context
   http://www.springframework.org/schema/context/spring-context-3.0.xsd">

    <bean name="t" class="Turkey">
        <property name="name" value="usaTurkey"/>
    </bean>

    <bean name="c" class="Cookhouse">
        <property name="name" value="cnCookhouse"/>
        <property name="turkey" ref="t"/>
    </bean>
</beans>
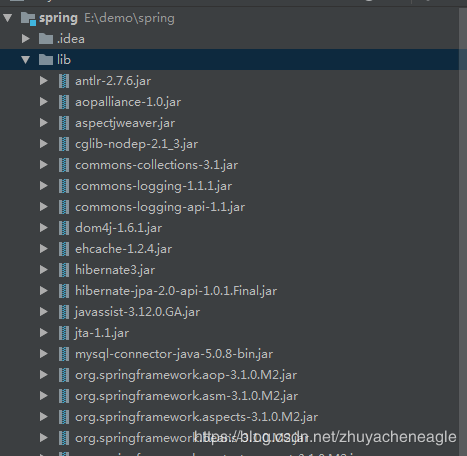
3、添加spring的相关JAR包
JAR包以及其它知识详见网上一个大神的项目: 自学网站
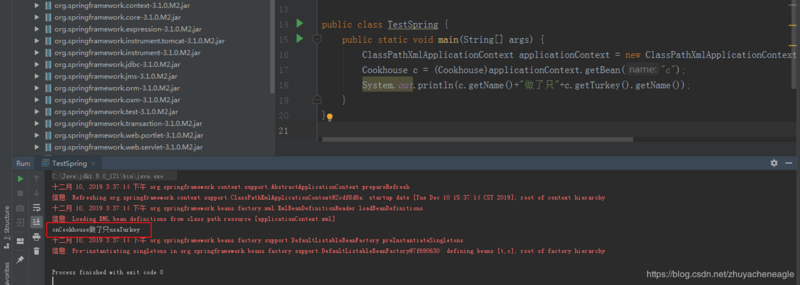
4、spring帮我们在厨房做火鸡
让spring帮我在厨房做火鸡吃,spring根据核心配置文件applicationContext.xml创建了一个中国厨房,然后做了只美国火鸡。
public class TestSpring {
    public static void main(String[] args) {
        ClassPathXmlApplicationContext applicationContext = new ClassPathXmlApplicationContext(new String[]{"applicationContext.xml"});
        Cookhouse c = (Cookhouse)applicationContext.getBean("c");
        System.out.println(c.getName()+"做了只"+c.getTurkey().getName());
    }
}
运行结果:
二、IOC——注解注入
有小伙伴说:火鸡做太慢,等饿了
spring说:那我来用注解注入的方式给你做火鸡
1、@Autowired对属性的注解
首先优化对象的注入方式,applicationContext.xml添加 <context:annotation-config/> ,表示告诉Spring要用注解的方式进行注入, <property name="turkey" ref="t"/> 就可以注释掉了,我们只需要在Cookhouse类的属性Turkey上面加上@Autowired就可以注入火鸡了
@Autowired
    private Turkey turkey;
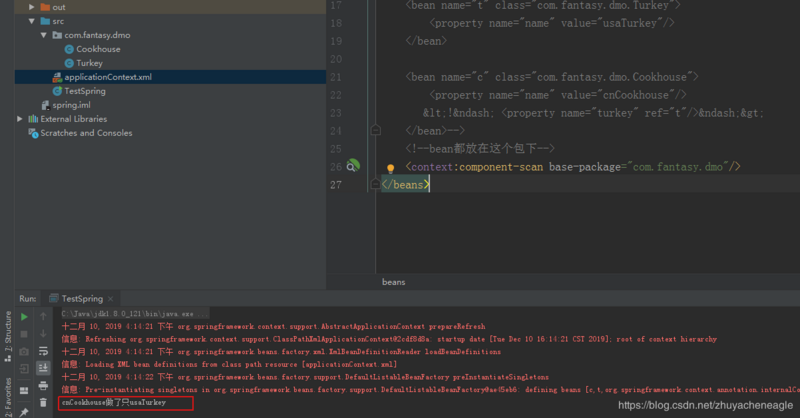
2、@Component对Bean的注解
然后优化Bean的注入方式,applicationContext.xml的Bean注入看上去还是比较繁琐,我们再简化下,只新增:
<context:component-scan base-package="com.fantasy.dmo"/>
其作用是告诉Spring,bean都放在这个包下
<?xml version="1.0" encoding="UTF-8"?>
<beans xmlns="http://www.springframework.org/schema/beans"
       xmlns:xsi="http://www.w3.org/2001/XMLSchema-instance"
       xmlns:aop="http://www.springframework.org/schema/aop"
       xmlns:tx="http://www.springframework.org/schema/tx"
       xmlns:context="http://www.springframework.org/schema/context"
       xsi:schemaLocation="
   http://www.springframework.org/schema/beans
   http://www.springframework.org/schema/beans/spring-beans-3.0.xsd
   http://www.springframework.org/schema/aop
   http://www.springframework.org/schema/aop/spring-aop-3.0.xsd
   http://www.springframework.org/schema/tx
   http://www.springframework.org/schema/tx/spring-tx-3.0.xsd
   http://www.springframework.org/schema/context
   http://www.springframework.org/schema/context/spring-context-3.0.xsd">

    <!--bean都放在这个包下-->
    <context:component-scan base-package="com.fantasy.dmo"/>
</beans>
因为Bean移到dmo了,所以在dmo分别给Cookhouse和Turkey加上注解@Component,然后给它们的属性name命名。
@Component("c")
public class Cookhouse {
    private int id;
    private String name="cnCookhouse";
    @Autowired
    private Turkey turkey;

    public int getId() {
        return id;
    }

    public void setId(int id) {
        this.id = id;
    }

    public String getName() {
        return name;
    }

    public void setName(String name) {
        this.name = name;
    }

    public Turkey getTurkey() {
        return turkey;
    }

    public void setTurkey(Turkey turkey) {
        this.turkey = turkey;
    }

    @Override
    public String toString() {
        return "com.fantasy.dmo.Cookhouse{" +
                "id=" + id +
                ", name='" + name + '/'' +
                '}';
    }
}

@Component("t")
public class Turkey {
    private int id;
    private String name="usaTurkey";

    public int getId() {
        return id;
    }

    public void setId(int id) {
        this.id = id;
    }

    public String getName() {
        return name;
    }

    public void setName(String name) {
        this.name = name;
    }
}
运行程序发现结果一样,又省去很多配置,香喷喷的火鸡做的更快了呢~
正文到此结束
热门推荐


相关文章


Loading...
![[HBLOG]公众号](http://www.liuhaihua.cn/img/qrcode_gzh.jpg)

