防止掉进Dubbo与Seata集成坑里的那些事
前言
博主最近在搞Dubbo分布式业务,相信来看此篇文章的开发朋友们对分布式这个名词肯定不陌生,在分布式业务中肯定就会牵涉到分布式事务,对于分布式事务博主开始听了这个词就觉得很难,但是其实还好,就是在整合Dubbo与Seata的其中踩了一些坑,并没有如同官方那么一帆风顺,那么本次就将整合步骤以及一些坑给大家爆出来,以防大家重蹈覆辙~
整合步骤
前提说明
我的业务框架是 Dubbo
+ Mybatis-Plus
+ Zookeeper
+ Nacos
+ Seata
,至于为什么要同时使用 Zookeeper
+ Nacos
呢,因为前期没有整合分布式事务的时候用的zk做的服务注册中心,后面可能进行移除,换为全局 Nacos
作为注册中心
安装Nacos
关于 Zookeeper
我就不多于说明了,因为本文主要是讲述 Dubbo
与 Seata
的集成方面的业务。
Nacos
我是用的 Docker
安装的,相关命令如下:
#拉取nacos镜像
docker pull nacos/nacos-server
# 启动镜像
docker run --env MODE=standalone --name nacos -d -p 8848:8848 nacos/nacos-server
# 默认账户密码是:nacos/nacos
启动好 Nacos
之后直接访问 http://{ip}:8848/nacos/index.html
即可登录:
下载/配置/启动Seata
进入到 https://github.com/seata/seata/releases 下载seata的发行版,我这里使用的0.9.0版本。
下载完成之后进行解压,其中 bin
目录下存放为启动脚本, conf
目录下存放为配置文件以及相关SQL和配置注入脚本, lib
目录下是seata的相关依赖。
进入到conf目录修改registry.conf
registry {
  type = "nacos"

  nacos {
    serverAddr = "127.0.0.1" #nacos地址ip
    namespace = "public" #nacos的命名空间,默认为public
    cluster = "default" #集群,由于没有所以填写default
  }
  file {
    name = "file.conf"
  }
}

config {
  type = "nacos"

  nacos {
    serverAddr = "127.0.0.1" #nacos地址ip
    cluster = "default" #集群,由于没有所以填写default
  }

  file {
    name = "file.conf"
  }
}
注意:在registry中config没有namespace属性,否则会出现服务启动失败或no available!
接着我们修改file.conf,其配置主要为:
transport {
  # tcp udt unix-domain-socket
  type = "TCP"
  #NIO NATIVE
  server = "NIO"
  #enable heartbeat
  heartbeat = true
  #thread factory for netty
  thread-factory {
    boss-thread-prefix = "NettyBoss"
    worker-thread-prefix = "NettyServerNIOWorker"
    server-executor-thread-prefix = "NettyServerBizHandler"
    share-boss-worker = false
    client-selector-thread-prefix = "NettyClientSelector"
    client-selector-thread-size = 1
    client-worker-thread-prefix = "NettyClientWorkerThread"
    # netty boss thread size,will not be used for UDT
    boss-thread-size = 1
    #auto default pin or 8
    worker-thread-size = 8
  }
  shutdown {
    # when destroy server, wait seconds
    wait = 3
  }
  serialization = "seata"
  compressor = "none"
}


service {
  #transaction service group mapping
  vgroup_mapping.service-user-provider-group = "default"
  vgroup_mapping.service-order-provider-group = "default"
  vgroup_mapping.service-storage-provider-group = "default"
  #这里是你的事务分组配置,格式为vgroup_mapping.${YOUR_SERVICE_NAME}-group,当然`${YOUR_SERVICE_NAME}-group`部分你可以自定
  #下面是你的seata的服务列表
  default.grouplist = "127.0.0.1:8091"
  #degrade current not support
  enableDegrade = false
  #disable
  disable = false
  max.commit.retry.timeout = "-1"
  max.rollback.retry.timeout = "-1"
  disableGlobalTransaction = false
}

client {
  async.commit.buffer.limit = 10000
  lock {
    retry.internal = 10
    retry.times = 30
  }
  report.retry.count = 5
  tm.commit.retry.count = 1
  tm.rollback.retry.count = 1
}

## transaction log store, only used in seata-server
store {
  ## store mode: file、db
  mode = "db"

  ## file store property
  file {
    ## store location dir
    dir = "sessionStore"
  }

  ## database store property
  db {
    ## the implement of javax.sql.DataSource, such as DruidDataSource(druid)/BasicDataSource(dbcp) etc.
    datasource = "dbcp"
    ## mysql/oracle/h2/oceanbase etc.
    ## 此处为你的数据库配置
    db-type = "mysql"
    driver-class-name = "com.mysql.jdbc.Driver"
    url = "jdbc:mysql://127.0.0.1:3306/seata"
    user = "root"
    password = "root"
    min-conn = 1
    max-conn = 3
    global.table = "global_table"
    branch.table = "branch_table"
    lock-table = "lock_table"
    query-limit = 100
  }
}


support {
  ## spring
  spring {
    # auto proxy the DataSource bean
    datasource.autoproxy = false
  }
}
配置好上述配置文件之后,我们将conf目录下的 db_store.sql
文件导入到我们的数据库,我这里的数据库名为 seata
(上述配置文件可以看出)
接着我们再修改目录下的 nacos-config.txt
,这个文件其实就是将 file.conf
翻译成properties格式的,这里我就不做过多的说明了,写好之后我们将配置写入到nacos中:
# 在conf目录下执行
sh nacos-config.sh {Nacos-Server-IP} #将{Nacos-Server-IP}换成你的IP
写入成功之后,你会看到这样一行小绿字:
init nacos config finished, please start seata-server.
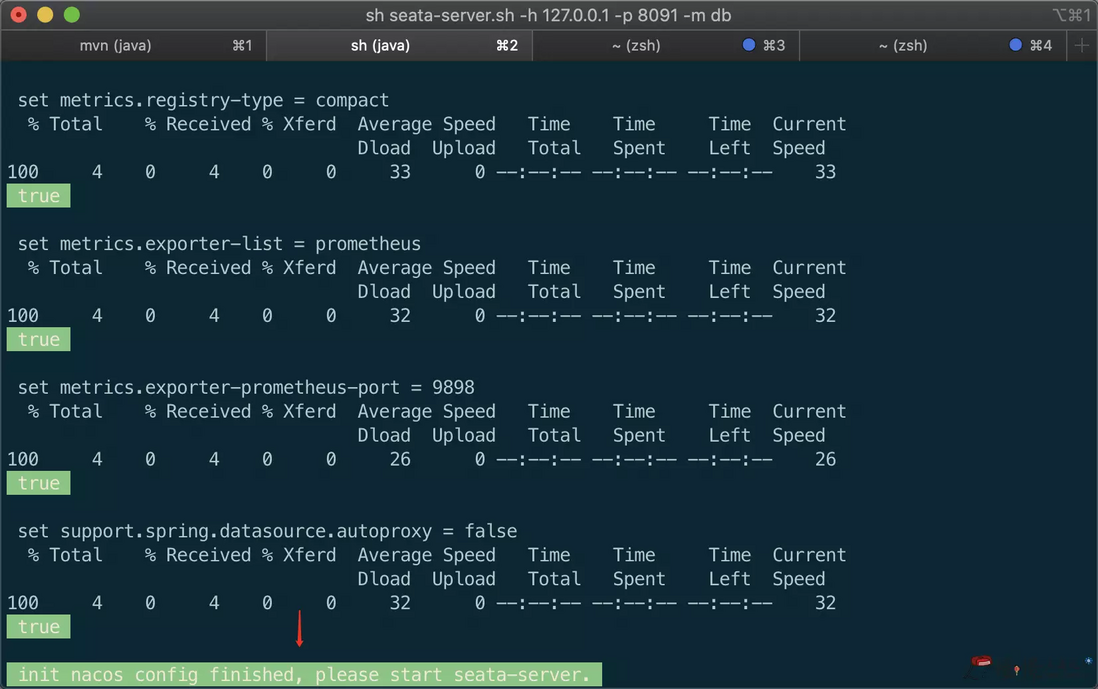
启动seata-server
# 在bin目录下执行
sh seata-server.sh
# or
sh seata-server.sh -h 127.0.0.1 -p 8091 -m db
# 下面的是带参启动可以覆盖配置文件里面的数据
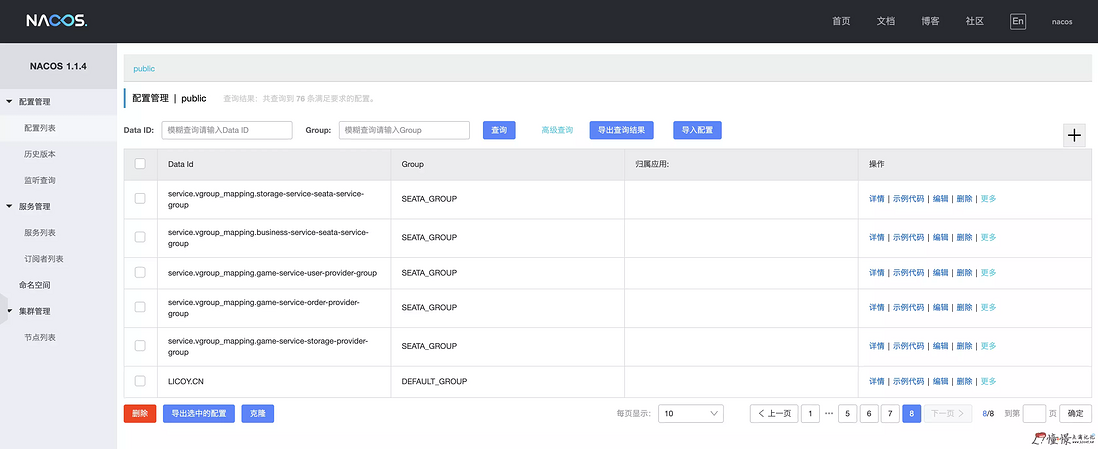
启动成功之后,你会看到Nacos的「控制台」-「服务列表」中会新增一项服务名为 serverAddr
的服务,如图:

业务整合
业务架构分为
service-order-provider # 订单服务
service-storage-provider # 库存服务
service-user-provider # 用户服务
service-user-consumer # 用户业务调用
导入日志数据表
将seata的conf目录下的 db_undo_log.sql
到你的业务数据库
业务配置
我们要在三个 provider
服务中写入如下配置:
/resources/file.conf
file.conf与seata的conf目录下一致
/resources/registry.conf
registry.conf与seata的conf目录下一致
pom.xml
引入需要的依赖包
<dependency>
    <groupId>com.alibaba.nacos</groupId>
    <artifactId>nacos-client</artifactId>
    <version>1.1.4</version>
</dependency>

<dependency>
    <groupId>io.seata</groupId>
    <artifactId>seata-all</artifactId>
    <version>0.9.0</version>
</dependency>
SeataAutoConfig.java
进行Seata的配置,包括数据库资源/数据库代理设置/SqlSessionFactory等
/**
 * @author .
 * .   ._. __ .__..   ,
 * |    | /  `|  | /./
 * |____|_/__.|__|  |
 * @version 2019/12/23
 */
@Configuration
public class SeataAutoConfig {

    @Value("${spring.application.name}")
    private String appName;

    @Autowired
    private DataSourceProperties dataSourceProperties;

    /**
     * init durid datasource
     *
     * @Return: druidDataSource  datasource instance
     */
    @Bean
    @Primary
    public DruidDataSource druidDataSource(){
        DruidDataSource druidDataSource = new DruidDataSource();
        druidDataSource.setUrl(dataSourceProperties.getUrl());
        druidDataSource.setUsername(dataSourceProperties.getUsername());
        druidDataSource.setPassword(dataSourceProperties.getPassword());
        druidDataSource.setDriverClassName(dataSourceProperties.getDriverClassName());
        druidDataSource.setInitialSize(0);
        druidDataSource.setMaxActive(180);
        druidDataSource.setMaxWait(60000);
        druidDataSource.setMinIdle(0);
        druidDataSource.setValidationQuery("Select 1 from DUAL");
        druidDataSource.setTestOnBorrow(false);
        druidDataSource.setTestOnReturn(false);
        druidDataSource.setTestWhileIdle(true);
        druidDataSource.setTimeBetweenEvictionRunsMillis(60000);
        druidDataSource.setMinEvictableIdleTimeMillis(25200000);
        druidDataSource.setRemoveAbandoned(true);
        druidDataSource.setRemoveAbandonedTimeout(1800);
        druidDataSource.setLogAbandoned(true);
        try {
            Driver driver = new Driver();
            druidDataSource.setDriver(driver);
        } catch (SQLException e) {
            e.printStackTrace();
        }
        return druidDataSource;
    }


    @Bean
    public DataSourceProxy dataSourceProxy(DruidDataSource druidDataSource){
        return new DataSourceProxy(druidDataSource);
    }

    // 因为我使用的是MybatisPlus,所以需要注入此部分
    @Bean
    public MybatisSqlSessionFactoryBean mybatisSqlSessionFactoryBean(DataSourceProxy proxy) throws IOException {
        MybatisSqlSessionFactoryBean mybatisPlus = new MybatisSqlSessionFactoryBean();
        mybatisPlus.setDataSource(proxy);
        mybatisPlus.setVfs(SpringBootVFS.class);
        PathMatchingResourcePatternResolver resolver = new PathMatchingResourcePatternResolver();
        mybatisPlus.setMapperLocations(resolver.getResources("classpath:mapper/*.xml"));
        GlobalConfig globalConfig = new GlobalConfig();
        GlobalConfig.DbConfig dbConfig = new GlobalConfig.DbConfig();
        // ID 策略 AUTO->`0`("数据库ID自增") INPUT->`1`(用户输入ID") ID_WORKER->`2`("全局唯一ID") UUID->`3`("全局唯一ID")
        //使用ID_WORKER_STR,因为前后端分离使用整形,前端JS会有精度丢失
        dbConfig.setIdType(IdType.ID_WORKER_STR);
        globalConfig.setDbConfig(dbConfig);
        mybatisPlus.setGlobalConfig(globalConfig);
        MybatisConfiguration mc = new MybatisConfiguration();
        // 对于完全自定义的mapper需要加此项配置,才能实现下划线转驼峰
        mc.setMapUnderscoreToCamelCase(true);
        mc.setDefaultScriptingLanguage(MybatisXMLLanguageDriver.class);
        mybatisPlus.setConfiguration(mc);
        return mybatisPlus;
    }


    @Bean
    public GlobalTransactionScanner globalTransactionScanner(){
        return new GlobalTransactionScanner(this.appName, String.format("%s-group", this.appName));
    }

}
业务接口
order服务下有创建订单的接口
/**
 * 创建订单
 * @param order 订单
 */
ClientOrder create(ClientOrder order);
storage服务下有减少库存的接口
/**
 * 扣除库存
 * @param productId 产品ID
 * @param total 扣除数量
 */
void decrease(String productId, Integer total);
user服务下有减少账户余额以及购买的接口
/**
 * 扣除账户余额
 * @param userId 用户ID
 * @param money 扣除金额
 */
void decreaseMoney(String userId, BigDecimal money);

/**
 * 购买产品
 * @param productId 产品ID
 * @param uid 用户ID
 * @param totalCount 购买数量
 */
void buy(String productId, String uid, Integer totalCount);
创建订单/扣除库存/扣除账户余额这三个接口我就不在此展示了,因为都是基本的CURD+业务判断,主要展示一下购买产品的业务接口实现,因为我们需要对此业务的过程中处理分布式事务:
@Override
@GlobalTransactional(name = "service-user-provider")
public void buy(String productId, String uid, Integer totalCount) {
    log.info("开始全局事务"+ RootContext.getXID());
    ClientOrder order = new ClientOrder();
    BigDecimal money = new BigDecimal(200);
    order.setMoney(money);
    order.setPid(productId);
    order.setUid(uid);
    order.setTotal(totalCount);
    log.info("====创建订单====");
    ClientOrder order1 = this.orderService.create(order);
    log.info("====创建订单完成====");
    log.info("====扣除库存====");
    this.storageService.decrease(productId, totalCount);
    log.info("====库存扣除完成====");
    log.info("====扣除账户余额====");
    this.decreaseMoney(uid, money);
    log.info("====账户余额扣除完成====");
    log.info("====购买成功====");
}
由上述代码可以看出,我们只需要添加一个@GlobalTransactional注解就可以进行分布式事务控制,其中name为该项目 spring.application.name
的值。
对于事务回滚,我们只需要将用户的余额设置为0,这个时候扣除余额就会失败,那么业务失败,就会进行事务回滚,当操作完成之后我们看到数据库的订单和库存并没有创建和减少,就代表我们的分布式事务Seata配置完成并可以成功使用。
后记
在配置Seata的时候确实踩了不少坑,现在回头过来有些都已经忘却(当时只顾得解决BUG,没有记录下来),所以此篇文章关于坑的展示并没有自己想的那么多,如果大家遇到了这方面的问题,可以在文章下方评论,博主将会尽可能的帮助你解决你的燃眉之急!
关于

- 作者博客: 憧憬点滴记忆
正文到此结束
- 本文标签: spring db tar map GitHub Select dubbo core Transport sqlsession 注册中心 remote sql Netty DOM 开发 src 下载 mapper bug 2019 目录 tab js zookeeper NSA HTML mybatis lib 文章 SqlSessionFactory springboot druid mysql unix https 集群 IDE App list client 朋友们 ORM 分布式 retry classpath git cat 数据 CTO value dataSource ACE bean id Proxy 翻译 ip 产品 UI 空间 XML DBCP Word Service IO JDBC root heartbeat 数据库 配置 TCP 分布式事务 consumer 博客 Action NIO session java pom Oracle 安装 代码 Docker provider http Property executor 服务注册
- 版权声明: 本文为互联网转载文章,出处已在文章中说明(部分除外)。如果侵权,请联系本站长删除,谢谢。
- 本文海报: 生成海报一 生成海报二
热门推荐


相关文章

近期评论
-
你这基本没有更新呀,最近文章显示还是2019年的文章。不符合要求哈
-
关键词:慕云博客 链接:https://www.lilun.me 描述:分享原创文字的个人博客
-
-
-
可以提供一下源码吗
-
不是商业站,鸡娃学习笔记
-
-
-
-
听他们说很厉害的样子
Loading...
![[HBLOG]公众号](http://www.liuhaihua.cn/img/qrcode_gzh.jpg)

