珠联璧合 | ServiceComb 集成 Shiro 实践
Shiro简介
Apache Shiro是一款功能强大、易用的轻量级开源Java安全框架,它主要提供认证、鉴权、加密和会话管理等功能。Spring Security可能是业界用的最广泛的安全框架,但是Spring Security和Spring耦合的太重,脱离了Spring框架就使用不了,所以一个轻量级的安全框架有时也是一个非常不错的选择。
Shiro主要通过安全API来提供四个方面使用:
- 认证 Authentication –提供用户身份,可以理解为登录验证。
- 授权 Authorization –访问控制,也就是通常所讲ACL(Access Control List)的RBAC(Role Base
Access Control)或者ABAC(Attribute Base Access Control)。 - 加密 Cryptography –加密、保护数据,确保数据安全。
- 会话管理 Session Management
–登录后的会话管理,Shiro有独立的会话管理机制,可以是J2EE的会话,也可以是普通Java应用的。
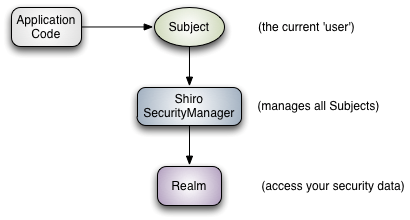
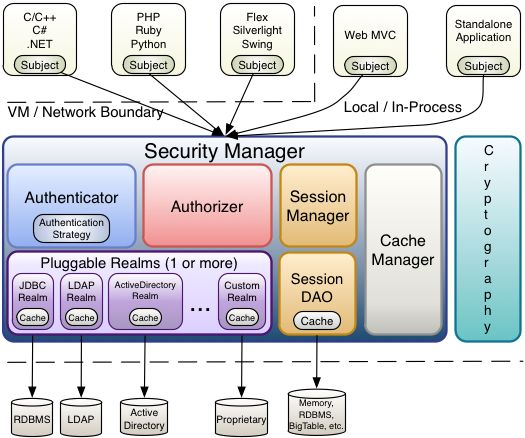
Shiro有几个关键的核心概念:Subject,SecurityManager和Realms,我们简单的介绍下这几个概念的含义:
Subject
权限责任主体,主要是让系统识别要管理的对象,比如一般系统的用户,这个也不一定是人,也可以是一台设备,Subject有登录、注销、权限检测等操作。所有的Subject都会绑定到SecurityManager上面,所有Subject的交互都会委托给SecurityManager。
SecurityManager
安全管理器,所有和安全相关的操作都会与SecurityManager打交道,它管理着所有的Subject,它就是Shiro的架构核心
Realm
领域,Shiro从Realm中获取安全数据。Realm扮演者Shiro和应用之间的桥梁,比如用户、角色列表。应用可以自定义实现不同的Realm,Shiro也提供了几个开箱即用的Realm,比如SimpleAccountRealm、IniRealm、JdbcRealm和DefaultLdapRealm、JndiRealm。通过这些简单的Realm我们可以很简单的上手Shiro,基本上所有定制化的扩展点都在实现自定义的Realm。
既然Shiro可以提供如此全面、简单易用的安全权限功能,那么ServiceComb是不是也可以非常方便的来进行集成呢?
答案当然是可以了。
简单集成
ServiceComb集成Shiro,可以使用两种方案,一种是集成Vertx-shiro,使用这种方法前提是使用Rest over Vertx的Transport方式,另外一种就是使用ServiceComb的handler或者HttpServerFilter扩展点机制。
第一种方式优点是可以使用异步的方式,完全使用vertx的扩展机制,跟ServiceComb关联不大,只需要扩展实现一个org.apache.servicecomb.transport.rest.vertx.VertxHttpDispatcher,在init方法中把认证逻辑加到要过滤的URL上。
1、 在POM中引入vertx-shiro依赖
<dependency>

<groupId>io.vertx</groupId>

<artifactId>vertx-auth-shiro</artifactId>

<version>3.6.3</version>

</dependency>
2、 增加vertx-shiro的用户、角色配置文件test-auth.properties
user.root = rootPassword,administrator

user.jsmith = jsmithPassword,manager,engineer,employee

user.abrown = abrownPassword,qa,employee

user.djones = djonesPassword,qa,contractor

user.test = testPassword,qa,contractor


role.administrator = *

role.manager = "user:read,write", file:execute:/usr/local/emailManagers.sh

role.engineer = "file:read,execute:/usr/local/tomcat/bin/startup.sh"

role.employee = application:use:wiki

role.qa = "server:view,start,shutdown,restart:someQaServer", server:view:someProductionServer

role.contractor = application:use:timesheet
3、 扩展实现VertxHttpDispatcher
package com.service.servicecombshiro;


import org.apache.servicecomb.foundation.vertx.VertxUtils;

import org.apache.servicecomb.transport.rest.vertx.VertxRestDispatcher;


import io.vertx.core.Vertx;

import io.vertx.core.json.JsonObject;

import io.vertx.ext.auth.AuthProvider;

import io.vertx.ext.auth.User;

import io.vertx.ext.auth.shiro.ShiroAuth;

import io.vertx.ext.auth.shiro.ShiroAuthOptions;

import io.vertx.ext.auth.shiro.ShiroAuthRealmType;

import io.vertx.ext.web.Router;


public class AuthVertxHttpDispatcher extends VertxRestDispatcher {


@Override

public boolean enabled() {

return true;

}


@Override

public int getOrder() {

return 0;

}


@Override

public void init(Router router) {

JsonObject config = new JsonObject().put("properties_path", "classpath:test-auth.properties");

Vertx vertx = VertxUtils.getVertxMap().get("transport");

AuthProvider authProvider = ShiroAuth

    .create(vertx, new ShiroAuthOptions().setType(ShiroAuthRealmType.PROPERTIES).setConfig(config));


router.route().handler(rc -> {

  JsonObject authInfo = new JsonObject().put("username", "test").put("password", "testPassword");

  authProvider.authenticate(authInfo, res -> {

    if (res.failed()) {

      // Failed!

      rc.response().setStatusCode(401).end("No right!");

      return;

    }

    User user = res.result();

    System.out.println(user.principal());

    rc.next();

  });

});

}
}
第二种方式就是使用扩展点的机制,示例中使用HttpServerFilter扩展点机制,所有的REST请求都会走到HttpServerFilter逻辑。具体实现如下:
1、 引入shiro的依赖
<dependency>

<groupId>org.apache.shiro</groupId>

<artifactId>shiro-core</artifactId>

<version>1.4.1</version>

</dependency>
2、 定义shiro的用户信息文件src/main/resources/shiro.ini文件
[users]

admin=123456

user1=Test123456
3、 使用SPI机制实现一个HttpServerFilter来做身份认证,这个简单的示例我们使用Http Basic Auth的认证方式来实现基本的身份认证。首先要初始化一个SecurityManager,并注入一个Realm,然后在afterReceiveRequest方法中获取身份信息,并且对身份信息做校验。(由于Shiro当前很多实现都是使用了线程上下文来传递SecurityManager,所以本实例只能使用同步编码的方式)
package com.service.servicecombshiro.auth;


import org.apache.servicecomb.common.rest.filter.HttpServerFilter;

import org.apache.servicecomb.core.Invocation;

import org.apache.servicecomb.foundation.vertx.http.HttpServletRequestEx;

import org.apache.servicecomb.swagger.invocation.Response;

import org.apache.shiro.SecurityUtils;

import org.apache.shiro.authc.AuthenticationException;

import org.apache.shiro.authc.UsernamePasswordToken;

import org.apache.shiro.codec.Base64;

import org.apache.shiro.mgt.DefaultSecurityManager;

import org.apache.shiro.realm.Realm;

import org.apache.shiro.realm.text.IniRealm;

import org.apache.shiro.subject.Subject;


public class HttpAuthFilter implements HttpServerFilter {


private org.apache.shiro.mgt.SecurityManager securityManager;


public HttpAuthFilter() {

Realm realm = new IniRealm("classpath:shiro.ini");  //使用ini的配置方法来初始化Realm

this.securityManager = new DefaultSecurityManager(realm);        //初始化SecurityManager

}


@Override

public int getOrder() {

return -10000;  // 确保这个Filter在一般的filter之前先执行

}


@Override

public Response afterReceiveRequest(Invocation invocation, HttpServletRequestEx httpServletRequestEx) {

SecurityUtils.setSecurityManager(securityManager);  // 因为用到了线程上下文,只支持同步编码方式

Subject user = SecurityUtils.getSubject();

String userInfo = httpServletRequestEx.getHeader("Authorization");

if (userInfo == null || userInfo.isEmpty()) {

  return Response.create(401, "Unauthorized",

      "WWW-Authenticate: Basic realm=protected_docs");

}

if (userInfo.length() < 5 || !userInfo.startsWith("Basic")) {

  return Response.create(401, "Unauthorized",

      "Header is wrong!");

}

String authInfo = userInfo.substring(5).trim();

String[] authInfos = Base64.decodeToString(authInfo).split(":");

if (authInfos.length != 2) {

  return Response.create(401, "Unauthorized",

      "Header is wrong!");

}

UsernamePasswordToken token = new UsernamePasswordToken(authInfos[0], authInfos[1]); // 获取到请求的用户名和密码

String path = httpServletRequestEx.getPathInfo();

if (path.startsWith("/auth")) { // 只对特定的资源检测

  try {

    user.login(token);  // 登录不报异常表示成功了

  } catch (AuthenticationException e) {

    System.out.println("Has no right!");  // 异常表示身份认证失败

    return Response.create(401, "Unauthorized", e.getMessage());

  }

}

return null;

}
}
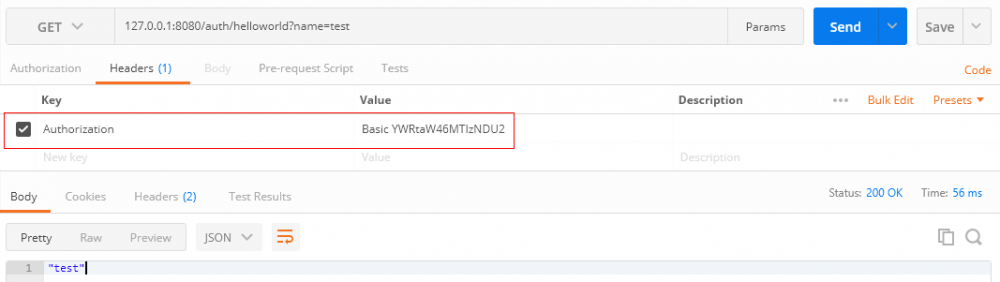
4、 发送请求进行验证
curl -X GET 'http://127.0.0.1:8080/auth/helloworld?name=test' -H 'authorization: Basic YWRtaW46MTIzNDU2'
分布式集成
微服务化的系统中,应用一般都是无状态的,所以服务器端一般不会实现传统的J2EE容器的会话机制,而是使用外置会话、Oath2协议,也可以使用无会话方案,每次请求客户端都带上身份信息,服务端都对客户端的身份进行识别,这种方案典型实现就是JWT。

1、 引入JWT和Shiro依赖
<dependency>

<groupId>org.apache.shiro</groupId>

<artifactId>shiro-core</artifactId>

<version>1.4.1</version>

</dependency>

<dependency>

<groupId>com.auth0</groupId>

<artifactId>java-jwt</artifactId>

<version>3.8.2</version>

</dependency>
2、 定义shiro的用户配置文件src/main/resources/shiro.ini
[users]

admin=123456

user1=Test123456
3、 实现一个JWTUtils,主要用来做JWT Token的签名和校验
package com.service.servicecombshiro.auth;


import java.util.Date;


import org.slf4j.Logger;

import org.slf4j.LoggerFactory;


import com.auth0.jwt.JWT;

import com.auth0.jwt.algorithms.Algorithm;

import com.auth0.jwt.exceptions.JWTCreationException;

import com.auth0.jwt.exceptions.JWTDecodeException;

import com.auth0.jwt.exceptions.JWTVerificationException;

import com.auth0.jwt.interfaces.DecodedJWT;

import com.auth0.jwt.interfaces.JWTVerifier;


public class JWTUtils {

private static final Logger LOGGER = LoggerFactory.getLogger(JWTUtils.class);


private static final int TOKEN_VALID_TIME = 5 * 60 * 1000;


public static boolean verify(String username, String secret, String token) {

try {

  Algorithm algorithm = Algorithm.HMAC256(secret);

  JWTVerifier verifier = JWT.require(algorithm)

      .withClaim("username", username)

      .build();

  DecodedJWT decodedJWT = verifier.verify(token);

  System.out.println(decodedJWT.getExpiresAt());

  return true;

} catch (JWTVerificationException exception) {

  return false;

}

}


public static String sign(String username, String secret) {

try {

  Algorithm algorithm = Algorithm.HMAC256(secret);

  String token = JWT.create().withClaim("username", username)

      .withExpiresAt(new Date(System.currentTimeMillis()   TOKEN_VALID_TIME))

      .sign(algorithm);

  return token;

} catch (JWTCreationException exception) {

  return null;

}

}


public static String decodeToken(String token) {


try {

  DecodedJWT jwt = JWT.decode(token);

  return jwt.getClaim("username").asString();

} catch (JWTDecodeException e) {

  LOGGER.error("token is error", e);

  return null;

}

}
}
4、 实现一个JWTSubjectFactory,用来生成Subject,JWT认证不需要会话信息,需要设置不创建会话。
package com.service.servicecombshiro.auth;


import org.apache.shiro.mgt.DefaultSubjectFactory;

import org.apache.shiro.subject.Subject;

import org.apache.shiro.subject.SubjectContext;


public class JWTSubjectFactory extends DefaultSubjectFactory {

@Override

public Subject createSubject(SubjectContext context) {

context.setSessionCreationEnabled(false);  // 不创建会话

return super.createSubject(context);

}
}
5、 创建一个JWTToken,保存JWT请求的token信息。
package com.service.servicecombshiro.auth;


import org.apache.shiro.authc.AuthenticationToken;


public class JWTToken implements AuthenticationToken {

private String token;


public JWTToken(String token) {

this.token = token;

}

@Override

public Object getPrincipal() {

return token;

}


@Override

public Object getCredentials() {

return token;

}
}
6、 实现一个JWTRealm,直接继承IniRealm,这样就可以直接使用配置文件来配置用户信息了,非常简单。主要的就是要实现JWT的token解码和认证。
package com.service.servicecombshiro.auth;


import org.apache.shiro.authc.AuthenticationException;

import org.apache.shiro.authc.AuthenticationInfo;

import org.apache.shiro.authc.AuthenticationToken;

import org.apache.shiro.authc.ExpiredCredentialsException;

import org.apache.shiro.authc.LockedAccountException;

import org.apache.shiro.authc.SimpleAccount;

import org.apache.shiro.authc.SimpleAuthenticationInfo;

import org.apache.shiro.authz.AuthorizationInfo;

import org.apache.shiro.realm.text.IniRealm;

import org.apache.shiro.subject.PrincipalCollection;


public class JWTRealm extends IniRealm {


public JWTRealm(String resourcePath) {

super(resourcePath);

}


@Override

public boolean supports(AuthenticationToken token) {

return token != null && token instanceof JWTToken;

}


@Override

protected AuthorizationInfo doGetAuthorizationInfo(PrincipalCollection principals) {

String username = JWTUtils.decodeToken(principals.toString());

USERS_LOCK.readLock().lock();

try {

  return this.users.get(username);

} finally {

  USERS_LOCK.readLock().unlock();

}

}


@Override

protected AuthenticationInfo doGetAuthenticationInfo(AuthenticationToken token) throws AuthenticationException {

JWTToken jwtToken = (JWTToken) token;

String username = JWTUtils.decodeToken(jwtToken.getCredentials().toString()); //解token,获取用户名信息

SimpleAccount account = getUser(username);

if (account != null) {

  if (account.isLocked()) {

    throw new LockedAccountException("Account [" + account + "] is locked.");

  }

  if (account.isCredentialsExpired()) {

    String msg = "The credentials for account [" + account + "] are expired";

    throw new ExpiredCredentialsException(msg);

  }

}

// token校验,根据用户、密码和token,验证token是否有效

if (!JWTUtils.verify(username, account.getCredentials().toString(), jwtToken.getCredentials().toString())) {

  throw new AuthenticationException("the token is error, please renew one!");

}

// 校验成功,返回认证完的身份信息

SimpleAuthenticationInfo simpleAuthenticationInfo = new SimpleAuthenticationInfo(username,

    jwtToken.getCredentials(), getName());

return simpleAuthenticationInfo;

}


public boolean canLogin(String username, String password) {

SimpleAccount account = getUser(username);

if (account == null) {

  return false;

}

if (account.getCredentials().toString().equals(password)) {

  return true;

}

return false;

}

}
7、 最后就是在HTTPServerFilter里面对请求做身份认证,因为是无状态的,所以不需要生成会话。
package com.service.servicecombshiro.auth;


import org.apache.servicecomb.common.rest.filter.HttpServerFilter;

import org.apache.servicecomb.core.Invocation;

import org.apache.servicecomb.foundation.vertx.http.HttpServletRequestEx;

import org.apache.servicecomb.swagger.invocation.Response;

import org.apache.shiro.SecurityUtils;

import org.apache.shiro.authc.AuthenticationException;

import org.apache.shiro.authc.UsernamePasswordToken;

import org.apache.shiro.codec.Base64;

import org.apache.shiro.mgt.DefaultSecurityManager;

import org.apache.shiro.mgt.DefaultSessionStorageEvaluator;

import org.apache.shiro.mgt.DefaultSubjectDAO;

import org.apache.shiro.realm.Realm;

import org.apache.shiro.session.mgt.DefaultSessionManager;

import org.apache.shiro.session.mgt.SessionManager;

import org.apache.shiro.subject.Subject;


public class HttpAuthFilter implements HttpServerFilter {


private DefaultSecurityManager securityManager;

private JWTRealm realm;


public HttpAuthFilter() {

realm = new JWTRealm("classpath:shiro.ini");  //使用ini的配置方法来初始化Realm

this.securityManager = new DefaultSecurityManager(realm);        //初始化SecurityManager

this.securityManager.setSubjectFactory(new JWTSubjectFactory());

DefaultSessionManager sm = new DefaultSessionManager();

// 关闭会话校验任务

sm.setSessionValidationSchedulerEnabled(false);

// 关闭会话存储,否则会报异常

((DefaultSessionStorageEvaluator) ((DefaultSubjectDAO) this.securityManager.getSubjectDAO())

    .getSessionStorageEvaluator()).setSessionStorageEnabled(false);

this.securityManager.setSessionManager(sm);

}


@Override

public int getOrder() {

return -10000;  // 确保这个Filter在一般的filter之前先执行

}


@Override

public Response afterReceiveRequest(Invocation invocation, HttpServletRequestEx httpServletRequestEx) {

SecurityUtils.setSecurityManager(securityManager);  // 因为用到了线程上下文,只支持同步编码方式

String path = httpServletRequestEx.getPathInfo();

String userInfo = httpServletRequestEx.getHeader("Authorization");

if (userInfo == null || userInfo.isEmpty()) {

  return tryLogin(httpServletRequestEx, path);

}

JWTToken token = new JWTToken(userInfo);


if (path.startsWith("/auth")) { // 只对特定的资源检测

  try {

    Subject user = SecurityUtils.getSubject();

    user.login(token);  // 登录不报异常表示成功了

  } catch (AuthenticationException e) {

    System.out.println("Has no right!");  // 异常表示身份认证失败

    return Response.create(401, "Unauthorized", e.getMessage());

  }

}

return null;

}


private Response tryLogin(HttpServletRequestEx httpServletRequestEx, String path) {

if (path.equals("/login/login")) {

  // 这里只是简单的获取用户密码,使用form表单的方式来提交

  String username = httpServletRequestEx.getParameter("username");

  String secret = httpServletRequestEx.getParameter("password");

  boolean login = realm.canLogin(username, secret);

  if (!login) {

    return Response.create(401, "Unauthorized",

        "User/Password is not right!");

  }

  String token = JWTUtils.sign(username, secret);

  return Response.createSuccess(token);

}

return Response.create(401, "Unauthorized",

    "JWT Token is missing, please login first!");

}
}
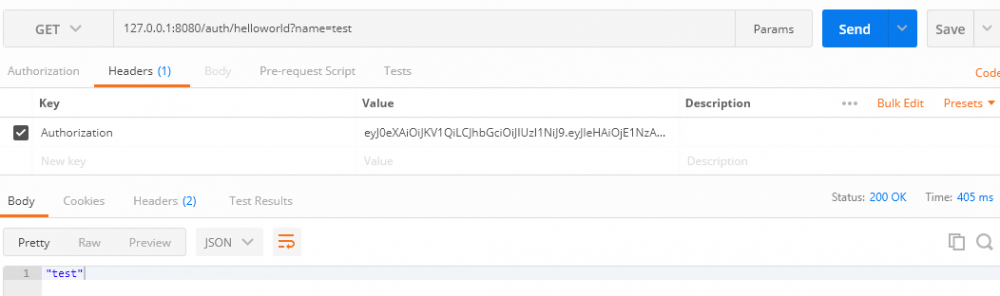
查看下效果,首先请求登录,生成一个JWT Token
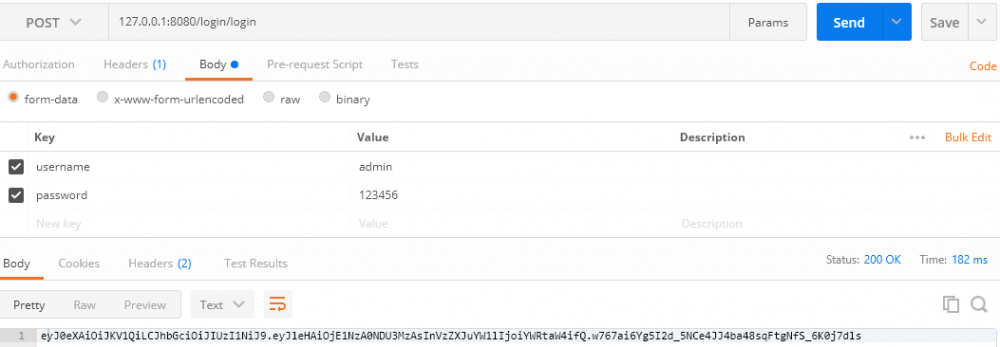
再使用token请求下正常接口
如果不带上token或者错误token以及token失效等时,返回401未授权

授权
上面已经实现了身份认证,有时候还需要对资源进行细粒度控制,比如有些方法只能是管理员才能调用。Shiro提供了三种授权方式:
编码的方式,使用硬编码的方式检查用户是否有角色或者权限,这种通常用于基于配置文件或者复杂的应用。比如角色权限都配置在配置文件或者数据库里面,需要修改后动态生效,我们可以使用自编码方式。
注解的方式,通过使用@RequiresPermissions/@RequiresRoles,这种方式一般都是通过AOP切面来实现的。
Subject currentUser = SecurityUtils.getSubject();

if (currentUser.hasRole("administrator")) {

//有权限

}

else {

//无权限
}
JSP标签,现在基本上废弃了。
ServiceComb的HttpServerFilter可以直接获取到调用方法的Method对象,所以在HttpServerFilter里面可以直接使用注解的方式来进行权限角色认证,如果是遗留应用改造先前用的是注解的方式,这样就可以直接兼容,不需要再重新设计。1、 定义shiro的用户角色配置文件src/main/resources/shiro.ini,配置文件users表示用户,比如admin=123456, administrator, viewer表示admin用户,密码是123456,具有administrator, viewer两个角色,详细的shiro配置可以参考官网 https://shiro.apache.org/configuration.html
[users]

admin=123456, administrator, viewer

user1=Test123456, viewer


[roles]

administrator = *

viewer = *:get
2、 在要控制权限的方法上打上注解。
package com.service.servicecombshiro.controller;


import javax.ws.rs.core.MediaType;


import org.apache.servicecomb.provider.rest.common.RestSchema;

import org.apache.shiro.authz.annotation.RequiresRoles;

import org.springframework.beans.factory.annotation.Autowired;

import org.springframework.web.bind.annotation.RequestMapping;

import org.springframework.web.bind.annotation.RequestMethod;

import org.springframework.web.bind.annotation.RequestParam;


@RestSchema(schemaId = "auth")

@RequestMapping(path = "/auth", produces = MediaType.APPLICATION_JSON)

public class ServicecombshiroImpl {


@Autowired

private ServicecombshiroDelegate userServicecombshiroDelegate;


@RequestMapping(value = "/helloworld",

  produces = {"application/json"},

  method = RequestMethod.GET)

@RequiresRoles(value = {"viewer"})

public String helloworld(@RequestParam(value = "name", required = true) String name) {

return userServicecombshiroDelegate.helloworld(name);

}


@RequestMapping(value = "/helloworld/admin",

  produces = {"application/json"},

  method = RequestMethod.POST)

@RequiresRoles("administrator")

public String admin(@RequestParam(value = "name", required = true) String name) {


return "admin " + userServicecombshiroDelegate.helloworld(name);

}
}
3、 在HttpAuthFilter里面加上角色权限校验逻辑,这里只是简单的实现,详细的实现需要覆盖所有的shiro的注解。
SwaggerProducerOperation swaggerProducerOperation = invocation.getOperationMeta().getExtData(Const.PRODUCER_OPERATION);

  RequiresRoles requiresRoles = swaggerProducerOperation.getProducerMethod().getAnnotation(RequiresRoles.class);

  if (requiresRoles != null) {

    String[] roles = requiresRoles.value();

    try {

      user.checkRoles(roles);

    } catch (AuthorizationException e) {

      System.out.println("Has no required roles!");  // 异常表示权限认证失败

      return Response.create(401, "Unauthorized", e.getMessage());

    }
}
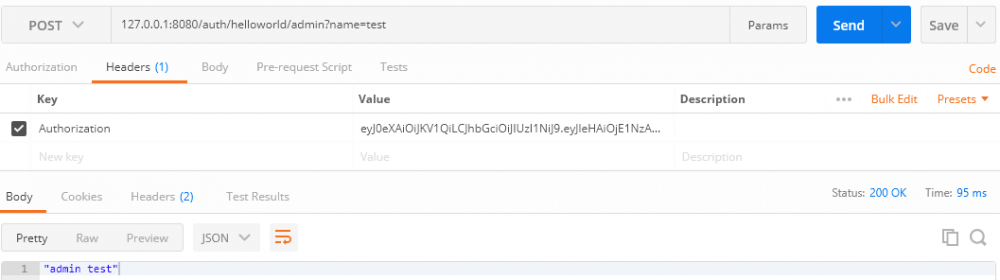
查看下效果,需要管理员的接口,使用admin的JWTToken来访问,正常返回:
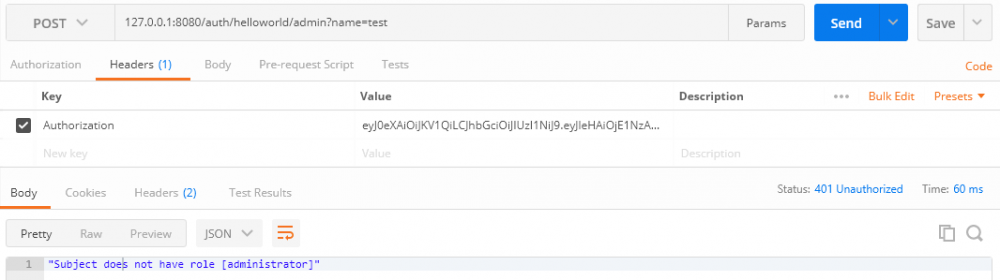
使用普通用户的JWTToken来访问管理员的接口,返回没有权限:
使用普通用户的JWTToken来访问查询接口,正常返回:

总结
Apache Shiro是一款功能强大的安全框架,ServiceComb集成使用相对来说也比较简单,通过这个简单的实践,能让ServiceComb用户知道怎样集成Shiro和大概的实现原理,也希望后续作为一个子项目,直接支持Shiro集成,方便用户使用。
项目托管地址:关注公号:微服务蜂巢 更多微服务干货等你get!
正文到此结束
- 本文标签: final core Security 服务端 JDBC web authenticate js map CTO REST src Authorization 希望 equals apache 认证 https 安全 CEO list build Transport AOP session java classpath ip apr API value schema producer Collection token spring 定制 tomcat cat 管理 json 同步 message IO Lua rmi 协议 servlet 线程 IDE 实例 provider ACE ORM 分布式 ldap mail 数据库 数据 开源 Word bean Spring Security 加密 服务器 pom tar UI HTML 总结 http Service id 微服务 root db 配置 App
- 版权声明: 本文为互联网转载文章,出处已在文章中说明(部分除外)。如果侵权,请联系本站长删除,谢谢。
- 本文海报: 生成海报一 生成海报二
热门推荐


相关文章

近期评论
-
你这基本没有更新呀,最近文章显示还是2019年的文章。不符合要求哈
-
关键词:慕云博客 链接:https://www.lilun.me 描述:分享原创文字的个人博客
-
-
-
可以提供一下源码吗
-
不是商业站,鸡娃学习笔记
-
-
-
-
听他们说很厉害的样子
Loading...
![[HBLOG]公众号](http://www.liuhaihua.cn/img/qrcode_gzh.jpg)

