从0开始入门ssm-crm系统实战
喜欢就点个赞呗!
GitHub项目 ssm-learn-crm
show me the code and take to me,做的出来更要说的明白
1.1 克隆
git clone https://github.com/buerbl/ssm-learn-crm.git
1. 2 结果
2 分析需求
我们需要做一个客户系统,使用者可以在系统上面保存、编辑、删除、客户信息。
3 技术选型
这次我们选择 ssm 三大框架搭建系统的后端,前端页面的话用 JSP 以及 JQuery EasyUI;数据库使用 MySQL;项目构想使用 Maven 工具。
| 技术 | 作用 |
|---|---|
| Spring | 管理对象,管理事务等 |
| SpringMVC | 路径跳转,请求访问等 |
| Mybatis | 数据获取等 |
| JQuery EasyUI | 页面展示等 |
| MySQL | 存取数据等 |
| IDEA | 快速写代码等 |
| Navicat | 数据库可视化软件 |
4 数据库
我们需要保存客户的名字、性别、联系方式和地址,因此我们的数据库脚本如下
CREATE table t_customer(
    id int PRIMARY KEY auto_increment,
    name VARCHAR(20),
    gender char(1),
    telephone VARCHAR(20),
    address VARCHAR(50)
);
5 Maven 管理
5.1 jar 包
一次性导入我们需要的jar,依赖如下
<dependencies>
        <dependency>
            <groupId>junit</groupId>
            <artifactId>junit</artifactId>
            <version>4.11</version>
            <scope>test</scope>
        </dependency>
        <dependency>
            <groupId>org.springframework</groupId>
            <artifactId>spring-web</artifactId>
            <version>4.3.3.RELEASE</version>
        </dependency>
        <dependency>
            <groupId>org.springframework</groupId>
            <artifactId>spring-webmvc</artifactId>
            <version>4.3.3.RELEASE</version>
        </dependency>
        <dependency>
            <groupId>org.apache.commons</groupId>
            <artifactId>commons-pool2</artifactId>
            <version>2.4.2</version>
        </dependency>
        <dependency>
            <groupId>commons-dbcp</groupId>
            <artifactId>commons-dbcp</artifactId>
            <version>1.4</version>
        </dependency>
        <dependency>
            <groupId>org.mybatis</groupId>
            <artifactId>mybatis</artifactId>
            <version>3.4.6</version>
        </dependency>
        <dependency>
            <groupId>mysql</groupId>
            <artifactId>mysql-connector-java</artifactId>
            <version>5.1.26</version>
        </dependency>
        <dependency>
            <groupId>org.springframework</groupId>
            <artifactId>spring-tx</artifactId>
            <version>4.3.3.RELEASE</version>
        </dependency>
        <dependency>
            <groupId>org.springframework</groupId>
            <artifactId>spring-core</artifactId>
            <version>4.3.3.RELEASE</version>
        </dependency>
        <dependency>
            <groupId>org.springframework</groupId>
            <artifactId>spring-beans</artifactId>
            <version>4.3.3.RELEASE</version>
        </dependency>
        <dependency>
            <groupId>org.springframework</groupId>
            <artifactId>spring-context</artifactId>
            <version>4.3.3.RELEASE</version>
        </dependency>
        <dependency>
            <groupId>org.springframework</groupId>
            <artifactId>spring-context-support</artifactId>
            <version>4.3.3.RELEASE</version>
        </dependency>
        <dependency>
            <groupId>org.springframework</groupId>
            <artifactId>spring-jdbc</artifactId>
            <version>4.3.3.RELEASE</version>
        </dependency>
        <dependency>
            <groupId>org.springframework</groupId>
            <artifactId>spring-expression</artifactId>
            <version>4.3.3.RELEASE</version>
        </dependency>
        <dependency>
            <groupId>org.springframework</groupId>
            <artifactId>spring-aspects</artifactId>
            <version>4.3.3.RELEASE</version>
        </dependency>
        <dependency>
            <groupId>org.mybatis</groupId>
            <artifactId>mybatis-spring</artifactId>
            <version>1.3.3</version>
        </dependency>
        <dependency>
            <groupId>org.springframework</groupId>
            <artifactId>spring-aop</artifactId>
            <version>4.3.3.RELEASE</version>
        </dependency>
        <dependency>
            <groupId>org.projectlombok</groupId>
            <artifactId>lombok</artifactId>
            <version>1.16.12</version>
        </dependency>
        <dependency>
            <groupId>com.fasterxml.jackson.core</groupId>
            <artifactId>jackson-annotations</artifactId>
            <version>2.6.0</version>
        </dependency>
        <dependency>
            <groupId>com.fasterxml.jackson.core</groupId>
            <artifactId>jackson-databind</artifactId>
            <version>2.6.0</version>
        </dependency>
        <dependency>
            <groupId>com.fasterxml.jackson.core</groupId>
            <artifactId>jackson-annotations</artifactId>
            <version>2.6.0</version>
        </dependency>
    </dependencies>
5.2 编译问题
可能当我们编译的时候,我们发现 webapp 的文件并没有编译进来,我们需要在 pom.xml 中加入如下,告诉 Mavne 需要编译特定文件。
<build>
   <resources>
        <resource>
            <directory>src/main/webapp</directory>
            <filtering>true</filtering>
        </resource>
    </resources>
</build>
6 划分层次
来到这里的话,我们需要建立文件夹,准备开始写代码。一般按照套路的话,我喜欢如下的规则
| 文件夹 | 作用 |
|---|---|
| controller | 控制层代码 |
| domain | 实体类代码 |
| dao | Mapper代码 |
| service | 服务层代码 |
7 实体类代码
我们根据数据库字段编写实体类代码,代码如下,我使用了 lombok 框架,这个东西需要 IDEA 安装一个 lombok 插件。
package com.buer.domain;

import lombok.AllArgsConstructor;
import lombok.Getter;
import lombok.Setter;
import lombok.ToString;

/**
 * @Description:
 * @Author: boolean
 * @Date: 2019/12/22 11:51
 */

@Getter
@Setter
@ToString

@AllArgsConstructor
public class Customer {
    private  Integer id;
    private String name;
    private String gender;
    private String telephone;
    private String address;
}
有个问题,这些字段是怎样和数据库字段一一对应的呢?下面揭晓。
8 Mapper代码
这里我们需要的 Mybatis 要上场了,首先我们需要如下Mapper代码
package com.buer.dao;

import com.buer.domain.Customer;

import java.util.List;

public interface CustomerMapper {
    /**
     * 添加客户
     */
    void saveCustomer(Customer customer);

    /**
     * 查询所有客户
     * @return
     */
    List<Customer> list();

    /***
     * 查找某个客户
     * @param id
     * @return
     */
    Customer findById(Integer id);
}
9 Mapper 对应的 xml
有了 Mapper 代码,我们需要给 Mapper 配上相应的 xml 文件。如下
<?xml version="1.0" encoding="UTF-8" ?>
<!DOCTYPE mapper
        PUBLIC "-//mybatis.org//DTD Mapper 3.0//EN"
        "http://mybatis.org/dtd/mybatis-3-mapper.dtd">
<!-- 该文件编写mybatis中的mapper接口里面的方法提供对应的sql语句 -->
<mapper namespace="com.buer.dao.CustomerMapper">

    <!-- 添加客户 -->
    <insert id="saveCustomer" parameterType="com.buer.domain.Customer">
        INSERT INTO ssm.t_customer
            (
            NAME,
            gender,
            telephone,
            address
            )
            VALUES
            (
            #{name},
            #{gender},
            #{telephone},
            #{address}
            )
    </insert>

    <select id="list" resultType="com.buer.domain.Customer">
        select * from t_customer
    </select>

    <select id="findById" resultType="com.buer.domain.Customer">
        select * from t_customer where id = #{id}
    </select>
</mapper>
解答上面的问题,实体类字段是怎样和数据库字段一一对应,通过 resultType 来自动映射。
10 服务层代码
先来接口层的代码。代码如下
package com.buer.service;

import com.buer.domain.Customer;

import java.util.List;

public interface IcustomerService {
    /**
     * 添加客户
     */
    void saveCustomer(Customer customer);

    /**
     * 返回所有数据
     * @return
     */
    List<Customer> list();

    /**
     * 修数据
     * @return
     */
    Customer findById(Integer id);
}
然后实现接口,代码如下
package com.buer.service.Impl;

import com.buer.dao.CustomerMapper;
import com.buer.domain.Customer;
import com.buer.service.IcustomerService;
import org.springframework.stereotype.Service;
import org.springframework.transaction.annotation.Transactional;

import javax.annotation.Resource;
import java.util.List;

/**
 * @Description:
 * @Author: boolean
 * @Date: 2019/12/22 18:28
 */
@Service("customerService")
public class IcustomerServiceImpl implements IcustomerService {
    @Resource
    private CustomerMapper customerMapper;
    @Override
    @Transactional
    public void saveCustomer(Customer customer) {
        customerMapper.saveCustomer(customer);
    }

    @Override
    public List<Customer> list() {
        return customerMapper.list();
    }

    @Override
    public Customer findById(Integer id) {
        return customerMapper.findById(id);
    }
}
这里我们看到 @Service("customerService") , @Resource , @Transactional ,这些注解他们的作用是啥子哦?请看下面
| 注解 | 作用 |
|---|---|
| @Service("customerService") | 告诉 Spring, 这是一个叫 customerService 的东西,你要照顾好她,给他在初始化的时候创建一个对象。 |
| @Resource | Java里面的注解,注入对象 |
| @Transactional | 告诉 Spring,需要开始事务 |
11 控制层代码
这里就是 SpringMVC 的舞台了。代码如下
package com.buer.controller;

import com.buer.domain.Customer;
import com.buer.service.IcustomerService;
import org.springframework.stereotype.Controller;
import org.springframework.web.bind.annotation.RequestMapping;
import org.springframework.web.bind.annotation.ResponseBody;

import javax.annotation.Resource;
import java.util.List;

/**
 * @Description:
 * @Author: boolean
 * @Date: 2019/12/22 18:50
 */

@Controller
@RequestMapping("/customer")
public class CustomerController {

    @Resource
    private IcustomerService service;
    @RequestMapping("/index")
    public String test(){
        System.out.println("ssss");
        return "index";
    }


    @RequestMapping("/save")
    public String save(Customer customer){
        System.out.println("save");
        service.saveCustomer(customer);
        return "success";
    }

    @RequestMapping("/list")
    @ResponseBody
    public List<Customer> list(){
        System.out.println("list");
        return service.list();
    }

    @RequestMapping("/findById")
    @ResponseBody
    public Customer findById(Integer id){
        System.out.println("findById");
        return service.findById(id);
    }
}
| 注解 | 作用 |
|---|---|
| @Controller | 告诉 SpringMVC, 这是你负责的代码 |
| @RequestMapping("/save") | 告诉 SpringMVC,用 “/save”路径访问 |
| @ResponseBody | 告诉 SpringMVC,需要返回JSON |
以上就是代码的编写,但是还没有完成哈,我们需要一些配置文件。
12 jdbc.properties
我们要连接数据库,代码如下
jdbc.url=jdbc:mysql://localhost:3306/ssm
jdbc.driverClass=com.mysql.jdbc.Driver
jdbc.user=root
jdbc.password=123456
13 applicationContext.xml
我们要告诉 Spring 连接数据库,以及我们写的代码在哪里,怎么去操作我们的代码。代码如下
<?xml version="1.0" encoding="UTF-8"?>
<beans xmlns="http://www.springframework.org/schema/beans"
       xmlns:xsi="http://www.w3.org/2001/XMLSchema-instance"
       xmlns:context="http://www.springframework.org/schema/context"
       xmlns:aop="http://www.springframework.org/schema/aop"
       xmlns:tx="http://www.springframework.org/schema/tx"
       xsi:schemaLocation="http://www.springframework.org/schema/beans
    http://www.springframework.org/schema/beans/spring-beans.xsd
    http://www.springframework.org/schema/context
    http://www.springframework.org/schema/context/spring-context.xsd
    http://www.springframework.org/schema/aop
    http://www.springframework.org/schema/aop/spring-aop.xsd
    http://www.springframework.org/schema/tx
    http://www.springframework.org/schema/tx/spring-tx.xsd">

    <!-- 读取jdbc.properties -->
    <context:property-placeholder location="classpath:jdbc.properties"/>

    <!-- 创建DataSource -->
    <bean id="dataSource" class="org.apache.commons.dbcp.BasicDataSource">
        <property name="url" value="${jdbc.url}"/>
        <property name="driverClassName" value="${jdbc.driverClass}"/>
        <property name="username" value="${jdbc.user}"/>
        <property name="password" value="${jdbc.password}"/>
        <property name="maxActive" value="10"/>
        <property name="maxIdle" value="5"/>
    </bean>

    <!-- 创建SqlSessionFactory对象 -->
    <bean id="sqlSessionFactory" class="org.mybatis.spring.SqlSessionFactoryBean">
        <!-- 关联连接池 -->
        <property name="dataSource" ref="dataSource"/>
        <!-- 加载mapper.xml -->
        <property name="mapperLocations" value="classpath:mapper/*.xml"/>
    </bean>
    <!-- Mapper所有接口的扫描 -->
    <!--注意:如果使用Mapper接口包扫描,那么每个Mapper接口在Spring容器中的id名称为类名: 例如 CustomerMapper -> customerMapper-->
    <bean class="org.mybatis.spring.mapper.MapperScannerConfigurer">
        <!-- 配置Mapper接口所在包路径  -->
        <property name="basePackage" value="com.buer.dao"></property>
    </bean>

    <!-- 开启Spring的IOC注解扫描 -->
    <context:component-scan base-package="com.buer"/>

    <!-- 开启Spring的事务 -->
    <!-- -事务管理器 -->
    <bean id="transactionManager" class="org.springframework.jdbc.datasource.DataSourceTransactionManager">
        <property name="dataSource" ref="dataSource"/>
    </bean>
    <!-- 启用Spring事务注解 -->
    <tx:annotation-driven transaction-manager="transactionManager"/>

</beans>
14 spring-mvc.xml
我们需要告诉 SpringMVC,他需要的代码在哪里,怎么去操作我们的代码
15 web.xml
我们需要启动项目了,以及一些字体指定。代码如下
<?xml version="1.0" encoding="UTF-8"?>
<web-app xmlns:xsi="http://www.w3.org/2001/XMLSchema-instance" xmlns="http://java.sun.com/xml/ns/javaee" xsi:schemaLocation="http://java.sun.com/xml/ns/javaee http://java.sun.com/xml/ns/javaee/web-app_2_5.xsd" id="WebApp_ID" version="2.5">
  <display-name>01.mybatis</display-name>
  <!-- 配置SpringMVC编码过滤器 -->
  <filter>
    <filter-name>CharacterEncodingFilter</filter-name>
    <filter-class>org.springframework.web.filter.CharacterEncodingFilter</filter-class>
    <init-param>
      <param-name>encoding</param-name>
      <param-value>utf-8</param-value>
    </init-param>
  </filter>
  <filter-mapping>
    <filter-name>CharacterEncodingFilter</filter-name>
    <url-pattern>/*</url-pattern>
  </filter-mapping>
  <!-- 启动SpringMVC -->
  <servlet>
    <servlet-name>DispatcherServlet</servlet-name>
    <servlet-class>org.springframework.web.servlet.DispatcherServlet</servlet-class>
    <!-- 参数:读取spring-mvc.xml -->
    <init-param>
      <param-name>contextConfigLocation</param-name>
      <param-value>classpath:spring-mvc.xml</param-value>
    </init-param>
  </servlet>
  <servlet-mapping>
    <servlet-name>DispatcherServlet</servlet-name>
    <url-pattern>*.action</url-pattern>
  </servlet-mapping>


  <!-- 启动spring -->
  <listener>
    <listener-class>org.springframework.web.context.ContextLoaderListener</listener-class>
  </listener>
  <!-- 修改路径 -->
  <context-param>
    <param-name>contextConfigLocation</param-name>
    <param-value>classpath:applicationContext.xml</param-value>
  </context-param>
</web-app>
这里的话,后端就搭起来了。
16 页面编写
16.1 index.jsp
我们需要编写首页,代码如下
<%@ page language="java" import="java.util.*" pageEncoding="utf-8"%>

<!DOCTYPE HTML PUBLIC "-//W3C//DTD HTML 4.01 Transitional//EN">
<html>
  <head>
    <title>booleanbl 公众号 客户关系管理系统</title>

    <meta http-equiv="pragma" content="no-cache">
    <meta http-equiv="cache-control" content="no-cache">
    <meta http-equiv="expires" content="0">
    <meta http-equiv="keywords" content="keyword1,keyword2,keyword3">
    <meta http-equiv="description" content="This is my page">
    <script type="text/javascript" src="easyui/jquery.min.js"></script>
    <script type="text/javascript" src="easyui/jquery.easyui.min.js"></script>
    <script type="text/javascript" src="easyui/locale/easyui-lang-zh_CN.js"></script>
    <link rel="stylesheet" type="text/css" href="easyui/themes/icon.css">
    <link id="themeLink" rel="stylesheet" type="text/css" href="easyui/themes/default/easyui.css">

    <style type="text/css">
        ul{
            line-height: 30px;
        }
    </style>
  </head>

  <body class="easyui-layout">
       <!-- 顶部 -->
    <div data-options="region:'north',split:true" style="height:80px;">

        <!-- logo -->
        <div id="logo">
            <img src="images/20191223003101.png"/>
        </div>

        <!-- 登录用户信息 -->
        <div id="loginDiv" style="position: absolute;right: 20px;top: 20px;">
             欢迎你,[超级管理员],你使用[192.156.21.22]IP登录!
        </div>

        <div id="themesDiv" style="position: absolute;right: 20px;top:40px;">
            <a href="javascript:void(0)" id="mb" class="easyui-menubutton"
                    data-options="menu:'#Themesmeus',iconCls:'icon-edit'">切换风格</a>
            <div id="Themesmeus" style="width:150px;">
                <div>default</div>
                <div>gray</div>
                <div>black</div>
                <div>bootstrap</div>
                <div>material</div>
                <div>metro</div>
            </div>
        </div>
    </div>

    <!-- 底部 -->
    <div data-options="region:'south',split:true" style="height:30px;">
        <div id="copyrightDiv" style="text-align: center;">
            booleanbl出品©2018版权所有
        </div>
    </div>

     <!-- 左边系统菜单 -->
    <div data-options="region:'west',title:'系统菜单',split:true" style="width:200px;">
        <div id="aa" class="easyui-accordion" style="width:193px;" data-options="border:0,multiple:true" >

            <div title="系统管理" data-options="iconCls:'icon-reload',selected:true" style="padding:10px;">
               <ul>
                    <li><a href="javascript:void(0)" pageUrl="customer_manage.jsp">客户管理</a></li>
               </ul>
            </div>
        </div>
    </div>

    <!-- 中间编辑区域 -->
    <div data-options="region:'center'" style="padding:5px;background:#eee;">
        <div id="tt" class="easyui-tabs" style="width:500px;height:250px;" data-options="fit:true">
            <div title="起始页" style="padding:20px;display:none;">
               欢迎登录booleanbl客户关系管理系统
            </div>
        </div>
    </div>


    <script type="text/javascript">
        $(function(){
            //给a标签绑定时间
            $("a[pageUrl]").click(function(){
                //1.获取pageUrl属性值(需要跳转的页面地址)
                var pageUrl = $(this).attr("pageUrl");
                //获取a标签的内容,标题
                var title = $(this).text();

                //2.判断是否存在指定标题的选项卡
                if( $("#tt").tabs("exists",title)  )  {
                    //3.如果存在,则选项该选项卡
                    $("#tt").tabs("select",title);
                }else{
                    //4.如果不存在,则添加选项卡
                    $("#tt").tabs("add",{
                        title:title,
                        content:"<iframe src='"+pageUrl+"' width='100%' height='100%' frameborder='0'><iframe>",
                        closable:true
                    });
                }
            });

            //点击切换模块菜单的时候,进行切换模块
            $("#Themesmeus").menu({
                onClick:function(item){
                    //1.获取需要改变的模块名称
                    var themeName = item.text;

                    //2.获取link标签的href属性
                    var href= $("#themeLink").attr("href");

                    //3.更改href的属性值
                    // easyui/themes/default/easyui.css
                    href = href.substring(0,href.indexOf("themes"))+"themes/"+themeName+"/easyui.css";

                    //4.更新link的href属性
                    $("#themeLink").attr("href",href);
                }
            });
        });

    </script>
  </body>
</html>
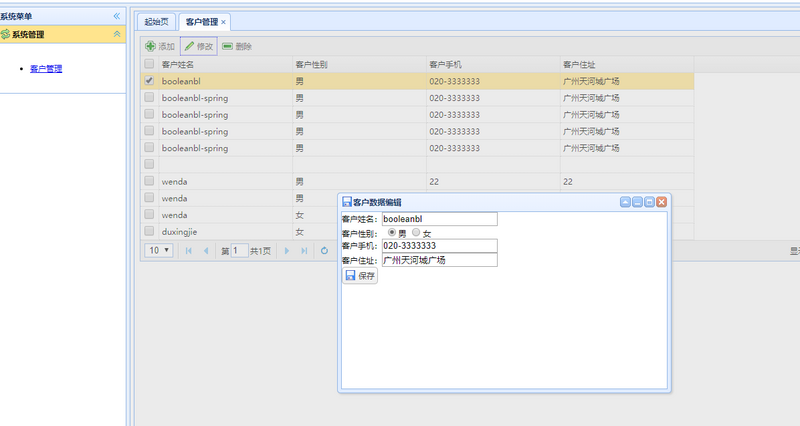
16.2 customer_manage.jsp
我们需要详情页,代码如下
<%@ page language="java" import="java.util.*" pageEncoding="utf-8"%>

<!DOCTYPE HTML PUBLIC "-//W3C//DTD HTML 4.01 Transitional//EN">
<html>
  <head>
    <title>客户管理</title>
    <meta http-equiv="pragma" content="no-cache">
    <meta http-equiv="cache-control" content="no-cache">
    <meta http-equiv="expires" content="0">
    <meta http-equiv="keywords" content="keyword1,keyword2,keyword3">
    <meta http-equiv="description" content="This is my page">
    <!-- 导入easyui的资源文件 -->
    <script type="text/javascript" src="easyui/jquery.min.js"></script>
    <script type="text/javascript" src="easyui/jquery.easyui.min.js"></script>
    <script type="text/javascript" src="easyui/locale/easyui-lang-zh_CN.js"></script>
    <link rel="stylesheet" type="text/css" href="easyui/themes/icon.css">
    <link id="themeLink" rel="stylesheet" type="text/css" href="easyui/themes/default/easyui.css">
  </head>

  <body>
      <table id="list"></table>

      <!-- 工具条 -->
      <div id="tb">
        <a id="addBtn" href="#" class="easyui-linkbutton" data-options="iconCls:'icon-add',plain:true">添加</a>
        <a id="editBtn" href="#" class="easyui-linkbutton" data-options="iconCls:'icon-edit',plain:true">修改</a>
        <a id="deleteBtn" href="#" class="easyui-linkbutton" data-options="iconCls:'icon-remove',plain:true">删除</a>
    </div>

    <!-- 编辑窗口 -->
    <div id="win" class="easyui-window" title="客户数据编辑" style="width:500px;height:300px"
        data-options="iconCls:'icon-save',modal:true,closed:true">
        <form id="editForm" method="post">
            <%--提供id隐藏域 --%>
            <input type="hidden" name="id">
              客户姓名:<input type="text" name="name" class="easyui-validatebox" data-options="required:true"/><br/>
              客户性别:
              <input type="radio" name="gender" value="男"/>男
              <input type="radio" name="gender" value="女"/>女
              <br/>
              客户手机:<input type="text" name="telephone" class="easyui-validatebox" data-options="required:true"/><br/>
              客户住址:<input type="text" name="address" class="easyui-validatebox" data-options="required:true"/><br/>
          <a id="saveBtn" href="#" class="easyui-linkbutton" data-options="iconCls:'icon-save'">保存</a>
      </form>
    </div>

      <script type="text/javascript">
          $(function(){
              $("#list").datagrid({
                  //url:后台数据查询的地址
                  url:"customer/list.action",
                  //columns:填充的列数据
                      //field:后台对象的属性
                      //tille:列标题
                  columns:[[
                      {
                          field:"id",
                          title:"客户编号",
                          width:100,
                          checkbox:true
                      },
                      {
                          field:"name",
                          title:"客户姓名",
                          width:200
                      },
                      {
                          field:"gender",
                          title:"客户性别",
                          width:200
                      },
                      {
                          field:"telephone",
                          title:"客户手机",
                          width:200
                      },
                      {
                          field:"address",
                          title:"客户住址",
                          width:200
                      }
                  ]],
                  //显示分页
                  pagination:true,
                  //工具条
                  toolbar:"#tb"
              });

              //打开编辑窗口
              $("#addBtn").click(function(){
                  //清空表单数据
                  $("#editForm").form("clear");
                  $("#win").window("open");
              });

              //保存数据
              $("#saveBtn").click(function(){
                  $("#editForm").form("submit",{
                      //url: 提交到后台的地址
                      url:"customer/save.action",
                      //onSubmit: 表单提交前的回调函数,true:提交表单   false:不提交表单
                      onSubmit:function(){
                          //判断表单的验证是否都通过了
                          return $("#editForm").form("validate");
                      },
                      //success:服务器执行完毕回调函数
                      success:function(data){ //data: 服务器返回的数据,类型字符串类
                          //要求Controller返回的数据格式:
                          //成功:{success:true} 失败:{success:false,msg:错误信息}

                          //把data字符串类型转换对象类型
                          data = eval("("+data+")");

                          if(data.success){
                              //关闭窗口
                              $("#win").window("close");
                              //刷新datagrid
                              $("#list").datagrid("reload");

                              $.messager.alert("提示","保存成功","info");
                          }else{
                              $.messager.alert("提示","保存失败:"+data.msg,"error");
                          }
                       }
                  });

              });

              //修改数据
              $("#editBtn").click(function(){
                  //判断只能选择一行
                  var rows = $("#list").datagrid("getSelections");
                  if(rows.length!=1){
                      $.messager.alert("提示","修改操作只能选择一行","warning");
                      return;
                  }

                  //表单回显
                  $("#editForm").form("load","customer/findById.action?id="+rows[0].id);

                  $("#win").window("open");
              });

              //删除
              $("#deleteBtn").click(function(){
                  var rows =$("#list").datagrid("getSelections");
                  if(rows.length==0){
                      $.messager.alert("提示","删除操作至少选择一行","warning");
                      return;
                  }

                  //格式: id=1&id=2&id=3
                  $.messager.confirm("提示","确认删除数据吗?",function(value){
                      if(value){
                          var idStr = "";
                          //遍历数据
                          $(rows).each(function(i){
                              idStr+=("id="+rows[i].id+"&");
                          });
                          idStr = idStr.substring(0,idStr.length-1);

                          //传递到后台
                          $.post("customer/delete.action",idStr,function(data){
                              if(data.success){
                                    //刷新datagrid
                                    $("#list").datagrid("reload");

                                    $.messager.alert("提示","删除成功","info");
                                }else{
                                    $.messager.alert("提示","删除失败:"+data.msg,"error");
                                }
                          },"json");
                      }
                  });
              });
          });

      </script>
  </body>
</html>
完成
常见问题
java-lang-illegalargumentexception-no-converter-found-for-return-value-of-type
原因是没有转换json返回
@ResponseBody
正文到此结束
- 本文标签: session java db https map Bootstrap 需求 json mybatis src message ORM id spring tab git sql IDE 代码 Select 软件 build CRM ioc AOP logo classpath struct 标题 数据 GitHub DOM 插件 schema ACE bean IO mysql 2019 编译 ip cat UI FIT 遍历 SpringMVC dataSource Word Service cache tag 服务器 servlet 数据库 jquery 管理 HTML list DBCP 删除 Action sqlsession junit root description Region NSA App value dependencies http Property mapper JDBC web pom find 配置 Menu CTO key 参数 W3C JavaScript 连接池 apache maven js 安装 CSS 时间 XML 分页 core 客户管理 SqlSessionFactory
- 版权声明: 本文为互联网转载文章,出处已在文章中说明(部分除外)。如果侵权,请联系本站长删除,谢谢。
- 本文海报: 生成海报一 生成海报二
热门推荐


相关文章


Loading...
![[HBLOG]公众号](http://www.liuhaihua.cn/img/qrcode_gzh.jpg)

