实战:SpringBoot & Restful API 构建示例
点击上方 Java后端 ,选择 设为星标
优质文章,及时送达
作者 | liuxiaopeng
链接 | cnblogs.com/paddix/p/8215245.html
在现在的开发流程中,为了最大程度实现前后端的分离,通常后端接口只提供数据接口,由前端通过Ajax请求从后端获取数据并进行渲染再展示给用户。我们用的最多的方式就是后端会返回给前端一个JSON字符串,前端解析JSON字符串生成JavaScript的对象,然后再做处理。
本文就来演示一下Spring boot如何实现这种模式,本文重点会讲解如何设计一个Restful的API,并通过Spring boot来实现相关的API。
不过,为了大家更好的了解Restful风格的API,我们先设计一个传统的数据返回接口,这样大家可以对比着来理解。
一、非Restful接口的支持
我们这里以文章列表为例,实现一个返回文章列表的接口,代码如下:
@Controller
@RequestMapping("/article")
public class ArticleController {

    @Autowired
    private ArticleService articleService;

    @RequestMapping("/list.json")
    @ResponseBody
    public List<Article> listArticles(String title, Integer pageSize, Integer pageNum) {
        if (pageSize == null) {
            pageSize = 10;
        }
        if (pageNum == null) {
            pageNum = 1;
        }
        int offset = (pageNum - 1) * pageSize;
        return articleService.getArticles(title, 1L, offset, pageSize);
    }
}
这个ArticleService的实现很简单,就是简单的封装了ArticleMapper的操作,ArticleService的实现类如下:
@Service
public class ArticleServiceImpl implements ArticleService {

    @Autowired
    private ArticleMapper articleMapper;

    @Override
    public Long saveArticle(@RequestBody Article article) {
        return articleMapper.insertArticle(article);
    }

    @Override
    public List<Article> getArticles(String title,Long userId,int offset,int pageSize) {
        Article article = new Article();
        article.setTitle(title);
        article.setUserId(userId);
        return articleMapper.queryArticlesByPage(article,offset,pageSize);
    }

    @Override
    public Article getById(Long id) {
        return articleMapper.queryById(id);
    }

    @Override
    public void updateArticle(Article article) {
        article.setUpdateTime(new Date());
        articleMapper.updateArticleById(article);
    }
}
运行Application.java这个类,然后访问:http://locahost:8080/article/list.json,就可以看到如下的结果:

ArticleServiceImpl这个类是一个很普通的类,只有一个Spring的注解@Service,标识为一个bean以便于通过Spring IoC容器来管理。我们再来看看ArticleController这个类,其实用过Spring MVC的人应该都熟悉这几个注解,这里简单解释一下:
-
@Controller 标识一个类为控制器。
-
@RequestMapping URL的映射。
-
@ResponseBody 返回结果转换为JSON字符串。
-
@RequestBody 表示接收JSON格式字符串参数。
通过这个三个注解,我们就能轻松的实现通过URL给前端返回JSON格式数据的功能。不过大家肯定有点疑惑,这不都是Spring MVC的东西吗?跟Spring boot有什么关系?
其实Spring boot的作用就是为我们省去了配置的过程,其他功能确实都是Spring与Spring MVC来为我们提供的,大家应该记得Spring boot通过各种starter来为我们提供自动配置的服务,我们的工程里面之前引入过这个依赖:
<dependency>
      <groupId>org.springframework.boot</groupId>
      <artifactId>spring-boot-starter-web</artifactId>
</dependency>
这个是所有Spring boot的web工程都需要引入的jar包,也就是说只要是Spring boot的web的工程,都默认支持上述的功能。这里我们进一步发现,通过Spring boot来开发web工程,确实为我们省了许多配置的工作。
二、Restful API设计
好了,我们现在再来看看如何实现Restful API。实际上Restful本身不是一项什么高深的技术,而只是一种编程风格,或者说是一种设计风格。
在传统的http接口设计中,我们一般只使用了get和post两个方法,然后用我们自己定义的词汇来表示不同的操作,比如上面查询文章的接口,我们定义了article/list.json来表示查询文章列表,可以通过get或者post方法来访问。而Restful API的设计则通过HTTP的方法来表示CRUD相关的操作。
因此,除了get和post方法外,还会用到其他的HTTP方法,如PUT、DELETE、HEAD等,通过不同的HTTP方法来表示不同含义的操作。下面是我设计的一组对文章的增删改查的Restful API:
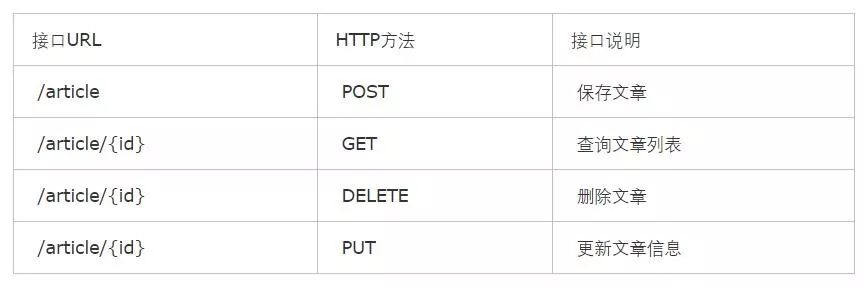
这里可以看出,URL仅仅是标识资源的路劲,而具体的行为由HTTP方法来指定。
三、Restful API实现
现在我们再来看看如何实现上面的接口,其他就不多说,直接看代码:
@RestController
@RequestMapping("/rest")
public class ArticleRestController {

    @Autowired
    private ArticleService articleService;

    @RequestMapping(value = "/article", method = POST, produces = "application/json")
    public WebResponse<Map<String, Object>> saveArticle(@RequestBody Article article) {
        article.setUserId(1L);
        articleService.saveArticle(article);
        Map<String, Object> ret = new HashMap<>();
        ret.put("id", article.getId());
        WebResponse<Map<String, Object>> response = WebResponse.getSuccessResponse(ret);
        return response;
    }

    @RequestMapping(value = "/article/{id}", method = DELETE, produces = "application/json")
    public WebResponse<?> deleteArticle(@PathVariable Long id) {
        Article article = articleService.getById(id);
        article.setStatus(-1);
        articleService.updateArticle(article);
        WebResponse<Object> response = WebResponse.getSuccessResponse(null);
        return response;
    }

    @RequestMapping(value = "/article/{id}", method = PUT, produces = "application/json")
    public WebResponse<Object> updateArticle(@PathVariable Long id, @RequestBody Article article) {
        article.setId(id);
        articleService.updateArticle(article);
        WebResponse<Object> response = WebResponse.getSuccessResponse(null);
        return response;
    }

    @RequestMapping(value = "/article/{id}", method = GET, produces = "application/json")
    public WebResponse<Article> getArticle(@PathVariable Long id) {
        Article article = articleService.getById(id);
        WebResponse<Article> response = WebResponse.getSuccessResponse(article);
        return response;
    }
}
我们再来分析一下这段代码,这段代码和之前代码的区别在于:
(1)我们使用的是@RestController这个注解,而不是@Controller,不过这个注解同样不是Spring boot提供的,而是Spring MVC4中的提供的注解,表示一个支持Restful的控制器。
(2)这个类中有三个URL映射是相同的,即都是/article/{id},这在@Controller标识的类中是不允许出现的。这里的可以通过method来进行区分,produces的作用是表示返回结果的类型是JSON。
(3)@PathVariable这个注解,也是Spring MVC提供的,其作用是表示该变量的值是从访问路径中获取。
所以看来看去,这个代码还是跟Spring boot没太多的关系,Spring boot也仅仅是提供自动配置的功能,这也是Spring boot用起来很舒服的一个很重要的原因,因为它的侵入性非常非常小,你基本感觉不到它的存在。
四、测试
代码写完了,怎么测试?除了GET的方法外,都不能直接通过浏览器来访问,当然,我们可以直接通过postman来发送各种http请求。不过我还是比较支持通过单元测试类来测试各个方法。这里我们就通过Junit来测试各个方法:
@RunWith(SpringJUnit4ClassRunner.class)
@SpringBootTest(classes = Application.class)
public class ArticleControllerTest {

    @Autowired
    private ArticleRestController restController;

    private MockMvc mvc;

    @Before
    public void setUp() throws Exception {
        mvc = MockMvcBuilders.standaloneSetup(restController).build();
    }

    @Test
    public void testAddArticle() throws Exception {
        Article article = new Article();
        article.setTitle("测试文章000000");
        article.setType(1);
        article.setStatus(2);
        article.setSummary("这是一篇测试文章");
        Gson gosn = new Gson();
        RequestBuilder builder = MockMvcRequestBuilders
                .post("/rest/article")
                .accept(MediaType.APPLICATION_JSON)
                .contentType(MediaType.APPLICATION_JSON_UTF8)
                .content(gosn.toJson(article));

        MvcResult result = mvc.perform(builder).andReturn();
        System.out.println(result.getResponse().getContentAsString());
    }

    @Test
    public void testUpdateArticle() throws Exception {
        Article article = new Article();
        article.setTitle("更新测试文章");
        article.setType(1);
        article.setStatus(2);
        article.setSummary("这是一篇更新测试文章");
        Gson gosn = new Gson();
        RequestBuilder builder = MockMvcRequestBuilders
                .put("/rest/article/1")
                .accept(MediaType.APPLICATION_JSON)
                .contentType(MediaType.APPLICATION_JSON_UTF8)
                .content(gosn.toJson(article));
        MvcResult result = mvc.perform(builder).andReturn();
    }

    @Test
    public void testQueryArticle() throws Exception {
        RequestBuilder builder = MockMvcRequestBuilders
                .get("/rest/article/1")
                .accept(MediaType.APPLICATION_JSON)
                .contentType(MediaType.APPLICATION_JSON_UTF8);
        MvcResult result = mvc.perform(builder).andReturn();
        System.out.println(result.getResponse().getContentAsString());
    }

    @Test
    public void testDeleteArticle() throws Exception {
        RequestBuilder builder = MockMvcRequestBuilders
                .delete("/rest/article/1")
                .accept(MediaType.APPLICATION_JSON)
                .contentType(MediaType.APPLICATION_JSON_UTF8);
        MvcResult result = mvc.perform(builder).andReturn();
    }
}
执行结果这里就不给大家贴了,大家有兴趣的话可以自己实验一下。整个类要说明的点还是很少,主要这些东西都与Spring boot没关系,支持这些操作的原因还是上一篇文章中提到的引入对应的starter:
<dependency>
      <groupId>org.springframework.boot</groupId>
      <artifactId>spring-boot-starter-test</artifactId>
      <scope>test</scope>
</dependency>
因为要执行HTTP请求,所以这里使用了MockMvc,ArticleRestController通过注入的方式实例化,不能直接new,否则ArticleRestController就不能通过Spring IoC容器来管理,因而其依赖的其他类也无法正常注入。通过MockMvc我们就可以轻松的实现HTTP的DELETE/PUT/POST等方法了。
五、总结
本文讲解了如果通过Spring boot来实现Restful的API,其实大部分东西都是Spring和Spring MVC提供的,Spring boot只是提供自动配置的功能。
但是,正是这种自动配置,为我们减少了很多的开发和维护工作,使我们能更加简单、高效的实现一个web工程,从而让我们能够更加专注于业务本身的开发,而不需要去关心框架的东西。
- END -
推 荐 阅 读
1. Java 线程有哪些不太为人所知的技巧与用法?
2. 关于 CPU 的一些基本知识总结
3. 发布没有答案的面试题,都是耍流氓
4. 什么是一致性 Hash 算法?
5. 团队开发中 Git 最佳实践

喜
欢
文
章
,
点
个
在看

正文到此结束
- 本文标签: db cat API list src mapper HashMap 测试 线程 RESTful value build ORM 专注 web tar 管理 json spring ioc ioc 一致性 update js IDE 实例 Ajax bean springboot java https 数据 解析 总结 Service Spring Boot spring git UI HTML 开发 JavaScript id ip 配置 App 参数 文章 AOP junit map 代码 REST http IO 单元测试
- 版权声明: 本文为互联网转载文章,出处已在文章中说明(部分除外)。如果侵权,请联系本站长删除,谢谢。
- 本文海报: 生成海报一 生成海报二
热门推荐


相关文章

近期评论
-
你这基本没有更新呀,最近文章显示还是2019年的文章。不符合要求哈
-
关键词:慕云博客 链接:https://www.lilun.me 描述:分享原创文字的个人博客
-
-
-
可以提供一下源码吗
-
不是商业站,鸡娃学习笔记
-
-
-
-
听他们说很厉害的样子
Loading...
![[HBLOG]公众号](http://www.liuhaihua.cn/img/qrcode_gzh.jpg)

