SpringBoot和Swagger快速构建REST-API并生成优美的API文档
上一篇《简单搭建SpringBoot项目》讲了简单的搭建SpringBoot 项目,而 SpringBoot 和 Swagger-ui 搭配在持续交付的前后端开发中意义重大,Swagger 规范和完整的框架,用于生成、描述、调用和可视化 RESTful 风格的 Web 服务,对调用方而言非常直观,接口也可以点击 try it out! 按钮 进行调试,在实际开发中大大增加了开发效率。点击可了解更多 swagger 相关信息 swagger-ui官网
pom.xml中增加:
<!-- Swagger -->
        <dependency>
            <groupId>io.springfox</groupId>
            <artifactId>springfox-swagger2</artifactId>
            <version>2.6.1</version>
        </dependency>
        <dependency>
            <groupId>io.springfox</groupId>
            <artifactId>springfox-swagger-ui</artifactId>
            <version>2.5.0</version>
        </dependency>
SwaggerConfig.java:
package com.example.swagger;

import org.springframework.context.annotation.Bean;
import org.springframework.context.annotation.Configuration;
import org.springframework.web.context.request.async.DeferredResult;
import springfox.documentation.builders.ApiInfoBuilder;
import springfox.documentation.service.ApiInfo;
import springfox.documentation.service.Contact;
import springfox.documentation.spi.DocumentationType;
import springfox.documentation.spring.web.plugins.Docket;
import springfox.documentation.swagger2.annotations.EnableSwagger2;

import static springfox.documentation.builders.PathSelectors.regex;

/**
 * Created by shuai on 2017/5/22.
 */
@Configuration
@EnableSwagger2
public class SwaggerConfig {

    /**
     * 可以定义多个组,比如本类中定义把test和demo区分开了
     */
    @Bean
    public Docket testApi() {
        return new Docket(DocumentationType.SWAGGER_2)
                .groupName("test")
                .genericModelSubstitutes(DeferredResult.class)
//                .genericModelSubstitutes(ResponseEntity.class)
                .useDefaultResponseMessages(false)
                .forCodeGeneration(true)
                .pathMapping("/")// base,最终调用接口后会和paths拼接在一起
                .select()
                .paths((regex("/api/test/.*")))//过滤的接口
                .build()
                .apiInfo(testApiInfo());
    }

    @Bean
    public Docket demoApi() {
        return new Docket(DocumentationType.SWAGGER_2)
                .groupName("demo")
                .genericModelSubstitutes(DeferredResult.class)
//              .genericModelSubstitutes(ResponseEntity.class)
                .useDefaultResponseMessages(false)
                .forCodeGeneration(false)
                .pathMapping("/")
                .select()
                .paths((regex("/api/demo/.*")))//过滤的接口
                .build()
                .apiInfo(demoApiInfo());
    }

    private ApiInfo testApiInfo() {
        return new ApiInfoBuilder()
                .title("Test 类型 API")//大标题
                .description("这是 Test 类型 API 描述")//详细描述
                .version("1.0")//版本
                .termsOfServiceUrl("NO terms of service")
                .contact(new Contact("shuai", "http://www.jianshu.com/u/07b9ae164f95", "1119386572@qq.com"))//作者
                .license("The Apache License, Version 2.0")
                .licenseUrl("http://www.apache.org/licenses/LICENSE-2.0.html")
                .build();
    }

    private ApiInfo demoApiInfo() {
        return new ApiInfoBuilder()
                .title("Demo 类型 API")//大标题
                .description("这是 Demo 类型 API 描述")//详细描述
                .version("1.0")//版本
                .termsOfServiceUrl("NO terms of service")
                .contact(new Contact("shuai", "http://www.jianshu.com/u/07b9ae164f95", "1119386572@qq.com"))//作者
                .license("The Apache License, Version 2.0")
                .licenseUrl("http://www.apache.org/licenses/LICENSE-2.0.html")
                .build();
    }
}
此时启动 SpringBoot 工程,在浏览器输入 http://localhost :8080/swagger-ui.html 即可看见:
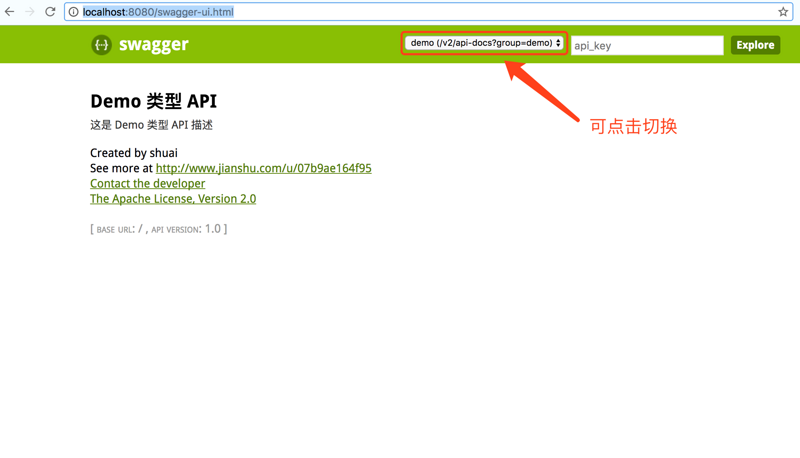
在 SwaggerConfig.java 文件中配置了扫描接口的路径,只有符合标准的接口才会显示出来,
常见swagger注解一览与使用
- 最常用的5个注解
@Api:修饰整个类,描述Controller的作用
@ApiOperation:描述一个类的一个方法,或者说一个接口
@ApiParam:单个参数描述
@ApiModel:用对象来接收参数
@ApiProperty:用对象接收参数时,描述对象的一个字段
- 其它若干
@ApiResponse:HTTP响应其中1个描述
@ApiResponses:HTTP响应整体描述
@ApiIgnore:使用该注解忽略这个API
下面创建符合规范的接口:
TestController.java:
package com.example.controller;

import io.swagger.annotations.ApiOperation;
import io.swagger.annotations.ApiParam;
import org.springframework.http.MediaType;
import org.springframework.stereotype.Controller;
import org.springframework.web.bind.annotation.RequestMapping;
import org.springframework.web.bind.annotation.RequestMethod;
import org.springframework.web.bind.annotation.RequestParam;
import org.springframework.web.bind.annotation.ResponseBody;

/**
 * Created by shuai on 2017/5/22.
 */
@Controller
@RequestMapping("/api/test")
public class TestController {

    @ResponseBody
    @RequestMapping(value = "/user", method= RequestMethod.POST, produces= MediaType.APPLICATION_JSON_VALUE)
    @ApiOperation(value="获取user", notes="根据id获取User的接口")
    public String getUser(
            @ApiParam(required=true, name="id", value="主键id") @RequestParam(name = "id", required=true) String id
            ){
        return "success";
    }
}
当对象作为入参时,需要创建一个对象,对象中要用到上面提到的 @ApiModel @ApiModelProperty 等注解:
UserVo.java:
package com.example.vo;

import io.swagger.annotations.ApiModel;
import io.swagger.annotations.ApiModelProperty;

/**
 * Created by shuai on 2017/5/22.
 */
@ApiModel(description = "用户的对象")
public class UserVo {

    @ApiModelProperty("姓名")
    private String name;

    @ApiModelProperty("年龄")
    private Integer age;

    @ApiModelProperty("性别")
    private String sex;

    //
    Get And Set Method...()
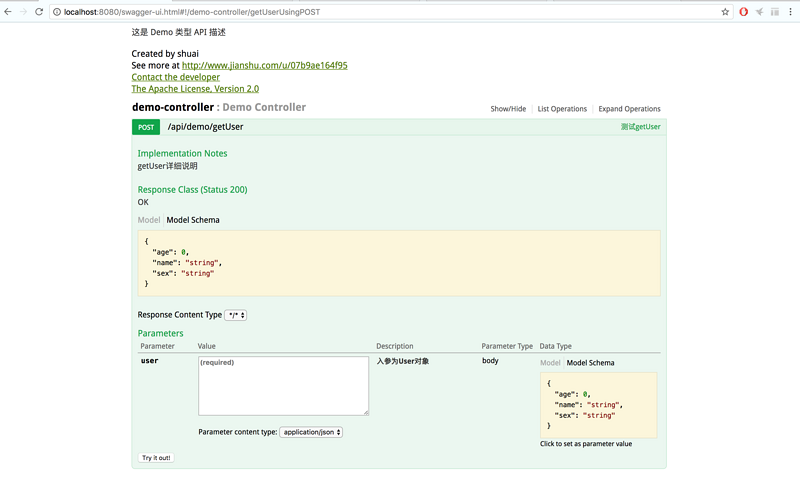
DemoController.java:
package com.example.controller;

import com.example.vo.UserVo;
import io.swagger.annotations.ApiOperation;
import io.swagger.annotations.ApiParam;
import org.slf4j.Logger;
import org.slf4j.LoggerFactory;
import org.springframework.http.HttpHeaders;
import org.springframework.http.HttpStatus;
import org.springframework.http.ResponseEntity;
import org.springframework.stereotype.Controller;
import org.springframework.ui.ModelMap;
import org.springframework.web.bind.annotation.*;
import springfox.documentation.annotations.ApiIgnore;

import javax.servlet.http.HttpServletRequest;
import javax.servlet.http.HttpServletResponse;
import javax.servlet.http.HttpSession;
import java.util.ArrayList;
import java.util.List;

/**
 * Created by shuai on 2017/5/21.
 */
@Controller
@RequestMapping(value = "/api/demo")
public class DemoController {

    @ResponseBody
    @RequestMapping(value = "/getUser", method = RequestMethod.POST)
    @ApiOperation(value="测试getUser", notes="getUser详细说明", response = UserVo.class)
    public UserVo getCount(
            @ApiParam( required = true, name = "user", value = "入参为User对象") @RequestBody UserVo user
    ) {
        return user;
    }

}
这样一个简单的 SpringBoot 和Swagger-ui 结合的工程就完成了,下面启动运行:
github地址: Spring Boot 教程、技术栈、示例代码

正文到此结束
- 本文标签: Spring Boot servlet map CTO list http id 标题 代码 value entity IO pom cat GitHub XML src plugin 测试 description API json build bean web js RESTful Select example Service ArrayList apache https 调试 Document 开发 Property session java git UI HTML 参数 message springboot spring ip 配置 App REST
- 版权声明: 本文为互联网转载文章,出处已在文章中说明(部分除外)。如果侵权,请联系本站长删除,谢谢。
- 本文海报: 生成海报一 生成海报二
热门推荐


相关文章

近期评论
-
你这基本没有更新呀,最近文章显示还是2019年的文章。不符合要求哈
-
关键词:慕云博客 链接:https://www.lilun.me 描述:分享原创文字的个人博客
-
-
-
可以提供一下源码吗
-
不是商业站,鸡娃学习笔记
-
-
-
-
听他们说很厉害的样子
Loading...
![[HBLOG]公众号](http://www.liuhaihua.cn/img/qrcode_gzh.jpg)

