最适合新手入门的SpringCloud教程 7—OpenFeign「F版本」

SpringCloud版本:Finchley.SR2
SpringBoot版本:2.0.3.RELEASE
源码地址: https://gitee.com/bingqilinpe...
前言
Tips:OpenFeign的使用类似于Dao接口的开发
上一篇使用了RestTemplate的服务调用,但是有一些问题:通过RestTemplate发送请求时候,携带参数比较的繁琐,另外RestTemplate中需要写完整的Url,这一步也是比较麻烦的。
今天就来分享一种更加简单的方式,OpenFeign的方式。
OpenFeign
什么是OpenFeign
OpenFeign是声明式的Http客户端,通过OpenFeign发送Http请求非常的简单
- 注解式开发,接口+注解的方式
- OpenFeign支持多种的对象的序列化 和 反序列化的工具
- OpenFeign默认集成了Ribbon,可以直接进行负载均衡
Feign 和 OpenFeign是两个技术,都是作为服务调用存在的,OpenFeign 是SpringCloud在Feign的基础上进行封装得到的,支持SpringMvc的注解。
OpenFeign的使用
Tips:代码在之前项目的基础上进行开发,源码地址: https://gitee.com/bingqilinpe...
创建OpenFeign的项目
1.创建新Module项目 cloud-openfeign-8806
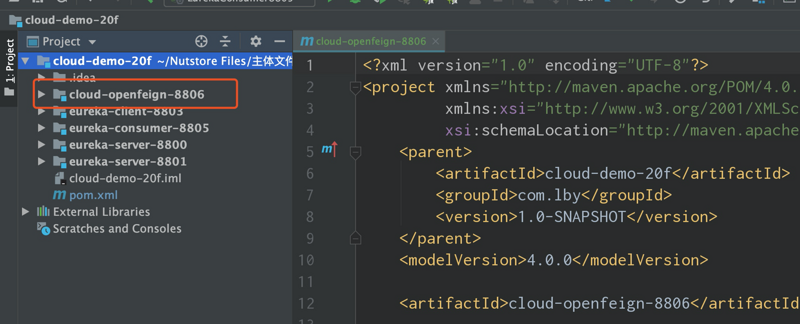
2.pom文件导入依赖
<?xml version="1.0" encoding="UTF-8"?>
<project xmlns="http://maven.apache.org/POM/4.0.0"
         xmlns:xsi="http://www.w3.org/2001/XMLSchema-instance"
         xsi:schemaLocation="http://maven.apache.org/POM/4.0.0 http://maven.apache.org/xsd/maven-4.0.0.xsd">
    <parent>
        <artifactId>cloud-demo-20f</artifactId>
        <groupId>com.lby</groupId>
        <version>1.0-SNAPSHOT</version>
    </parent>
    <modelVersion>4.0.0</modelVersion>

    <artifactId>cloud-openfeign-8806</artifactId>

    <dependencies>
<!--        openfeign-->
        <dependency>
            <groupId>org.springframework.cloud</groupId>
            <artifactId>spring-cloud-starter-openfeign</artifactId>
        </dependency>

        <!--        Eureka 客户端的依赖-->
        <dependency>
            <groupId>org.springframework.cloud</groupId>
            <artifactId>spring-cloud-starter-netflix-eureka-client</artifactId>
        </dependency>

        <!--        web的依赖-->
        <dependency>
            <groupId>org.springframework.boot</groupId>
            <artifactId>spring-boot-starter-web</artifactId>
        </dependency>

        <!--        测试的依赖-->
        <dependency>
            <groupId>org.springframework.boot</groupId>
            <artifactId>spring-boot-starter-test</artifactId>
            <scope>test</scope>
        </dependency>
    </dependencies>
</project>
3.启动类
package com.lby;

import org.springframework.boot.SpringApplication;
import org.springframework.boot.autoconfigure.SpringBootApplication;
import org.springframework.cloud.client.discovery.EnableDiscoveryClient;
import org.springframework.cloud.openfeign.EnableFeignClients;

/**
 * @EnableFeignClients OpenFeign的注解
 */
@SpringBootApplication
@EnableDiscoveryClient
@EnableFeignClients
public class OpenFeignRun8806 {
    public static void main(String[] args) {
        SpringApplication.run(OpenFeignRun8806.class,args);
    }

}
4.配置文件
server:
  port: 8806

#指定当前服务的名称  会注册到注册中心
spring:
  application:
    name: eureka-openfeign-8806

#  指定 服务注册中心的地址
eureka:
  client:
    serviceUrl:
      defaultZone: http://localhost:8801/eureka,http://localhost:8800/eureka
通过四步我们就拥有了一个最初步的项目,接下来,我们会通过接口+注解的方式开发OpenFeign的服务调用。
OpenFeign接口的开发
OpenFeign的开发方式:接口+注解,微服务调用的接口+@FeignClient
1.业务逻辑接口+@FeignClient创建OpenFeign服务调用
package com.lby.service;

import org.springframework.cloud.openfeign.FeignClient;
import org.springframework.stereotype.Component;
import org.springframework.web.bind.annotation.GetMapping;
import org.springframework.web.bind.annotation.RequestParam;

/**
 * @author luxiaoyang
 * @create 2020-04-05-19:41
 *
 * @FeignClient 参数是要请求服务的服务名称
 */
@Component
@FeignClient(value = "eureka-client-8803")
public interface ConsumerFeignService {

    /**
     * 接口中的方法是被调用服务的Controller接口
     */
    @GetMapping("showImgById")
    String showImgById(@RequestParam("id") Integer id);
}
接口的书写规则如下图所示:
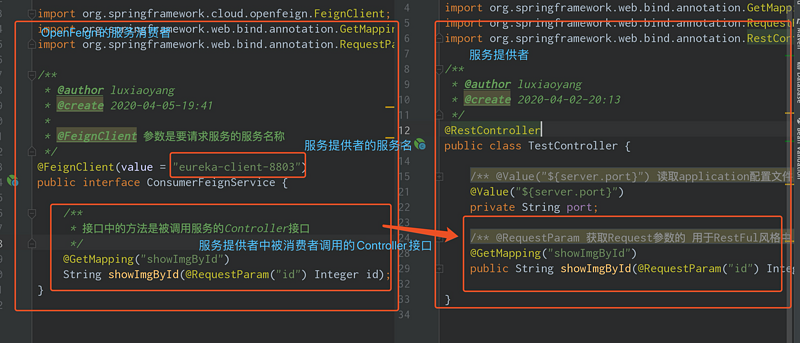
2.在消费者中创建一个ConsumerController使用OpenFeign接口
package com.lby.controller;

import com.lby.service.ConsumerFeignService;
import org.springframework.web.bind.annotation.GetMapping;
import org.springframework.web.bind.annotation.RestController;

import javax.annotation.Resource;

/**
 * @author luxiaoyang
 * @create 2020-04-05-19:47
 */
@RestController
public class ConsumerController {
    /**
     * 直接装配OpenFeign的服务调用接口
     */
    @Resource
    private ConsumerFeignService consumerFeignService;

    @GetMapping("testOpenFeign")
    public String testOpenFeign(){
        String s = consumerFeignService.showImgById(1);
        return "Feign服务调用的结果为:"+s;
    }
}
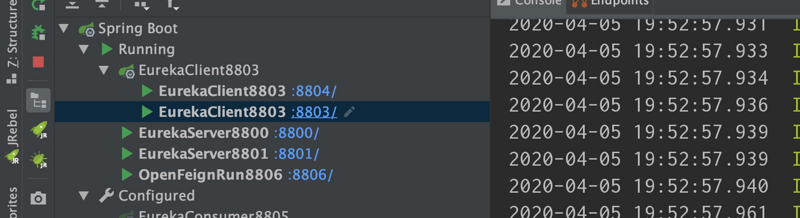
启动项目
启动注册中心,服务提供者(两个)(启动方法见上一篇),以及Feign服务
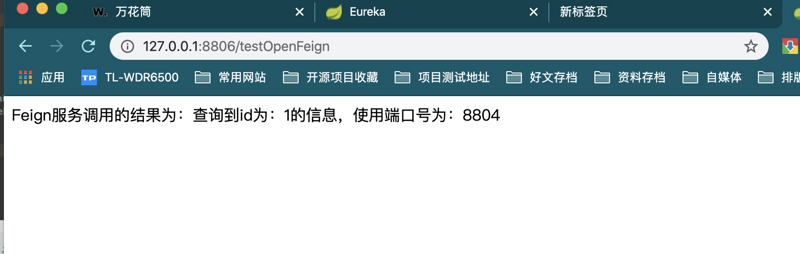
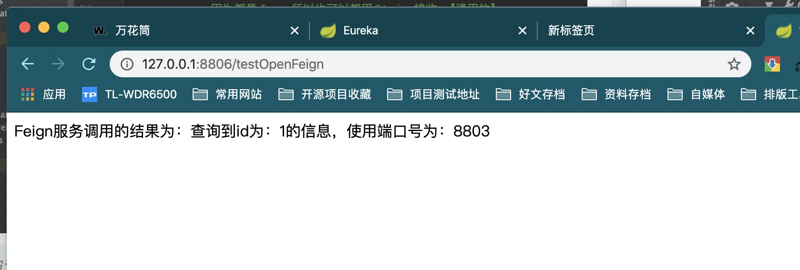
请求eureka-openfeign-8806的Controller接口: http://127.0.0.1 :8806/testOpenFeign
可以看到两次请求都能够获取服务提供者的响应,并且能够负载均衡
总结
以上就是OpenFeign的基本使用,关于OpenFeign的其他使用见下篇文章。
源码地址: https://gitee.com/bingqilinpe...
恭喜你完成了本章的学习,为你鼓掌!如果本文对你有帮助,请帮忙点赞,评论,转发,这对作者很重要,谢谢。

要掌握SpringCloud更多的用法,请持续关注本系列教程。
求关注,求点赞,求转发
欢迎关注本人公众号:鹿老师的Java笔记,将在长期更新Java技术图文教程和视频教程,Java学习经验,Java面试经验以及Java实战开发经验。
正文到此结束
- 本文标签: map Eureka client springboot pom cat SpringMVC schema id 微服务 maven tar value consumer IO 服务注册 源码 负载均衡 XML 总结 Service 注册中心 测试 https App 开发 文章 Netflix web git 代码 dependencies ACE Feign apache ip UI 参数 http ribbon java 配置 REST src springcloud spring
- 版权声明: 本文为互联网转载文章,出处已在文章中说明(部分除外)。如果侵权,请联系本站长删除,谢谢。
- 本文海报: 生成海报一 生成海报二
热门推荐


相关文章

近期评论
-
你这基本没有更新呀,最近文章显示还是2019年的文章。不符合要求哈
-
关键词:慕云博客 链接:https://www.lilun.me 描述:分享原创文字的个人博客
-
-
-
可以提供一下源码吗
-
不是商业站,鸡娃学习笔记
-
-
-
-
听他们说很厉害的样子
Loading...
![[HBLOG]公众号](http://www.liuhaihua.cn/img/qrcode_gzh.jpg)

