配置文件@ConfigurationProperties读取List、Map参数
背景
在SpringBoot环境中,我们有“使用不完的”注解。这也是SpringBoot替代了传统的Spring项目中的xml配置的原因。在使用这些annotation的时候,我们一定要了解这些注解背后的原理以及约定。
package org.springframework.boot.context.properties;

import java.lang.annotation.Documented;
import java.lang.annotation.ElementType;
import java.lang.annotation.Retention;
import java.lang.annotation.RetentionPolicy;
import java.lang.annotation.Target;

import org.springframework.core.annotation.AliasFor;

@Target({ ElementType.TYPE, ElementType.METHOD })
@Retention(RetentionPolicy.RUNTIME)
@Documented
public @interface ConfigurationProperties {
  ......
}
支持的类型
List
custom.config.config1.folders[0]=/root
custom.config.config1.folders[1]=/home/user1
custom.config.config1.folders[2]=/home/user2
对应的Java实现
@ConfigurationProperties(prefix = "custom.config.config1")
public class Config1Properties{
    private List<String> folders;
    ...
}
Map
custom.config.config1.map.key1=value1
custom.config.config1.map.key2=value2
custom.config.config1.map.key3=value3
custom.config.config1.map.key4=value4
custom.config.config1.map.key5=value5
对应的Java实现
@ConfigurationProperties(prefix = "custom.config.config1")
public class Config1Properties{
    private Map<String, String> map;
    ...
}
Object
custom.config.config1.server.host=host1
custom.config.config1.server.port=22
custom.config.config1.server.username=username1
custom.config.config1.server.password=password1
对应的Java实现
@ConfigurationProperties(prefix = "custom.config.config1")
public class Config1Properties{
    private ServerProperties server;
    ...
    public static class ServerProperties {
        private String host;
        private int port;
        private String username;
        private String password;
        ...
    }
}
Object List
custom.config.config1.servers[0].host=host1
custom.config.config1.servers[0].port=22
custom.config.config1.servers[0].username=username1
custom.config.config1.servers[0].password=password1
custom.config.config1.servers[1].host=host2
custom.config.config1.servers[1].port=22
custom.config.config1.servers[1].username=username2
custom.config.config1.servers[1].password=password2
对应的Java实现
@ConfigurationProperties(prefix = "custom.config.config1")
public class Config1Properties{
    private List<ServerProperties> servers;
    ...
    public static class ServerProperties {
        private String host;
        private int port;
        private String username;
        private String password;
        ...
    }
}
Map的使用案例
比如,我们同时需要连接多个OSS(阿里对象存储),那我们就可以利用ConfigurationProperties的方式来配置多个。而且可以通过Spring的加载动态的注入到容器中去。
配置中心的配置:
# OSS1配置
oss.multi.clients.accout.accessKeyId=xxx
oss.multi.clients.accout.accessKeySecret=xxx
oss.multi.clients.accout.privateEndpoint=xxx
oss.multi.clients.accout.bucketName=bucket-b-test

# OSS2配置
oss.multi.enabled=true
oss.multi.clients.xdtrans.accessKeyId=xxx
oss.multi.clients.xdtrans.accessKeySecret=xxx
oss.multi.clients.xdtrans.privateEndpoint=xxx
oss.multi.clients.xdtrans.bucketName=bucket-a-test
对应的Java实现
@Data
@EqualsAndHashCode(callSuper = false)
@ConfigurationProperties(prefix = OssConstants.MULTI_CONFIG_PREFIX)
public class MultiOssProperties {
    private Map<String, OssProperties> clients;

    @Data
    public static class OssProperties {
        private String accessKeyId;
        private String accessKeySecret;
        private String publicEndpoint;
        private String privateEndpoint;
        private String bucketName;
        private String object;
    }
动态的定义我们需要的BeanDefinition。
public class MultiOssScannerConfigurer implements BeanDefinitionRegistryPostProcessor, InitializingBean, ApplicationContextAware, BeanNameAware {

    private ApplicationContext applicationContext;

    @Setter
    private MultiOssProperties multiOssProperties;

    @Override
    public void setBeanName(String name) {
        log.info("init bean {}", name);
    }

    @Override
    public void afterPropertiesSet() throws Exception {
        Objects.requireNonNull(this.multiOssProperties, "multiOssProperties不能为空");
        Objects.requireNonNull(this.applicationContext, "applicationContext不能为空");
    }

  // 动态的定义Bean
    @Override
    public void postProcessBeanDefinitionRegistry(BeanDefinitionRegistry beanDefinitionRegistry) throws BeansException {
        String beanSuffixName = StringUtils.capitalize(OssConstants.BEAN_SUFFIX_NAME);
    // productCodes实际与oss.multi.clients.xdtrans的xdtrans保持一致
        multiOssProperties.getClients().forEach((productCode, ossProperties) -> {
            AbstractBeanDefinition beanDefinition = BeanDefinitionBuilder.genericBeanDefinition(OssClient.class,
                    () -> OssClientUtils.buildOssClient(ossProperties))
                    .getRawBeanDefinition();
            beanDefinition.setInitMethodName("init");
            beanDefinition.setDestroyMethodName("shutDown");
            beanDefinitionRegistry.registerBeanDefinition(productCode + beanSuffixName, beanDefinition);
        });
    }

    @Override
    public void postProcessBeanFactory(ConfigurableListableBeanFactory configurableListableBeanFactory) throws BeansException {
    }

    @Override
    public void setApplicationContext(ApplicationContext applicationContext) throws BeansException {
        this.applicationContext = applicationContext;
    }

}
通过binder来让配置与对应的Java代码产生关系:
@Configuration
@EnableConfigurationProperties(MultiOssProperties.class)
@ConditionalOnProperty(prefix = OssConstants.MULTI_CONFIG_PREFIX, value = "enabled")
public class MultiOssAutoConfiguration {

    /**
     * 初始化多个 ossClient 自动配置
     *
     * @param environment 环境变量属性
     * @return OssClient 自动扫描注册器
     */
    @Bean
    public MultiOssScannerConfigurer multiOssScannerConfigurer(Environment environment) {
        Binder binder = Binder.get(environment);
        MultiOssProperties properties = binder.bind(OssConstants.MULTI_CONFIG_PREFIX, MultiOssProperties.class).get();
        MultiOssScannerConfigurer multiOssScannerConfigurer = new MultiOssScannerConfigurer();
        multiOssScannerConfigurer.setMultiOssProperties(properties);
        return multiOssScannerConfigurer;
    }
}
如何使用?
@Getter
@AllArgsConstructor
public enum OssTypeEnum {
        // 注意一下这里的beanName,要跟上面的postProcessBeanDefinitionRegistry保持一致
    XDtransOssClient("xdtransOssClient", "oss1"),
    DianDianOssClient("ddacctOssClient", "oss2"),
    ;

    private final String beanName;
    private final String desc;

    // 根据BeanName来Spring容器中获取即可
    public OssClient getBean() {
        return SpringContextHolder.getBean(beanName, OssClient.class);
    }
Binder是如何映射的?
通过上面的代码 binder.bind(OssConstants.MULTI_CONFIG_PREFIX, MultiOssProperties.class).get(); 来进行bind。
protected final <T> T bind(ConfigurationPropertyName name, Bindable<T> target, BindHandler handler, Context context, boolean allowRecursiveBinding) {
        context.clearConfigurationProperty();
        try {
            target = handler.onStart(name, target, context);
            if (target == null) {
                return null;
            }
            Object bound = bindObject(name, target, handler, context,allowRecursiveBinding);
            return handleBindResult(name, target, handler, context, bound);
        } catch (Exception ex) {
            return handleBindError(name, target, handler, context, ex);
        }
}
如果我们的key是:oss.multi.clients.accout.xxx
实际上对应的是Map,那么它的引用名字就是clients。具体的key就是accout,那么对应的value就是OssProperties。
private Object bindBean(ConfigurationPropertyName name, Bindable<?> target,
        BindHandler handler, Context context, boolean allowRecursiveBinding) {
    if (containsNoDescendantOf(context.getSources(), name)
            || isUnbindableBean(name, target, context)) {
        return null;
    }
    BeanPropertyBinder propertyBinder = (propertyName, propertyTarget) -> bind(
            name.append(propertyName), propertyTarget, handler, context, false);
    Class<?> type = target.getType().resolve(Object.class);
    if (!allowRecursiveBinding && context.hasBoundBean(type)) {
        return null;
    }
    return context.withBean(type, () -> {
        Stream<?> boundBeans = BEAN_BINDERS.stream()
                .map((b) -> b.bind(name, target, context, propertyBinder));
        return boundBeans.filter(Objects::nonNull).findFirst().orElse(null);
    });
}
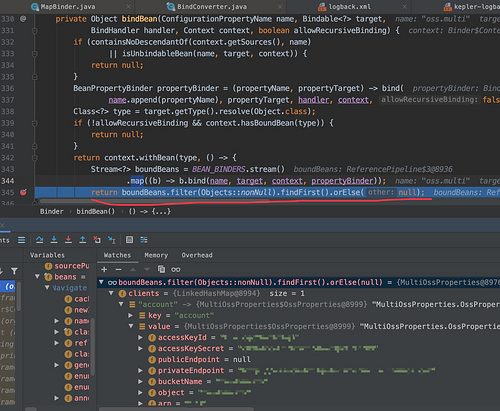
具体的一个bind情况。
private static final List<BeanBinder> BEAN_BINDERS;

static {
    List<BeanBinder> binders = new ArrayList<>();
    binders.add(new JavaBeanBinder());
    BEAN_BINDERS = Collections.unmodifiableList(binders);
}

public <T> T bind(ConfigurationPropertyName name, Bindable<T> target, Context context,
        BeanPropertyBinder propertyBinder) {
    boolean hasKnownBindableProperties = hasKnownBindableProperties(name, context);
    Bean<T> bean = Bean.get(target, hasKnownBindableProperties);
    if (bean == null) {
        return null;
    }
    BeanSupplier<T> beanSupplier = bean.getSupplier(target);
    boolean bound = bind(propertyBinder, bean, beanSupplier);
    return (bound ? beanSupplier.get() : null);
}
// 返回对应的对象
public BeanSupplier<T> getSupplier(Bindable<T> target) {
    return new BeanSupplier<>(() -> {
        T instance = null;
        if (target.getValue() != null) {
            instance = target.getValue().get();
        }
        if (instance == null) {
            instance = (T) BeanUtils.instantiateClass(this.resolvedType);
        }
        return instance;
    });
}
参考地址
- https://blog.csdn.net/sayyy/article/details/83657119
如果大家喜欢我的文章,可以关注个人订阅号。欢迎随时留言、交流。如果想加入微信群的话一起讨论的话,请加管理员简栈文化-小助手(lastpass4u),他会拉你们进群。

正文到此结束
- 本文标签: BeanDefinition 配置中心 java tar API key src IOS springboot spring https 管理 XML client 文章 id struct IDE Collections build ACE Collection UI Document final Word IO db 配置 App 参数 http bean stream node map CTO BeanUtils ask constant equals tab cat 代码 list Property ArrayList root find SDN value core
- 版权声明: 本文为互联网转载文章,出处已在文章中说明(部分除外)。如果侵权,请联系本站长删除,谢谢。
- 本文海报: 生成海报一 生成海报二
热门推荐


相关文章

近期评论
-
你这基本没有更新呀,最近文章显示还是2019年的文章。不符合要求哈
-
关键词:慕云博客 链接:https://www.lilun.me 描述:分享原创文字的个人博客
-
-
-
可以提供一下源码吗
-
不是商业站,鸡娃学习笔记
-
-
-
-
听他们说很厉害的样子
Loading...
![[HBLOG]公众号](http://www.liuhaihua.cn/img/qrcode_gzh.jpg)

