学习SpringMVC
-
学习视频: www.bilibili.com/video/BV1aE…
-
Spring:IOC和AOP必须掌握
-
SpringMVC:执行流程必须掌握
-
官网: docs.spring.io/spring/docs…
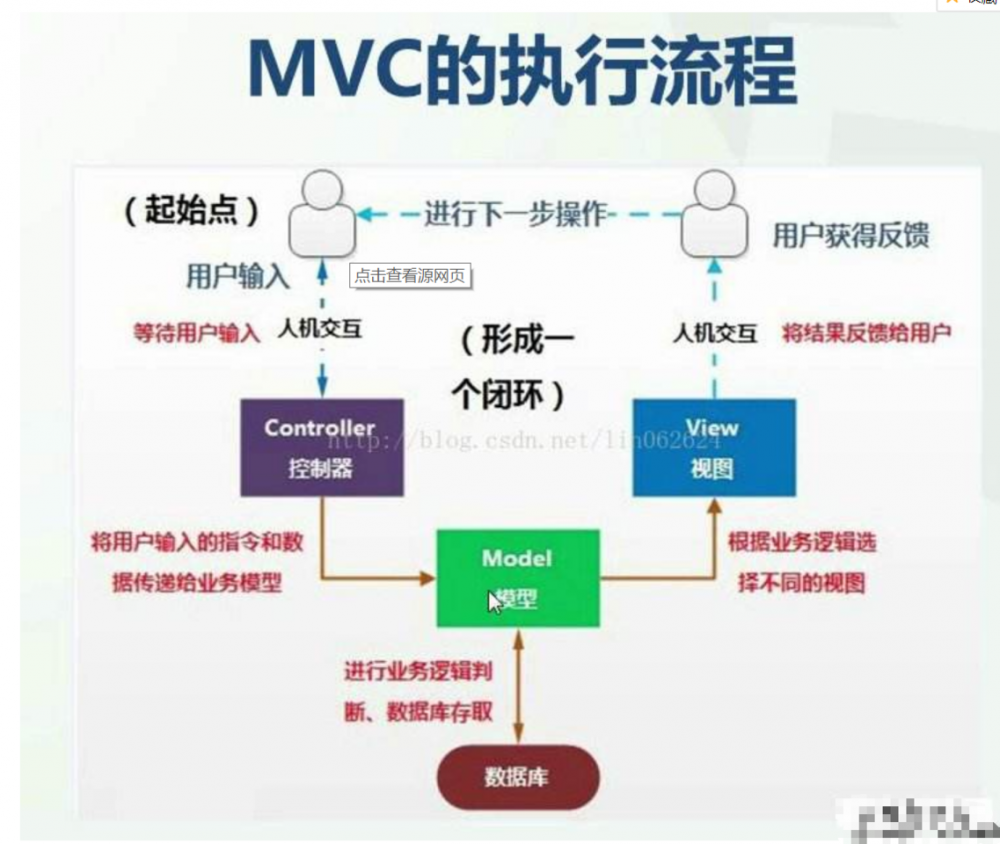
1.1 什么是MVC?
- Model:数据模型,提供要展示的数据,因此包含数据和行为,可以认为是领域模型或JavaBean组件(包含数据和行为),不过现在一般都分离开来:Value Object(数据Dao) 和 服务层(行为Service)。也就是模型提供了模型数据查询和模型数据的状态更新等功能,包括数据和业务。
- View:负责进行模型的展示,一般就是我们见到的用户界面,客户想看到的东西。
- Controller(调度员): 接收用户请求,委托给模型进行处理(状态改变),处理完毕后把返回的模型数据返回给视图,由视图负责展示。也就是说控制器做了个调度员的工作。
- 最常用的MVC:(Model)Bean +(view) Jsp +(Controller) Servlet
1.2 Model1时代
- 分为:视图层V和模型层M;由视图层的view来控制分发数据并展示给用户
- 缺点:JSP职责不单一,过重,不便于维护
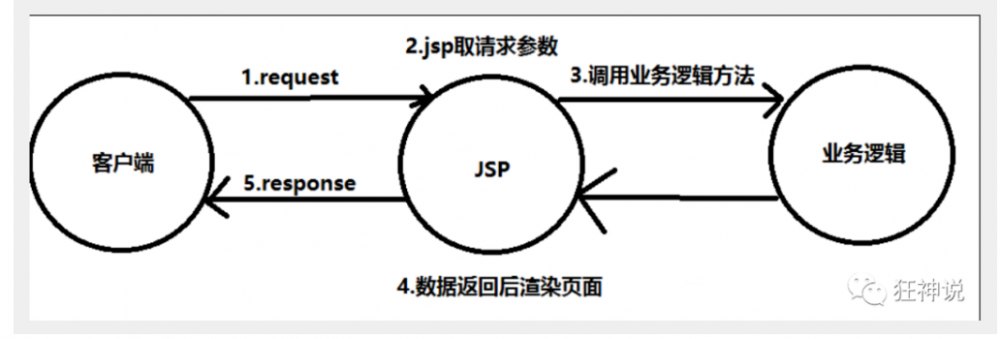
1.3 Model2时代(MVC延续至今)
- 流程:分为了Contrller,Model,View
- 访问流程:
- 用户发请求
- Servlet接收请求数据,并调用对应的业务逻辑方法
- 业务处理完毕,返回更新后的数据给servlet
- servlet转向到JSP,由JSP来渲染页面
- 响应给前端更新后的页面
1.4 回顾Servlet创建
- 创建maven,父工程:pom.xml
<?xml version="1.0" encoding="UTF-8"?>
<project xmlns="http://maven.apache.org/POM/4.0.0"
         xmlns:xsi="http://www.w3.org/2001/XMLSchema-instance"
         xsi:schemaLocation="http://maven.apache.org/POM/4.0.0 http://maven.apache.org/xsd/maven-4.0.0.xsd">
    <modelVersion>4.0.0</modelVersion>

    <groupId>com.ssl</groupId>
    <artifactId>SpringMVC</artifactId>
    <packaging>pom</packaging>
    <version>1.0-SNAPSHOT</version>
    <!--父工程导入依赖-->
    <dependencies>
        <dependency>
            <groupId>junit</groupId>
            <artifactId>junit</artifactId>
            <version>4.12</version>
        </dependency>
        <dependency>
            <groupId>org.springframework</groupId>
            <artifactId>spring-webmvc</artifactId>
            <version>5.2.4.RELEASE</version>
        </dependency>
        <dependency>
            <groupId>javax.servlet</groupId>
            <artifactId>servlet-api</artifactId>
            <version>2.5</version>
        </dependency>
        <dependency>
            <groupId>javax.servlet.jsp</groupId>
            <artifactId>jsp-api</artifactId>
            <version>2.2</version>
        </dependency>
        <dependency>
            <groupId>javax.servlet</groupId>
            <artifactId>jstl</artifactId>
            <version>1.2</version>
        </dependency>
        <dependency>
            <groupId>org.projectlombok</groupId>
            <artifactId>lombok</artifactId>
            <version>1.18.12</version>
        </dependency>
        <dependency>
            <groupId>com.fasterxml.jackson.core</groupId>
            <artifactId>jackson-databind</artifactId>
            <version>2.10.0</version>
        </dependency>

        <dependency>
            <groupId>com.alibaba</groupId>
            <artifactId>fastjson</artifactId>
            <version>1.2.62</version>
        </dependency>

    </dependencies>

    <!--资源过滤器,防止导入资源失败问题,最好在父子pom.xml里都加入一下代码-->
    <build>
        <resources>
            <resource>
                <directory>src/main/resources</directory>
                <includes>
                    <include>**/*.properties</include>
                    <include>**/*.xml</include>
                </includes>
                <filtering>true</filtering>
            </resource>

            <resource>
                <directory>src/main/java</directory>
                <includes>
                    <include>**/*.properties</include>
                    <include>**/*.xml</include>
                </includes>
                <filtering>true</filtering>
            </resource>
        </resources>
    </build>

</project>
复制代码
- 创建子工程,idea右键Add Framwork Support添加web支持
- 实现HelloServlet继承HttpServlet接口,并创建/WEB-INF/jsp/test.jsp
public class HelloServlet extends HttpServlet {

    @Override
    protected void doGet(HttpServletRequest req, HttpServletResponse resp) throws ServletException, IOException {
        //1 获得参数
        //2 调用业务层
        //3 视图转发或者重定向
        req.getRequestDispatcher("/WEB-INF/jsp/test.jsp").forward(req, resp);
    }

    @Override
    protected void doPost(HttpServletRequest req, HttpServletResponse resp) throws ServletException, IOException {
        super.doPost(req, resp);
    }
}
复制代码
- web.xml中注册HelloServlet,测试跳转: http://localhost:8080/springmvc_01_servlet//helloServlet

<?xml version="1.0" encoding="UTF-8"?>
<web-app xmlns="http://xmlns.jcp.org/xml/ns/javaee"
         xmlns:xsi="http://www.w3.org/2001/XMLSchema-instance"
         xsi:schemaLocation="http://xmlns.jcp.org/xml/ns/javaee http://xmlns.jcp.org/xml/ns/javaee/web-app_4_0.xsd"
         version="4.0">

    <servlet>
        <servlet-name>HelloServlet</servlet-name>
        <servlet-class>com.ssl.web.HelloServlet</servlet-class>
    </servlet>
    <servlet-mapping>
        <servlet-name>HelloServlet</servlet-name>
        <url-pattern>/helloServlet</url-pattern>
    </servlet-mapping>
</web-app>
复制代码
2 第一个SpringMVC
- 概念:SpringMVC是Spring框架中的一个分支,是基于Java实现MVC的轻量级Web框架
- 核心:Spring的web框架围绕 DispatcherServlet [ 调度Servlet ] 设计的。
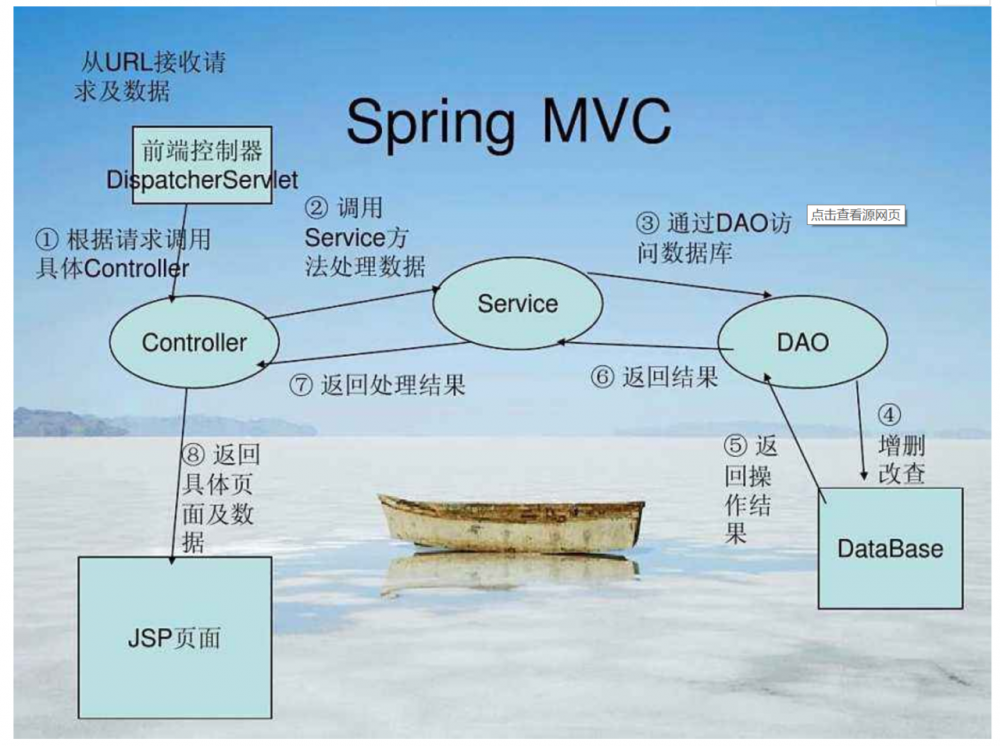
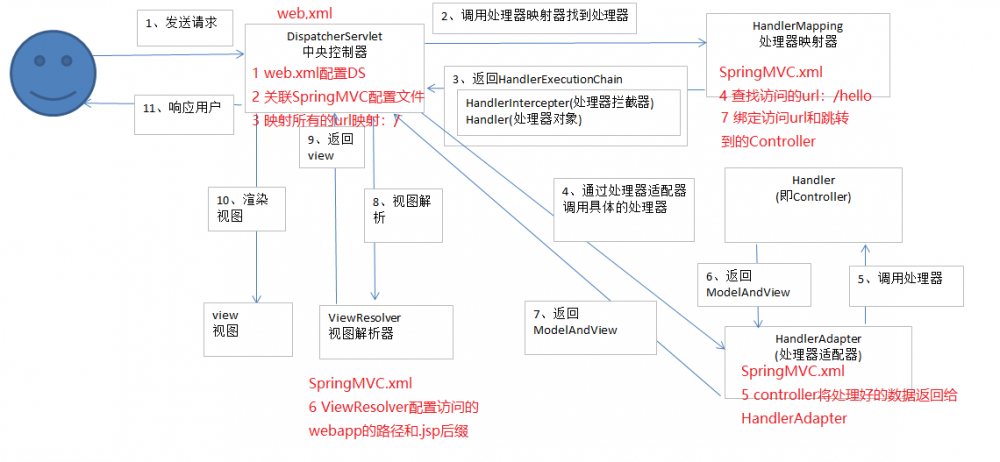
2.1 执行原理
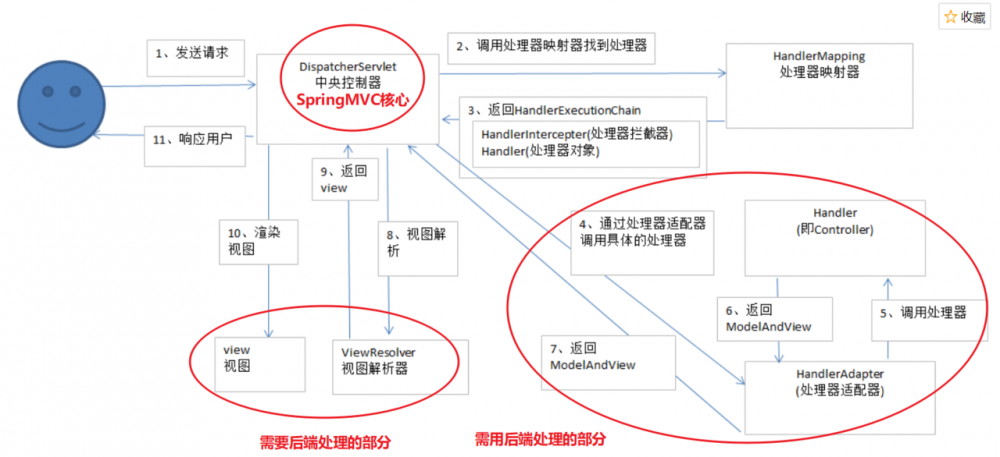
SpringMVC底层工作原理:
- DispatcherServlet表示前置控制器,是整个SpringMVC的控制中心。用户发出请求,DispatcherServlet接收请求并拦截请求。
- 假设url为 : http://localhost:8080/SpringMVC/hello
- 服务器域名: http://localhost:8080
- web站点:/SpringMVC
- hello表示控制器:/hello
- 通过分析,如上url表示为:请求位于服务器localhost:8080上的SpringMVC站点的hello控制器。
- HandlerMapping为处理器映射。DispatcherServlet调用HandlerMapping,HandlerMapping根据请求url查找Handler。
- HandlerExecution表示具体的Handler,其主要作用是根据url查找控制器,如上url被查找控制器为:hello。
- HandlerExecution将解析后的信息传递给DispatcherServlet,如解析控制器映射等。
- HandlerAdapter表示处理器适配器,其按照特定的规则去执行Handler。
- Handler让具体的Controller执行。
- Controller将具体的执行信息返回给HandlerAdapter,如ModelAndView。
- HandlerAdapter将视图逻辑名或模型传递给DispatcherServlet。
- DispatcherServlet调用视图解析器(ViewResolver)来解析HandlerAdapter传递的逻辑视图名。
- 视图解析器将解析的逻辑视图名传给DispatcherServlet。
- DispatcherServlet根据视图解析器解析的视图结果,调用具体的视图。
- 最终视图呈现给用户。
2.2 不使用注解开发
- 了解具体的执行过程=面试谈资。虽然开发中不会这么麻烦的使用,但必须看完-理解-继续学习
1 配置web.xml
- 完成DispatcherServlet,关联resource配置文件
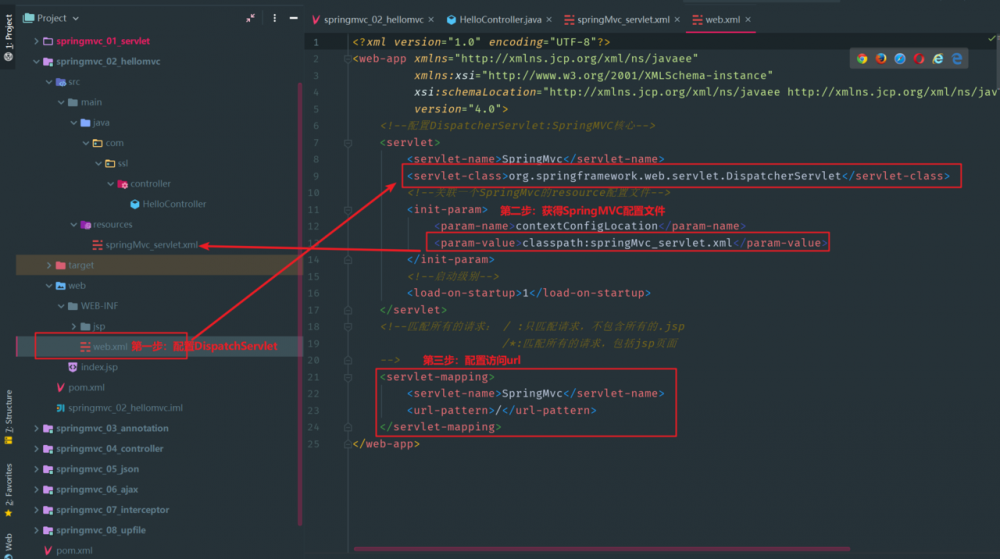
<?xml version="1.0" encoding="UTF-8"?>
<web-app xmlns="http://xmlns.jcp.org/xml/ns/javaee"
         xmlns:xsi="http://www.w3.org/2001/XMLSchema-instance"
         xsi:schemaLocation="http://xmlns.jcp.org/xml/ns/javaee http://xmlns.jcp.org/xml/ns/javaee/web-app_4_0.xsd"
         version="4.0">
    <!--配置DispatcherServlet:SpringMVC核心-->
    <servlet>
        <servlet-name>SpringMvc</servlet-name>
        <servlet-class>org.springframework.web.servlet.DispatcherServlet</servlet-class>
        <!--关联一个SpringMvc的resource配置文件-->
        <init-param>
            <param-name>contextConfigLocation</param-name>
            <param-value>classpath:springMvc_servlet.xml</param-value>
        </init-param>
        <!--启动级别-->
        <load-on-startup>1</load-on-startup>
    </servlet>
    <!--匹配所有的请求: / :只匹配请求,不包含所有的.jsp
                      /*:匹配所有的请求,包括jsp页面
    -->
    <servlet-mapping>
        <servlet-name>SpringMvc</servlet-name>
        <url-pattern>/</url-pattern>
    </servlet-mapping>
</web-app>
复制代码
2 配置springMvc_servlet.xml
- 获得视图解析器、映射器、适配器,绑定跳转url
<?xml version="1.0" encoding="UTF-8"?>
<beans xmlns="http://www.springframework.org/schema/beans"
       xmlns:xsi="http://www.w3.org/2001/XMLSchema-instance"
       xmlns:context="http://www.springframework.org/schema/context"
       xmlns:p="http://www.springframework.org/schema/p"
       xmlns:c="http://www.springframework.org/schema/c"
       xmlns:aop="http://www.springframework.org/schema/aop"
       xsi:schemaLocation="http://www.springframework.org/schema/beans
        https://www.springframework.org/schema/beans/spring-beans.xsd
        http://www.springframework.org/schema/context
        https://www.springframework.org/schema/context/spring-context.xsd
        http://www.springframework.org/schema/aop
        https://www.springframework.org/schema/aop/spring-aop.xsd">

    <!--处理器映射器HandlerMapping:查找访问的url控制器-->
    <bean class="org.springframework.web.servlet.handler.BeanNameUrlHandlerMapping"/>
    <!--处理器适配器HandlerAdapter:controller将处理好的数据返回给HandlerAdapter-->
    <bean class="org.springframework.web.servlet.mvc.SimpleControllerHandlerAdapter"/>
    <!--视图解析器ViewResolver:将后端处理好的数据和视图传给DispatchServlet,DS再交给ViewResolver先解析一遍,确认无误再传给前端
        必须熟悉,以后还要学模版引擎Thymeleaf/Freemarker...
        1 获取ModeAndView的数据
        2 解析ModeAndView的视图名字
        3 拼接视图名字,找到对应的视图 WEB-INF/jsp/hello.jsp
    -->
    <bean class="org.springframework.web.servlet.view.InternalResourceViewResolver" id="internalResourceViewResolver">
        <property name="prefix" value="/WEB-INF/jsp/" />
        <property name="suffix" value=".jsp" />
    </bean>
    <!--BeanNameUrlHandlerMapping处理器:绑定跳转的url=页面访问的网址-->
    <bean id="/hello" class="com.ssl.controller.HelloController"/>
</beans>

复制代码
3 /WEB-INF/jsp/hello.jsp
<%@ page contentType="text/html;charset=UTF-8" language="java" %>
<html>
<head>
    <title>hello</title>
</head>
<body>
<%--接受传递的参数--%>
${msg}
</body>
</html>
复制代码
4 HelloController实现Controller
- 访问: http://localhost:8080/springmvc_02_hellomvc/hello
public class HelloController implements Controller {
    @Override
    public ModelAndView handleRequest(HttpServletRequest httpServletRequest, HttpServletResponse httpServletResponse) throws Exception {
        //1 创建modelAndView
        ModelAndView mv = new ModelAndView();
        //2 调用业务层,这里没有,就不写
        //3 封装对象,放在mv中添加
        mv.addObject("msg", "Hello SpringMvc");
        //4 封装要跳转的视图,WEB-INF/jsp/hello.jsp
        mv.setViewName("hello");
        return mv;
    }
}
复制代码
==5 SpringMVC原理回顾==
- 反复观看,理解原理!
2.3 使用注解开发
1 web.xml
<?xml version="1.0" encoding="UTF-8"?>
<web-app xmlns="http://xmlns.jcp.org/xml/ns/javaee"
         xmlns:xsi="http://www.w3.org/2001/XMLSchema-instance"
         xsi:schemaLocation="http://xmlns.jcp.org/xml/ns/javaee http://xmlns.jcp.org/xml/ns/javaee/web-app_4_0.xsd"
         version="4.0">
  	<!--与前面一样-->
    <servlet>
        <servlet-name>springMvc</servlet-name>
        <servlet-class>org.springframework.web.servlet.DispatcherServlet</servlet-class>
        <init-param>
            <param-name>contextConfigLocation</param-name>
            <param-value>classpath:springMvc_servlet.xml</param-value>
        </init-param>
        <load-on-startup>1</load-on-startup>
    </servlet>

    <servlet-mapping>
        <servlet-name>springMvc</servlet-name>
        <url-pattern>/</url-pattern>
    </servlet-mapping>
</web-app>
复制代码
2 springMvc_servlet.xml
- 注解省略了映射器、适配器,专注于写视图解析器;跳转的Controller也不用配置进Spring
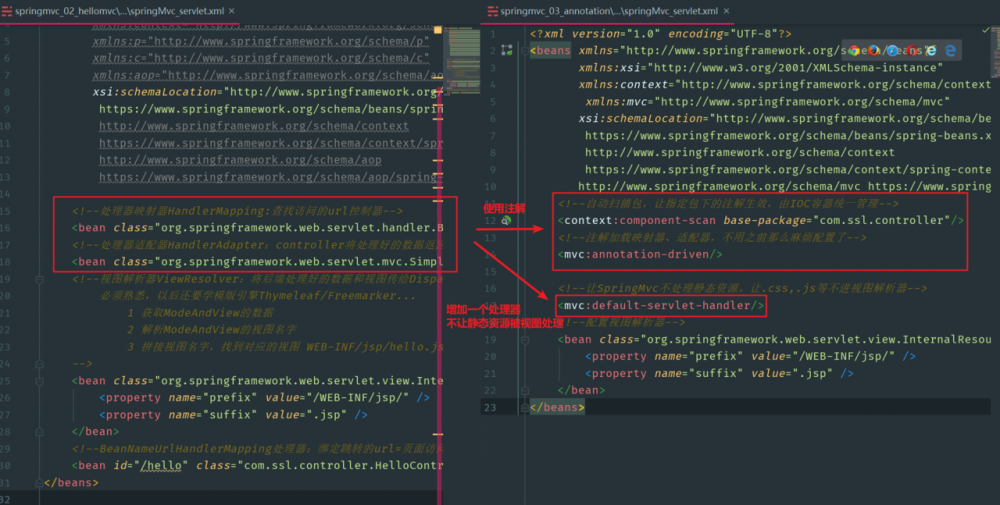
<?xml version="1.0" encoding="UTF-8"?>
<beans xmlns="http://www.springframework.org/schema/beans"
       xmlns:xsi="http://www.w3.org/2001/XMLSchema-instance"
       xmlns:context="http://www.springframework.org/schema/context"
        xmlns:mvc="http://www.springframework.org/schema/mvc"
       xsi:schemaLocation="http://www.springframework.org/schema/beans
        https://www.springframework.org/schema/beans/spring-beans.xsd
        http://www.springframework.org/schema/context
        https://www.springframework.org/schema/context/spring-context.xsd
       http://www.springframework.org/schema/mvc https://www.springframework.org/schema/mvc/spring-mvc.xsd">
    <!--自动扫描包,让指定包下的注解生效,由IOC容器统一管理-->
    <context:component-scan base-package="com.ssl.controller"/>
    <!--让SpringMvc不处理静态资源。让.css,.js等不进视图解析器-->
    <mvc:default-servlet-handler/>
    <!--注解加载映射器、适配器,不用之前那么麻烦配置了-->
    <mvc:annotation-driven/>
    <!--配置视图解析器-->
    <bean class="org.springframework.web.servlet.view.InternalResourceViewResolver" id="internalResourceViewResolver">
        <property name="prefix" value="/WEB-INF/jsp/" />
        <property name="suffix" value=".jsp" />
    </bean>
</beans>
复制代码
3 /WEB-INF/jsp/hello.jsp
<%@ page contentType="text/html;charset=UTF-8" language="java" %>
<html>
<head>
    <title>hello</title>
</head>
<body>
${msg}
</body>
</html>
复制代码
4 HelloController
- 简化了实现的接口,使用@注解配置映射器
- 访问: http://localhost:8080/springmvc_03_annotation/hello
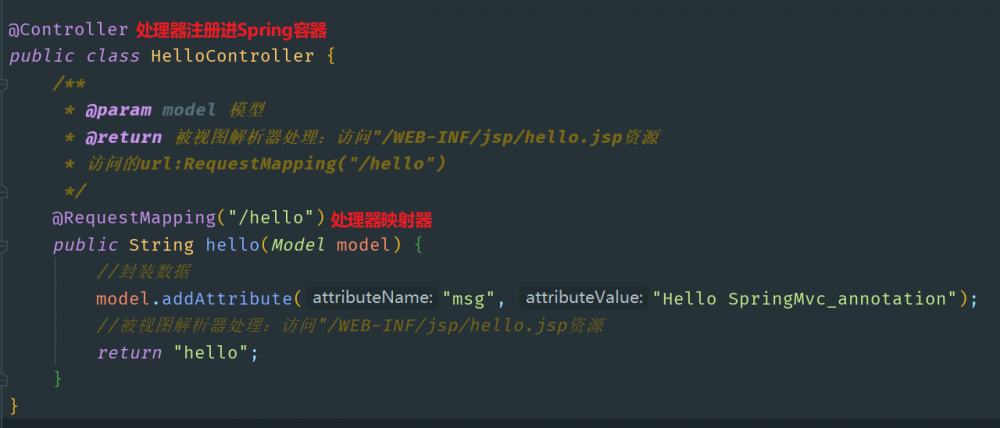
@Controller
public class HelloController {
    /**
     * @param model 模型
     * @return 被视图解析器处理:访问"/WEB-INF/jsp/hello.jsp资源
     * 访问的url:RequestMapping("/hello")
     */
    @RequestMapping("/hello")
    public String hello(Model model) {
        //封装数据
        model.addAttribute("msg", "Hello SpringMvc_annotation");
        //被视图解析器处理:访问"/WEB-INF/jsp/hello.jsp资源
        return "hello";
    }
复制代码
3 Controller和RestFul
- 配置web.xml
<?xml version="1.0" encoding="UTF-8"?>
<web-app xmlns="http://xmlns.jcp.org/xml/ns/javaee"
         xmlns:xsi="http://www.w3.org/2001/XMLSchema-instance"
         xsi:schemaLocation="http://xmlns.jcp.org/xml/ns/javaee http://xmlns.jcp.org/xml/ns/javaee/web-app_4_0.xsd"
         version="4.0">
    <servlet>
        <servlet-name>springMvc</servlet-name>
        <servlet-class>org.springframework.web.servlet.DispatcherServlet</servlet-class>
        <init-param>
            <param-name>contextConfigLocation</param-name>
            <param-value>classpath:spring_mvc_servlet.xml</param-value>
        </init-param>
    </servlet>
    <servlet-mapping>
        <servlet-name>springMvc</servlet-name>
        <url-pattern>/</url-pattern>
    </servlet-mapping>

   <!-- <filter>
        <filter-name>encode</filter-name>
        <filter-class>com.ssl.filter.EncodeFilter</filter-class>
    </filter>
    <filter-mapping>
        <filter-name>encode</filter-name>
        <url-pattern>/</url-pattern>
    </filter-mapping>-->
    <filter>
        <filter-name>encode</filter-name>
        <filter-class>org.springframework.web.filter.CharacterEncodingFilter</filter-class>
        <init-param>
            <param-name>encoding</param-name>
            <param-value>utf-8</param-value>
        </init-param>
    </filter>
    <filter-mapping>
        <filter-name>encode</filter-name>
        <url-pattern>/*</url-pattern>
    </filter-mapping>
</web-app>
复制代码
- spring_mvc_servlet.xml
<?xml version="1.0" encoding="UTF-8"?>
<beans xmlns="http://www.springframework.org/schema/beans"
       xmlns:xsi="http://www.w3.org/2001/XMLSchema-instance"
       xmlns:context="http://www.springframework.org/schema/context"
       xmlns:mvc="http://www.springframework.org/schema/mvc"
       xsi:schemaLocation="http://www.springframework.org/schema/beans
        https://www.springframework.org/schema/beans/spring-beans.xsd
        http://www.springframework.org/schema/context
        https://www.springframework.org/schema/context/spring-context.xsd
       http://www.springframework.org/schema/mvc https://www.springframework.org/schema/mvc/spring-mvc.xsd">
    <!--自动扫描包,让指定包下的注解生效,由IOC容器统一管理-->
    <context:component-scan base-package="com.ssl.controller"/>
    <!--让SpringMvc不处理静态资源。让.css,.js等不进视图解析器-->
    <mvc:default-servlet-handler/>
    <!--注解加载映射器、适配器,不用之前那么麻烦配置了-->
    <mvc:annotation-driven/>
    <!--以上的是定死的代码,
        以下是配置视图解析器-->
    <bean class="org.springframework.web.servlet.view.InternalResourceViewResolver" id="internalResourceViewResolver">
        <property name="prefix" value="/WEB-INF/jsp/" />
        <property name="suffix" value=".jsp" />
    </bean>
    <!--不使用注解开发的适配器:/demo1,注意点是id需要配置/-->
    <bean id="/demo" class="com.ssl.controller.ControllerDemo1"/>
</beans>
复制代码
3.1 Controller
- 不使用注解,极其不推荐使用,因为:
- 配置麻烦:
<bean id="/demo" class="com.ssl.controller.ControllerDemo1"/>,并且需要implements Controller - 不够灵活,太费力气,浪费时间
- 访问: http://localhost:8080/springmvc_04_controller/demo
- 配置麻烦:
public class ControllerDemo1 implements Controller {
    @Override
    public ModelAndView handleRequest(HttpServletRequest httpServletRequest, HttpServletResponse httpServletResponse) throws Exception {
        ModelAndView modelAndView = new ModelAndView();
        modelAndView.addObject("demo1","demo1:Controller会返回一个modelAndView");
        modelAndView.setViewName("demo1");
        return modelAndView;
    }
}
复制代码
3.2 @Controller
- 使用注解开发,@Controller注册进Spring容器,如果返回值是String,并且有具体的页面可以跳转,那么就会被视图解析器解析
- 访问: http://localhost:8080/springmvc_04_controller/demo2
@Controller
public class ControllerDemo2 {
    @RequestMapping("/demo2")
    public String test1(Model model) {
        model.addAttribute("demo2", "demo2");
        return "demo2";
    }
}
复制代码
3.3 @RequestMapping
- 可以在类和方法上配置url访问路径
- 访问: http://localhost:8080/springmvc_04_controller/controller/demo3
@Controller
@RequestMapping("/controller")
public class ControllerDemo3 {
    @RequestMapping("/demo3")
    public String test1(Model model) {
        model.addAttribute("demo3", "demo3");
        return "demo3";
    }
}
复制代码
3.4 RestFul风格
- 优点:
- 最大的优势是安全,看不出源代码的参数和意义
- 实现地址复用,使得get和post访问url相同,框架会自动进行类型转换
- 高效:支持缓存
- 缺点:
- 不像原生的url见名知意,url理解不直观
- 实现方式:
- 1:url
@GetMapping("/addRest/{a}/{b}")+ 参数@PathVariable int a, @PathVariable int b- 访问: http://localhost:8080/springmvc_04_controller/addRest/1/2
- 2:url
@PostMapping("/addRest/{a}/{b}")+ 参数不变@PathVariable int a, @PathVariable int b- 使用Postman中的post访问: http://localhost:8080/springmvc_04_controller/addRest/1/2
- 1:url
@Controller
public class RestFulController {

    /**
     * 原生的url:http://localhost:8080/springmvc_04/add?a=1&b=1
     */
    @RequestMapping("/add")
    public String getAdd1(int a, int b, Model model) {
        int result = a + b;
        model.addAttribute("add", "原生的url:结果为" + result);
        return "add";
    }

    /**
     * RestFul方式一:method = get
     * RequestMapping("/addRest/{a}/{b}" method=requestMethod.GET) = @GetMapping()
     * http://localhost:8080/springmvc_04/addRest/1/1
     */
    @GetMapping("/addRest/{a}/{b}")
    public String getAdd2(@PathVariable int a, @PathVariable int b, Model model) {
        int result = a + b;
        model.addAttribute("add", "Rest的url:结果为" + result);
        return "addRest";
    }

    /**
     * 复用相同的url
     * RestFul方式二:method=post,使用RestFul的话,请求的url和GET就一样了
     */
    @PostMapping("/addRest/{a}/{b}")
    public String getAdd3(@PathVariable int a, @PathVariable int b, Model model) {
        int result = a + b;
        model.addAttribute("add", "Rest的url:结果为" + result);
        return "addRest";
    }
}
复制代码
3.5 重定向和转发
return “forward:xxx”/"redirect:xxx"
@Controller
public class ModelTest1 {
    //原生的转发:返回值是void,没有经过视图解析器;原生的重定向同样如此,都不走视图解析器,直接重定向
    @RequestMapping("/test1")
    public void test1(HttpServletRequest request, HttpServletResponse response) throws ServletException, IOException {
        String id = request.getSession().getId();
        System.out.println(id);
        request.getRequestDispatcher("index.jsp").forward(request,response);
    }
    //SpringMvc转发:测试结果是不走视图解析器,url没变是转发
    @RequestMapping("/test2")
    public String test2(Model model) {
        model.addAttribute("demo1","这是test2中的Spring转发");
        return "forward:/WEB-INF/jsp/demo1.jsp";
    }
    //SpringMvc重定向:测试结果是不走视图解析器
    @RequestMapping("/test3")
    public String test3() {
        System.out.println("跳转回首页index.jsp");
        return "redirect:index.jsp";
    }
}
复制代码
3.6 接受请求参数和数据回显
- 前端提交的name和后端映射器接受的形参名一样,则直接接受
- 前端提交的name和后端映射器接受的形参名不用一样,再形参前
@RequestParam("xxx")更改名称一致- 养成习惯:无论是否一样,都必须加上
@RequestParam
- 养成习惯:无论是否一样,都必须加上
- 后端参数封装如果成一个pojo,前端传过来的name会自动pojo中的成员属性,不匹配的属性=null/0
- 如何解决中文乱码问题?请看下节!
@Controller
public class UserController {
    /** http://localhost:8080/springmvc_04/t1?id=1&name=abc&age=18
     * @param user SpringMvc 会自动封装数据到参数里的pojo,不匹配的属性=null/0
     */
    @GetMapping("/t1")
    public String getUser(User user){
        System.out.println(user);
        return "test1";
    }
}
复制代码
3.7 Model,ModelAndView等
- Model:精简版,适合初学者,大多数情况封装参数,设置转发视图层就够用
- ModelMap:继承了LinkedHashMap,有它的方法和特性
- ModelAndView:可以在存储数据的同时,可以进行设置返回的逻辑视图,进行控制展示层的跳转
- 怎么学习:用80%的时间学号基础,18%时间研究框架,2%学点英文,剩下不会的看官方文档
4 乱码问题
- 方法一:web.xml里面配置的SpringMvc自带的过滤器
CharacterEncodingFilter-
<url-pattern>/*</url-pattern>:因为要跳转到xxx.jsp页面,所以url是/*(≠/)
-
<?xml version="1.0" encoding="UTF-8"?>
<web-app xmlns="http://xmlns.jcp.org/xml/ns/javaee"
         xmlns:xsi="http://www.w3.org/2001/XMLSchema-instance"
         xsi:schemaLocation="http://xmlns.jcp.org/xml/ns/javaee http://xmlns.jcp.org/xml/ns/javaee/web-app_4_0.xsd"
         version="4.0">
    <!--配置SpringMVC-->
    <servlet>
        <servlet-name>springMvc</servlet-name>
        <servlet-class>org.springframework.web.servlet.DispatcherServlet</servlet-class>
        <init-param>
            <param-name>contextConfigLocation</param-name>
            <param-value>classpath:spring_mvc_servlet.xml</param-value>
        </init-param>
    </servlet>
    <servlet-mapping>
        <servlet-name>springMvc</servlet-name>
        <url-pattern>/</url-pattern>
    </servlet-mapping>

    <!--web容器解决中文乱码问题-->
    <filter>
        <filter-name>encode</filter-name>
        <filter-class>org.springframework.web.filter.CharacterEncodingFilter</filter-class>
        <init-param>
            <param-name>encoding</param-name>
            <param-value>utf-8</param-value>
        </init-param>
    </filter>
    <filter-mapping>
        <filter-name>encode</filter-name>
        <url-pattern>/*</url-pattern>
    </filter-mapping>
</web-app>
复制代码
- 方法二:一劳永逸,但需要重启Tomcat服务器,修改Tomcat里面的server.xml配置文件:
URIEncoding = "UTF-8"
<Connector port="8080" protocol="HTTP/1.1"
           connectionTimeout="20000"
           redirectPort="8443"
           URIEncoding = "UTF-8"/>
<!-- A "Connector" using the shared thread pool-->
复制代码
5 JSON
5.1 前端初识Json
- 前端展示两者数据,学会js和json互相转换
<%@ page contentType="text/html;charset=UTF-8" language="java" %>
<html>
<head>
    <title>json</title>
    <script type="text/javascript">
        //user是一个js对象
        var user = {
            name: "张三",
            age: 18,
            sex: "男"
        };
        //后端传的json其实是一个字符串,前端将后端传的json转换成js对象渲染在页面上
        //jsonUser:模拟后端传的json数据
        //js转换成json
        var jsonUser = JSON.stringify(user);
        console.log(jsonUser);
        //jsUser:js是一个对象
        //json转换成js
        var jsUser = JSON.parse(jsonUser);
        console.log(jsUser)
    </script>
</head>
<body>
</body>
</html>
复制代码
5.2 Jackson Databind
- 使用 Jackson Databind可以快速生成json数据
1 导入依赖
<dependency>
    <groupId>com.fasterxml.jackson.core</groupId>
    <artifactId>jackson-databind</artifactId>
    <version>2.10.0</version>
</dependency>
复制代码
- json=一个字符串,所以会有中文乱码问题,需要在springmvc.xml配置
<?xml version="1.0" encoding="UTF-8"?>
<beans xmlns="http://www.springframework.org/schema/beans"
       xmlns:xsi="http://www.w3.org/2001/XMLSchema-instance"
       xmlns:context="http://www.springframework.org/schema/context"
       xmlns:mvc="http://www.springframework.org/schema/mvc"
       xsi:schemaLocation="http://www.springframework.org/schema/beans
        https://www.springframework.org/schema/beans/spring-beans.xsd
        http://www.springframework.org/schema/context
        https://www.springframework.org/schema/context/spring-context.xsd
       http://www.springframework.org/schema/mvc https://www.springframework.org/schema/mvc/spring-mvc.xsd">
    <!--自动扫描包,让指定包下的注解生效,由IOC容器统一管理-->
    <context:component-scan base-package="com.ssl.controller"/>
    <!--让SpringMvc不处理静态资源。让.css,.js等不进视图解析器-->
    <mvc:default-servlet-handler/>

    <!--注解加载映射器、适配器,解决Json数据中文乱码问题-->
    <mvc:annotation-driven>
        <mvc:message-converters register-defaults="true">
            <bean class="org.springframework.http.converter.StringHttpMessageConverter">
                <constructor-arg value="UTF-8"/>
            </bean>
            <bean class="org.springframework.http.converter.json.MappingJackson2HttpMessageConverter">
                <property name="objectMapper">
                    <bean class="org.springframework.http.converter.json.Jackson2ObjectMapperFactoryBean">
                        <property name="failOnEmptyBeans" value="false"/>
                    </bean>
                </property>
            </bean>
        </mvc:message-converters>
    </mvc:annotation-driven>

    <!--配置视图解析器,明确json数据不走数据解析器,直接传给前端-->
    <bean class="org.springframework.web.servlet.view.InternalResourceViewResolver" id="internalResourceViewResolver">
        <property name="prefix" value="/WEB-INF/jsp/"/>
        <property name="suffix" value=".jsp"/>
    </bean>
</beans>
复制代码
2 编写Controller
- @RestControoler:该类下所有方法不走视图解析器,返回一个json数据
- @ResponceBody:该方法不走视图解析器,返回一个json数据
- 访问: http://localhost:8080/springmvc_05_json/t1,页面显示一个json数据,不经过视图解析器
- 回顾日期:
new SimpleDateFormat("yyyy-MM-dd:HH:mm:ss")
@RestController
public class UserController {
    /*  概念:前后端分离的项目,后端代码不走视图解析器,后端传给前端的是json数据
        方法上:注解@ResponseBody指定该方法不走视图解析器,会直接返回一个String=json数据就是一个字符串
        类上:注解@RestController指定该类下的所有方法都不走视图解析器
        Json返回一个对象
     */
    @RequestMapping("/t1")
    public String json1() throws JsonProcessingException {
        User user = new User(1, "张三", 20);
        ObjectMapper jacksonMapper = new ObjectMapper();
        String str_user = jacksonMapper.writeValueAsString(user);
        //user.toString()是自己指定的String但是公司通常是允许的,通常是使用第三方工具来返回String
        //str_user有中文乱码问题,springMvc可以统一配置
        return str_user;
    }

    /**
     * Json返回一个List
     */
    @RequestMapping("/t2")
    public String json2() throws JsonProcessingException {
        User user1 = new User(1, "张三", 20);
        User user2 = new User(2, "张三", 21);
        User user3 = new User(3, "张三", 22);
        User user4 = new User(4, "张三", 23);
        List<User> list = new ArrayList<>();
        list.add(user1);
        list.add(user2);
        list.add(user3);
        list.add(user4);
        return new ObjectMapper().writeValueAsString(list);
    }

    /**
     *  json返回一个日期格式
     */
    @RequestMapping("/t3")
    public String json3() throws JsonProcessingException {
        //方式一:原始纯java日期转换:推荐使用
        // String date = new SimpleDateFormat("yyyy-MM-dd:HH-mm-ss").format(new Date());
        ObjectMapper objectMapper = new ObjectMapper();
        //方式二:使用mapper来制定日期格式,先关闭时间戳表示
        objectMapper.configure(SerializationFeature.WRITE_DATE_KEYS_AS_TIMESTAMPS, false);
        objectMapper.setDateFormat(new SimpleDateFormat("yyyy-MM-dd:HH:mm:ss"));
        Date date = new Date();
        return objectMapper.writeValueAsString(date);
    }

    @Test
    public void DateTest1() {
        //传统的java日期格式转换
        String date = new SimpleDateFormat("yyyy-MM-dd:HH:mm:ss").format(new Date());
        System.out.println(date);
    }
}
复制代码
5.3 FastJson
- 阿里巴巴官方提供的,实现Json数据的另一个工具,比JackSon Databind更方便
1 导包
<dependency>
    <groupId>com.alibaba</groupId>
    <artifactId>fastjson</artifactId>
    <version>1.2.62</version>
</dependency>
复制代码
2 编写Controller
- 比Jackson使用更方便
@RequestMapping("/t4")
    public String json4() throws JsonProcessingException {
        User user1 = new User(1, "张三", 20);
        User user2 = new User(2, "张三", 21);
        User user3 = new User(3, "张三", 22);
        User user4 = new User(4, "张三", 23);
        List<User> list = new ArrayList<>();
        list.add(user1);
        list.add(user2);
        list.add(user3);
        list.add(user4);
        String jsonString = JSON.toJSONString(list);
        return jsonString;
    }
复制代码
6 SSM整合
6.1 环境
- IDEA+Mysq5.7+Tomca5.7+Maven3.6
- 数据库
create database `ssmbuild`;
use `ssmbuild`;
CREATE TABLE `books` (
  `bookId` int(10) NOT NULL AUTO_INCREMENT COMMENT '书id',
  `bookName` varchar(100) NOT NULL COMMENT '书名',
  `bookCounts` int(11) NOT NULL COMMENT '数量',
  `detail` varchar(200) NOT NULL COMMENT '描述',
  KEY `bookId` (`bookId`)
) ENGINE=InnoDB AUTO_INCREMENT=4 DEFAULT CHARSET=utf8
复制代码
- pom.xml
<?xml version="1.0" encoding="UTF-8"?>
<project xmlns="http://maven.apache.org/POM/4.0.0"
         xmlns:xsi="http://www.w3.org/2001/XMLSchema-instance"
         xsi:schemaLocation="http://maven.apache.org/POM/4.0.0 http://maven.apache.org/xsd/maven-4.0.0.xsd">
    <modelVersion>4.0.0</modelVersion>

    <groupId>com.ssl</groupId>
    <artifactId>ssmbuild</artifactId>
    <version>1.0-SNAPSHOT</version>
    <!--依赖:junit,数据库驱动,连接池,Servlet,jsp,mybatis,mybatis-mvc,Spring,SpringMVC-->
    <dependencies>
        <dependency>
            <groupId>junit</groupId>
            <artifactId>junit</artifactId>
            <version>4.12</version>
        </dependency>
        <dependency>
            <groupId>mysql</groupId>
            <artifactId>mysql-connector-java</artifactId>
            <version>5.1.47</version>
        </dependency>
        <dependency>
            <groupId>com.mchange</groupId>
            <artifactId>c3p0</artifactId>
            <version>0.9.5.2</version>
        </dependency>
        <dependency>
            <groupId>javax.servlet</groupId>
            <artifactId>servlet-api</artifactId>
            <version>2.5</version>
        </dependency>
        <dependency>
            <groupId>javax.servlet.jsp</groupId>
            <artifactId>jsp-api</artifactId>
            <version>2.2</version>
        </dependency>
        <dependency>
            <groupId>javax.servlet</groupId>
            <artifactId>jstl</artifactId>
            <version>1.2</version>
        </dependency>
        <dependency>
            <groupId>org.mybatis</groupId>
            <artifactId>mybatis</artifactId>
            <version>3.5.2</version>
        </dependency>
        <dependency>
            <groupId>org.mybatis</groupId>
            <artifactId>mybatis-spring</artifactId>
            <version>2.0.2</version>
        </dependency>
        <dependency>
            <groupId>org.springframework</groupId>
            <artifactId>spring-webmvc</artifactId>
            <version>5.2.4.RELEASE</version>
        </dependency>
        <dependency>
            <groupId>org.springframework</groupId>
            <artifactId>spring-jdbc</artifactId>
            <version>5.0.5.RELEASE</version>
        </dependency>
        <dependency>
            <groupId>org.projectlombok</groupId>
            <artifactId>lombok</artifactId>
            <version>1.18.12</version>
        </dependency>
    </dependencies>


    <!--Maven资源过滤设置-->
    <build>
        <resources>
            <resource>
                <directory>src/main/resources</directory>
                <includes>
                    <include>**/*.properties</include>
                    <include>**/*.xml</include>
                </includes>
                <filtering>true</filtering>
            </resource>

            <resource>
                <directory>src/main/java</directory>
                <includes>
                    <include>**/*.properties</include>
                    <include>**/*.xml</include>
                </includes>
                <filtering>true</filtering>
            </resource>
        </resources>
    </build>
</project>
复制代码
6.2 开发流程
- 需求分析+设计数据库+业务+传给前端页面
- 整体效果:

6.3 整合Mybatis
- mybatis-config.xml
- 数据库连接交给Spring-dao.xml配置
<?xml version="1.0" encoding="UTF-8" ?>
<!DOCTYPE configuration
        PUBLIC "-//mybatis.org//DTD Config 3.0//EN"
        "http://mybatis.org/dtd/mybatis-3-config.dtd">
<!--核心配置文件-->
<configuration>
    <settings>
        <setting name="logImpl" value="STDOUT_LOGGING"/>
    </settings>
    <!--配置数据源,交给Spring去做-->
    <!--取别名-->
    <typeAliases>
        <!--resultMap:默认类名小写为使用id-->
        <package name="com.ssl.pojo"/>
    </typeAliases>
    <mappers>
        <mapper class="com.ssl.dao.BookMapper"/>
    </mappers>
</configuration>
复制代码
# db.properties配置文件
driver=com.mysql.jdbc.Driver
url=jdbc:mysql://localhost:3306/ssmbuild?useSSL=false&useUnicode=true&characterEncoding=utf-8
username=root
password=123456
复制代码
6.4 整合Spring
- 1 spring-dao.xml
- 数据库连接读取db.properties有bug,手动连接jdbcurl和user
<?xml version="1.0" encoding="UTF-8"?>
<beans xmlns="http://www.springframework.org/schema/beans"
       xmlns:xsi="http://www.w3.org/2001/XMLSchema-instance"
       xmlns:context="http://www.springframework.org/schema/context"
       xmlns:mvc="http://www.springframework.org/schema/mvc"
       xsi:schemaLocation="http://www.springframework.org/schema/beans
        https://www.springframework.org/schema/beans/spring-beans.xsd
        http://www.springframework.org/schema/context
        https://www.springframework.org/schema/context/spring-context.xsd
       http://www.springframework.org/schema/mvc https://www.springframework.org/schema/mvc/spring-mvc.xsd">
    <!--1 关联数据库配置文件-->
    <context:property-placeholder location="classpath:db.properties"/>
    <!--2 连接池 这次使用c3p0的连接池.常见的数据库:
    dbcp:半自动操作,不能自动连接
    c3p0:自动化操作,并且可以配置到对象中
    druid,hikari(SpringBoot)-->
    <bean id="dataSource" class="com.mchange.v2.c3p0.ComboPooledDataSource">
        <property name="driverClass" value="${driver}"/>
        <property name="jdbcUrl" value="${url}"/>
        <property name="user" value="${username}"/>
        <property name="password" value="${password}"/>
        <!--c3p0的私有属性-->
        <property name="maxPoolSize" value="30"/>
        <property name="minPoolSize" value="10"/>
        <!--关闭连接后,不自动commit-->
        <property name="autoCommitOnClose" value="false"/>
        <property name="checkoutTimeout" value="10000"/>
        <property name="acquireRetryAttempts" value="2"/>
     </bean>
    <!--3 sqlSessionFactory-->
    <bean id="sqlSessionFactory" class="org.mybatis.spring.SqlSessionFactoryBean">
        <!--绑定数据库-->
        <property name="dataSource" ref="dataSource"/>
        <!--绑定Mybatis的配置文件-->
        <property name="configLocation" value="classpath:mybatis-config.xml"/>
    </bean>
    <!--4 配置dao接口扫描包,动态的实现了dao接口可以注入到Spring容器中,不用写mapperImpl.xml-->
    <bean class="org.mybatis.spring.mapper.MapperScannerConfigurer">
        <!--注入sqlSessionFactory-->
        <property name="sqlSessionFactoryBeanName" value="sqlSessionFactory"/>
        <!--扫描要扫描的dao的包-->
        <property name="basePackage" value="com.ssl.dao"/>
    </bean>
</beans>
复制代码
- 2 spring-service.xml
<?xml version="1.0" encoding="UTF-8"?>
<beans xmlns="http://www.springframework.org/schema/beans"
       xmlns:xsi="http://www.w3.org/2001/XMLSchema-instance"
       xmlns:context="http://www.springframework.org/schema/context"
       xmlns:mvc="http://www.springframework.org/schema/mvc"
       xsi:schemaLocation="http://www.springframework.org/schema/beans
        https://www.springframework.org/schema/beans/spring-beans.xsd
        http://www.springframework.org/schema/context
        https://www.springframework.org/schema/context/spring-context.xsd
       http://www.springframework.org/schema/mvc https://www.springframework.org/schema/mvc/spring-mvc.xsd">
    <!--1 扫描service下的包-->
    <context:component-scan base-package="com.ssl.service"/>
    <!--2 将我们的所有业务类,注入到Spring,这里使用bean配置,平时是使用注解-->
    <bean id="BookServiceImpl" class="com.ssl.service.BookServiceImpl">
        <property name="bookMapper" ref="bookMapper"/>
    </bean>
    <!--3  声明式事务配置-->
    <bean  id="transactionManager" class="org.springframework.jdbc.datasource.DataSourceTransactionManager">
        <property name="dataSource" ref="dataSource"/>
    </bean>
    <!--4 AOP横切事务,这里用不到-->
</beans>
复制代码
- 3 application.xml
- 导入其他配置进spring主配置文件
<?xml version="1.0" encoding="UTF-8"?>
<beans xmlns="http://www.springframework.org/schema/beans"
       xmlns:xsi="http://www.w3.org/2001/XMLSchema-instance"
       xmlns:context="http://www.springframework.org/schema/context"
       xmlns:mvc="http://www.springframework.org/schema/mvc"
       xsi:schemaLocation="http://www.springframework.org/schema/beans
        https://www.springframework.org/schema/beans/spring-beans.xsd
        http://www.springframework.org/schema/context
        https://www.springframework.org/schema/context/spring-context.xsd
       http://www.springframework.org/schema/mvc https://www.springframework.org/schema/mvc/spring-mvc.xsd">

    <import resource="classpath:spring-dao.xml"/>
    <import resource="classpath:spring-service.xml"/>
    <import resource="classpath:spring-mvc.xml"/>
</beans>
复制代码
6.5 整合SpringMVC
- 增加web项目的支持
- web.xml
<?xml version="1.0" encoding="UTF-8"?>
<web-app xmlns="http://xmlns.jcp.org/xml/ns/javaee"
         xmlns:xsi="http://www.w3.org/2001/XMLSchema-instance"
         xsi:schemaLocation="http://xmlns.jcp.org/xml/ns/javaee http://xmlns.jcp.org/xml/ns/javaee/web-app_4_0.xsd"
         version="4.0">
    <!--SpringMVC配置-->
    <!--1 DispatcherServlet-->
    <servlet>
        <servlet-name>springMVC</servlet-name>
        <servlet-class>org.springframework.web.servlet.DispatcherServlet</servlet-class>
        <init-param>
            <param-name>contextConfigLocation</param-name>
            <param-value>classpath:application.xml</param-value>
        </init-param>
        <load-on-startup>1</load-on-startup>
    </servlet>
    <servlet-mapping>
        <servlet-name>springMVC</servlet-name>
        <url-pattern>/</url-pattern>
    </servlet-mapping>
    <!--2 乱码过滤-->
    <filter>
        <filter-name>encodingFilter</filter-name>
        <filter-class>org.springframework.web.filter.CharacterEncodingFilter</filter-class>
        <init-param>
            <param-name>encoding</param-name>
            <param-value>utf-8</param-value>
        </init-param>
    </filter>
    <filter-mapping>
        <filter-name>encodingFilter</filter-name>
        <url-pattern>/*</url-pattern>
    </filter-mapping>
    <!--3 Session过期时间-->
    <session-config>
        <session-timeout>15</session-timeout>
    </session-config>

</web-app>
复制代码
- spring-mvc.xml
<?xml version="1.0" encoding="UTF-8"?>
<beans xmlns="http://www.springframework.org/schema/beans"
       xmlns:xsi="http://www.w3.org/2001/XMLSchema-instance"
       xmlns:context="http://www.springframework.org/schema/context"
       xmlns:mvc="http://www.springframework.org/schema/mvc"
       xsi:schemaLocation="http://www.springframework.org/schema/beans
        https://www.springframework.org/schema/beans/spring-beans.xsd
        http://www.springframework.org/schema/context
        https://www.springframework.org/schema/context/spring-context.xsd
       http://www.springframework.org/schema/mvc https://www.springframework.org/schema/mvc/spring-mvc.xsd">
    <!--1 注解驱动-->
    <mvc:annotation-driven/>
    <!--2 静态资源过滤-->
    <mvc:default-servlet-handler/>
    <!--3 扫描包:Controller-->
    <context:component-scan base-package="com.ssl.controller"/>
    <!--4 视图解析器-->
    <bean class="org.springframework.web.servlet.view.InternalResourceViewResolver">
        <property name="prefix" value="/WEB-INF/jsp/"/>
        <property name="suffix" value=".jsp"/>
    </bean>
</beans>
复制代码
6.6 dao层
- BookMapper接口和BookMapperMapper.xml
public interface BookMapper {
    //增加一本书
    int addBook(Books books);

    //删除一本书
    int deleteBookById(@Param("bookId") int id);

    //修改一本书
    int updateBook(Books books);

    //查询一本书根据id
    Books queryBookById(@Param("bookId")int id);

    //查询全部书
    List<Books> queryAllBook();

    Books queryBookByName(@Param("bookName") String bookName);
}
复制代码
<?xml version="1.0" encoding="UTF-8" ?>
<!DOCTYPE mapper
        PUBLIC "-//mybatis.org//DTD Config 3.0//EN"
        "http://mybatis.org/dtd/mybatis-3-mapper.dtd">
<!--核心配置文件-->
<mapper namespace="com.ssl.dao.BookMapper">
    <insert id="addBook" parameterType="Books">
        insert into ssmbuild.books(bookName, bookCounts, detail)
        values (#{bookName},#{bookCounts},#{detail});
    </insert>
    <delete id="deleteBookById" parameterType="int">
        delete from ssmbuild.books where bookId = #{bookId}
    </delete>
    <update id="updateBook" parameterType="Books">
        update ssmbuild.books set
        bookName=#{bookName},
        bookCounts=#{bookCounts},
        detail=#{detail}
        where bookId=#{bookId};
    </update>
    <select id="queryBookById" parameterType="int" resultType="Books">
        select * from ssmbuild.books where bookId = #{bookId};
    </select>
    <select id="queryAllBook" resultType="Books">
        select * from ssmbuild.books;
    </select>

    <select id="queryBookByName" parameterType="String" resultType="Books">
         select * from ssmbuild.books where bookName=#{bookName}
    </select>
</mapper>
复制代码
6.7 service层
public interface BookService {
    //增加一本书
    int addBook(Books books);

    //删除一本书
    int deleteBookById(int id);

    //修改一本书
    int updateBook(Books books);

    //查询一本书根据id
    Books queryBookById(int id);

    //查询全部书
    List<Books> queryAllBook();

    Books queryBookByName(String bookName);
}
复制代码
public class BookServiceImpl implements BookService {
    //注入Dao层
    private BookMapper bookMapper;
    public void setBookMapper(BookMapper bookMapper) {
        this.bookMapper = bookMapper;
    }

    @Override
    public int addBook(Books books) {
        return bookMapper.addBook(books);
    }

    @Override
    public int deleteBookById(int id) {
        return bookMapper.deleteBookById(id);
    }

    @Override
    public int updateBook(Books books) {
        return bookMapper.updateBook(books);
    }

    @Override
    public Books queryBookById(int id) {
        return bookMapper.queryBookById(id);
    }

    @Override
    public List<Books> queryAllBook() {
        return bookMapper.queryAllBook();
    }

    @Override
    public Books queryBookByName(String bookName) {

        return bookMapper.queryBookByName(bookName);
    }
}
复制代码
6.8 controller层
@Controller
@RequestMapping("/book")
public class BookController {

    @Autowired
    @Qualifier("BookServiceImpl")
    private BookService bookService;

    //查询全部的书籍,并且返回到一个书籍展示页面
    @RequestMapping("/allBook")
    public String list(Model model) {
        List<Books> books = bookService.queryAllBook();
        model.addAttribute("list", books);
        return "allBook";
    }

    //跳转到增加书籍页面
    @RequestMapping("/toAddBook")
    public String toAddBook() {
        return "addBook";
    }

    //添加书籍
    @RequestMapping("/addBook")
    public String addBook(Books books) {
        int result = bookService.addBook(books);
        if (result > 0) {
            System.out.println("添加书籍成功");
        }
        return "redirect:/book/allBook";
    }

    @RequestMapping("/toUpdateBook")
    public String toUpdate(int bookId, Model model) {
        Books books = bookService.queryBookById(bookId);
        model.addAttribute("book", books);
        return "updateBook";
    }

    /*
        没有提交事务操作,更新会失败
     */
    @RequestMapping("/updateBook")
    public String updateBook(Books books) {
        int result = bookService.updateBook(books);
        if (result > 0) {
            System.out.println("修改书籍成功");
        }
        return "redirect:/book/allBook";
    }

    /*
        删除书籍,回顾RestFul风格
     */
    @RequestMapping("/deleteBook/{bookId}")
    public String deleteBook(@PathVariable("bookId") int bookId) {
        int result = bookService.deleteBookById(bookId);
        if (result > 0) {
            System.out.println("删除书籍成功");
        }
        return "redirect:/book/allBook";
    }

    @RequestMapping("/queryBook")
    public String queryBook(String queryBookName, Model model) {
        Books books = bookService.queryBookByName(queryBookName);
        //复用,这样就显示一个
        List<Books> list = new ArrayList<>();
        list.add(books);
        if (books == null) {
            list= bookService.queryAllBook();
            model.addAttribute("errMsg","未查任何书籍");
        }
        model.addAttribute("list", list);
        return "allBook";
    }
}

复制代码
6.9 前端页面
index.xml
<%@ page contentType="text/html;charset=UTF-8" language="java" %>
<html>
<head>
    <title>$Title$</title>
    <style>
        /*消除字体蓝色下划线*/
        a {
            text-decoration: none;
            color: black;
            font-size: 18px;
        }

        h3 {
            width: 180px;
            height: 38px;
            margin: 100px auto;
            text-align: center;
            line-height: 38px;
            background: deepskyblue;
            border-radius: 5px;
        }
    </style>
</head>
<body>
<h3>
    <a href="${pageContext.request.contextPath}/book/allBook">进入书籍展示页面</a>
</h3>
</body>
</html>

复制代码
WEB-INF/jsp/addBook.jsp
<%@ page contentType="text/html;charset=UTF-8" language="java" %>
<html>
<head>
    <title>Title</title>
    <%--BootStrap美化界面--%>
    <link href="https://cdn.staticfile.org/twitter-bootstrap/3.3.7/css/bootstrap.min.css" rel="stylesheet">
    <div class="row clearfix">
        <%--屏幕分成12列--%>
        <div class="col-md-12 column">
            <div class="page-header">
                <h1>
                    <small>新增书籍</small>
                </h1>
            </div>
        </div>
    </div>
    <%--BootStrap官网拿"表单"数据  name属性保证pojo属性名称一致 required保证必须提交--%>
    <form action="${pageContext.request.contextPath}/book/addBook" method="post">
        <div class="form-group">
            <label for="bName">书籍名称:</label>
            <input type="text" name="bookName" class="form-control" id="bName" required>
        </div>
        <div class="form-group">
            <label for="bCount">书籍数量:</label>
            <input type="text" name="bookCounts" class="form-control" id="bCount" required>
        </div>
        <div class="form-group">
            <label for="bDesc">书籍描述:</label>
            <input type="text" name="detail" class="form-control" id="bDesc" required>
        </div>
        <div class="form-group">
            <input type="submit" class="form-control" value="添加">
        </div>

    </form>
</head>
<body>

</body>
</html>

复制代码
WEB-INF/jsp/allBook.jsp
<%@ taglib prefix="c" uri="http://java.sun.com/jsp/jstl/core" %>
<%@ page contentType="text/html;charset=UTF-8" language="java" %>
<html>
<head>
    <title>书籍展示页面</title>
    <%--BootStrap美化界面--%>
    <link href="https://cdn.staticfile.org/twitter-bootstrap/3.3.7/css/bootstrap.min.css" rel="stylesheet">

</head>
<body>

<div class="container">
    <div class="row clearfix">
        <%--屏幕分成12列--%>
        <div class="col-md-12 column">
            <div class="page-header">
                <h1>
                    <small> 书籍列表——————————显示所有书籍</small>
                </h1>
            </div>
        </div>
        <div class="row">
            <div class="col-md-4 column">
                <a class="btn btn-primary" href="${pageContext.request.contextPath}/book/toAddBook">新增书籍</a>
                <a class="btn btn-primary" href="${pageContext.request.contextPath}/book/allBook">显示全部书籍</a>
            </div>

            <div class="col-md-4 column"></div>

            <div class="col-md-8 column">
                <form action="${pageContext.request.contextPath}/book/queryBook" method="post" style="float: right">
                    <%--前端未传任何信息,就显示错误提示信息:未查任何书籍--%>
                    <span style="color: red;font-weight: bold">${errMsg}</span>
                    <%--class="form-inline"保证在同一行--%>
                    <input type="text" name="queryBookName" class="form-inline" placeholder="请输入要查询的书籍名称">
                    <input type="submit" value="查询" class="btn btn-primary">

                </form>
            </div>
        </div>

    </div>
    <div class="row clearfix">
        <div class="col-md-12 column">
            <table class="table table-hover table-striped">
                <thead>
                <tr>
                    <th>书籍编号</th>
                    <th>书籍名称</th>
                    <th>书籍数量</th>
                    <th>书籍详情</th>
                    <th>操作</th>
                </tr>
                </thead>
                <%--书籍从数据库中查询出来,从这个list中遍历出来,foreach--%>
                <tbody>
                <c:forEach var="book" items="${list}">
                    <tr>
                        <td>${book.bookId}</td>
                        <td>${book.bookName}</td>
                        <td>${book.bookCounts}</td>
                        <td>${book.detail}</td>
                        <td>

                            <a href="${pageContext.request.contextPath}/book/toUpdateBook?bookId=${book.bookId}">修改</a>
                              |
                            <a href="${pageContext.request.contextPath}/book/deleteBook/${book.bookId}">删除</a>
                        </td>
                    </tr>
                </c:forEach>
                </tbody>
            </table>
        </div>
    </div>
</div>
</body>
</html>
复制代码
WEB-INF/jsp/updateBook.jsp
<%@ page contentType="text/html;charset=UTF-8" language="java" %>
<html>
<head>
    <title>Title</title>
    <%--BootStrap美化界面--%>
    <link href="https://cdn.staticfile.org/twitter-bootstrap/3.3.7/css/bootstrap.min.css" rel="stylesheet">
    <div class="row clearfix">
        <%--屏幕分成12列--%>
        <div class="col-md-12 column">
            <div class="page-header">
                <h1>
                    <small>修改书籍</small>
                </h1>
            </div>
        </div>
    </div>
    <%--BootStrap官网拿"表单"数据  name属性保证pojo属性名称一致 required保证必须提交--%>
    <form action="${pageContext.request.contextPath}/book/updateBook" method="post">
        <%--提交失败:没有回显:问题:
            1. 事务没有提交
            2. sql执行失败,没有提交BookId,需要前端的隐藏域
        --%>
        <%--添加bookId的隐藏域--%>
        <input type="hidden" name="BookId" value="${book.bookId}">
        <div class="form-group">
            <label for="bName">书籍名称:</label>
            <input type="text" name="bookName" class="form-control" id="bName" value="${book.bookName}" required>
        </div>
        <div class="form-group">
            <label for="bCount">书籍数量:</label>
            <input type="text" name="bookCounts" class="form-control" id="bCount" value="${book.bookCounts}"required>
        </div>
        <div class="form-group">
            <label for="bDesc">书籍描述:</label>
            <input type="text" name="detail" class="form-control" id="bDesc" value="${book.detail}" required>
        </div>
        <div class="form-group">
            <input type="submit" class="form-control" value="添加">
        </div>

    </form>
</head>
<body>

</body>
</html>
复制代码
7 Ajax
7.1 概念
- Ajax就是一个异步无刷新请求,无需更新整个页面就异步加载一些数据,交互性更强
- 模拟异步请求
<!DOCTYPE html>
<html lang="en">
<head>
    <meta charset="UTF-8">
    <title>模拟Ajax异步请求</title>
    <script>
        function go() {
            var url = document.getElementById("url").value;
            document.getElementById("iframe1").src = url;
        }
    </script>
</head>
<body>
<div>
    <p>请输入地址:</p>
    <p>
        <input type="text" id="url">
        <input type="button" id="button" value="提交" onclick="go()">
    </p>
</div>
<div>
    <iframe id="iframe1" style="width:100%;height: 500px">
    </iframe>
</div>
</body>
</html>
复制代码
7.2 使用JQ使用Ajax
1 初试Ajax
<%@ page contentType="text/html;charset=UTF-8" language="java" %>
<html>
<head>
    <title>$Title$</title>
    <%--加载动态的JQ资源--%>
    <script src="https://code.jquery.com/jquery-3.4.1.js"></script>
    <script>
        /*
        AJax后盾必须懂的东西:
        url:后端接受的地址
        data:后端接受到的请求参数,json数据格式=前后端分离时候,后端传的数据便于前端接受就是json数据
        success:后端接受成功返回的函数
        error:后盾失败接受返回的函数
        */
        function username() {
            $.post({
                url: "${pageContext.request.contextPath}/a1",
                data: {"name": $("#username").val()},
                success: function (data, status) {
                    console.log("data:" + data);
                    console.log("status:" + status);
                }
            })
        }

    </script>
</head>
<body>
<%--实现Ajax异步请求
    1 绑定单击事件
    2 单击事件函数使用Jq:$.post({})
--%>
用户名:<input type="text" id="username" onclick="username()">
</body>
</html>
复制代码
2 Ajax实现异步加载
<%@ page contentType="text/html;charset=UTF-8" language="java" %>
<html>
<head>
    <title>Ajax</title>

    <script src="https://code.jquery.com/jquery-3.4.1.js"></script>
    <script>
        /*页面加载完*/
        $(function () {
            /*绑定btn单击事件*/
            $("#btn").click(function () {
                /*JQ使用Ajax异步请求*/
                $.post("${pageContext.request.contextPath}/a2", function (data) {
                    // data接受返回的值
                    //console.log(data);
                    var html = "";
                    for (let i = 0; i < data.length; i++) {
                        html += "<tr>" +
                            "<td>" + data[i].name + "</td>" +
                            "<td>" + data[i].age + "</td>" +
                            "<td>" + data[i].sex + "</td>" +
                            +"<tr>"
                    }
                    $("#content").html(html);
                });
            });

        })
    </script>
</head>
<body>
<input type="button" id="btn" value="加载数据">
<table>
    <tr>
        <td>姓名</td>
        <td>年龄</td>
        <td>性别</td>
    </tr>
    <tbody id="content">

    </tbody>

</table>
</body>
</html>

复制代码
3 实现登录验证
<%@ page contentType="text/html;charset=UTF-8" language="java" %>
<html>
<head>
    <title>login</title>
    <script src="https://code.jquery.com/jquery-3.4.1.js"></script>
    <script>
        function nameFun() {
            $.post({
                url: "${pageContext.request.contextPath}/a3",
                data: {"name": $("#name").val()},
                success: function (data) {
                    //console.log(data);
                    if (data.toString() === "用户名成功") {
                        $("#userInfo").css("color", "green");
                    } else {
                        $("#userInfo").css("color", "red");
                    }
                    $("#userInfo").html(data);
                }
            })
        }

        function passwordFun() {
            $.post({
                url: "${pageContext.request.contextPath}/a3",
                data: {"password": $("#password").val()},
                success: function (data) {
                    if (data.toString() === "密码正确") {
                        $("#userPasswordInfo").css("color", "green");
                    }else {
                        $("#userPasswordInfo").css("color", "red");
                    }
                    $("#userPasswordInfo").html(data);
                }
            })
        }
    </script>
</head>
<body>
<p>
    用户名:<input type="text" id="name" onclick="nameFun()">
    <%--span提示信息--%>
    <span id="userInfo"></span>
</p>
<p>
    用户密码:<input type="password" id="password" onclick="passwordFun()">
    <span id="userPasswordInfo"></span>
</p>
</body>
</html>
复制代码
appliacation.xml添加json乱码问题
<?xml version="1.0" encoding="UTF-8"?>
<beans xmlns="http://www.springframework.org/schema/beans"
       xmlns:xsi="http://www.w3.org/2001/XMLSchema-instance"
       xmlns:context="http://www.springframework.org/schema/context"
       xmlns:mvc="http://www.springframework.org/schema/mvc"
       xsi:schemaLocation="http://www.springframework.org/schema/beans
        https://www.springframework.org/schema/beans/spring-beans.xsd
        http://www.springframework.org/schema/context
        https://www.springframework.org/schema/context/spring-context.xsd
       http://www.springframework.org/schema/mvc https://www.springframework.org/schema/mvc/spring-mvc.xsd">
    <!--1 自动扫描包,让指定包下的注解生效,由IOC容器统一管理-->
    <context:component-scan base-package="com.ssl.controller"/>
    <!--2 注解驱动-->
    <mvc:annotation-driven/>
    <!--  使用JQ,使用静态资源过滤需要引用,动态就不需要-->
    <mvc:default-servlet-handler/>
    <!--注解加载映射器、适配器,解决Json数据中文乱码问题-->
    <mvc:annotation-driven>
        <mvc:message-converters register-defaults="true">
            <bean class="org.springframework.http.converter.StringHttpMessageConverter">
                <constructor-arg value="UTF-8"/>
            </bean>
            <bean class="org.springframework.http.converter.json.MappingJackson2HttpMessageConverter">
                <property name="objectMapper">
                    <bean class="org.springframework.http.converter.json.Jackson2ObjectMapperFactoryBean">
                        <property name="failOnEmptyBeans" value="false"/>
                    </bean>
                </property>
            </bean>
        </mvc:message-converters>
    </mvc:annotation-driven>
    <!--3 以上的是定死的代码,以下是配置视图解析器-->
    <bean class="org.springframework.web.servlet.view.InternalResourceViewResolver" id="internalResourceViewResolver">
        <property name="prefix" value="/WEB-INF/jsp/"/>
        <property name="suffix" value=".jsp"/>
    </bean>
</beans>
复制代码
7.3 后端需要的前端知识
- HTML+CSS+Js(超级熟练)
- Js必会?:
- 函数闭包?
- DOM
- id,name.tag
- create,remove
- BOM:浏览器对象模型
- window
- document
8 拦截器
8.1 概念
- 数据独立性:Servlet中的是过滤器,而拦截器是SpringMVC框架独有的,独享request和response
- 拦截器只会拦截访问的控制器方法,如果访问的是jsp/html/css等式不会拦截的
- 拦截器是基于AOP思想的,和AOP实现是一样的,在application.xml中配置
<!--拦截器配置-->
<mvc:interceptors>
    <mvc:interceptor>
        <!--
                /**是拦截之后所有的请求,比如/admin/a1/2131
            -->
        <mvc:mapping path="/**"/>
        <bean class="com.ssl.config.MyInterceptor"/>
    </mvc:interceptor>
</mvc:interceptors>
复制代码
8.2 自定义拦截器
- 实现 HandlerInterceptor
public class MyInterceptor implements HandlerInterceptor {
    @Override
    public boolean preHandle(HttpServletRequest request, HttpServletResponse response, Object handler) throws Exception {
        //return true:执行下一个拦截器
        System.out.println("===========处理前,这里进行拦截处理=================");
        return true;
    }

    @Override
    public void postHandle(HttpServletRequest request, HttpServletResponse response, Object handler, ModelAndView modelAndView) throws Exception {
        System.out.println("===========处理后,通常进行日志管理=================");
    }

    @Override
    public void afterCompletion(HttpServletRequest request, HttpServletResponse response, Object handler, Exception ex) throws Exception {
        System.out.println("===========清洁中=================");
    }
}
复制代码
- applica.xml配置
<!--拦截器配置-->
<mvc:interceptors>
    <mvc:interceptor>
        <!--
                /**是拦截之后所有的请求,比如/admin/a1/2131
            -->
        <mvc:mapping path="/**"/>
        <bean class="com.ssl.config.MyInterceptor"/>
    </mvc:interceptor>
</mvc:interceptors>
复制代码
8.3 登录验证判断
public class LoginInterceptor implements HandlerInterceptor {
    @Override
    public boolean preHandle(HttpServletRequest request, HttpServletResponse response, Object handler) throws Exception {
        HttpSession session = request.getSession();
        request.getRequestURL();
        //URL:http://localhost:8080/springmvc_07_interceptor/user//main
        System.out.println("URL:" + request.getRequestURL());
        //URI:/springmvc_07_interceptor/user//main
        System.out.println("URI:" + request.getRequestURI());

        if (session.getAttribute("username") == null || session.getAttribute("password") == null) {
            request.getRequestDispatcher("/WEB-INF/jsp/login.jsp").forward(request, response);
        } else if (session.getAttribute("username").equals("admin") && session.getAttribute("password").equals("123456")) {
            return true;
        }
        if (request.getRequestURI().contains("ogin")) {
            return true;
        }
        request.getRequestDispatcher("/WEB-INF/jsp/login.jsp").forward(request, response);
        return false;
    }
}
复制代码
@Controller
@RequestMapping("/user")
public class LoginController {

    @RequestMapping("/main")
    public String main() {
        //沒登陸就不等進入首頁
        return "main";
    }

    @RequestMapping("/goLogin")
    public String goLogin() {
        return "login";
    }


    @RequestMapping("/login")
    public String login(String username, String password, HttpSession session, Model model) {
        session.setAttribute("username", username);
        session.setAttribute("password", password);
        model.addAttribute("username", username);
        return "main";
    }

    @RequestMapping("/outUser")
    public String outUser(HttpSession session) {
        session.removeAttribute("username");
        session.removeAttribute("password");
        return "main";
    }
}
复制代码
9 文件上传
- 前端form添加enctype="multipart/form-data",method="post"
<form enctype="multipart/form-data" method="post" action="">

  </form>
复制代码
- 后端pom导包
<dependencies>
        <dependency>
            <groupId>commons-fileupload</groupId>
            <artifactId>commons-fileupload</artifactId>
            <version>1.4</version>
        </dependency>
        <!--导入高版本的api-->
        <dependency>
            <groupId>javax.servlet</groupId>
            <artifactId>javax.servlet-api</artifactId>
            <version>4.0.1</version>
        </dependency>
    </dependencies>
复制代码
- Spring自带的文件上传,application.xml配置
<!--4 文件上传配置-->
    <bean id="multipartResolver" class="org.springframework.web.multipart.commons.CommonsMultipartResolver">
        <property name="defaultEncoding" value="utf-8"/>
        <!--最大上传大小:单位是1字节-->
        <property name="maxUploadSize" value="10485760"/>
        <property name="maxInMemorySize" value="40960"/>
    </bean>

复制代码
@RestController
public class FileController {
    @RequestMapping("/upFile")
    public String upFile(@RequestParam("file") CommonsMultipartFile file, HttpServletRequest request) throws IOException {
        //设置文件保存路径
        String path = request.getServletContext().getRealPath("/upload");
        System.out.println("path:" + path);
        File realPath = new File(path);
        if (!realPath.exists()) {
            realPath.mkdir();
        }
        System.out.println("上传的文件地址:" + realPath);
        //CommonsMultipartFile的方法写文件,简化
        file.transferTo(new File(realPath + "/" + file.getOriginalFilename()));
        return "redirect:/index.jsp";
    }
}
复制代码
10 文件下载
- 方式一:写方法下载
@RequestMapping(value = "/download")
    public String downLoad(HttpServletResponse response, HttpServletRequest request) throws IOException {
        //手动设置,要下载的图片地址
        String path = request.getServletContext().getRealPath("/upload");
        String fileName = "1.png";
        //设置响应头
        response.reset();//设置页面不缓存,清空buffer
        response.setCharacterEncoding("UTF-8");
        response.setContentType("multipart/form-data");//二进制传输数据
        response.setHeader("Content-Disposition", "attachment;fileName=" + URLEncoder.encode(fileName, "UTF-8"));
        File file = new File(path, fileName);
        //读取文件-输入流
        InputStream input = new FileInputStream(file);
        //写入文件-输出流
        OutputStream out = response.getOutputStream();
        byte[] buff = new byte[1024];
        int index = 0;
        while ((index = input.read(buff)) != -1) {
            out.write(buff,0,index);
            out.flush();
        }
        input.close();
        out.close();
        return "redirect:/index.jsp";
    }
复制代码
- 方式二: 标签直接web下静态获取
正文到此结束
- 本文标签: list Ajax src autocommit Action web SQL执行 db springboot struct ArrayList 安全 junit Bootstrap 时间 parse value 开发 lib 下载 Property apache mapper tab id ip session 阿里巴巴 retry IDE 需求 遍历 key dependencies build 数据模型 Twitter update SqlSessionFactory classpath MQ tomcat HashMap cat 适配器 数据 代码 解析 参数 schema ACE Freemarker java ORM 测试 AOP servlet Thread pool 数据库 缓存 UI API HTML XML mybatis Connection Word 处理器 spring 业务层 ssl 工作原理 乱码 tar Qualifier jquery RESTful 初学者 json REST dataSource 删除 JavaScript mysql ioc 服务器 IO pom bug CDN JDBC 配置 tag 管理 App Select 文件上传 C3P0 http message bean 站点 图片 maven 专注 js 连接池 map druid NSA CTO DOM SpringMVC DBCP core Logging Service root sqlsession 自动化 模型 https equals sql stream CSS 域名 Document
- 版权声明: 本文为互联网转载文章,出处已在文章中说明(部分除外)。如果侵权,请联系本站长删除,谢谢。
- 本文海报: 生成海报一 生成海报二
热门推荐


相关文章


Loading...
![[HBLOG]公众号](http://www.liuhaihua.cn/img/qrcode_gzh.jpg)

