netty 入门
文档 使用手册
近期公司通过 TCP 连接的的方式接了一个硬件设备,用了最基础的 ServerSocket 类,参考的oracle的 文档 。 实现的比较简单,放在 github 上,不过这里应该用 Netty 才是正解。所以,过一下 Netty 的入门文档。
本文 demo
序言
问题
我们一般会用Http客户端库来调用web服务,获取数据。如果一个东西是出于一般性目的设计出来的,那么他在某些方面可能就不是最合适的。比如获取大文件,收发邮件,展示实时的金融数据,游戏数据传输等。为了实现这些需求,需要一个为其高度优化的特定协议。还有一个无法避免的问题是你可能需要调用老系统的数据,但是他的协议又是特定。重点来了,如何在不牺牲 可靠性 和 性能 的前提下 快速 实现这么一个系统。
解决方案
用Netty。用Netty。用Netty。重要的事情说3遍。
Netty是一个 异步 事件驱动 网络框架 ,可以用来快速开发易维护,高性能,可扩展的服务端/客户端。换句话说他简化了TCP和UDP 等服务的网络开发。
容易开发或者快速开发并不意味着他会牺牲可维护性或者是面临性能问题。Netty吸取了大量用于实现FTP,SMTP,HTTP协议的经验,并且仔细小心谨慎的设计。所以,他在易于开发,追求性能,确保稳定性和灵活性上并没有对任何一点有所妥协。
有人可能会说别的框架他们也这么说自己,那Netty到底或者为什么和他们不一样。答案是他的 设计理念 。Netty提供的API用起来就非常舒服。现在可能不是那么直观,但是当你使用的时候就会体会到。
开始使用
这节会围绕Netty的核心构建过程,用几个例子来让你快速上手。学完这节你会可以在Netty框架的基础上学会写client和server。
如果你想学的深入一点,了解一下他的底层实现, 第二节,架构概览 是个不错的起点。
开始之前
这节需要两个东西,新版的Netty和jdk1.6+。 Netty下载地址 。
<dependencies>
    <!-- https://mvnrepository.com/artifact/io.netty/netty-all -->
    <dependency>
        <groupId>io.netty</groupId>
        <artifactId>netty-all</artifactId>
        <version>4.1.49.Final</version>
    </dependency>
</dependencies>
随着你不断往下看,你能会对这节引入的类有疑惑,你可以随时通过API文档来了解更多。类名都是带链接的,可以直接点过去。
编写一个Discard Server
前半部分
世界上最简单的协议并不是输出Hello world,而是 Discard ,就是过来什么都直接丢弃,并且不给任何回复。下面让我们直接从Netty提供的handler实现来处理IO事件。
package io.netty.example.discard;

import io.netty.buffer.ByteBuf;
import io.netty.channel.ChannelHandlerContext;
import io.netty.channel.ChannelInboundHandlerAdapter;

public class DiscardServerHandler extends ChannelInboundHandlerAdapter {//1
    @Override
    public void channelRead(ChannelHandlerContext ctx, Object msg) throws Exception {//2
//        super.channelRead(ctx, msg);
        ((ByteBuf) msg).release();//3
    }

    @Override
    public void exceptionCaught(ChannelHandlerContext ctx, Throwable cause) throws Exception {//4
//        super.exceptionCaught(ctx, cause);
        cause.printStackTrace();
        ctx.close();
    }
}
有以下几点:
-
我们写一个
DiscardServerHandler类继承自 ChannelInboundHandlerAdapter ,这个ChannelInboundHandlerAdapter继承自抽象类ChannelHandlerAdapter并且实现了接口ChannelInboundHandler。ChannelInboundHandler提供了各种各样的可重写的事件handler方法。这里只要使用ChannelInboundHandlerAdapter对ChannelInboundHandler的默认实现就好,不需要自己去实现所有的ChannelInboundHandler方法。 -
channelRead方法我们重写掉了,这个方法会在收到客户端消息的时候调用。例子中,消息msg的类型为 ByteBuf 。ByteBuf是对byte[]的一种抽象,可以让我们访问数组内容。 -
我们这里需要实现的是Discard协议,就是丢弃协议,所以需要忽略收到的所有消息。ByteBuf是一种
reference-counted的对象(可以简单理解指针之类的东西),必须通过显式调用其release方法来释放。通常,我们的channelRead方法是下面这样的@Override public void channelRead(ChannelHandlerContext ctx, Object msg) throws Exception { try{ //对msg做一些处理 }finally { ReferenceCountUtil.release(msg); } } -
Netty在处理IO的遇到exception就会进入
exceptionCaught方法。通常,需要做一下日志记录,然后把相关的channel(通道)关闭。这里做法也不是固定的,你可以先发一个带code的Response然后再关闭。
后半部分
到这一步,我们已经实现了Discard服务的前半部分,剩下的就是写一个 main 方法然后来启动这个 DiscardServerHandler 服务。
package io.netty.example.discard;

import io.netty.bootstrap.ServerBootstrap;
import io.netty.channel.ChannelFuture;
import io.netty.channel.ChannelInitializer;
import io.netty.channel.ChannelOption;
import io.netty.channel.EventLoopGroup;
import io.netty.channel.nio.NioEventLoopGroup;
import io.netty.channel.socket.SocketChannel;
import io.netty.channel.socket.nio.NioServerSocketChannel;

public class DiscardServer {
    private int port;

    public DiscardServer(int port) {
        this.port = port;
    }

    public void run() throws InterruptedException {
        EventLoopGroup bossGroup = new NioEventLoopGroup();//1
        EventLoopGroup workerGroup = new NioEventLoopGroup();
        try {
            ServerBootstrap b = new ServerBootstrap();//2
            b.group(bossGroup, workerGroup)
                    .channel(NioServerSocketChannel.class)//3
                    .childHandler(new ChannelInitializer<SocketChannel>() {//4
                        protected void initChannel(SocketChannel socketChannel) throws Exception {
                            socketChannel.pipeline().addLast(new DiscardServerHandler());
                        }
                    })
                    .option(ChannelOption.SO_BACKLOG, 128)//5 最大连接数128
                    .childOption(ChannelOption.SO_KEEPALIVE, true);//6

            //绑定端口启动服务
            ChannelFuture f = b.bind(port).sync();//7
            //server关闭的时候调用。因为这里是Discard 服务,所以永远不会调用。
            f.channel().closeFuture().sync();
        } finally {
            workerGroup.shutdownGracefully();
            bossGroup.shutdownGracefully();
        }
    }

    public static void main(String[] args) throws InterruptedException {
        int port = 8080;
        if (args.length > 0)
            port = Integer.parseInt(args[0]);

        new DiscardServer(port).run();
    }
}
有以下几点:
-
NioEventLoopGroup 是一个多线程的event loop(事件环?)。Netty针对不同的情况提供了多(18)种
EventLoopGroup的实现,因为这里是一个服务端应用,所以使用NioEventLoopGroup。new出来两个对象,通常第一个叫boss,接收进来的连接。第二个,通常叫worker,因为当boss接收了连接之后会把链接注册给worker,让worker来处理后面的通信。每个EventLoopGroup使用线程数以及他们如何被映射到 Channel 由EventLoopGroup的实现决定,并且可能可以通过构造函数来指定。-
下面是
NioEventGroup的部分构造函数。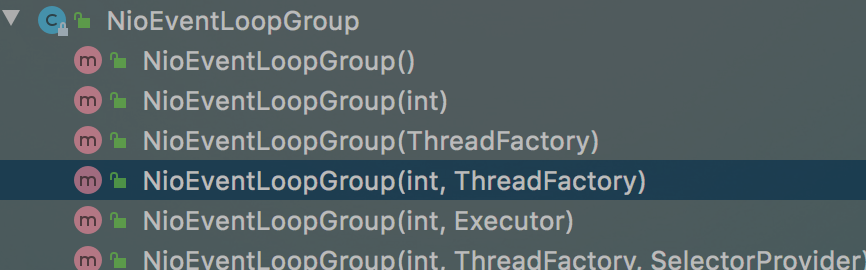
-
什么是Netty的
Channel。按照 文档 的介绍,可以简单理解为socket的一个抽象,或者是IO的操作,包括IO的读写,连接,绑定等。Channel会给使用者提供以下功能:- 当前的状态(连接是否已经打开或者连上)
- channel的 配置参数 。(接收的缓冲区大小)
- socket,io相关的操作(读写等)
- 处理io事件的 管道
-
详细的以后再说
-
-
ServerBootstarp 是一个配置server的帮助类,你可以使用Channel自己来配置,但是会比较枯燥,所以,大多数情况下直接使用这个
ServerBootstrap就好。 -
NioServerSocketChannel是一个Channel的实例,用来处理进来的连接(上面说的channel的功能)。 -
ChannelInitializer 是一个特殊的Handler,作用是帮助用户配置Channel。通常的作用是把ChannelHandler放到ChannelPipeline(管道)里面,请求会进入到Pipeline,处理就按照这个Pipeline配置的Handler来。
DiscardServerHandler就是一种Handler。 -
用来配置Channel的参数。顺道看一下
ServerBootstrap的定义,这个ServerBootstrap是用来启动ServerChannel,ServerChannel实际上就是一个Channel。我们这里实现的是一个TCP/IP server,所以,可以设置tcpNoDelay和keepAlive等参数。具体设置看文档。public class ServerBootstrap extends AbstractBootstrap<ServerBootstrap, ServerChannel>{} -
option的为接收连接的配置,也就是给boss用,后面的childOption为worker配置选项。
-
万事俱备,只欠把绑定端口配置上去然后启动服务。
main方法里面。
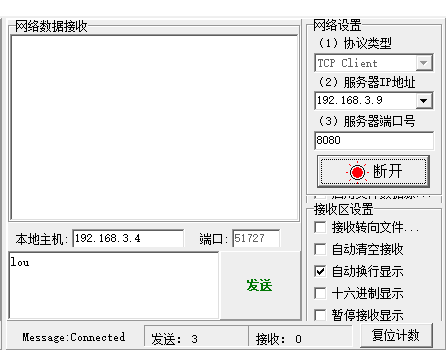
恭喜,搞定。用个tcp 客户端连接试试~~可以看到连接成功,发送了3字节,然后因为是Discard,所以没有返回。
收到的数据
让我们稍微修改一下代码,以便看看我们收到的数据。按照之前的例子,需要再channelRead方法里面做修改。
@Override
public void channelRead(ChannelHandlerContext ctx, Object msg) throws Exception {
    final ByteBuf in = (ByteBuf) msg;
    try {
        System.out.println(in.toString(CharsetUtil.US_ASCII));
    } finally {
        in.release();
    }
}
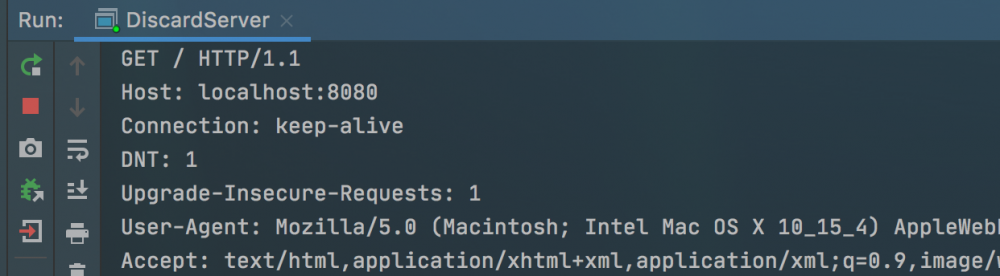
msg可以直接转换成 ByteBuf 对象,然后用ByteBuf的toString方法,设置ASCII参数装成string打印出来。
运行起来然后可以直接在浏览器输入localhost:8080访问,就能看到传过来的数据。
写一个Echo Server
我们写一个Echo服务,客户端输入什么,我们就回复什么。
public class EchoServerHandler extends ChannelInboundHandlerAdapter {
    @Override
    public void channelRead(ChannelHandlerContext ctx, Object msg) throws Exception {
        ctx.write(msg);//1
        ctx.flush();//2
    }
}
- 通过 ChannelHandlerContext 对象,我们可以触发一些IO事件或者执行一些操作。这里我们不需要手动 release msg ,因为当我们执行了
wirte方法,Netty会帮我们释放。 -
ctx.write(Object)会把内容写到缓冲区,在调用flush后再输出出去。可以用writeAndFlush方法代替。
测试一下,发送3个字节,收到3个字节的回复。
写一个TIME Server
这个例子用来实现一个 Time 协议。通过实现这个协议,我们可以了解Netty如何 构造 和 发送 数据。根据RFC868协议,Time协议有这么几步
- 服务器监听37端口
- 客户端连接
- 服务端返回一个4字节的int时间数据
- 客户端接收到这个数据
- 客户端关闭连接
- 服务端关闭连接。
这里服务端忽略收到的任何客户端数据,而是当客户端一建立连接就返回数据,所以这里不使用 channelRead 方法,而是 channelActive 方法。
package io.netty.example.time;

import io.netty.buffer.ByteBuf;
import io.netty.channel.ChannelFuture;
import io.netty.channel.ChannelFutureListener;
import io.netty.channel.ChannelHandlerContext;
import io.netty.channel.ChannelInboundHandlerAdapter;

public class TimeServerHandler extends ChannelInboundHandlerAdapter {
    @Override
    public void channelActive(final ChannelHandlerContext ctx) throws Exception {//1
        final ByteBuf timeBuf = ctx.alloc().buffer(4);//2
        timeBuf.writeInt((int) (System.currentTimeMillis() / 1000L + 2208988800L));

        final ChannelFuture channelFuture = ctx.writeAndFlush(timeBuf);//3
        channelFuture.addListener(new ChannelFutureListener() {
            public void operationComplete(ChannelFuture future) throws Exception {
                assert channelFuture == future;
                ctx.close();
            }
        });//4

    }

    @Override
    public void exceptionCaught(ChannelHandlerContext ctx, Throwable cause) throws Exception {
        cause.printStackTrace();
        ctx.close();
    }
}
-
重写的是
channelActive方法,这个方法会在连接进来的时候调用。 -
因为要返回一个int值,所以需要4个字节,通过
ChannelHandlerContext分配,然后writeAndFlush方法写入并发送。 -
把数据发送给非阻塞IO流的时候不需要调用
java.nio.ByteBuffer.flip()方法,Netty的ByteBuf没有提供这个方法,因为他不需要。ByteBuf内部有两个指针,一个用于读,一个用于写。write的时候读指针移动,写指针不动,反之同理。在使用ByteBuffer的时候如果没有flip,数据就会乱。Netty里面所有的IO操作都是异步的,这样可能会导致write没有开始(或者没有完成)之前就连接就close掉了。比如下面的代码:
Channel ch = ...;
ch.writeAndFlush(message);
ch.close();//这也不是立马关闭,也是一个ChannelFuture对象
write(writeAndFlush)返回的是一个ChannelFuture对象,来大致看下这个对象的解释。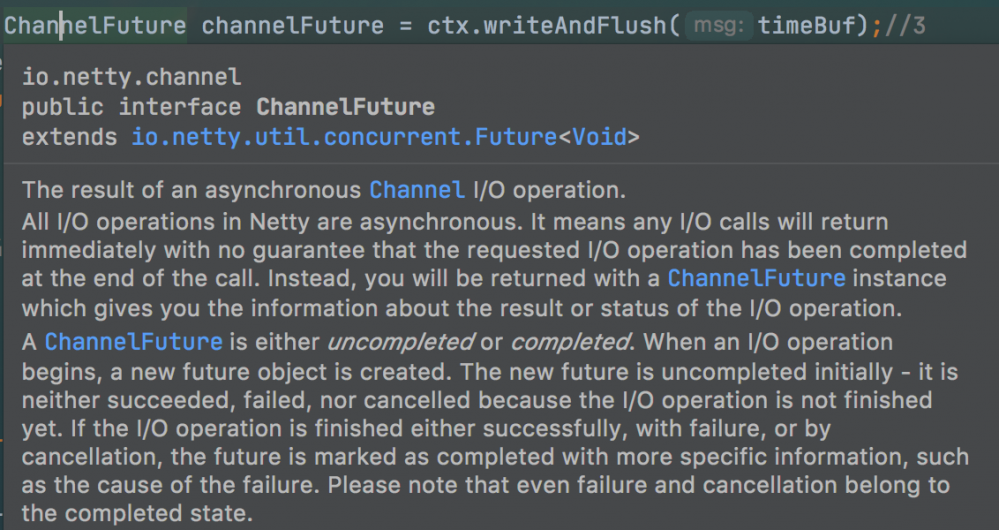
继承自Future,表示一个Channel的IO操作的结果,不过他还没完成,只是表示已经创建。【详细的以后再讲。】
-
如何能知道这个IO操作的结果呢?我们可以给这个ChannelFuture增加一个
ChannelFutureListener的实例(接口),然后实现它的operationComplete方法。这里面的方法比较简单,就是close掉这个ChannelHandlerContext,所以,可以使用定义好的ChannelFutureListener.CLOSE方法。像下面这样channelFuture.addListener(ChannelFutureListener.CLOSE);
-
用rdate 测试一下。测试通过。

写一个TIME Client
写完server之后就要写client了。client程序和server程序最大的不同在于选择的 Bootstrap 和 Channel 的实现类的差异。
package io.netty.example.time;

import io.netty.bootstrap.Bootstrap;
import io.netty.channel.ChannelFuture;
import io.netty.channel.ChannelInitializer;
import io.netty.channel.ChannelOption;
import io.netty.channel.EventLoopGroup;
import io.netty.channel.nio.NioEventLoopGroup;
import io.netty.channel.socket.SocketChannel;
import io.netty.channel.socket.nio.NioSocketChannel;

public class TimeClient {
    public static void main(String[] args) throws InterruptedException {
        int port = 37;
        String host = "192.168.1.181";
        EventLoopGroup workerGroup = new NioEventLoopGroup();

        try {
            final Bootstrap bootstrap = new Bootstrap();//1
            bootstrap.group(workerGroup);//2
            bootstrap.channel(NioSocketChannel.class);//3
            bootstrap.option(ChannelOption.SO_KEEPALIVE, true);//4
            bootstrap.handler(new ChannelInitializer<SocketChannel>() {
                protected void initChannel(SocketChannel ch) throws Exception {
                    ch.pipeline().addLast(new TimeClientHandler());//6
                }
            });

            final ChannelFuture connectFuture = bootstrap.connect(host, port).sync();//5

            connectFuture.channel().closeFuture().sync();
        } finally {
            workerGroup.shutdownGracefully();
        }
    }
}
-
Bootstrap 和前面的 ServerBootstrap 类似,不过这个不是给
non-server非服务器用,而是给客户端或者connectionless非连接的用。 -
客户端就不需要boss
EventLoopGroup了。其实前面的Server中group能用同一个。serverBootstrap.group(workGroup, workGroup);//同一个group
-
channel也需要换成
NioSocketChannel,而不是NioServerSocketChannel。 -
这里直接用option方法,而不是childOption和option,因为对应client,没有childOption的概念。
-
client需要去connect,而不是bind来监听。
看一下TimeClientHander.java
package io.netty.example.time;

import io.netty.buffer.ByteBuf;
import io.netty.channel.ChannelHandlerContext;
import io.netty.channel.ChannelInboundHandlerAdapter;

import java.util.Date;

public class TimeClientHandler extends ChannelInboundHandlerAdapter {
    @Override
    public void channelRead(ChannelHandlerContext ctx, Object msg) throws Exception {
        final ByteBuf m = (ByteBuf) msg;//1
        try {
            final long currentTimeMills = (m.readUnsignedInt() - 2208988800L) * 1000L;//2
            System.out.println(new Date(currentTimeMills));
            ctx.close();
        } finally {
            m.release();
        }
    }

    @Override
    public void exceptionCaught(ChannelHandlerContext ctx, Throwable cause) throws Exception {
        cause.printStackTrace();
        ctx.close();
    }
}
ByteBuf
readUnsignedInt()
代码看起来比较简单,但是一定可能性(小概率)会有 IndexOutOfBoundsException 异常,我们下节讨论。
处理基于stream的传输
Socket Buffer的一个问题
TCP/IP 是一个典型的stream-based协议,接收数据然后放到socket buffer里面。但是这个buffer队列存的是byte,而不是packet数据包。所以,就算发了两个packet,在系统看来,他就是一堆byte。所以,没有办法保证你读取到的东西和发过来的一定一样。
举个例子,假设收到了3个数据包,ABC,DEF,GHI

有可能收到的是下面这样的
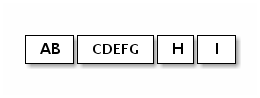
所以,server和client需要一种规则来划分数据包,然后对方就知道每个包到底是啥样的。
第一种解决方案
其实道理上来说因为int数据包也就4个字节,所以不太会被分片,不太容易出现 IndexOutOfBoundsException 异常。但是,随着数据包变大,分片的可能性就会增加,到时候异常出现的概率就会增大。
因为我们知道收到的数据是4个字节,所以,我们可以分配一个4自己的空间,等到一满,我们就知道已经收到该有的数据包了,就直接处理就好。来改一下我们的TimeClientHandler
package io.netty.example.time;

import io.netty.buffer.ByteBuf;
import io.netty.channel.ChannelHandlerContext;
import io.netty.channel.ChannelInboundHandlerAdapter;

import java.util.Date;

public class TimeClientHandler2 extends ChannelInboundHandlerAdapter {
    private ByteBuf buf;

    @Override
    public void handlerAdded(ChannelHandlerContext ctx) throws Exception {
        buf = ctx.alloc().buffer(4);//1
    }

    @Override
    public void handlerRemoved(ChannelHandlerContext ctx) throws Exception {
        buf.release();//1
        buf = null;
    }

    @Override
    public void channelRead(ChannelHandlerContext ctx, Object msg) throws Exception {
        final ByteBuf m = (ByteBuf) msg;
        buf.writeBytes(m);//2
        m.release();

        if (buf.readableBytes() >= 4) {//3
            final long currentTimeMillis = (buf.readUnsignedInt() - 2208988800L) * 1000L;
            System.out.println(new Date(currentTimeMillis));
            ctx.close();
        }
    }

    @Override
    public void exceptionCaught(ChannelHandlerContext ctx, Throwable cause) throws Exception {
        cause.printStackTrace();
        ctx.close();
    }
}
- 重写了
handlerAdded和handlerRemoved方法,在这两个方法里面初始化或者销毁buf对象。只要这两个方法不会阻塞太长时间,是没有关系的。 - 把收到的内容写到buf对象里面。
- 每次有数据过来的时候会进入channelRead方法(不同的连接不会串),做一个业务逻辑判断。
第二种解决方案
虽然上面的问题是解决了,但是因为我们晓得发过来的数据是4个字节的(就一个字段),所以比较好处理。但是,如果这个对象是一个比较复杂的业务对象,那么要维护这个类就会比较麻烦。
我们可以对这个 TimeClientHandler2 的功能拆解成2部分。
TimeDecoder
TimeClientHandler2
package io.netty.example.time;

import io.netty.buffer.ByteBuf;
import io.netty.channel.ChannelHandlerContext;
import io.netty.handler.codec.ByteToMessageDecoder;

import java.util.List;

public class TimeDecoder  extends ByteToMessageDecoder {//1
    protected void decode(ChannelHandlerContext ctx, ByteBuf in, List<Object> out) throws Exception {//2
        if (in.readableBytes()<4)
            return;//3
        out.add(in.readBytes(4));//4
    }
}
- ByteToMessageDecoder 继承自 ChannelInboundHandlerAdapter ,实现了 ChannelInboundHandler 接口,所以这个Decoder对象也是一个
ChannelHandler对象。他专门用来处理分片问题。 -
ByteToMessageDecoder会在有新的数据进来的时候调用decode方法,内部维护一个buffer。 -
ByteToMessageDecoder可以根据自己的业务逻辑来执行。 - 假设进来的字节数据大于4,那么他就会调用这个decode多次,每次处理4个字节。
使用POJO而不是ByteBuf
前面的例子读写数据的核心都是 ByteBuf 类,在 ChannelHandler 里面直接把object msg 转成ByteBuf,然后操作。如果我们能通过POJO来操作,那么,代码的可维护性明显会高一些。让我们来改造一下我们的代码。
第一步,定义一个 UnixTime 类,来表示我们要处理的对象。
package io.netty.example.time2;

import java.util.Date;

public class UnixTime {
    private final long value;

    public UnixTime() {
        this(System.currentTimeMillis() / 1000L + 2208988800L);
    }

    public UnixTime(long value) {
        this.value = value;
    }

    public long getValue() {
        return value;
    }

    @Override
    public String toString() {
        return "转换出来的时间是:"+ new Date((getValue() - 2208988800L) * 1000L).toString();
    }
}
第二步,我们改一下我们的 TimeDecoder 来产生一个UnixTime对象。
package io.netty.example.time2.client;

import io.netty.buffer.ByteBuf;
import io.netty.channel.ChannelHandlerContext;
import io.netty.handler.codec.ByteToMessageDecoder;

import java.util.List;

public class TimeDecoder extends ByteToMessageDecoder {
    @Override
    protected void decode(ChannelHandlerContext ctx, ByteBuf in, List<Object> out) throws Exception {
        if (in.readableBytes()<4)
            return;
        out.add(new UnixTime(in.readUnsignedInt()));
    }
}
第三步,在 ChannelHandler 里面我们直接按照 UnixTime 对象操作。
package io.netty.example.time2.client;

import io.netty.channel.ChannelHandlerContext;
import io.netty.channel.ChannelInboundHandlerAdapter;

public class TimeClientHandler extends ChannelInboundHandlerAdapter {
    @Override
    public void channelRead(ChannelHandlerContext ctx, Object msg) throws Exception {
        UnixTime time = (UnixTime) msg;
        System.out.println(time);
        ctx.close();
    }
}
第四步,同理,server端也可以类似的修改。
package io.netty.example.time2.server;

import io.netty.channel.ChannelFuture;
import io.netty.channel.ChannelFutureListener;
import io.netty.channel.ChannelHandlerContext;
import io.netty.channel.ChannelInboundHandlerAdapter;

public class TimeServerHandler extends ChannelInboundHandlerAdapter {
    @Override
    public void channelActive(ChannelHandlerContext ctx) throws Exception {
        ChannelFuture channelFuture = ctx.writeAndFlush(new UnixTime());
        channelFuture.addListener(ChannelFutureListener.CLOSE);
    }
}
相较于以前的分配空间的操作,明显简单了许多。
第五步,现在,还缺一个东西,一个encoder,用来把 UnixTime 转成 ByteBuf ,这个是逃不开的,哈哈。
package io.netty.example.time2.server;

import io.netty.buffer.ByteBuf;
import io.netty.channel.ChannelHandlerContext;
import io.netty.channel.ChannelOutboundHandlerAdapter;
import io.netty.channel.ChannelPromise;

public class TimeEncoder extends ChannelOutboundHandlerAdapter {
    @Override
    public void write(ChannelHandlerContext ctx, Object msg, ChannelPromise promise) throws Exception {
        UnixTime m = (UnixTime) msg;
        ByteBuf buffer = ctx.alloc().buffer(4);
        buffer.writeInt((int)m.getValue());
        ctx.write(buffer,promise);//1
    }
}
- 这一行里面有一些比较重要的事情。
- 这里有个 ChannelPromise 对象,来标记write成功与否。
- 我们没有手动调用
flush方法,因为ChannelOutboundHandlerAdapter有个flush会自动调用。
其实这个用 MessageToByteEncoder
package io.netty.example.time2.server;

import io.netty.buffer.ByteBuf;
import io.netty.channel.ChannelHandlerContext;
import io.netty.handler.codec.MessageToByteEncoder;

public class TimeEncoder2 extends MessageToByteEncoder<UnixTime> {
    @Override
    protected void encode(ChannelHandlerContext ctx, UnixTime msg, ByteBuf out) throws Exception {
        out.writeInt((int) msg.getValue());
    }
}
MessageToByteEncoder 是一个 ChannelOutboundHandlerAdapter 的实现抽象类,专门负责把POJO对象转成ByteBuf。
最后一步,把Encoder像之前Decoder一样加到 ChannelPipeline 里面。你懂的。
client.handler(new ChannelInitializer<SocketChannel>() {
    @Override
    protected void initChannel(SocketChannel ch) throws Exception {
        ch.pipeline().addLast(new TimeDecoder(), new TimeClientHandler());//客户端解码 加进去
    }
});
server.group(bossGroup, workerGroup)
        .channel(NioServerSocketChannel.class)
        .childHandler(new ChannelInitializer<SocketChannel>() {
            @Override
            protected void initChannel(SocketChannel ch) throws Exception {
                ch.pipeline().addLast(new TimeEncoder2(), new TimeServerHandler());//服务端直接操作UnixTime,需要编码,加进去
            }
        })
        .option(ChannelOption.SO_BACKLOG, 128)
        .childOption(ChannelOption.SO_KEEPALIVE, true);
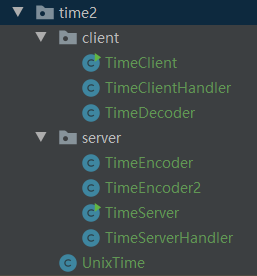
代码结构看起来是这样的
关闭程序
关闭比较简单,调用 shutdownGracefully() 即可,然后会返回一个Future对象。
小结
强烈建议看看官方的 例子 。
正文到此结束
- 本文标签: java db 配置 多线程 HTML final http 服务端 node 线程 Netty 空间 开发 DDL HTTP协议 端口 Oracle API UDP dependencies src IO unix tar Bootstrap TCP 参数 client NIO 测试 IDE 时间 list example message 协议 https 数据 需求 value ftp IOS 并发 服务器 git UI 代码 实例 Connection 下载 stream web ip 金融 GitHub parse 性能问题 ACE id
- 版权声明: 本文为互联网转载文章,出处已在文章中说明(部分除外)。如果侵权,请联系本站长删除,谢谢。
- 本文海报: 生成海报一 生成海报二
热门推荐


相关文章

近期评论
-
Your article is a perfect article without a hitch. Thank you. My site: horse racing betting game
-
-
你这基本没有更新呀,最近文章显示还是2019年的文章。不符合要求哈
-
关键词:慕云博客 链接:https://www.lilun.me 描述:分享原创文字的个人博客
-
-
-
可以提供一下源码吗
-
不是商业站,鸡娃学习笔记
-
-
Loading...
![[HBLOG]公众号](http://www.liuhaihua.cn/img/qrcode_gzh.jpg)

