Easy CDC Event Streaming Using Hazelcast and Debezium
CDC – What is it and why use it?
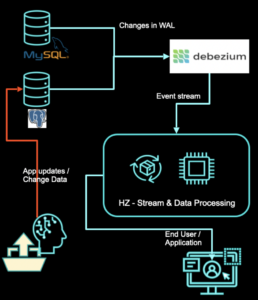
Hazelcast has a Debezium Change Data Capture (CDC) integration built-in. What is this CDC, you may ask? It is a technique that allows you to identify changes in the database and stream them. CDC can then quickly detect valuable changes without the need to rewrite other systems producing the data – especially old, legacy systems.Sounds simple, right? However, algorithms behind the most known form of CDC are very low-level and require a lot of DB knowledge. Namely, most CDC libraries read databases’ WALs (Write Ahead Logs) and transform WAL entries into usable events. It doesn’t mean that you are doomed! I’ll show you how to run a simple CDC pipeline in the Hazelcast Platform, using the built-in Debezium connector.
Use case
Our “step zero” is simple: get an idea of what to do! In this blog post, I will show you the following scenario:Imagine you have a database of some shop. It’s an old system critical for the business and will not likely be updated to contain new fancy features like data streaming. You also don’t want to risk any downtimes or bugs that may cause interruptions in the main flow. However, your boss says that he wants real-time analytics on the orders per customer.
To achieve this goal, we have the following options available:
- Modify the existing system and add order summary statistics update on each new order placement. It sounds like an easy task but bear in mind it’s not always possible, especially on old/proprietary systems.
- Add views that will include statistics / build a data warehouse. It sounds like a very easy task, but then think about high-volume sites. Each query will consume a lot of resources and the warehouse ETL process may take a lot of time. Businesses don’t want to wait!
- Use the mentioned CDC. Combine Hazelcast with Debezium using built-in CDC sources and you will be able to stream all the newest events immediately as they appear in the database, perform view updates and save it as Hazelcast cache, which may be then queried using SQL. Everything without touching the source system.
Other use cases
Use cases for CDC, other than those mentioned above, include:- Cache invalidation
- Real-time change streaming to BI tools
- Keeping several systems in sync
- Data replication to various systems, places, etc.
Setup
To start hacking with CDC, first we have to get a database. The easiest possible way is to use Docker image with some preconfigured database. In this blogpost I will use `Debezium Postgres Example Database`. I’m assuming you have Docker installed. Run following command in the terminal:docker run -d --rm --name cdc-postgres -p 5432:5432 \ -e POSTGRES_DB=postgres -e POSTGRES_USER=postgres \ -e POSTGRES_PASSWORD=cdcpwd1337 debezium/example-postgres:1.9.3.FinalAnd voila, the database is up and ready! We can now connect to it using:
docker exec -it cdc-postgres bash
 psql -U postgres
We can see all tables using:
\dt inventory.*
               List of relations
 Schema   |       Name       | Type  |  Owner
 -----------+------------------+-------+----------
 inventory | customers        | table | postgres
 inventory | geom             | table | postgres
 inventory | orders           | table | postgres
 inventory | products         | table | postgres
 inventory | products_on_hand | table | postgres
 inventory | spatial_ref_sys  | table | postgres
In order to properly implement this feature, let’s review the steps we have to take:
- Read changes from “orders” and “customers” tables
- Aggregate data:
- If customer data was added or updated, fill stats info with it
- If order data was:
- Added – increase order count, item count, etc.
- Updated item count – update item count in stats accordingly
- Updated customer id – subtract old item count (it also may have changed) from old customer’s stats, add new item count to new customer’s stats
- Deleted – subtract items from customer’s stats.
| Type | Entity | State |
| INSERT Customer | { “id”: 1, “firstName”: “Tomasz”} | {”purchaserId”: 1,”firstName”: “Tomasz”} |
| INSERT Customer | { “id”: 2, “firstName”: “Luke” } | {”purchaserId”: 2,”firstName”: “Luke”},{”purchaserId”: 1,”firstName”: “Tomasz”} |
| INSERT Order | { “id”: 1, “purchaserId”: 2, “quantity”: 2 } | {”purchaserId”: 2,”firstName”: “Luke”,”ordersTotal”: 1,”itemsTotal”: 2},{”purchaserId”: 1, ”firstName”: Tomasz, ”ordersTotal”: 0, ”itemsTotal”: 0 } |
| UPDATE Order | { “id”: 1, “purchaserId”: 1, “quantity”: 3 } | {”purchaserId”: 1,”firstName”: “Tomasz”, ”ordersTotal”: 1,”itemsTotal”: 3},{”purchaserId”: 2,”firstName”: “Luke”, ”ordersTotal”: 0, ”itemsTotal”: 0 } |
Time for some Java
We have a database ready, now let’s start with pipeline code.How to set up the Hazelcast Debezium connector
First, we need to connect to the database using Debezium source. It’s as simple as:Pipeline pipeline = Pipeline.create();
pipeline.readFrom(
PostgresCdcSources.postgres("inventory-db")
.setDatabaseName("postgres")
.setSchemaWhitelist("inventory")
.setDatabaseAddress("localhost")
.setDatabaseUser("postgres")
.setDatabasePassword("cdcpwd1337")
.setTableWhitelist("inventory.customers", "inventory.orders")
.build())
.withoutTimestamps()
Here we created a new pipeline and told Hazelcast to read from Postgres CDC Source, which is configured to read from database postgres with provided address, user and password. We want to listen to changes in only two tables, so we are adding them to the whitelist. You may feel surprised, but this is all that’s needed to use CDC sources. All transformations below are generic and can operate on any stream of data with the same structure. All the WAL reading and result streaming to the next transformation is done for us by the Hazelcast streaming engine and the Debezium connector.Problems with updates in aggregation
Next step is a bit tricky. We want to parse theChangeRecord into our domain classes, but let’s stop for a moment and think about operations that may be done on the database. Keep in mind that we will be doing stateful mapping. Each event just modifies the state, not causing our system to re-read the whole database. Situation is pretty clear for INSERT, SYNC (sync is similar to insert, loads data from the database on launch before streaming all events that happened after we have already connected) and DELETE operations – we either add or subtract data from the order. But what about UPDATEs?Imagine we have order:
Order(id = 1001, purchaser = 2001, quantity = 1)Now someone updates the order – by mistake the wrong customer was provided. Now we have:
Order(id = 1001, purchaser = 2011, quantity = 1).If we just group by purchaser ID (which is natural grouping key for us, as we want stats per user) and then update the state using `ChangeRecord#value()`, we won’t be able to also update the state of the old purchaser! To avoid such errors, we must return 2 events for Order update – one that will represent insert for the new purchaser, one representing delete for the old purchaser. In case of a purchaser being the same in the old and updated Order, the calculation using such 2 events will still give the same result.
Enough theory, let’s code it:
.flatMap(record -> {
       if (isOrder(record) && record.operation() == Operation.UPDATE) {
           return traverseItems(
               orderEvent(record.newValue().toObject(Order.class), INSERT),
               orderEvent(record.oldValue().toObject(Order.class), DELETE)
           );
       } else {
           return eventFor(record, record.operation());
       }
 })
In the code above we are checking if an event relates to an order and if it is an update, then we are splitting the event into two events. Otherwise, we just pass this one event.Embrace Java 17!
You probably caught the fact that I am usingorderEvent and eventFor functions in the code. Why? Next step is aggregation. For aggregation we need an aggregation key. Instead of creating new types or methods in the old system’s classes, I’ve created a DTO class that will carry changed record parsed data, operation type and aggregation key. Thanks to Java 17 records, we can do it very easily:
public record ReportEvent<E> (int customerId, Operation operation, E event) {
       static ReportEvent<Order> orderEvent(Order order, Operation operation) {
           return new ReportEvent<>(order.getPurchaser(), operation, order);
       }
       static ReportEvent<Customer> customerEvent(Customer customer, Operation operation) {
           return new ReportEvent<>(customer.id, operation, customer);
       }
       static Traverser<ReportEvent<?>> eventFor(ChangeRecord record, Operation operation) {
           return singleton(
                   isOrder(record)
                           ? orderEvent(record.value().toObject(Order.class), operation)
                           : customerEvent(record.value().toObject(Customer.class), operation)
           );
       }
    }
Note, that the factory methods are not necessary – it’s just easier and cleaner to have them.Aggregation time
Next step is to aggregate the data. You may think – stateful operations are hard, it will be painful… But not with Hazelcast! Let’s take a look at code and say what is what:.groupingKey(ReportEvent::customerId)
.mapStateful(CustomerStatsReport::new, (state, key, record) -> {
if (record.event() instanceof Customer customer) {
state.setCustomerFirstName(customer.firstName);
state.setCustomerLastName(customer.lastName);
state.setCustomerId(customer.id);
} else {
var order = (Order) record.event();
var operation = record.operation();
if (operation == Operation.SYNC || operation == INSERT) {
state.setCustomerId(order.getPurchaser());
state.setItemsTotal(state.getItemsTotal() + order.getQuantity());
state.setOrdersTotal(state.getOrdersTotal() + 1);
state.setItemsAvg(state.getItemsTotal() * 1.0d / state.getOrdersTotal());
} else if (operation == DELETE) {
state.setItemsTotal(state.getItemsTotal() - order.getQuantity());
state.setOrdersTotal(state.getOrdersTotal() - 1);
state.setItemsAvg(state.getItemsTotal() * 1.0d / state.getOrdersTotal());
}
}
return state;
})
First, we are grouping by the customer id (our aggregation key). Next, we apply the stateful mapping function. As a state we create a new instance of CustomerStatsReport. Mapping itself is very easy:
- if it’s a customer event, just update first name/last name
- otherwise, for INSERT/SYNC add order numerical data, for DELETE subtract them.
map sink:
.map(state -> tuple2(state.getCustomerId(), state))
 .writeTo(Sinks.map("CustomerStatsReport"))
Once we have our pipeline ready (and under `pipeline` variable – crazy naming, huh?), we can start the job using:
var job = jet.newJob(pipeline);
 job.join();
Seeing the results
Now our report is ready to go. You may write an application that will read from caches and present the data. However, we all know that typically people use SQL to query their data. Don’t panic, Hazelcast is ready for this! Before starting our job, let’s add following statement:hz.getSql().execute( """ create mapping CustomerStatsReport ( customerId int, customerFirstName varchar, customerLastName varchar, ordersTotal int, itemsTotal int, itemsAvg double) type IMap options ( 'keyFormat' = 'int', 'valueFormat' = 'compact', 'valueCompactTypeName' = 'CustomerStatsReport' ); """ );This statement will create a SQL mapping for IMap called CustomerStatsReport. We provide which fields this mapping will contain (you don’t have to make all fields “public”) and format of key and values in the IMap. Also, at the very beginning of your main method, before starting the instance, add:
var config = new Config();
 config.getJetConfig().setEnabled(true);
 config.getSerializationConfig()
 .getCompactSerializationConfig()
 .addClass(CustomerStatsReport.class);
 HazelcastInstance hz = Hazelcast.newHazelcastInstance(config);
Here we enabled Hazekcast in our example and registered CustomerStatsReport class for compact serializer. Next, you can query your Hazelcast cluster. Simply download our JDBC driver and connect to
jdbc:hazelcast://localhost:5701. You are ready! Launch following SQL query:select * from CustomerStatsReport
What’s next?
You now have basic knowledge of CDC and how to use it in real world applications. It’s worth mentioning one more CDC-related problem. Once you start the job, the Debezium connector reads all the data in the table and then starts scanning the WAL.This initial reading step is called snapshotting. It may take a while if your table is very large. So what should we do in such cases? With Hazelcast, you may try to read the snapshot data of a huge table via JDBC source. Such a source can parallelize its work, so you will be able to get better overall performance.
Parallel snapshotting example
var orderJdbc = pipeline.readFrom(
 jdbc(
 () -> DriverManager.getConnection("jdbc:postgresql://localhost:5432/postgres", "postgres", "cdcpwd1337"),
 (connection, parallelism, index) -> {
 PreparedStatement stmt = connection.prepareStatement("select * from inventory.orders where id % ? = ?");
 stmt.setInt(1, parallelism);
 stmt.setInt(2, index);
 return stmt.executeQuery();
 },
 rs -> {
 Order order = new Order();
 order.setId(rs.getInt("id"));
 order.setOrderDate(rs.getDate("order_date"));
 order.setPurchaser(rs.getInt("purchaser"));
 order.setProductId(rs.getInt("product_id"));
 order.setQuantity(rs.getInt("quantity"));
 return orderEvent(order, Operation.SYNC);
 })).addTimestamps(o -> o.event.getOrderDate().getTime(), LAG);

var cdc = pipeline.readFrom(
 postgres("inventory-db")
 .setDatabaseName("postgres")
 .setSchemaWhitelist("inventory")
 .setDatabaseAddress("localhost")
 .setDatabaseUser("postgres")
 .setDatabasePassword("cdcpwd1337")
 .setTableWhitelist("inventory.orders", "inventory.customers")
 .setDatabasePort(5432)
 .setCustomProperty("snapshot.mode", "initial")
 .build())
 .withNativeTimestamps(LAG)
 .flatMap(record -> {
 boolean isOrder = isOrder(record);
 if (isOrder && record.operation() == SYNC) return Traversers.empty();
 if (isOrder && record.operation() == Operation.UPDATE) {
 return traverseItems(
 orderEvent(record.newValue().toObject(Order.class), INSERT),
 orderEvent(record.oldValue().toObject(Order.class), DELETE)
 );
 } else {
 return eventFor(record, record.operation());
 }
 });

cdc.merge(orderJdbc)
 .groupingKey(ReportEvent::customerId)
 .mapStateful(CustomerStatsReport::new, (state, key, record) -> {
 if (record.event() instanceof Customer customer) {
 state.setCustomerFirstName(customer.firstName);
 state.setCustomerLastName(customer.lastName);
 state.setCustomerId(customer.id);

 } else {
 var order = (Order) record.event();
 var operation = record.operation();
 if (operation == Operation.SYNC || operation == INSERT) {
 if (!state.processedOrderIds.add(order.getId())) return state;
 state.setCustomerId(order.getPurchaser());
 state.setItemsTotal(state.getItemsTotal() + order.getQuantity());
 state.setOrdersTotal(state.getOrdersTotal() + 1);
 state.setItemsAvg(state.getItemsTotal() * 1.0d / state.getOrdersTotal());
 } else if (operation == DELETE) {
 state.setItemsTotal(state.getItemsTotal() - order.getQuantity());
 state.setOrdersTotal(state.getOrdersTotal() - 1);
 state.setItemsAvg(state.getItemsTotal() * 1.0d / state.getOrdersTotal());
 }
 }
 return state;
 })
 .peek(s -> "State: \n" + s)
 .map(state -> tuple2(state.getCustomerId(), state))
 .writeTo(Sinks.map("CustomerStatsReport"));
var job = jet.newJob(pipeline);
job.join();
Note that for real-world applications, you should also deduplicate the data – jdbc and cdc sources shouldn’t read the same order IDs. The deduplication is very simple and relies on a state’s processedOrderIds set. For production this approach with HashSet will be probably too memory-consuming; This example aims to just show the overall idea.
Conclusions
In this blog post I’ve shown you how easy it is to start playing with Change Data Capture and that it may be a very useful technique in day-to-day work. We’ve learned how to create a simple Hazelcast pipeline, read from CDC source, apply stateful mapping and save the results to be accessible via standard SQL. All that in just a few minutes and one Java class (ok, two if you count record). Code from this blogpost is available on our GitHub repository.In case of any questions, let us know on the Hazelcast Community Slack. Happy hacking!
正文到此结束
热门推荐


相关文章

近期评论
-
你这基本没有更新呀,最近文章显示还是2019年的文章。不符合要求哈
-
关键词:慕云博客 链接:https://www.lilun.me 描述:分享原创文字的个人博客
-
-
-
可以提供一下源码吗
-
不是商业站,鸡娃学习笔记
-
-
-
-
听他们说很厉害的样子
Loading...
![[HBLOG]公众号](http://www.liuhaihua.cn/img/qrcode_gzh.jpg)

