iOS笔记053- Quartz2D-练习
1、水印处理
给图片添加文字、图片水印
// 水印处理
- ( void )shuiyin
{
// 水印处理
UIImage *image = [ UIImage imageNamed : @"4" ];
UIImage *image2 = [ UIImage imageNamed : @"010" ];
CGFloat imageH = image. size . height ;
CGFloat imageW = image. size . width ;
// 获取位图上下文
UIGraphicsBeginImageContextWithOptions (image. size , NO , 0.0 );
// 绘制图形或者文字
[image drawAtPoint : CGPointZero ];
NSString *str = @"@zhang@163.com" ;
CGFloat strlenth = str. length * 8 ;
// 文字水印
[str drawAtPoint : CGPointMake (imageW - strlenth, imageH - 44 ) withAttributes : nil ];
// 图片水印
[image2 drawAtPoint : CGPointMake (imageW - strlenth - 66 , imageH - 66 )];
// 关闭位图上下文
UIGraphicsEndPDFContext ();
// 获取位图
_imageView . image = UIGraphicsGetImageFromCurrentImageContext ();
// 保存图片,需要转换成二进制数据
NSData *data = UIImageJPEGRepresentation ( _imageView . image , 1 ); // 参数 2 表示图片质量
NSData *data1 = UIImagePNGRepresentation ( _imageView . image ); // png 默认最高质量
// 写入文件
[data1 writeToFile : @"/Users/song/Desktop/me.png" atomically : YES ];
}

2、图形裁切
首先设置一个裁切区域,然后在裁切区域显示图片。
// 图形裁切
- ( void )clipImage
{
// 获取图片
UIImage *image = [ UIImage imageNamed : @"4" ];
// 获取位图上下文
UIGraphicsBeginImageContextWithOptions (image. size , NO , 0.0 );
// 设置圆形裁剪区域,正切与图片
UIBezierPath *path = [ UIBezierPath bezierPathWithOvalInRect : CGRectMake ( 0 , 0 , image. size . width , image. size . height )];
// 添加裁切区域
[path addClip ];
// 绘制图片
[ima drawAtPoint : CGPointZero ];
// 从上下文获取图片
UIImage *image = UIGraphicsGetImageFromCurrentImageContext ();
// 关闭位图上下文
UIGraphicsEndImageContext ();
// 显示位图
_imageView . image = image;
}

带边框的圆形裁切
首先绘制一个红色的圆,然后在圆中心绘制图片,保留一定的边框。
// 带边框的原型裁切
- ( void )cicleAroundImage
{
// 1 、绘制一个大圆,设置背景色
// 获取图片
UIImage *ima = [ UIImage imageNamed : @"4" ];
// 图片宽高
CGFloat imageW = ima. size . width ;
// 边界宽度
CGFloat boarder = 3 ;
// 圆环宽高
CGFloat cicleW = imageW + 2 * boarder;
// 获取位图上下文
UIGraphicsBeginImageContextWithOptions ( CGSizeMake (cicleW, cicleW), NO , 0.0 );
// 绘制圆形
UIBezierPath *path = [ UIBezierPath bezierPathWithOvalInRect : CGRectMake ( 0 , 0 , cicleW, cicleW)];
// 填充红色
[[ UIColor redColor ] set ];
[path fill ];
// 2 、绘制图片,要比大圆小一点
UIBezierPath *clipArea = [ UIBezierPath bezierPathWithOvalInRect : CGRectMake (boarder , boarder, imageW, imageW)];
// 裁切
[clipArea addClip ];
// 绘制图片
[ima drawAtPoint : CGPointMake (boarder, boarder)];
// 从上下文获取图片
UIImage *image = UIGraphicsGetImageFromCurrentImageContext ();
// 关闭位图上下文
UIGraphicsEndImageContext ();
// 显示位图
_imageView . image = image;
}

带有边框的裁切可以使用一个分类
#import "UIImage+image.h"
@implementation UIImage (image)
+ ( instancetype ) imageWithImage:( UIImage *)image withBoard:( CGFloat )board withColor:( UIColor *)color
{
// 1 、绘制一个大圆,设置背景色
// 获取图片
UIImage *ima = image;
// 图片宽高
CGFloat imageW = ima. size . width ;
// 边界宽度
CGFloat boarder = board;
// 圆环宽高
CGFloat cicleW = imageW + 2 * boarder;
// 获取位图上下文
UIGraphicsBeginImageContextWithOptions ( CGSizeMake (cicleW, cicleW), NO , 0.0 );
// 绘制圆形
UIBezierPath *path = [ UIBezierPath bezierPathWithOvalInRect : CGRectMake ( 0 , 0 , cicleW, cicleW)];
// 填充红色
[color set ];
[path fill ];
// 2 、绘制图片,要比大圆小一点
UIBezierPath *clipArea = [ UIBezierPath bezierPathWithOvalInRect : CGRectMake (boarder , boarder, imageW, imageW)];
// 裁切
[clipArea addClip ];
// 绘制图片
[ima drawAtPoint : CGPointMake (boarder, boarder)];
// 从上下文获取图片
UIImage *clipImage = UIGraphicsGetImageFromCurrentImageContext ();
// 关闭位图上下文
UIGraphicsEndImageContext ();
// 显示位图
return clipImage;
}
@end
使用起来也方便,直接包含头文件即可使用
#import "ViewController.h"
#import "UIImage+image.h"
@interface ViewController ()
@property ( weak , nonatomic ) IBOutlet UIImageView *imageView;
@end
@implementation ViewController
- ( void )viewDidLoad {
[ super viewDidLoad ];
// 使用分类
UIImage *ima = [ UIImage imageWithImage :[ UIImage imageNamed : @"4" ] withBoard : 3 withColor :[ UIColor blueColor ]];
_imageView . image = ima;
}
3、屏幕截图
主要是从控制器上获取图层。一定要使用 renderInContext : 进行渲染,不可使用draw...
// 屏幕截图
- ( void )snipImage
{
// 获取位图上下文
UIGraphicsBeginImageContextWithOptions ( self . view . bounds . size , NO , 0 );
// 获取当前上下文
CGContextRef ctx = UIGraphicsGetCurrentContext ();
// 渲染控制器图层到图形上下文,把控件上的图层渲染到上下文 ,layer 只能渲染
[ self . view . layer renderInContext :ctx];
// 获取图形上下文
UIImage *snipImage = UIGraphicsGetImageFromCurrentImageContext ();
// 关闭位图上下文
UIGraphicsEndImageContext ();
NSData *data = UIImagePNGRepresentation (snipImage);
[data writeToFile : @"/Users/song/Desktop/snip.png" atomically : YES ];
}
4、手势解锁
效果

4.1、界面
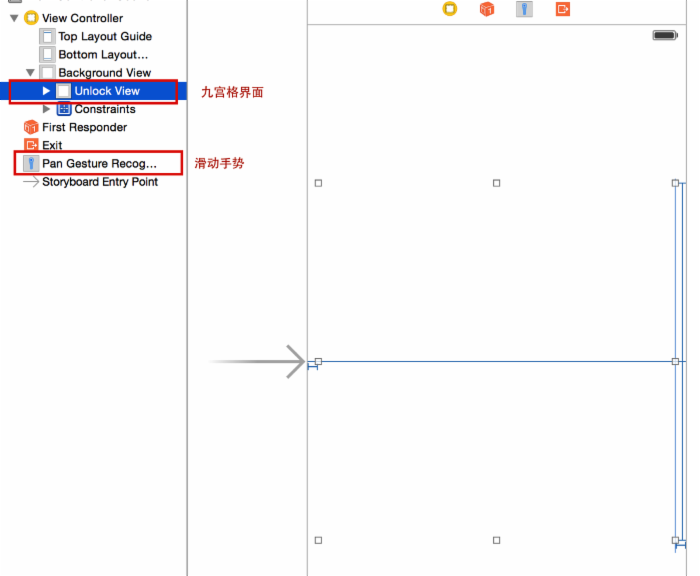
在storyboard里添加一个view用来显示九宫格
4.2、新建一个类继承自UIView
添加按钮
// 添加按钮
- ( void )awakeFromNib
{
[ super awakeFromNib ];
// 创建按钮
for ( NSInteger i = 0 ; i < 9 ; i ++)
{
UIButton *btn = [ UIButton buttonWithType : UIButtonTypeCustom ];
[btn setBackgroundImage :[ UIImage imageNamed : @"gesture_node_normal" ] forState : UIControlStateNormal ];
[btn setBackgroundImage :[ UIImage imageNamed : @"gesture_node_highlighted" ] forState : UIControlStateSelected ];
btn. userInteractionEnabled = NO ;
btn. tag = i;
[ self addSubview :btn];
}
}
设置按钮frame
// 九宫格按钮计算
- ( void )layoutSubviews
{
[ super layoutSubviews];
// 按钮个数
NSInteger count = self .subviews.count;
// 按钮宽度和高度
CGFloat x = 0 ;
CGFloat y = 0 ;
CGFloat w = 74 ;
CGFloat h = 74 ;
// 行
NSInteger cols = 3 ;
// 列
NSInteger rows = 3 ;
// 间距
CGFloat margin = ( self .bounds.size.width - cols * w)/(cols + 1 );
// 设置 frame
for (NSInteger i = 0 ; i < count; i ++)
{
UIButton *btn = (UIButton *) self .subviews[i];
// 当前行
NSInteger row = i / rows;
// 当前列
NSInteger col = i % cols;
// x
x = margin + col * (margin + w);
// y
y = row * (margin + h);
btn.frame = CGRectMake(x, y, w, h);
}
}
定义一个可变数组用来保存选中按钮
@property ( nonatomic , strong ) NSMutableArray *selectedBtn;
- ( NSMutableArray *)selectedBtn
{
if ( _selectedBtn == nil ) {
_selectedBtn = [ NSMutableArray array ];
}
return _selectedBtn ;
}
实现滑动手势方法
- ( IBAction )pan:( UIPanGestureRecognizer *)sender {
// NSLog(@"pan");
// 获取触摸点
_curP = [sender locationInView : self ];
// 遍历按钮数组
for ( UIButton *btn in self . subviews ) {
// 判断点是否包含在按钮中
if ( CGRectContainsPoint (btn. frame , _curP ) && !btn. selected ) {
btn. selected = YES ;
[ self . selectedBtn addObject :btn];
}
}
// 重绘
[ self setNeedsDisplay ];
// 恢复原状
if (sender. state == UIGestureRecognizerStateEnded ) {
// 保存密码
NSMutableString *str = [ NSMutableString string ];
for ( UIButton *btn in self . selectedBtn ) {
[ str appendFormat : @"%ld" ,btn. tag ];
}
NSLog ( @"%@" ,str);
// 删除选中状态
[ self . selectedBtn makeObjectsPerformSelector : @selector (setSelected:) withObject : @( NO ) ];
// 情况选中数组
[ self . selectedBtn removeAllObjects ];
}
}
然后在drawRect中进行连线
- ( void )drawRect:( CGRect )rect
{
// 没有选中按钮,直接退出
if ( self . selectedBtn . count == 0 ) {
return ;
}
// 把所有选中的按钮连线
NSInteger count = self . selectedBtn . count ;
UIBezierPath *path = [ UIBezierPath bezierPath ];
// 遍历选中按钮数组,对按钮连线
for ( int i = 0 ; i < count ; i ++) {
UIButton *btn = self . selectedBtn [i];
if (i == 0 ) {
// 设置起点
[path moveToPoint :btn. center ];
} else
{
[path addLineToPoint :btn. center ];
}
}
// 连接到当前点
[path addLineToPoint : _curP ];
// 设置连线样式
[[ UIColor greenColor ] set ];
path. lineWidth = 10 ;
path. lineJoinStyle = kCGLineJoinRound ;
[path stroke ];
}
5、画板
5.1、通过自动布局搭建界面
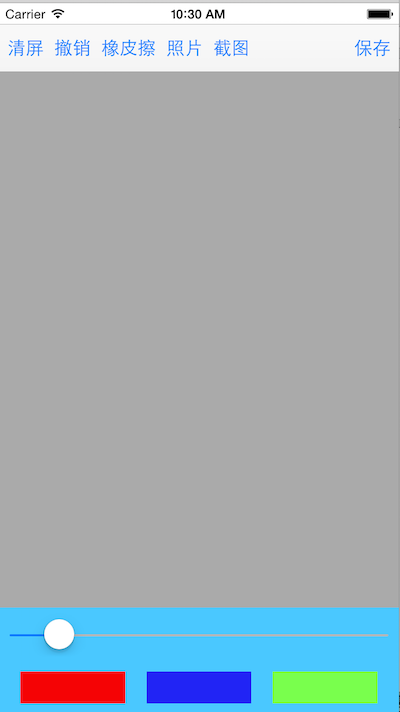
5.2、在自定义view中得实现

使用滑动手势进行画线
自定义一个继承自 UIBezierPath 的类,用来改变线条的颜色,只需添加一个属性即可
#import <UIKit/UIKit.h>
@interface drawPath : UIBezierPath
@property ( nonatomic , strong ) UIColor *lineColor;
@end
自定义一个view封装画板的操作 DrawView
#import <UIKit/UIKit.h>
@class drawPath ;
@interface DrawView : UIView
@property ( nonatomic , strong ) UIColor *lineColor; // 线条颜色
@property ( nonatomic , assign ) CGFloat lineWidth; // 线条宽度
@property ( nonatomic , strong ) UIImage *image; // 保存加载的图片
- ( void )eraseScreen; // 清屏
- ( void )undo; // 撤销
@end
类扩展中添加两个属性
#import "DrawView.h"
#import "drawPath.h"
@interface DrawView ()
@property ( nonatomic , strong ) drawPath *path; // 绘图路径
@property ( nonatomic , strong ) NSMutableArray *drawLines; // 路径数组
@end
// 数组 懒加载
- ( NSMutableArray *)drawLines
{
if ( _drawLines == nil ) {
_drawLines = [ NSMutableArray array ];
}
return _drawLines ;
}
初始化方法
- ( void )setUp
{
// 设置手势
UIPanGestureRecognizer *pan = [[ UIPanGestureRecognizer alloc ] initWithTarget : self action : @selector (pan:)];
[ self addGestureRecognizer :pan];
_lineColor = [ UIColor blackColor ];
_lineWidth = 1 ;
}
手势实现
- ( void )pan:( UIPanGestureRecognizer *)pan
{
// 获取当前点
CGPoint curPoint = [pan locationInView : self ];
if (pan. state == UIGestureRecognizerStateBegan )
{
// 设置起点
_path = [[ drawPath alloc ] init ];
_path . lineColor = _lineColor ;
_path . lineWidth = _lineWidth ;
[ _path moveToPoint :curPoint];
// 保存路径
[ self . drawLines addObject : _path ];
}
// 绘制
[ _path addLineToPoint :curPoint];
// 重绘
[ self setNeedsDisplay ];
}
重写的构造方法
// xib 调用
- ( void )awakeFromNib
{
[ self setUp ];
}
// 代码调用
- ( instancetype )initWithFrame:( CGRect )frame
{
if ( self = [ super initWithFrame :frame]) {
[ self setUp ];
}
returnself ;
}
在 drawRect 绘制图片
// 清空屏幕
- ( void )drawRect:( CGRect )rect
{
for ( drawPath *path in self . drawLines ) {
// 判断是不是图片
if ([path isKindOfClass :[ UIImage class ]]) {
// 绘制图片
UIImage *image = ( UIImage *)path;
[image drawInRect :rect];
}
// 不是图片就画线
else
{
[path. lineColor set ];
[path stroke ];
}
}
}
其他方法实现
// 清屏
- ( void )eraseScreen
{
[ self . drawLines removeAllObjects ];
[ self setNeedsDisplay ];
}
// 撤销
- ( void )undo
{
[ self . drawLines removeLastObject ];
[ self setNeedsDisplay ];
}
// setter 方法,传入照片时进行刷新
- ( void )setImage:( UIImage *)image
{
_image = image;
// 添加图片到绘图数组
[ self . drawLines addObject : _image ];
[ self setNeedsDisplay ];
}
5.3、在控制器中实现
添加两个属性,imageView位于DrawView下面
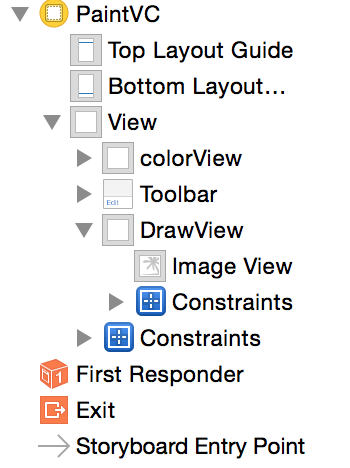
@property ( nonatomic , strong ) IBOutlet DrawView *drawView; // 绘图面板
@property ( weak , nonatomic ) IBOutlet UIImageView *imageView; // 加载的图片显示面板
工具栏:通过拖线的方式创建一个方法
// 清屏
- ( IBAction )eraseScreen:( UIBarButtonItem *)sender {
[ _drawView eraseScreen ];
}
// 撤销
- ( IBAction )undo:( id )sender {
[ _drawView undo ];
}
// 橡皮擦
- ( IBAction )eraser:( UIBarButtonItem *)sender {
if ([sender. title isEqualToString : @" 橡皮擦 " ]) {
sender. title = @" 绘图 " ;
_drawView . lineColor = [ UIColor whiteColor ];
_drawView . lineWidth = 5 ;
}
else if ([sender. title isEqualToString : @" 绘图 " ]) {
sender. title = @" 橡皮擦 " ;
_drawView . lineColor = [ UIColor blackColor ];
_drawView . lineWidth = 1 ;
}
}
// 保存图片到相册
- ( IBAction )save:( id )sender {
// 开启上下文
UIGraphicsBeginImageContextWithOptions ( self . drawView . bounds . size , NO , 0 );
// 获取上下文
CGContextRef ref = UIGraphicsGetCurrentContext ();
// 渲染控制器到上下文
[ self . drawView . layer renderInContext :ref];
UIImage *image = UIGraphicsGetImageFromCurrentImageContext ();
// 关闭上下文
UIGraphicsEndImageContext ();
// 保存画板的内容放入相册
// image: 写入的图片
// completionTarget 图片保存监听者
// 注意:以后写入相册方法中,想要监听图片有没有保存完成,保存完成的方法不能随意乱写 , 必须传入这个方法 didFinishSavingWithError
UIImageWriteToSavedPhotosAlbum (image, self , @selector (image:didFinishSavingWithError:contextInfo:), nil );
// 保存到桌面
// NSData *data = UIImagePNGRepresentation(image);
// [data writeToFile:@"/Users/song/Desktop/sss.png" atomically:YES];
}
// 监听保存完成,必须实现这个方法
- ( void )image: ( UIImage *) image didFinishSavingWithError: ( NSError *) error contextInfo: ( void *) contextInfo
{
NSLog ( @" 图片保存成功 " );
}
加载图片:图片控制器
// 从相册加载一张图片
- ( IBAction )photo:( id )sender {
// 初始化图片控制器
UIImagePickerController *pick = [[ UIImagePickerController alloc ] init ];
// 设置路径
// 设置选择控制器的来源
// UIImagePickerControllerSourceTypePhotoLibrary 相册集
// UIImagePickerControllerSourceTypeSavedPhotosAlbum: 照片库
pick. sourceType = UIImagePickerControllerSourceTypeSavedPhotosAlbum ;
// 设置代理
pick. delegate = self ;
// modal 方式弹出图片控制器
[ self presentViewController :pick animated : YES completion : nil ];
}
// 图片代理
- ( void )imagePickerController:( UIImagePickerController *)picker didFinishPickingMediaWithInfo:( NSDictionary *)info
{
// 获取选中的图片
UIImage *image = info[ @"UIImagePickerControllerOriginalImage" ];
NSLog ( @"%@" ,image);
self . imageView . alpha = 1 ; // 可见
self . imageView . userInteractionEnabled = YES ; // 设置交互
self . imageView . image = image;
[ self addGestures ]; // 添加手势
// 退出控制器
[ self dismissViewControllerAnimated : YES completion : nil ];
}
添加各种手势
- ( void )addGestures
{
// 滑动
UIPanGestureRecognizer *pan = [[ UIPanGestureRecognizer alloc ] initWithTarget : self action : @selector (pan:)];
pan. delegate = self ;
[ self . imageView addGestureRecognizer :pan];
// 旋转
UIRotationGestureRecognizer *rotate = [[ UIRotationGestureRecognizer alloc ] initWithTarget : self action : @selector (rotate:)];
rotate. delegate = self ;
[ self . imageView addGestureRecognizer :rotate];
// 捏合
UIPinchGestureRecognizer *pinch = [[ UIPinchGestureRecognizer alloc ] initWithTarget : self action : @selector (pinch:)];
pinch. delegate = self ;
[ self . imageView addGestureRecognizer :pinch];
// 长按
UILongPressGestureRecognizer *lPress = [[ UILongPressGestureRecognizer alloc ] initWithTarget : self action : @selector (lPress:)];
[ self . imageView addGestureRecognizer :lPress];
// 点按
UITapGestureRecognizer *tap = [[ UITapGestureRecognizer alloc ] initWithTarget : self action : @selector (tap:)];
[ self . imageView addGestureRecognizer :tap];
}
// 同一时刻运行响应多个手势
- ( BOOL )gestureRecognizer:( UIGestureRecognizer *)gestureRecognizer shouldRecognizeSimultaneouslyWithGestureRecognizer:( UIGestureRecognizer *)otherGestureRecognizer
{
return YES ;
}
- ( void )pan:( UIPanGestureRecognizer *)pan
{
CGPoint curP = [pan translationInView : self . imageView ];
self . imageView . transform = CGAffineTransformTranslate ( self . imageView . transform , curP. x , curP. y );
// 复位
[pan setTranslation : CGPointZero inView : self . imageView ];
}
- ( void )pinch:( UIPinchGestureRecognizer *)pinch
{
CGFloat scale = pinch. scale ;
self . imageView . transform = CGAffineTransformScale ( self . imageView . transform , scale, scale);
// 复位
pinch. scale = 1 ;
}
- ( void )tap:( UITapGestureRecognizer *)tap
{
}
- ( void )lPress:( UILongPressGestureRecognizer *)lPress
{
// 截取图片到绘图面板
if (lPress. state == UIGestureRecognizerStateBegan ) {
[ UIView animateWithDuration : 0.25 animations :^{
self . imageView . alpha = 0.5 ;
} completion :^( BOOL finished) {
[ UIView animateWithDuration : 0.25 animations :^{
self . imageView . alpha = 1 ;
} completion :^( BOOL finished) {
// 截屏,使用之前定义的分类,包含头文件即可使用
UIImage *image = [ UIImage imageWithSnipView : self . drawView ];
self . imageView . alpha = 0 ;
_drawView . image = image; // 显示图片到绘图面板
}];
}];
}
}
- ( void )rotate:( UIRotationGestureRecognizer *)rotate
{
CGFloat rotation = rotate. rotation ;
self . imageView . transform = CGAffineTransformRotate ( self . imageView . transform , rotation);
// 复位
rotate. rotation = 0 ;
}
线条颜色和宽度设置
- ( IBAction )colorChange:( UIButton *)sender {
_drawView . lineColor = sender. backgroundColor ;
}
- ( IBAction )valueChange:( UISlider *)sender {
_drawView . lineWidth = sender. value * 10 ;
}
效果


![[HBLOG]公众号](http://www.liuhaihua.cn/img/qrcode_gzh.jpg)

