iOS几个效果动画-------------------(实例详讲)qq粘性效果
这几天做了一些简单iOS的效果图,感觉苹果官方已经帮我们做了很多了,我们只是站在巨人的肩膀上编程,这些也没什么难的,最难的也就是用到了初中的三角函数,先让大家看看这几个动画吧。 
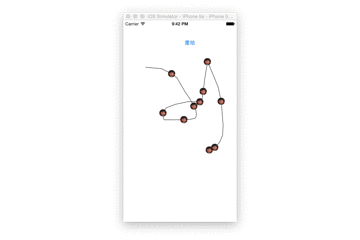
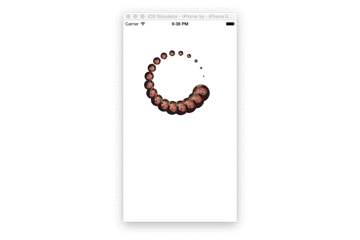
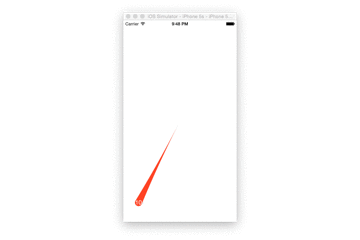 先列这几个把,由上而下分别是 数据缓冲效果 ,粒子动画,HUD指示效果,QQ未读消息的粘性效果,图一把一半遮住就是一种音乐播放器的播放效果,好了图一,图二, 图三都好简单就好似黄子华讲过,我只要一张嘴,两只手就可以把她搞得好嗨皮,而图一 图二,图三就是只要一个Animation,两个Layer就搞定了,而图四也不难,下面详细说一下图四
粒子图
思路
- 添加控件
- 添加手势画线
- 重写drawRect方法
- 添加Layer
- 添加动画
HUD指示器
- 添加layer
- 添加动画
- 添加复制图层
缓冲跳动
- 添加控件
- 添加layer
- 添加动画
- 添加复制层
QQ粘性效果
--思路
新建自定义UIButton
添加拖动手势
计算圆的变化
计算圆之间矩形并且填充
回弹
爆炸
--步骤
先完成空间布局以及手势添加
然后计算圆的变化,计算圆之间的矩形面积
效果微调
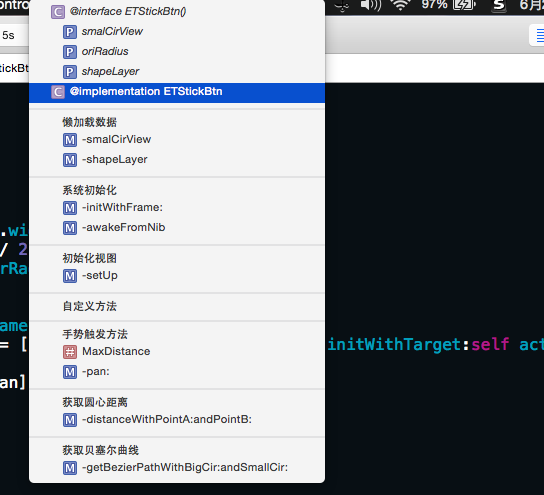
预览代码结构图
详细步骤
- 在一个storyBoard里面拖一个UIButton进去,然后新建一个自定义UIBUtton类 如:ETBUtton类与之对应,好了,一切新建工作完毕,下面,我们只需要在自定义的UIButton类里面做功夫就好了,简单的代码直接上好
#import "ETStickBtn.h" @interface ETStickBtn () @property (nonatomic, strong) UIView *smalCirView; @property (nonatomic, assign) NSInteger oriRadius; @property (nonatomic, strong) CAShapeLayer *shapeLayer; @end @implementation ETStickBtn #pragma mark - 懒加载数据 - (UIView *)smalCirView{ if (!_smalCirView) { // 新建一个圆 UIView *smalCirView = [[UIView alloc] init]; // smalCirView.frame = self.frame; smalCirView.backgroundColor = self.backgroundColor; [self.superview insertSubview:smalCirView belowSubview:self]; _smalCirView = smalCirView; } return _smalCirView; } - (CAShapeLayer *)shapeLayer{ if (!_shapeLayer) { CAShapeLayer *shapeLayer = [CAShapeLayer layer]; shapeLayer.fillColor = self.backgroundColor.CGColor; [self.superview.layer insertSublayer:shapeLayer below:self.layer]; _shapeLayer = shapeLayer; } return _shapeLayer; } #pragma mark - 系统初始化 - (id)initWithFrame:(CGRect)frame{ self = [super initWithFrame:frame]; if (self) { [self setUp]; } return self; } - (void)awakeFromNib{ [self setUp]; } #pragma mark - 初始化视图 - (void)setUp{ CGFloat w = self.bounds.size.width; self.layer.cornerRadius = w / 2; self.smalCirView.layer.cornerRadius = w/2; // 记录半径 _oriRadius = w/2; _smalCirView.frame = self.frame; UIPanGestureRecognizer *pan = [[UIPanGestureRecognizer alloc] initWithTarget:self action:@selector(pan:)]; [self addGestureRecognizer:pan]; } - 在添加完Pan手势后当然我们要在自定义的Pan方法里面做功夫,先看看已经实现了拖动效果的Pan代码块吧。
- (void)pan:(UIPanGestureRecognizer *)pan{ // 移动 CGPoint transPoint = [pan translationInView:self]; CGPoint center = self.center; center.x += transPoint.x; center.y += transPoint.y; self.center = center; [pan setTranslation:CGPointZero inView:self]; } - 就这样,可以拖动啦,接下来你想做什么呢?我就想你不断拖动大圆的过程中,小圆的半径一直减少直到为0, 具体思路是圆心距越大,小圆半径越小 ,这是奉上此时的Pan代码。
- (void)pan:(UIPanGestureRecognizer *)pan{ // 移动 CGPoint transPoint = [pan translationInView:self]; CGPoint center = self.center; center.x += transPoint.x; center.y += transPoint.y; self.center = center; [pan setTranslation:CGPointZero inView:self]; // 设置小圆变化的值 CGFloat cirDistance = [self distanceWithPointA:self.center andPointB:self.smalCirView.center]; CGFloat smallCirRadius = _oriRadius - cirDistance/10.0; if(smallCirRadius<0) smallCirRadius = 0; _smalCirView.bounds = CGRectMake(0, 0, smallCirRadius * 2, smallCirRadius * 2); self.smalCirView.layer.cornerRadius = smallCirRadius; } #pragma mark - 获取圆心距离 - (CGFloat)distanceWithPointA:(CGPoint)pointA andPointB:(CGPoint)pointB{ CGFloat offSetX = pointA.x - pointB.x; CGFloat offSetY = pointA.y - pointB.y; return sqrt(offSetX*offSetX + offSetY*offSetY); } - 好了,现在小圆终于可以随着两圆心距的变大而变小了,之后重头戏来了,获取贝塞尔曲线路径,也就是绘制两圆之间的曲线部分
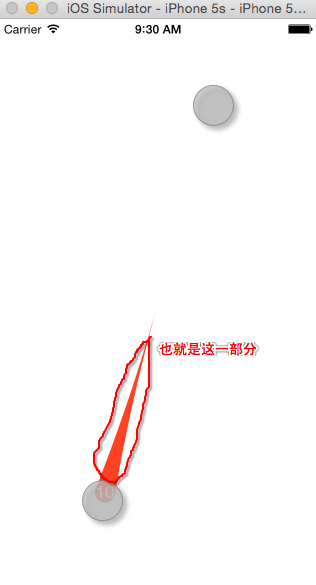
- 这个也不难,只是用到初中的知识,先上个原型图(手绘)
-

- 咳咳,由于用铅笔画的,有点模糊,那就奉上一个根据原型图用电脑绘制的图吧!
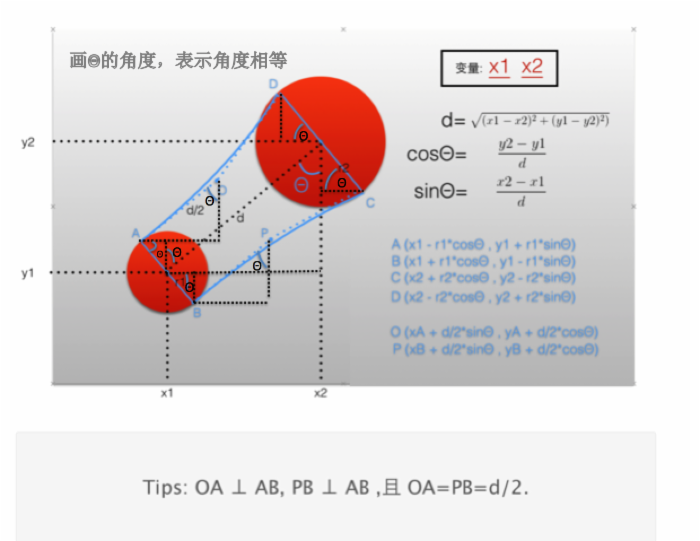
- 至此,重要的点都已经计算出来的,也不难吧,把算式换成代码如下
- (UIBezierPath *)getBezierPathWithSmallCir:(UIView *)smallCir andBigCir:(UIView *)bigCir{ // 获取最小的圆 if (bigCir.frame.size.width < smallCir.frame.size.width) { UIView *view = bigCir; bigCir = smallCir; smallCir = view; } // 获取小圆的信息 CGFloat d = [self distanceWithPointA:smallCir.center andPointB:bigCir.center]; CGFloat x1 = smallCir.center.x; CGFloat y1 = smallCir.center.y; CGFloat r1 = smallCir.bounds.size.width/2; // 获取大圆的信息 CGFloat x2 = bigCir.center.x; CGFloat y2 = bigCir.center.y; CGFloat r2 = bigCir.bounds.size.width/2; // 获取三角函数 CGFloat sinA = (y2 - y1)/d; CGFloat cosA = (x2 - x1)/d; // 获取矩形四个点 CGPoint pointA = CGPointMake(x1 - sinA*r1, y1 + cosA * r1); CGPoint pointB = CGPointMake(x1 + sinA*r1, y1 - cosA * r1); CGPoint pointC = CGPointMake(x2 + sinA*r2, y2 - cosA * r2); CGPoint pointD = CGPointMake(x2 - sinA*r2, y2 + cosA * r2); // 获取控制点,以便画出曲线 CGPoint pointO = CGPointMake(pointA.x + d / 2 * cosA , pointA.y + d / 2 * sinA); CGPoint pointP = CGPointMake(pointB.x + d / 2 * cosA , pointB.y + d / 2 * sinA); // 创建路径 UIBezierPath *path =[UIBezierPath bezierPath]; [path moveToPoint:pointA]; [path addLineToPoint:pointB]; [path addQuadCurveToPoint:pointC controlPoint:pointP]; [path addLineToPoint:pointD]; [path addQuadCurveToPoint:pointA controlPoint:pointO]; return path; }
// 获取最小的圆 if (bigCir.frame.size.width < smallCir.frame.size.width) { UIView *view = bigCir; bigCir = smallCir; smallCir = view; } - 以上这段代码,由于我作图是小圆的圆心为x1 y1,所以如果把大圆小圆的位置调过来会导致曲线面积的中间鼓起来,所以为了防止别人传错值,也不用他们那么纠结了,我代码里面自己找出最小的圆就好了,所以一定要加上这一句,然后奉上此时的pan代码。
- (void)pan:(UIPanGestureRecognizer *)pan{ // 移动 CGPoint transPoint = [pan translationInView:self]; CGPoint center = self.center; center.x += transPoint.x; center.y += transPoint.y; self.center = center; [pan setTranslation:CGPointZero inView:self]; // 设置小圆变化的值 CGFloat cirDistance = [self distanceWithPointA:self.center andPointB:self.smalCirView.center]; CGFloat smallCirRadius = _oriRadius - cirDistance/10.0; if(smallCirRadius<0) smallCirRadius = 0; _smalCirView.bounds = CGRectMake(0, 0, smallCirRadius * 2, smallCirRadius * 2); self.smalCirView.layer.cornerRadius = smallCirRadius; self.shapeLayer.path = [self getBezierPathWithSmallCir:self andBigCir:self.smalCirView].CGPath; } - 好了接下来就是收尾部分了,只是我想做在超过一定距离后,按钮就完全被拖走了 依依不舍的走了。
#pragma mark - 自定义方法 #pragma mark - 手势触发方法 #define MaxDistance 90 - (void)pan:(UIPanGestureRecognizer *)pan{ // 移动 CGPoint transPoint = [pan translationInView:self]; CGPoint center = self.center; center.x += transPoint.x; center.y += transPoint.y; self.center = center; [pan setTranslation:CGPointZero inView:self]; // 设置小圆变化的值 CGFloat cirDistance = [self distanceWithPointA:self.center andPointB:self.smalCirView.center]; CGFloat smallCirRadius = _oriRadius - cirDistance/10.0; if(smallCirRadius<0) smallCirRadius = 0; _smalCirView.bounds = CGRectMake(0, 0, smallCirRadius * 2, smallCirRadius * 2); self.smalCirView.layer.cornerRadius = smallCirRadius; // 画图 if (cirDistance > MaxDistance) { self.smalCirView.hidden = YES; [self.shapeLayer removeFromSuperlayer]; // self.smalCirView = nil; self.shapeLayer = nil; }else if(self.smalCirView.hidden == NO && cirDistance > 0){ self.shapeLayer.path = [self getBezierPathWithSmallCir:self andBigCir:self.smalCirView].CGPath; }
- 最后,我们判断在限定范围内放手就回弹,超过就爆炸消失
#pragma mark - 自定义方法 #pragma mark - 手势触发方法 #define MaxDistance 90 - (void)pan:(UIPanGestureRecognizer *)pan{ // 移动 CGPoint transPoint = [pan translationInView:self]; CGPoint center = self.center; center.x += transPoint.x; center.y += transPoint.y; self.center = center; [pan setTranslation:CGPointZero inView:self]; // 设置小圆变化的值 CGFloat cirDistance = [self distanceWithPointA:self.center andPointB:self.smalCirView.center]; CGFloat smallCirRadius = _oriRadius - cirDistance/10.0; if(smallCirRadius<0) smallCirRadius = 0; _smalCirView.bounds = CGRectMake(0, 0, smallCirRadius * 2, smallCirRadius * 2); self.smalCirView.layer.cornerRadius = smallCirRadius; // 画图 if (cirDistance > MaxDistance) { self.smalCirView.hidden = YES; [self.shapeLayer removeFromSuperlayer]; // self.smalCirView = nil; self.shapeLayer = nil; }else if(self.smalCirView.hidden == NO && cirDistance > 0){ self.shapeLayer.path = [self getBezierPathWithSmallCir:self andBigCir:self.smalCirView].CGPath; } // 爆炸或还原 if(pan.state == UIGestureRecognizerStateBegan){ NSLog(@"%@",NSStringFromCGRect(self.frame)); } if (pan.state == UIGestureRecognizerStateEnded) { if (cirDistance > MaxDistance){ // 这是动画的爆炸效果 UIImageView *imageView = [[UIImageView alloc] initWithFrame:self.bounds]; NSLog(@"%@",NSStringFromCGRect(self.frame)); NSMutableArray *imageArr = [NSMutableArray array]; for (int i = 1 ; i < 9; i++) { UIImage *image = [UIImage imageNamed:[NSString stringWithFormat:@"%d",i]]; [imageArr addObject:image]; } imageView.animationImages = imageArr; imageView.animationDuration = 0.5; imageView.animationRepeatCount = 1; [imageView startAnimating]; [self addSubview:imageView]; dispatch_after(dispatch_time(DISPATCH_TIME_NOW, (int64_t)(0.4 * NSEC_PER_SEC)), dispatch_get_main_queue(), ^{ // 移除控件 [self removeFromSuperview]; }); }else{ // 回弹 [self.shapeLayer removeFromSuperlayer]; self.shapeLayer = nil; [UIView animateWithDuration:0.5 delay:0 usingSpringWithDamping:0.2 initialSpringVelocity:0 options:UIViewAnimationOptionCurveLinear animations:^{ self.center = self.smalCirView.center; } completion:^(BOOL finished) { self.smalCirView.hidden = NO; }]; } } } - 这时基本上已经可以宣告完成的了,但是在爆炸效果释放的时候你会发现,爆炸效果不在我们当前的位置爆炸,而是在初始位置爆炸,这是因为苹果官方自动给StoryBoard添加了自动布局约束,这是只需要把约束渲染设为NO就好了,就是在ViewController里面加上一句代码
- (void)viewDidLoad { [super viewDidLoad]; self.view.translatesAutoresizingMaskIntoConstraints = NO; } -
最后奉上整个类的代码
#import "ETStickBtn.h" @interface ETStickBtn () @property (nonatomic, strong) UIView *smalCirView; @property (nonatomic, assign) NSInteger oriRadius; @property (nonatomic, strong) CAShapeLayer *shapeLayer; @end @implementation ETStickBtn #pragma mark - 懒加载数据 - (UIView *)smalCirView{ if (!_smalCirView) { // 新建一个圆 UIView *smalCirView = [[UIView alloc] init]; // smalCirView.frame = self.frame; smalCirView.backgroundColor = self.backgroundColor; [self.superview insertSubview:smalCirView belowSubview:self]; _smalCirView = smalCirView; } return _smalCirView; } - (CAShapeLayer *)shapeLayer{ if (!_shapeLayer) { CAShapeLayer *shapeLayer = [CAShapeLayer layer]; shapeLayer.fillColor = self.backgroundColor.CGColor; [self.superview.layer insertSublayer:shapeLayer below:self.layer]; _shapeLayer = shapeLayer; } return _shapeLayer; } #pragma mark - 系统初始化 - (id)initWithFrame:(CGRect)frame{ self = [super initWithFrame:frame]; if (self) { [self setUp]; } return self; } - (void)awakeFromNib{ [self setUp]; } #pragma mark - 初始化视图 - (void)setUp{ CGFloat w = self.bounds.size.width; self.layer.cornerRadius = w / 2; self.smalCirView.layer.cornerRadius = w/2; // 记录半径 _oriRadius = w/2; _smalCirView.frame = self.frame; UIPanGestureRecognizer *pan = [[UIPanGestureRecognizer alloc] initWithTarget:self action:@selector(pan:)]; [self addGestureRecognizer:pan]; } #pragma mark - 自定义方法 #pragma mark - 手势触发方法 #define MaxDistance 90 - (void)pan:(UIPanGestureRecognizer *)pan{ // 移动 CGPoint transPoint = [pan translationInView:self]; CGPoint center = self.center; center.x += transPoint.x; center.y += transPoint.y; self.center = center; [pan setTranslation:CGPointZero inView:self]; // 设置小圆变化的值 CGFloat cirDistance = [self distanceWithPointA:self.center andPointB:self.smalCirView.center]; CGFloat smallCirRadius = _oriRadius - cirDistance/10.0; if(smallCirRadius<0) smallCirRadius = 0; _smalCirView.bounds = CGRectMake(0, 0, smallCirRadius * 2, smallCirRadius * 2); self.smalCirView.layer.cornerRadius = smallCirRadius; // 画图 if (cirDistance > MaxDistance) { self.smalCirView.hidden = YES; [self.shapeLayer removeFromSuperlayer]; // self.smalCirView = nil; self.shapeLayer = nil; }else if(self.smalCirView.hidden == NO && cirDistance > 0){ self.shapeLayer.path = [self getBezierPathWithSmallCir:self andBigCir:self.smalCirView].CGPath; } // 爆炸或还原 if(pan.state == UIGestureRecognizerStateBegan){ NSLog(@"%@",NSStringFromCGRect(self.frame)); } if (pan.state == UIGestureRecognizerStateEnded) { if (cirDistance > MaxDistance){ // 这是动画的爆炸效果 UIImageView *imageView = [[UIImageView alloc] initWithFrame:self.bounds]; NSLog(@"%@",NSStringFromCGRect(self.frame)); NSMutableArray *imageArr = [NSMutableArray array]; for (int i = 1 ; i < 9; i++) { UIImage *image = [UIImage imageNamed:[NSString stringWithFormat:@"%d",i]]; [imageArr addObject:image]; } imageView.animationImages = imageArr; imageView.animationDuration = 0.5; imageView.animationRepeatCount = 1; [imageView startAnimating]; [self addSubview:imageView]; dispatch_after(dispatch_time(DISPATCH_TIME_NOW, (int64_t)(0.4 * NSEC_PER_SEC)), dispatch_get_main_queue(), ^{ // 移除控件 [self removeFromSuperview]; }); }else{ // 回弹 [self.shapeLayer removeFromSuperlayer]; self.shapeLayer = nil; [UIView animateWithDuration:0.5 delay:0 usingSpringWithDamping:0.2 initialSpringVelocity:0 options:UIViewAnimationOptionCurveLinear animations:^{ self.center = self.smalCirView.center; } completion:^(BOOL finished) { self.smalCirView.hidden = NO; }]; } } } #pragma mark - 获取圆心距离 - (CGFloat)distanceWithPointA:(CGPoint)pointA andPointB:(CGPoint)pointB{ CGFloat offSetX = pointA.x - pointB.x; CGFloat offSetY = pointA.y - pointB.y; return sqrt(offSetX*offSetX + offSetY*offSetY); } #pragma mark - 获取贝塞尔曲线 - (UIBezierPath *)getBezierPathWithSmallCir:(UIView *)smallCir andBigCir:(UIView *)bigCir{ // 获取最小的圆 if (bigCir.frame.size.width < smallCir.frame.size.width) { UIView *view = bigCir; bigCir = smallCir; smallCir = view; } // 获取小圆的信息 CGFloat d = [self distanceWithPointA:smallCir.center andPointB:bigCir.center]; CGFloat x1 = smallCir.center.x; CGFloat y1 = smallCir.center.y; CGFloat r1 = smallCir.bounds.size.width/2; // 获取大圆的信息 CGFloat x2 = bigCir.center.x; CGFloat y2 = bigCir.center.y; CGFloat r2 = bigCir.bounds.size.width/2; // 获取三角函数 CGFloat sinA = (y2 - y1)/d; CGFloat cosA = (x2 - x1)/d; // 获取矩形四个点 CGPoint pointA = CGPointMake(x1 - sinA*r1, y1 + cosA * r1); CGPoint pointB = CGPointMake(x1 + sinA*r1, y1 - cosA * r1); CGPoint pointC = CGPointMake(x2 + sinA*r2, y2 - cosA * r2); CGPoint pointD = CGPointMake(x2 - sinA*r2, y2 + cosA * r2); // 获取控制点,以便画出曲线 CGPoint pointO = CGPointMake(pointA.x + d / 2 * cosA , pointA.y + d / 2 * sinA); CGPoint pointP = CGPointMake(pointB.x + d / 2 * cosA , pointB.y + d / 2 * sinA); // 创建路径 UIBezierPath *path =[UIBezierPath bezierPath]; [path moveToPoint:pointA]; [path addLineToPoint:pointB]; [path addQuadCurveToPoint:pointC controlPoint:pointP]; [path addLineToPoint:pointD]; [path addQuadCurveToPoint:pointA controlPoint:pointO]; return path; } @end好了,一个简单的粘性效果完成了
正文到此结束
热门推荐


相关文章


Loading...
![[HBLOG]公众号](http://www.liuhaihua.cn/img/qrcode_gzh.jpg)

