IOS 数据存储之 Core Data详解
Core Date是ios3.0后引入的数据持久化解决方案,它是是苹果官方推荐使用的,不需要借助第三方框架。Core Date实际上是对SQLite的封装,提供了更高级的持久化方式。在对数据库操作时,不需要使用sql语句,也就意味着即使不懂sql语句,也可以操作数据库中的数据。
在各类应用开发中使用数据库操作时通常都会用到 (ORM) “对象关系映射”,Core Data就是这样的一种模式。ORM是将关系数据库中的表,转化为程序中的对象,但实际上是对数据中的数据进行操作。
在使用Core Data进⾏行数据库存取并不需要手动创建数据库,创建数据库的过程完全由Core Data框架自动完成,开发者需要做的就是把模型创建起来,具体数据库的创建不需要管。简单点说,Core Data实际上是将数据库的创建、表的创建、对象和表的转换等操作封装起来,极大的简化了我们的操作。
Core Date与SQLite相比较,SQLite比较原始,操作比较复杂,使用的是C的函数对数据库进行操作,但是SQLite可控性更强,并且能够跨平台。
下面,让我们一起来学习一下Core Data的简单使用。
一、使用Core Data,添加实体和模型
在创建项目的时候可以选择使用Core Data,项目创建成功后,会在AppDelegate类中自动添加相关代码,此外,还会自动生成一个数据模型文件JRCoreData.xcdatamodeld

AppDelegate.h
// AppDelegate.h // JRCoreData // // Created by jerei on 15-6-24. // Copyright (c) 2015年 jerehedu. All rights reserved. // #import <UIKit/UIKit.h> #import <CoreData/CoreData.h> @interface AppDelegate : UIResponder <UIApplicationDelegate> @property (strong, nonatomic) UIWindow *window; @property (readonly, strong, nonatomic) NSManagedObjectContext *managedObjectContext; @property (readonly, strong, nonatomic) NSManagedObjectModel *managedObjectModel; @property (readonly, strong, nonatomic) NSPersistentStoreCoordinator *persistentStoreCoordinator; - (void)saveContext; - (NSURL *)applicationDocumentsDirectory; @end
AppDelegate.m
// AppDelegate.m // JRCoreData // // Created by jerei on 15-6-24. // Copyright (c) 2015年 jerehedu. All rights reserved. // #import "AppDelegate.h" @interface AppDelegate () @end @implementation AppDelegate - (BOOL)application:(UIApplication *)application didFinishLaunchingWithOptions:(NSDictionary *)launchOptions { // Override point for customization after application launch. return YES; } - (void)applicationWillResignActive:(UIApplication *)application { // Sent when the application is about to move from active to inactive state. This can occur for certain types of temporary interruptions (such as an incoming phone call or SMS message) or when the user quits the application and it begins the transition to the background state. // Use this method to pause ongoing tasks, disable timers, and throttle down OpenGL ES frame rates. Games should use this method to pause the game. } - (void)applicationDidEnterBackground:(UIApplication *)application { // Use this method to release shared resources, save user data, invalidate timers, and store enough application state information to restore your application to its current state in case it is terminated later. // If your application supports background execution, this method is called instead of applicationWillTerminate: when the user quits. } - (void)applicationWillEnterForeground:(UIApplication *)application { // Called as part of the transition from the background to the inactive state; here you can undo many of the changes made on entering the background. } - (void)applicationDidBecomeActive:(UIApplication *)application { // Restart any tasks that were paused (or not yet started) while the application was inactive. If the application was previously in the background, optionally refresh the user interface. } - (void)applicationWillTerminate:(UIApplication *)application { // Called when the application is about to terminate. Save data if appropriate. See also applicationDidEnterBackground:. // Saves changes in the application's managed object context before the application terminates. [self saveContext]; } #pragma mark - Core Data stack @synthesize managedObjectContext = _managedObjectContext; @synthesize managedObjectModel = _managedObjectModel; @synthesize persistentStoreCoordinator = _persistentStoreCoordinator; - (NSURL *)applicationDocumentsDirectory { // The directory the application uses to store the Core Data store file. This code uses a directory named "com.jerehedu.JRCoreData" in the application's documents directory. return [[[NSFileManager defaultManager] URLsForDirectory:NSDocumentDirectory inDomains:NSUserDomainMask] lastObject]; } - (NSManagedObjectModel *)managedObjectModel { // The managed object model for the application. It is a fatal error for the application not to be able to find and load its model. if (_managedObjectModel != nil) { return _managedObjectModel; } NSURL *modelURL = [[NSBundle mainBundle] URLForResource:@"JRCoreData" withExtension:@"momd"]; _managedObjectModel = [[NSManagedObjectModel alloc] initWithContentsOfURL:modelURL]; return _managedObjectModel; } - (NSPersistentStoreCoordinator *)persistentStoreCoordinator { // The persistent store coordinator for the application. This implementation creates and return a coordinator, having added the store for the application to it. if (_persistentStoreCoordinator != nil) { return _persistentStoreCoordinator; } // Create the coordinator and store _persistentStoreCoordinator = [[NSPersistentStoreCoordinator alloc] initWithManagedObjectModel:[self managedObjectModel]]; NSURL *storeURL = [[self applicationDocumentsDirectory] URLByAppendingPathComponent:@"JRCoreData.sqlite"]; NSError *error = nil; NSString *failureReason = @"There was an error creating or loading the application's saved data."; if (![_persistentStoreCoordinator addPersistentStoreWithType:NSSQLiteStoreType configuration:nil URL:storeURL options:nil error:&error]) { // Report any error we got. NSMutableDictionary *dict = [NSMutableDictionary dictionary]; dict[NSLocalizedDescriptionKey] = @"Failed to initialize the application's saved data"; dict[NSLocalizedFailureReasonErrorKey] = failureReason; dict[NSUnderlyingErrorKey] = error; error = [NSError errorWithDomain:@"YOUR_ERROR_DOMAIN" code:9999 userInfo:dict]; // Replace this with code to handle the error appropriately. // abort() causes the application to generate a crash log and terminate. You should not use this function in a shipping application, although it may be useful during development. NSLog(@"Unresolved error %@, %@", error, [error userInfo]); abort(); } return _persistentStoreCoordinator; } - (NSManagedObjectContext *)managedObjectContext { // Returns the managed object context for the application (which is already bound to the persistent store coordinator for the application.) if (_managedObjectContext != nil) { return _managedObjectContext; } NSPersistentStoreCoordinator *coordinator = [self persistentStoreCoordinator]; if (!coordinator) { return nil; } _managedObjectContext = [[NSManagedObjectContext alloc] init]; [_managedObjectContext setPersistentStoreCoordinator:coordinator]; return _managedObjectContext; } #pragma mark - Core Data Saving support - (void)saveContext { NSManagedObjectContext *managedObjectContext = self.managedObjectContext; if (managedObjectContext != nil) { NSError *error = nil; if ([managedObjectContext hasChanges] && ![managedObjectContext save:&error]) { // Replace this implementation with code to handle the error appropriately. // abort() causes the application to generate a crash log and terminate. You should not use this function in a shipping application, although it may be useful during development. NSLog(@"Unresolved error %@, %@", error, [error userInfo]); abort(); } } } @end
如果项目在创建的时候没有选择使用Core Data,但是在后面需要使用,那么需要手动的添加AppDelegate中的相关代码。此外,还需要手动添加一个Data Model文件
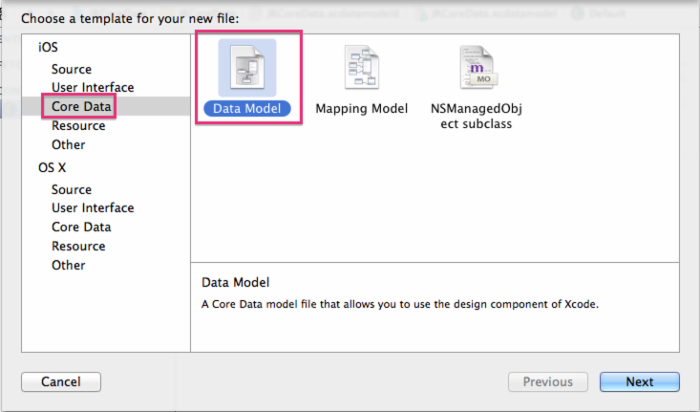
创建Data Model文件时需要注意,文件名称要与AppDelegate.m中managedObjectModel方法中提到的文件名称相匹配。
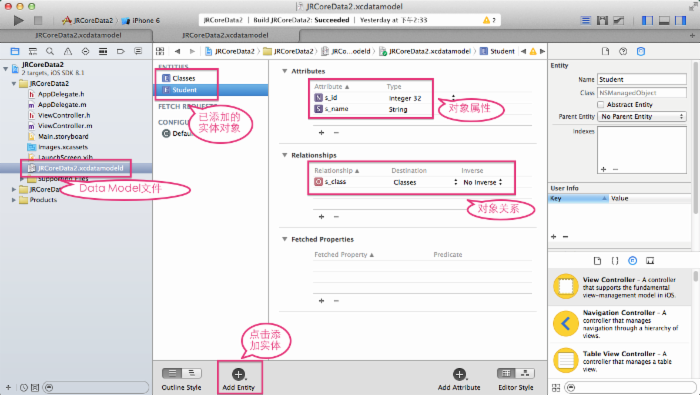
有了Data Model文件后,就可以在里面添加实体和关系,实际上就是向数据库中添加表格和建立表格之间的关联。添加实体如图所示:
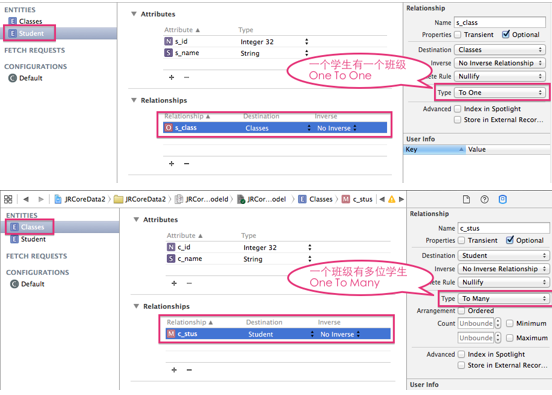
每个学生有一个所在的班级,每个班级中有多个学生,因此,学生和班级之间可以建立关系。建立关系如图所示:
建立关系之后,可以切换显示的样式,以图表的方式查看实体之间的关系,如图所示:
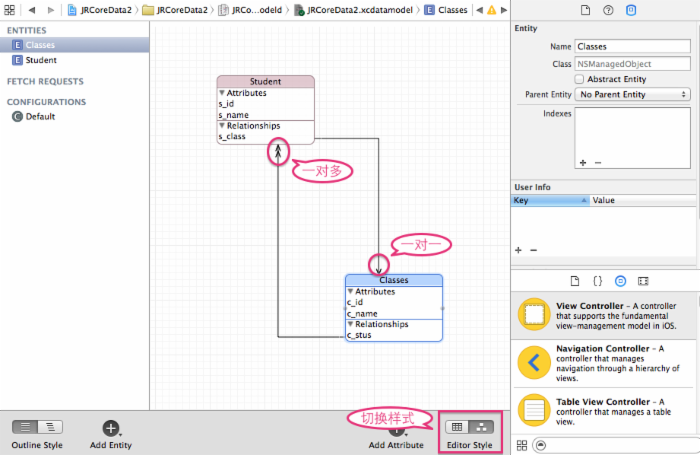
完成上述步骤,数据库中表格的创建就已经完成,和使用SQLite比较,省略了sql语句以及调用C函数操作数据库的步骤,另外,在创建实体的时候不需要设置主键,实体对象的属性的类型是OC的类型,实体中其他实体对象类型是通过建立关系添加的。
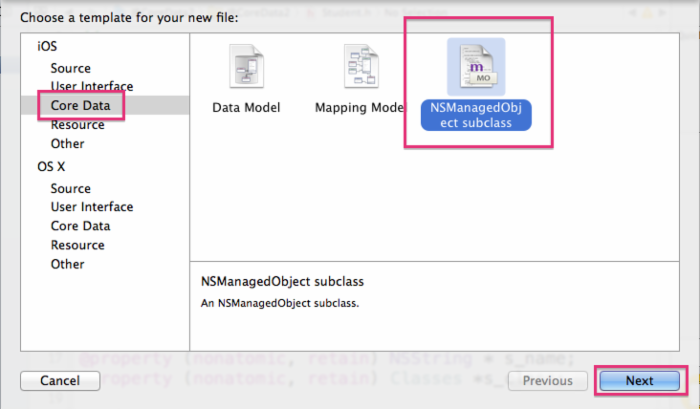
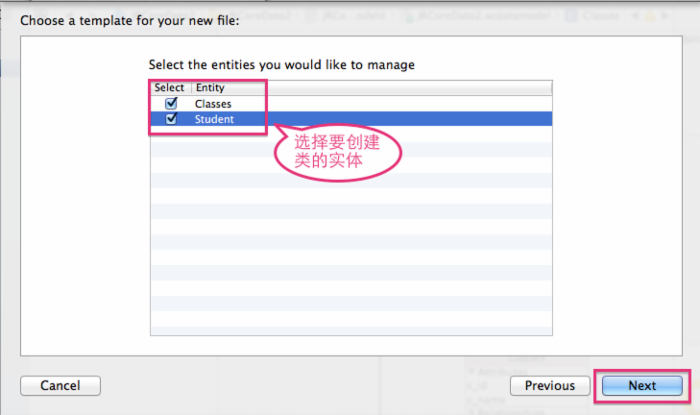
创建好实体后,可以通过添加NSManagedObject subclass文件,系统可以自动添加实体对应的数据模型类,如图所示:


二、通过代码实现数据库的操作
1、 向学生表中插入一条数据
在使用Core Data的时候,AppDelegate中添加了NSManagedObjectContext对象,需要获得这个管理对象的上下文来进行操作。在操作的过程中,需要得到NSManagedObject实体,然后通过kvc设置实体的属性值,最后通过上下文调用save方法保存数据。
- (void)insert { AppDelegate *delegate = [[UIApplication sharedApplication] delegate]; //1. 获得context NSManagedObjectContext *context = delegate.managedObjectContext; //2. 找到实体结构,并生成一个实体对象 /* NSEntityDescription实体描述,也就是表的结构 参数1:表名字 参数2:实例化的对象由谁来管理,就是context */ NSManagedObject *stu = [NSEntityDescription insertNewObjectForEntityForName:@"Student" inManagedObjectContext:context]; NSManagedObject *class1 = [NSEntityDescription insertNewObjectForEntityForName:@"Classes" inManagedObjectContext:context]; [class1 setValue:[NSNumber numberWithInt:1] forKey:@"c_id"]; [class1 setValue:@"一班" forKey:@"c_name"]; //3. 设置实体属性值 [stu setValue:[NSNumber numberWithInt:1] forKey:@"s_id"]; [stu setValue:@"jerehedu" forKey:@"s_name"]; [stu setValue:class1 forKey:@"s_class"]; //4. 调用context,保存实体,如果没有成功,返回错误信息 NSError *error; if ([context save:&error]) { NSLog(@"save ok"); } else { NSLog(@"%@",error); } }
2、查询学生表中全部数据
查询与插入数据操作类似,但是多了构造查询对象的步骤,查询得到结果集是一个数组,遍历数组,可以取出查询数据。
- (void)selectAll { AppDelegate *delegate = [[UIApplication sharedApplication] delegate]; NSManagedObjectContext *context = delegate.managedObjectContext; NSEntityDescription *stu = [NSEntityDescription entityForName:@"Student" inManagedObjectContext:context]; //构造查询对象 NSFetchRequest *request = [[NSFetchRequest alloc] init]; [request setEntity:stu]; //执行查询,返回结果集 NSArray *resultAry = [context executeFetchRequest:request error:nil]; //遍历结果集 for (NSManagedObject *enity in resultAry) { NSLog(@"id=%i name=%@ class=%@",[[enity valueForKey:@"s_id"] intValue],[enity valueForKey:@"s_name"],[[enity valueForKey:@"s_class"] valueForKey:@"c_name"]); } }
3、查询指定条件的学生信息,并更新
指定条件的查询除了需要构造查询对象,还需要把查询的条件用谓词表示。然后遍历查询结果数组中的数据,进行更行,并保存。
- (void)update { // 更新 (从数据库找到-->更新) AppDelegate *delegate = [[UIApplication sharedApplication] delegate]; NSManagedObjectContext *context = delegate.managedObjectContext; NSEntityDescription *stu = [NSEntityDescription entityForName:@"Student" inManagedObjectContext:context]; NSFetchRequest *request = [NSFetchRequest new]; [request setEntity:stu]; //构造查询条件,相当于where子句 NSPredicate *predicate = [NSPredicate predicateWithFormat:@"s_id=%i",1]; //把查询条件放进去 [request setPredicate:predicate]; //执行查询 NSArray *studentAry = [context executeFetchRequest:request error:nil]; if (studentAry.count>0) { //更新里面的值 NSManagedObject *obj = studentAry[0]; [obj setValue:@"apple" forKey:@"s_name"]; } [context save:nil]; //显示 [self selectAll]; }
4、删除指定条件的学生信息
删除之前首先需要根据条件进行查询,查询到数据后删除,并保存。
- (void)delete { //删除 先找到,然后删除 AppDelegate *delegate = [[UIApplication sharedApplication] delegate]; NSManagedObjectContext *context = delegate.managedObjectContext; NSEntityDescription *stu = [NSEntityDescription entityForName:@"Student" inManagedObjectContext:context]; NSFetchRequest *request = [NSFetchRequest new]; [request setEntity:stu]; //构造查询条件,相当于where子句 NSPredicate *predicate = [NSPredicate predicateWithFormat:@"s_id=%i",1]; //把查询条件放进去 [request setPredicate:predicate]; //执行查询 NSManagedObject *obj = [[context executeFetchRequest:request error:nil] lastObject]; //删除 if (obj) { [context deleteObject:obj]; [context save:nil]; } [self selectAll]; }
三、小结
Core Data是苹果官方推荐使用的数据持久化方式,在使用的过程中,不需要导入数据库框架,也不需要使用sql语句操作数据库,完全是按照面向对象的思想,使用实体模型来操作数据库。在使用的过程中需要注意的是,如果模型发生了变化,可以选择重新生成实体类文件,但是自动生成的数据库并不会自动更新,需要考虑重新生成数据库,并把之前数据库中数据进行移植。Core Data能够简化操作,但是它不支持跨平台使用,如果想实现跨平台,就需要使用SQLite来进行数据持久化。
疑问咨询或技术交流,请加入官方QQ群:  (452379712)
作者: 杰瑞教育
出处: http://www.cnblogs.com/jerehedu/
本文版权归 烟台杰瑞教育科技有限公司 和博客园共有,欢迎转载,但未经作者同意必须保留此段声明,且在文章页面明显位置给出原文连接,否则保留追究法律责任的权利。
正文到此结束
热门推荐


相关文章


Loading...
![[HBLOG]公众号](http://www.liuhaihua.cn/img/qrcode_gzh.jpg)

