Custom Collection View Layouts(四)
今天我们来实现一个类似于 UltraVisual 的 app,你也可以参照 Ray 的 这篇文章 ,效果如下:

现在让我们分解成三个大步骤来实现这个效果
一、Featured Cell
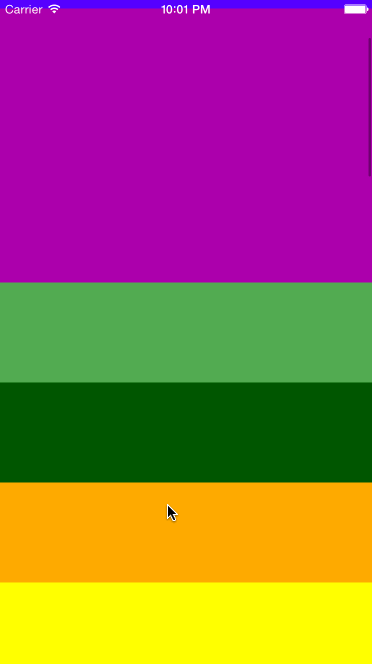
我们先来实现一个简单的随 UICollectionView 滚动,靠近顶部 Cell height 逐步增大的效果,该效果如下:
我们注意到这里有一个 featured cell (高度最大的那个 cell)和一系列的 standard cell (普通高度),当用户滚动, the next stanndard cell (紧邻着 featured cell)将会增加高度,然后重置自己的位置,最终成为 featured cell 。
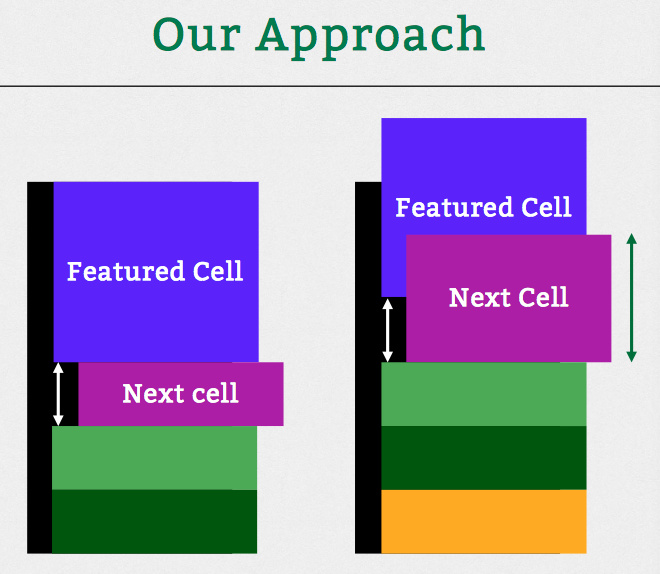
要达到这种效果,我们需要管理三种状态(state),然后将所有的 cell 放置到正确的位置上。 featured cell 和 standard cell 都有一个经过修正的高度(fixed height),当用户滚动时, the next stanndard cell 的高度将会动态增长为 featured cell ,这时要重新计算屏幕上所有 cell 的位置,确保他们都保持一个正确的间隙(一个挨一个)
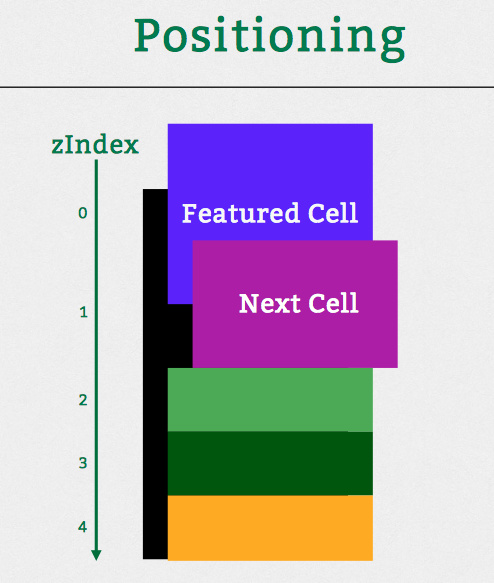
在执行过程中,每个 the next stanndard cell 的 zIndex 都会设置为比 featured cell 大 1,这样当 the next stanndard cell 在成为 featured cell 的过程中就会 产生覆盖在前者上的效果。
下面我们来看啊具体实现,同样的是采取了自定义 UICollectionViewLayout 的方式:
class UltravisualLayout: UICollectionViewLayout { // MARK: Properties and Variables /* The amount the user needs to scroll before the featured cell changes */ // 滚动超过 dragOffset 索引就变成下一个 let dragOffset: CGFloat = 180 var cache = [UICollectionViewLayoutAttributes]() /* Returns the item index of the currently featured cell */ var featuredItemIndex: Int { get { /* Use max to make sure the featureItemIndex is never < 0 */ return max(0, Int(collectionView!.contentOffset.y / dragOffset)) } } /* Returns a value between 0 and 1 that represents how close the next cell is to becoming the featured cell */ var nextItemPercentageOffset: CGFloat { get { return (collectionView!.contentOffset.y / dragOffset) - CGFloat(featuredItemIndex) } } ...... }
挑些重要的 property 说一说
-
dragOffset这个表示 UICollectionView 滚动超过一个距离,索引就变成下一个,那么这里这个 magic number 为什么要设为 180 呢,稍后会详细说 -
cache不用多说,缓存 attributes 的 -
featuredItemIndex当前 featured cell 的索引,用 max 函数确保不小于 0 -
nextItemPercentageOffset这是一个介于 0 和 1 直接的一个数(或者看成百分比),用来表示 the next stanndard cell 成长为 featured cell 的进度
现在我们将主要精力放在 func prepareLayout() 上,来具体看一下:
override func prepareLayout() { cache.removeAll(keepCapacity: false) let standardHeight = UltravisualLayoutConstants.Cell.standardHeight let featuredHeight = UltravisualLayoutConstants.Cell.featuredHeight var frame = CGRectZero var y: CGFloat = 0 for item in 0..<numberOfItems { // 1 得到当前 indexPath 的 attributes let indexPath = NSIndexPath(forItem: item, inSection: 0) let attributes = UICollectionViewLayoutAttributes(forCellWithIndexPath: indexPath) /* 2 设置 zIndex,确保 indexPaht 次序在后面的比在前面的 z 坐标大 默认所有 cell 高度都为 standardHeight */ attributes.zIndex = item var height = standardHeight // 3 判断当前 cell 的状态,是 featured cell 还是 standard cell if indexPath.item == featuredItemIndex { // 4 根据从视觉上 featured cell 滚动的距离,计算出 y 坐标 let yOffset = standardHeight * nextItemPercentageOffset y = collectionView!.contentOffset.y - yOffset height = featuredHeight } else if indexPath.item == (featuredItemIndex + 1) && indexPath.item != numberOfItems { // 5 算出 the next stanndard cell 的 y 坐标 let maxY = y + standardHeight height = standardHeight + max((featuredHeight - standardHeight) * nextItemPercentageOffset, 0) y = maxY - height } // 6 计算出最终 frame frame = CGRect(x: 0, y: y, width: width, height: height) attributes.frame = frame cache.append(attributes) // 7 得到下一个 cell 的 origin.y y = CGRectGetMaxY(frame) } }
这里着重从 注释4 说一说,Ray 那篇文章也没怎么说清楚
let yOffset = standardHeight * nextItemPercentageOffset 请注意:我对这行的解释是从视觉上 cell 滚动的距离,来看一下 yOffset 的范围: [0, standardHeight] 我们再观察一下本小节开始的那个动态图:从一个 the next stanndard cell 开始增长,到 featured cell 完全消失,从视觉上看,整个 scrollView 移动的距离是一个 standardHeight ,因此这里我们用 yOffset 来记录这种动态变化。但为什么我们这里要用一个 从视觉上 呢,继续往下看:
还记得我们之前的 dragOffset 么?被设为了 180,你们有想过这个数字的意义么?一开始我也被这个 magic number 的取值搞晕了,后来总算搞明白了,再来观察一下 featuredItemIndex 和 nextItemPercentageOffset 的定义:
var featuredItemIndex: Int { get { /* Use max to make sure the featureItemIndex is never < 0 */ return max(0, Int(collectionView!.contentOffset.y / dragOffset)) } } var nextItemPercentageOffset: CGFloat { get { return (collectionView!.contentOffset.y / dragOffset) - CGFloat(featuredItemIndex) } }
在上面的代码中,我们注意到使用了 collectionView!.contentOffset.y / dragOffset 这句代码,他是用来控制 scrollView(collectionView) 滚动距离对 cell 状态的切换,即在 scrollView 的坐标体系下, scrollView 滚动 dragOffset 才能让一个 the next stanndard cell 变成 featured cell ,这里我们给出的 dragOffset 是 180,意味着 collectionView 实际滚动 180 ,才能完成 cell 状态的切换。
现在又回到 从视觉上看 这个概念,我们从感官上, the next stanndard cell 变成 featured cell 整个 view 只移动了 standardHeight 的距离,但实际上我们知道,由于 dragOffset 的存在, collectionView 的移动距离可能远大于 standardHeight。
为了达到我们 从视觉上看移动了一个 standardHeight ,我们需要在 collectionView 的坐标系中重新修正 cell 的 frame.y,即通过下一行代码:
y = collectionView!.contentOffset.y - yOffset
通过这行代码,我们计算出修正后的 featured cell 的 y 坐标(和 collectionView 在统一的坐标系中)
那么这个 dragOffset 的数值有什么意义,设想一下,将该值设为 100 ,即一个 standardHeight 的距离,这样,collectionView 的实际滚动距离就和视觉上 cell 的滚动距离一致了。再进一步,我们将 dragOffset 的值设为 600,你运行一下就会发现,虽然只让 scrollView 滚动一个 standardHeight,明显阻尼大了很多。也就是说,你要拿出正常滚动 600 的手感力度,才能滚动出 100 的距离。即 collectionView.offset 都滚了 600 了,屏幕上的结果才滚了 100。有种天上一天,地上一年的感觉
剩下的代码见注释,很简单,就不一一详述了,本小节代码见 这里 ,请自行 convert to lastest swift syntax
二、Fading Content
接下来我们将这些色块替换成真实的照片,并使 featured cell 的 photo 比 standard cell 的更加明亮。
大致思路:为每个 cell 添加一个 UIImageView,用 autolayout 使 photo 保持高度恒定,垂直居中,这样 photo 在 featured cell 中会完全显示,而在 standard cell 中只显示中间一部分。随着 cell 的状态改变,photo 显示画幅也会改变。明亮度,可以在 photo 上添加 overlay 并根据 scrolling 设置不同的 alpha 来实现。

原理很简单,直接来看实现,先在 StoryBoard 中为 cell 添加一个 UIImageView,并设置高度和约束
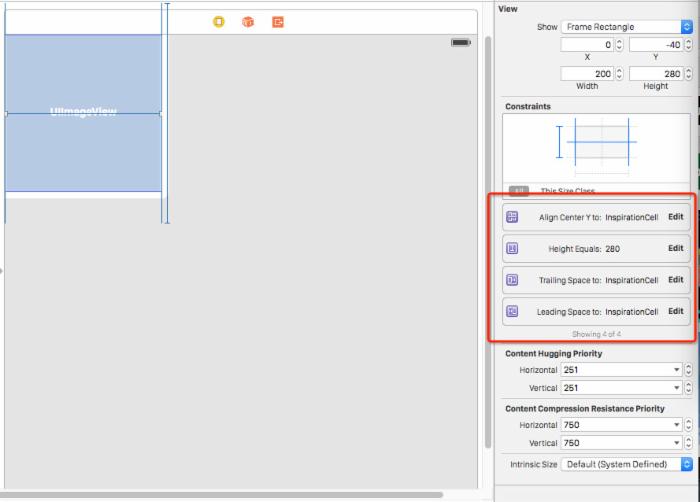
修改 imageView 的缩放 Mode 为: Aspect Fill ,并和 InspirationCell 的 iamgeView 进行连线
接着修改 InspirationsViewController (UICollectionViewController 对象)将 cell 替换成 InspirationCell ,数据源替换成真实的 Photos
此时运行一下,所有的色块 cell 都被真实的 photo 所填充,下来我们来添加蒙版 view(overlay)来调整不同 cell 的明暗度。
同样的,先在 StoryBoard 上,拖一个 view 到刚才添加的 iamgeView 上面,设置四个方向约束紧贴 cell,背景色为 blackColor(别忘了连线)
最后为 InspirationCell 添加 applyLayoutAttributes: 方法响应 layout 的改变:
override func applyLayoutAttributes(layoutAttributes: UICollectionViewLayoutAttributes!) { super.applyLayoutAttributes(layoutAttributes) let featuredHeight = UltravisualLayoutConstants.Cell.featuredHeight let standardHeight = UltravisualLayoutConstants.Cell.standardHeight let delta = 1 - (featuredHeight - CGRectGetHeight(frame)) / (featuredHeight - standardHeight) let minAlpha: CGFloat = 0.3 let maxAlpha: CGFloat = 0.75 imageCoverView.alpha = maxAlpha - (delta * (maxAlpha - minAlpha)) }
这里,随着 cell.frame.y 由 standard cell height 增长到 featured cell height,delta 也会按比例由 0 到 1;这样 imageCoverView 的透明度也会由 maxAlpha 变为 minAlpha,结果就是越明亮
为 Photo 上添加 title 和 一些 text 也很简单,以添加 title 为例,拖一个 UILabel 到 cell 上,设置好约束。我们需要 featured cell 的 title 比 standard cell 的 title 大一些,可以用 UILable 的 transform 配合 delta 来实现
// scale 不小于 0.5 let scale = max(delta, 0.5) titleLabel.transform = CGAffineTransformMakeScale(scale, scale)
本小节代码见 这里 ,请自行 convert to lastest swift syntax
三、Cell Snapping
这一小节,我们来实现 cell snapping 效果,有点类似于 UIPageViewController 切换时的场景,只有当 scrollView 的滚动距离超过 cell height 一半,就会自动滚动一个 cell height,没有超过则复位。
在这里我们使用一个新的方法来实现:
func targetContentOffsetForProposedContentOffset(_ proposedContentOffset: CGPoint, withScrollingVelocity velocity: CGPoint) -> CGPoint
你可以手动覆盖此方法返回一个 CGPoint,表示你想让内容滚动多少距离(content offset),原始默认的原始滚动距离通过参数 proposedContentOffset 提供
要实现 UIPageViewController 的效果,思路如下,在 targetContentOffsetForProposedContentOffset 方法中根据 proposedContentOffset 参数得到当前 item index(四舍五入),然后计算出新的 y,最后返回新的 CGPoint
来看下实现,在 UltravisualLayout 中添加新的方法:
override func targetContentOffsetForProposedContentOffset(proposedContentOffset: CGPoint, withScrollingVelocity velocity: CGPoint) -> CGPoint { // 四舍五入得到索引,计算新的 y let itemIndex = round(proposedContentOffset.y / dragOffset) let yOffset = itemIndex * dragOffset return CGPoint(x: 0, y: yOffset) }
到此为止运行,已经有类似于 UIPageViewController 的效果了,但还是有点不完美 ,当滚动非常慢的时候,即手势在屏幕上已经滚动了超过半个 cell height,松手!此时 cell 会继续悠闲地滑动到终点,这个速度真心有点慢啊。
还好我们有办法解决他,在这里我们使用 UIScrollView 的 decelerationRate 来修正速度不够快的问题,因为 collectionView 继承自 UIScrollView,所以我们可以很安全地在 viewDidLoad 里添加这么一行:
collectionView!.decelerationRate = UIScrollViewDecelerationRateFast
Bingo!运行一下试试看,完整的代码在 这里 请自行 convert to lastest swift syntax
正文到此结束
热门推荐


相关文章

近期评论
-
出现OpenClaw "device signature expired"。the Gateway rejects if Math.abs(Date.now() - signedAt) > 10 * 60 * 1000 (10 minutes)
-
-
想购买您这个站,我的联系方式QQ741756694微信同步 能卖联系
-
-
-
博主的博客用的什么技术栈,内容都是干货,赞
-
-
https://www.liuhaihua.cn/archives/40657.html 这篇博客中的图片打不开了
-
不会英语啊。
-
Loading...
![[HBLOG]公众号](https://www.liuhaihua.cn/img/qrcode_gzh.jpg)

