使用 Secure Gateway 和 API Management 服务将现场 REST API 发布到 Bluemix
Bluemix™ 上的应用程序越来越需要访问现场环境。但您能否像 Bluemix 上的其他服务一样调用现场 REST API 服务?答案是 “能”,只需使用 Secure Gateway 和 API Management 服务。
“ 在本文中,我将展示如何轻松地将 REST API 服务从现场发布到 Bluemix。 ”
借助 Secure Gateway 服务,您可以轻松地在 Bluemix 与一个现场环境之间建立一条安全隧道,以便可以向 Bluemix 公开本地 REST API。借助 API Management 服务,您可以适当地管理公开的 API,并将它发布为自定义服务,以便其他应用程序可以像使用其他任何服务一样使用它。
听起来很有趣?请继续阅读。在本文中,我将展示如何使用 Secure Gateway 和 API Management 服务,轻松地将一个 REST API 服务从现场发布到 Bluemix。
运行应用程序
获取代码
构建您的应用程序所需的准备工作
- 一个Bluemix 帐户
- 一个 DevOps Services 帐户
- 熟悉 Node.js 编程语言
- 熟悉 Docker(可选)
- 熟悉 Cloud Foundry 命令行工具(可选)
概述
本教程一步一步地演示了在现场设置一个示例 REST API 服务,向 Bluemix 公开它,管理它并将它发布为一个新的自定义服务,然后构建一个示例应用程序来执行验证的过程。
我用来设置和构建我的示例应用程序的系统是 Ubuntu Linux 14.04(64 位)。本教程中的一些命令是 Ubuntu 所独有的。
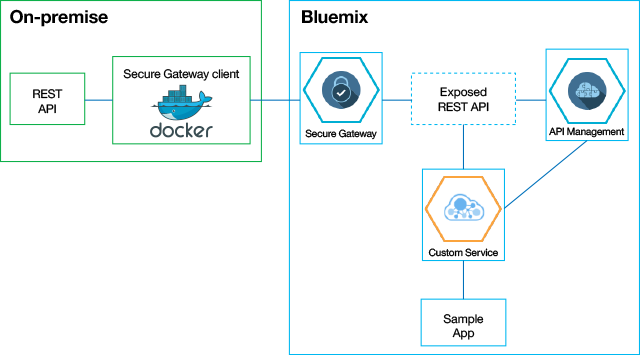
如下图所示,这些步骤如下:
- 设置示例 REST API 服务。
- 在本地安装一个 Secure Gateway 客户端,它基于一个 Docker 容器,用于设置现场与 Bluemix 之间的隧道。
- 使用 API Management 服务管理和发布自定义服务。
- 部署并运行示例应用程序。其他应用程序现在可以调用新的自定义服务,就像调用其他任何 Bluemix 服务一样。
假设有一个 REST API 服务在现场运行,我们将展示如何将它发布为 Bluemix 上一个新的自定义服务。首先,在本地安装一个 Secure Gateway 客户端,它基于一个 Docker 容器,用于设置 Bluemix 与现场之间的隧道。通过 Secure Gateway 服务向 Bluemix 公开该 REST API 后,我们将通过 API Management 服务管理它,并向 Bluemix 发布一个自定义服务。最后,我们可以构建应用程序来调用该自定义服务,就像其他 Bluemix 服务一样。要更好地理解它,可以参考下图。
点击查看大图
关闭 [x]
我们在 Node.js 中构建了一个用于查询库存数据的非常简单的 REST API 服务。本教程不会介绍它的实现细节,但您可以在 源代码 中的 apimanrest/app.js 中找到它。
我们需要准备一个 Docker 环境来安装 Secure Gateway 客户端。当然,应该可以从 Docker 环境访问该 REST API 服务,以便可以向 Bluemix 公开它。您可以将 REST API 服务和 Docker 环境安装在不同的主机上。在我的示例中,为了简便起见,我将它们都部署在同一个主机上,这是一个能够访问网络但没有公共 IP 地址的 Ubuntu Linux 14.04 (64bit) 虚拟机。
设置示例 REST API 服务
我们将分解该源代码,在本地运行示例 REST API 服务。
第 1 步. 设置示例 REST API 服务
- 在本地主机上打开一个控制台。
- 安装 Node.js、npm 和 git 包(如果尚未安装)。
sudo apt-get install nodejs npm git
- 使用 git 将 REST API 源代码分解到本地主机,使用 npm 安装相关的引用包,然后使用 node.js 启动它。
备注:不要关闭控制台,否则会关闭该服务。
git clone https://hub.jazz.net/git/chunbintang/apiman cd apiman/apimanrest npm install nodejs app.js
- 您会获得消息
server starting on 8080,这表明 REST 服务已在端口 8080 上成功启动。示例 REST API 的详细代码可在 源代码 中的
apimanrest/app.js中找到,基本上讲,它以 JSON 格式返回指定城市的库存数据。访问http://<local_ip>:8080/inventory会返回所有城市的库存数据,而访问http://<local_ip>:8080/inventory/<city>只会返回某个指定城市的库存数据。<local_ip>是本地主机的 IP 地址,在我的示例中为 192.168.190.132,如下所示。在<city>字段中,指定了Shanghai(区分大小写)作为示例。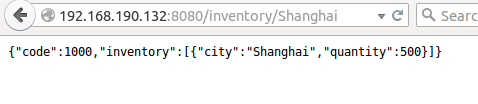
-
准备一个 Docker 环境来安装 Secure Gateway 客户端。应该可以从 Docker 环境访问该 REST API 服务,以便可以向 Bluemix 公开它。该 REST API 服务和 Docker 环境可位于不同的主机上,但为了简便起见,我将二者都部署在同一个主机上。
在同一个本地主机上打开另一个控制台。
- 按照 Docker 文档 来安装 Docker 环境。
sudo apt-get install wget sudo wget -qO- https://get.docker.com/ | sh
- 验证 Docker 是否已正确安装,以便可以安装 Secure Gateway 客户端。
sudo docker run hello-world
第 2 步. 使用 Secure Gateway 向 Bluemix 公开现场 REST API
在这一步中,使用 Secure Gateway 服务在 Bluemix 与现场之间设置了一个安全隧道,以便可以向 Bluemix 公开本地 REST API。不需要进行编码!
创建应用程序
- 使用您的 Bluemix 帐户登录Bluemix。
- 在您的仪表板中,单击 CREATE APP 。
- 选择 WEB 模板。
- 对于 Starting Point,选择 SDK for Node.js 。单击 CONTINUE 。
- 在 APP NAME 字段中,指定您的应用程序的名称。我的示例应用程序为
apiman。单击 FINISH 并等待载入您的应用程序。
添加 Secure Gateway 服务
- 选择您刚刚创建的应用程序。
- 单击 ADD A SERVICE OR API 。
- 向下滚动到 Integration 部分并选择 Secure Gateway 。
- 单击 CREATE 。如果提示重新呈现您的应用程序,请单击 RESTAGE 。
打开 Secure Gateway 控制台
- 选择您的应用程序,然后单击左边面板上的 Secure Gateway 。
- 单击 ADD GATEWAY ,然后键入您选择的一个名称。(示例应用程序使用了
inventorygateway。)单击 CONNECT IT 。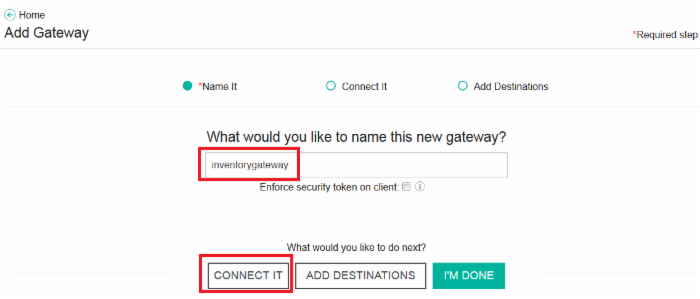
点击查看大图
关闭 [x]
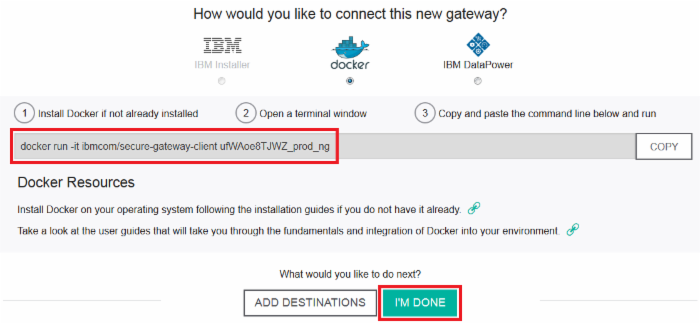
- 复制显示的 Docker 命令供以后使用。单击 I'M DONE 。
点击查看大图
关闭 [x]
启动 Secure Gateway 客户端
- 再次转到本地主机。
- 运行复制的 Docker 命令来启动 Secure Gateway 客户端。
docker run命令启动了一个隔离的容器来运行 Secure Gateway 客户端,以便您可以在现场与 Bluemix 之间建立一个隧道。通过检查确保您获得了消息The secure Gateway tunnel is connected。还可以将sudo放在docker run命令前面。有关docker run命令的更多信息,请参阅 Docker 文档 。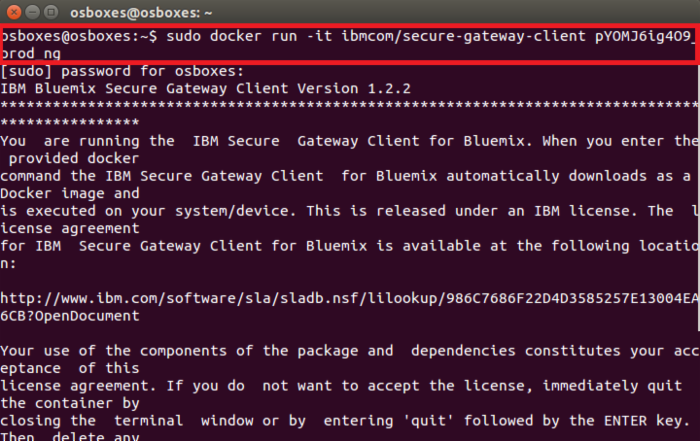
点击查看大图
关闭 [x]
备注:您可能获得以下错误消息:
[ERROR] The response is code:ENOTFOUND, message: getaddrinfo。如果遇到这种情况,请在控制台中键入quit,添加--net="host"参数来更新docker run命令,然后再次执行它(并希望它能够成功)。有关 Docker 中的网络设置的更多信息,请参阅 Docker 文档 。
点击查看大图
关闭 [x]
配置 Secure Gateway 控制台
- 返回到 Bluemix 上的 Secure Gateway 控制台,等待几秒,您会看到网关的状态显示为
Enabled。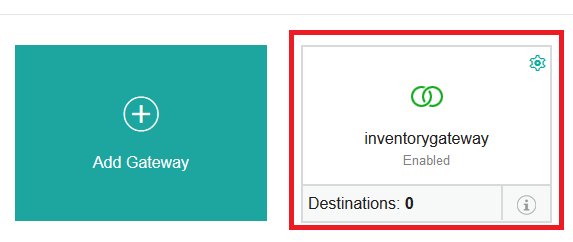
- 单击
inventorygateway(或您的网关的名称),然后单击 ADD DESTINATION 并填入目标名称(我使用的是InventoryRestAPI)。键入 IP 地址或完全限定域名 (FQDN),这是 REST API 主机的本地 IP 地址。在我的示例中,它是 192.168.190.132,端口为 (8080)。选择 HTTP 并单击 加号 (+) 图标。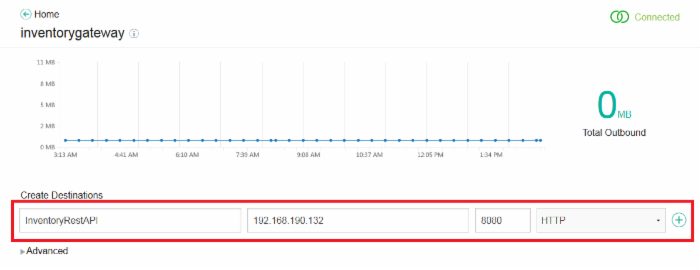
点击查看大图
关闭 [x]
- 单击新添加的目标的 info (i) 图标。在对话框中,复制 Cloud Host :Port 字段的信息供以后使用。
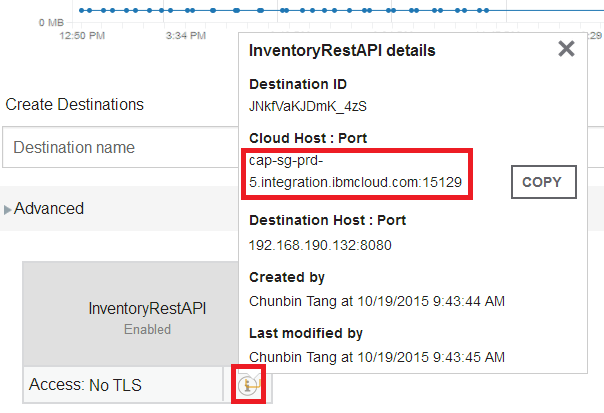
- 现在,已成功向 Bluemix 公开现场 REST API。您可以访问
http://<cloud_host>:<port>/inventory或http://<cloud_host>:<port>/inventory/<city>来导航该 REST API 服务,其中<cloud_host>和<port>是上一步中复制的值,<city>是要查询的城市,例如Shanghai。
有关 Secure Gateway 服务的更多信息,请参阅 Bluemix 文档 中包含的丰富内容。
第 3 步. 使用 API Management 服务管理和发布自定义服务
向 Bluemix 公开本地 REST API 后,现在,应该由 API Management 服务管理它,并在 Bluemix 上发布一个自定义服务。同样不需要进行编码。
添加 API Management 服务。
- 返回到 Bluemix 控制台。
- 打开 CATALOG 菜单,向下滚动到 Integration 部分,然后选择 API Management 。单击 CREATE 。
- 单击 GO TO API MANAGER 打开控制台。
配置 API
- 单击左边的 API 图标。展开 + API 并单击 Compose 。

点击查看大图
关闭 [x]
- 在 Title 字段中填入
InventoryAPI,在 Base Path 中输入/inventoryapi。单击 Add 。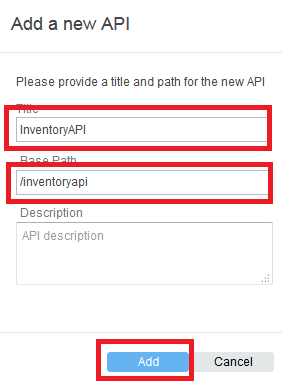
- 单击新添加的
InventoryAPI。单击 + Operation ,将 Path 指定为/inventory,删除 POST ,然后单击 Add 。
点击查看大图
关闭 [x]
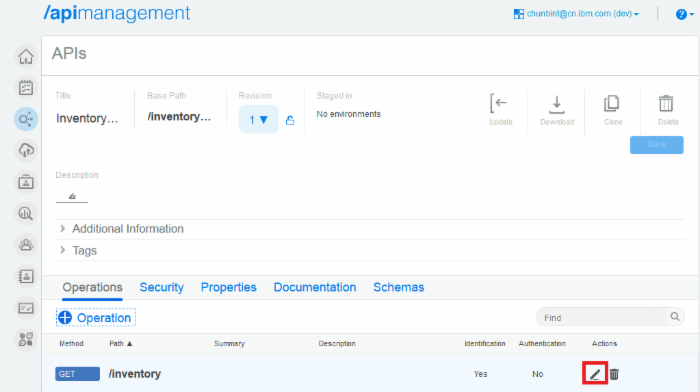
- 单击 铅笔 图标编辑添加的操作。
点击查看大图
关闭 [x]
- 单击 Implementation > Proxy ,将 PROXY URL 指定为您前面复制的已公开的 URL
http://<cloud_host>:<port>/inventory。例如, http://cap-sg-prd-5.integration.ibmcloud.com:15129/inventory 。单击 Save 。
点击查看大图
关闭 [x]
- 单击 Add Operation ,在 Path 中填入
/inventory/{city},删除 POST ,然后单击 Add 。单击 铅笔 图标编辑添加的操作。在 Implementation > Proxy 下,将 PROXY URL 指定为公开的 URLhttp://<cloud_host>:<port>/inventory/{city},例如 http://cap-sg-prd-5.integration.ibmcloud.com:15129/inventory/{city}. 。单击 Save 。
配置计划
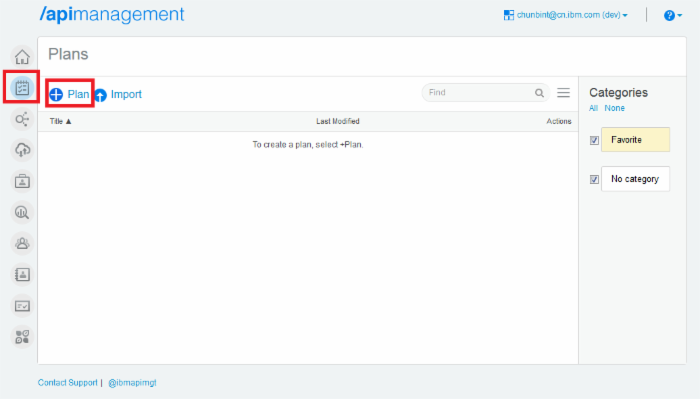
- 单击 Plans 图标 > + Plan 。
点击查看大图
关闭 [x]
- 将计划标题指定为
Basic Plan。单击 Add 。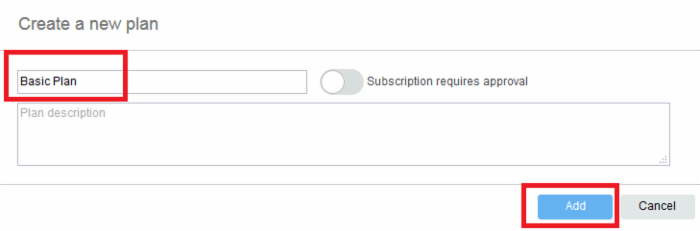
点击查看大图
关闭 [x]
- 单击新创建的 Basic Plan 。单击 + Operation 。
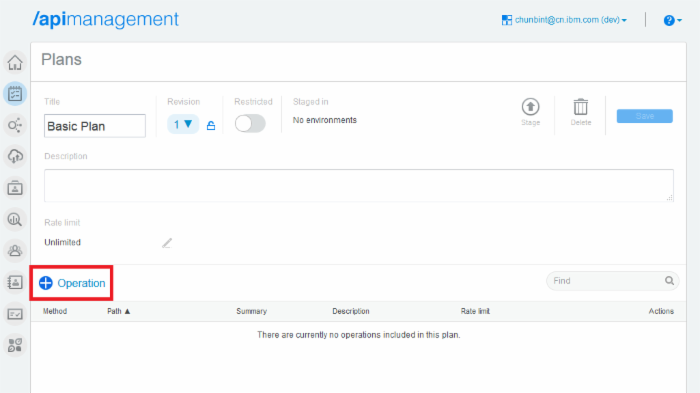
点击查看大图
关闭 [x]
- 从
InventoryAPI中选择 API 并单击 Add 。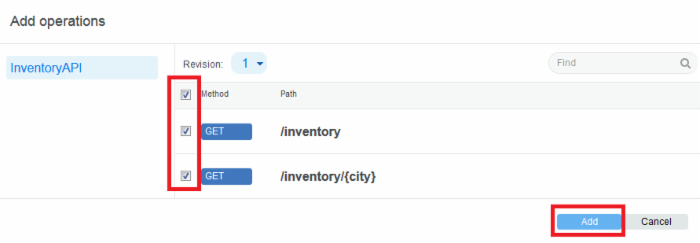
点击查看大图
关闭 [x]
- 单击 Save 。单击选项菜单中的 Stage > Sandbox 。需要花费几秒的时间来载入该计划。
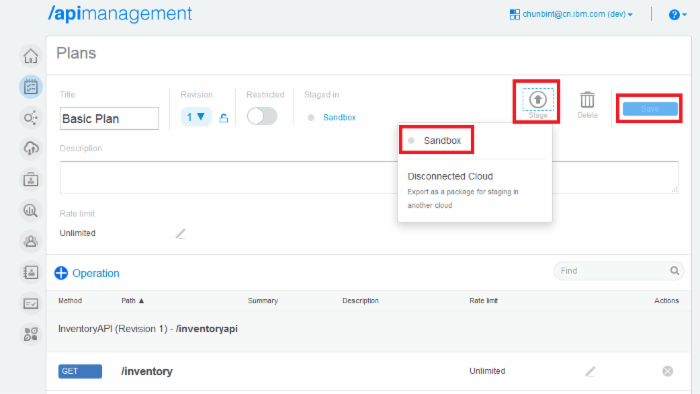
点击查看大图
关闭 [x]
配置管理
- 单击 Management 图标。然后单击 Basic Plan 上的 gear 图标。选择 Publish 。需要几秒时间来完成发布。
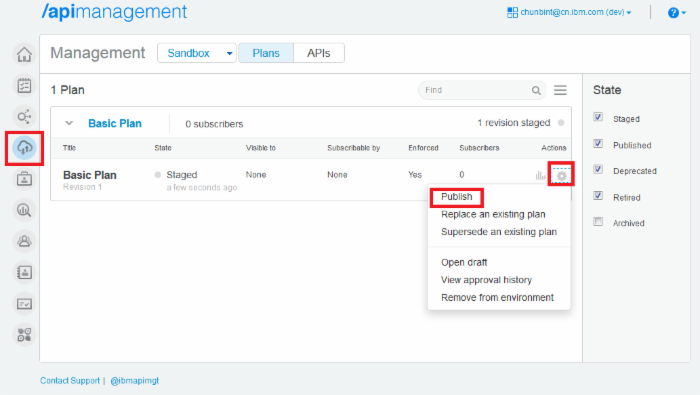
点击查看大图
关闭 [x]
- 您会收到一条消息表明它已发布。
在 Bluemix 目录中检查这个自定义服务
- 返回到 Bluemix 控制台并单击 CATALOG 。您将在 Custom APIs 下看到一个名为
InventoryAPI的服务。它显示InventoryAPI已成功发布到 Bluemix。(您可能需要在浏览器中刷新该页面。)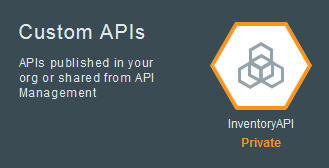
InventoryAPI 服务已发布到您自己的组织。有关 API Management 服务的更多信息,请参阅 Bluemix 文档 。
第 4 步. 部署并运行示例应用程序
在发布自定义服务后,构建一个示例应用程序来调用该自定义服务并打印结果。
源代码 中的文件 apimandemo/app.js 是示例应用程序的主要类。它从 VCAP 环境读取自定义 API ( InventoryAPI ) 凭证,执行查询,然后打印收到的结果。
//------------------------------------------------------------------------------ // node.js demo application for APIMan //------------------------------------------------------------------------------ var util = require('util'), url = require('url'), request = require('request'), express = require('express'), _ = require('underscore'); // cfenv provides access to your Cloud Foundry environment // for more info, see: https://www.npmjs.com/package/cfenv var cfenv = require('cfenv'); // create a new express server var app = express(); // get the app environment from Cloud Foundry var appEnv = cfenv.getAppEnv(); // Set up objects to talk to API Management var inventoryAPICreds = appEnv.getServiceCreds(/InventoryAPI/i) var apimUrl = url.parse(inventoryAPICreds.url); apimUrl.query = { 'client_id': inventoryAPICreds.client_id, 'client_secret': inventoryAPICreds.client_secret }; app.get('/', function(req, res) { // Make a request to get the inventory data var requestUrl = _.clone(apimUrl); requestUrl.pathname += '/inventory'; console.log('Making request to: ' + url.format(requestUrl)); request.get({ url: url.format(requestUrl), json: true }, function(err, resp, body) { console.log(body); res.send({ result: body, url: url.format(requestUrl) }); }); }); app.get('/:city', function(req, res) { // Make a request to get the inventory data for one city var requestUrl = _.clone(apimUrl); requestUrl.pathname += '/inventory/'; requestUrl.pathname += req.params.city; console.log('Making request to: ' + url.format(requestUrl)); request.get({ url: url.format(requestUrl), json: true }, function(err, resp, body) { console.log(body); res.send({ result: body, url: url.format(requestUrl) }); }); }); // start server on the specified port and binding host app.listen(appEnv.port, appEnv.bind, function() { // print a message when the server starts listening console.log("server starting on " + appEnv.url); }); 在仪表板中创建示例应用程序
- 打开 CATALOG 菜单。
- 在 Runtimes 部分,单击 SDK for Node.js 。
- 在 APP NAME 字段中,指定您的测试应用程序的名称。我的是
apimandemo。 - 单击 CREATE 并等待载入您的应用程序。
添加自定义服务
- 在您的仪表板中,单击您创建的应用程序。
- 单击 ADD A SERVICE OR API 。
- 选择 Custom API 部分的 InventoryAPI 。
- 单击 CREATE 。如果提示重新载入该应用程序,请单击 RESTAGE 。
- 单击左边面板上的 Environment Variables 。您会在这里找到 InventoryAPI 服务的凭证。在示例应用程序中使用它们执行验证。
将示例应用程序部署到 Bluemix
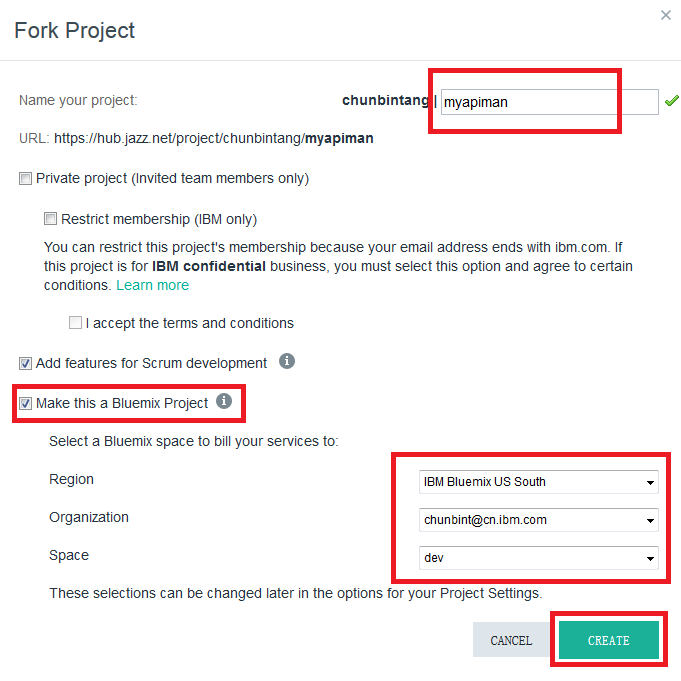
- 在 源代码 中:
- 单击 FORK PROJECT
- 在获得提示时,使用您的 IBM ID 登录到 DevOps Services。
- 在请求时输入您的项目名称。
- 确保已选择复选框 Make this a Bluemix Project ,检查字段 Bluemix Region、Organization 和 Space 是否正确。单击 CREATE 分解该存储库。
点击查看大图
关闭 [x]
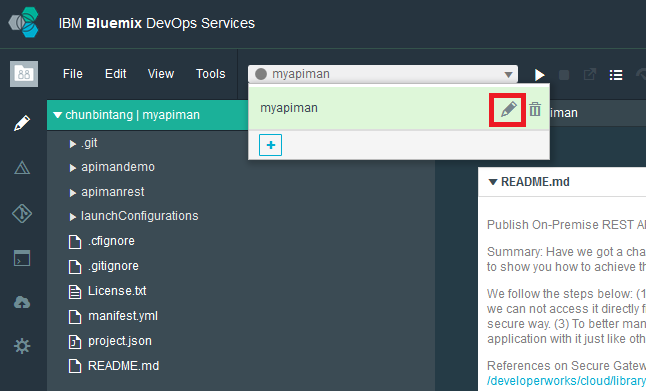
- 单击新创建的项目的菜单中的 Edit ,然后单击 铅笔 图标编辑启动配置。
点击查看大图
关闭 [x]
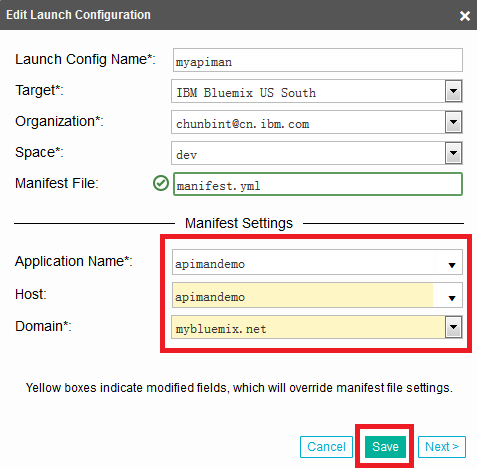
- 使用您的 Bluemix 应用程序名称更新 Application Name 和 Host 字段。通过检查确保其他所有字段都是正确的,然后单击 Save 。
- 单击 向右 箭头图标来部署该应用程序。等待一分钟左右,然后检查部署状态。
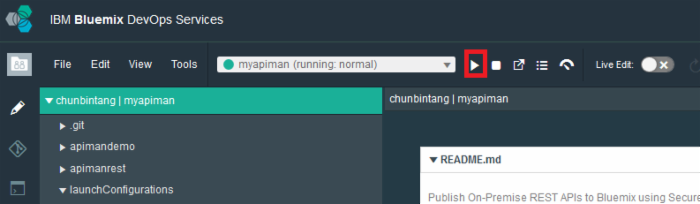
点击查看大图
关闭 [x]
使用 cf 命令行接口(可选)
如果更喜欢使用 cf 命令行接口来将此项目部署到本地,可执行以下步骤。
- 在本地分解 源代码 。
- 更新
manifest.yml文件。将<your_app_name>更改为您创建的 Bluemix 应用程序名称。默认内存容量为 128MB,但您可以更改它来满足您的需要。--- applications: - name: <your_app_name> memory: 128M instances: 1 host: <your_app_name> path: ./apimandemo
- 运行 cf 命令来部署您的应用程序。
cf push
运行演示应用程序
- 在
http://<your_sample_app>.mybluemix.net上访问该 Web 应用程序,在我的示例中是 http://apimandemo.mybluemix.net/ 。您将看到所有城市的库存数据。 - 还可以在
http://<your_sample_app>.mybluemix.net/<city>上访问单个城市的库存数据,在我的示例中是 http://apimandemo.mybluemix.net/Shanghai 。
点击查看大图
关闭 [x]
结束语
在本教程中,您学习了在现场提供一个示例 REST API 服务后,如何使用 Secure Gateway 服务向 Bluemix 公开该服务,通过 API Management 服务管理公开的 API 并将它发布为新的自定义服务,最后构建一个示例应用程序来执行验证。现在您已经知道将现场环境与 Bluemix 结合使用有多容易。享受您的阅读吧!
BLUEMIX SERVICE USED IN THIS TUTORIAL: 安全网关 给您的 Bluemix 环境带来了混合集成功能。
相关主题: Docker Ubuntu
正文到此结束
热门推荐


相关文章


Loading...
![[HBLOG]公众号](https://www.liuhaihua.cn/img/qrcode_gzh.jpg)

