iOS 9 by Tutorials 笔记(十)
Chapter 10: Custom Segues
iOS 9 通过自定义 segues 的方式 使 transition animation 和 view controller 在代码部分彻底分离。
还有比较重要的一点变化是 segues 可以在转场过程(modal or popover presentations of scenes)中被保留了(retained),通过 segues 导航到一个新的场景 VC,此时该 segues 已经初始化,之后一直被保留在内存中,直到该场景 VC 被 dismiss 掉,segues 才会被释放。
这意味着你可以将所有转场动画(transition's animation)和自适应(adaptivity)相关代码移入 segue 类,随之带来的好处就是你可以重用这些 segue 了
本章主要内容:
- 创建一个自定义的 segue
- 通过 segue 实施一个转场动画
- 使你自定义的 segue 在 navigation 和 tab controller 中重用
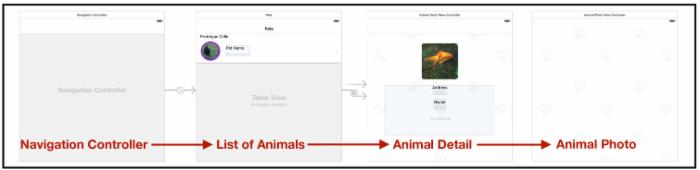
本章我们要来实现一个 宠物照看手册 ,大概是这个样子

打开 Storyboard 瞄一眼
现在还没有任何转场效果,下面我们来添加
What are segues?
Segue 描述了两个 VC 之间的转换,有四种类型的 segues
- Show :将一个 VC push 到 navigation controller 上
- Show Detail :使用
UISplitViewController时替换一个 detail 场景 - Present Modally
- Popover
将一个 child VC 嵌入到容器 VC 这种 Relationships 关系虽然也是 segue,但不能自定义
iOS 9 现在可以在上面四种 Segue 类型的基础上加入自定义的选项
A simple segue
我们先来实现一个简单的 segue,用户点击一张宠物缩略图,model 展示一张大尺寸照片。实现需要分为两个步骤:
- 设置 segue,
prepareForSegue(_:sender:)准备一些 destination VC 需要的数据 - 执行前往 destination VC 的转场动画,通常使用默认的,但这次我们来定制他
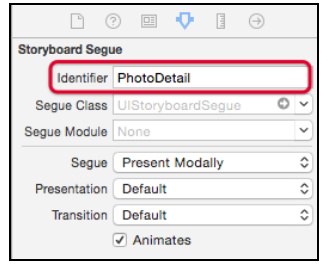
Storyboard 选中 Animal Detail View Controller ,往上面的宠物缩略图拖一个 Tap Gesture Recognizer ,之后从这个 Tap 手势 Ctrl-drag 拉条线到 Animal Photo View Controller 来展示宠物大照片,过渡方式选择 present modally
我们命名该 segue 为 PhotoDetail ,之后在 prepareForSegue 做点准备工作
override func prepareForSegue(segue: UIStoryboardSegue, sender: AnyObject?) { if segue.identifier == "PhotoDetail" { let controller = segue.destinationViewController as! AnimalPhotoViewController controller.image = imageView.image } } 为了 Dismiss ,紧挨上面的方法添加一个 unwind 方法
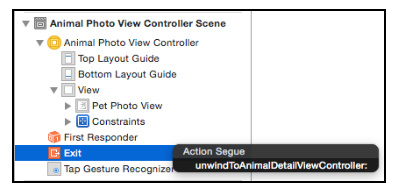
@IBAction func unwindToAnimalDetailViewController( segue:UIStoryboardSegue) { // placeholder for unwind segue } 同样的给 Animal Photo View Controller 上的宠物打照片加个 Tap 手势,Ctrl-drag 拉到 Exit ,选择 unwindToAnimalDetailViewController:
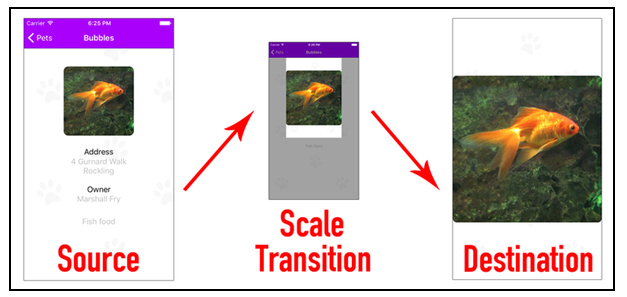
运行,点击金鱼小图片,会跳转大图片,再点击大图片,又会回到小图片

现在我们来分析下整个过程,伴随着点击缩略图,一个从 AnimalDetailViewController 到 AnimalPhotoViewController 的 model segue 初始化,该 segue 保持了 source 和 destination VC 的引用。
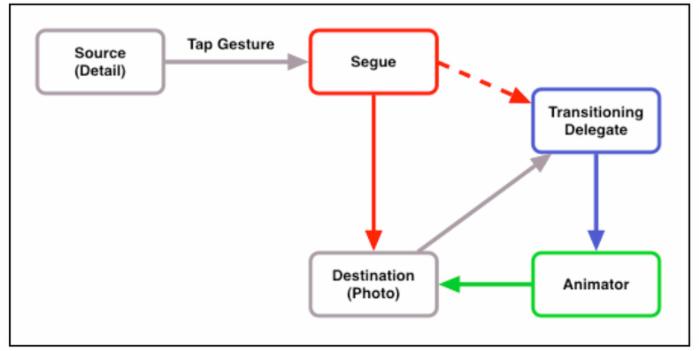
这个 segue 其实在幕后设置了 destination VC 的 transitioning delegate ,并且根据当前 size class 设置了 presentation
而 source VC 的 prepareForSegue(_:sender:) 主要为 destination VC 准备了所需要的数据
系统过渡到 destination VC 时,destination view controller 会调用他的 transition delegate 来执行动画(默认设置)
以上就是关于 Segue 的一些基本常识
Your custom segue library
因为 Segue 在整个过渡过程中都是存在的,所以你可以将 UIViewController 中写的过渡代码转移到自定义的 seuges 类中来,segue 可以同时负责 presentation 和 dismissal 的过渡过程
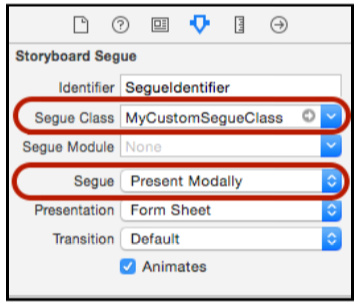
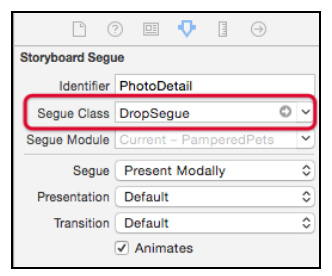
我们这里已经创建了一个自定义的 seuges 类 DropSegue ,在 Storyboard 中的 Segue Class 选择这个自定义类即可
现在运行,你会发现过渡动画效果完全不一样了呢
Creating a custom segue
看完了上面的,我们来创建一个自己的 segue 来取代 DropSegue ,这个 segue 的过渡动画采用 Scale transition animation
进行实际操作前,先熟悉下下面几个方法:
-
UIViewControllerTransitioningDelegate:自定义的 segue 部署这个协议来声明一个动画对象用在 presentation 和 dismissal 时 -
UIViewControllerAnimatedTransitioning:上面定义的动画对象部署这个协议来描述动画过程 -
UIViewControllerContextTransitioning:这个 context 包含所有关于 presentingVC 和 presentedVC 以及 views 的细节。你之后会传递给 animator 对象。
在开始前,先来回顾下创建一个 animated segue 的步骤:
- 创建
UIStoryboardSegue的子类 segue,然后设置为destination controller的transitioning delegate - 创建 presenting 和 dismissing 的 animator classes
- 定义一个
animation并设置持续时间,将会用在第 2 步的animators中 - 构造一个
segue, animator 类将会用来 presentation 和 dismissal - 最后,在
storyboard中使用这个segue
下面我们逐一来实现
1.Subclass UIStoryboardSegue
创建一个 UIStoryboardSegue 的子类 ScaleSegue.swift ,用来部署 transitioning delegate 协议,从而指定自定义的转场动画
class ScaleSegue: UIStoryboardSegue { override func perform() { // 在执行转场时指定 transitioningDelegate destinationViewController.transitioningDelegate = self super.perform() } } 之前的版本你可能会把 转场动画放进 perform 中,而现在你让 segue 部署 transitioning delegate 来解耦
2. Create the animator
现在我们把注意力放在创建一个转场动画上,添加一个 animator class ScalePresentAnimator 用来表现一段 modal 动画,dismissal 动画还未设定,先用系统提供的
class ScalePresentAnimator : NSObject, UIViewControllerAnimatedTransitioning { } 3. Define the animation
实现动画
class ScalePresentAnimator : NSObject, UIViewControllerAnimatedTransitioning { func transitionDuration( transitionContext: UIViewControllerContextTransitioning?) -> NSTimeInterval { return 2.0 } func animateTransition(transitionContext: UIViewControllerContextTransitioning) { // 1. Get the transition context to- controller and view let toViewController = transitionContext .viewControllerForKey( UITransitionContextToViewControllerKey)! let toView = transitionContext .viewForKey(UITransitionContextToViewKey) // 2. Add the to- view to the transition context if let toView = toView { transitionContext.containerView()?.addSubview(toView) } // 3. Set up the initial state for the animation toView?.frame = .zero toView?.layoutIfNeeded() // 4. Perform the animation let duration = transitionDuration(transitionContext) let finalFrame = transitionContext .finalFrameForViewController(toViewController) UIView.animateWithDuration(duration, animations: { toView?.frame = finalFrame toView?.layoutIfNeeded() }, completion: { finished in // 5. Clean up the transition context transitionContext.completeTransition(true) }) } } 4. Set the animator in the segue
上面提到以前我们会将动画的实现放在 perform 中,现在我们让 segue 部署 transitioning delegate 来解耦
extension ScaleSegue: UIViewControllerTransitioningDelegate { func animationControllerForPresentedController(presented: UIViewController, presentingController presenting: UIViewController, sourceController source: UIViewController) -> UIViewControllerAnimatedTransitioning? { return ScalePresentAnimator() } } 5. Use the segue in the storyboard
在 Storyboard Segue 选择刚才创建的自定义 segue 就好,Presentation 选择 Form Sheet 是为了在 iPad 上有更好的体验

运行,点击宠物缩略图,无码大图从左上角伸展开来铺满整个屏幕

Passing data to animators
现在来继续改进,我们希望点击小图后,就在原有位置上小图伸展开来变成大图,而不是从左上角开始出来一个 view。那就需要告诉 animator 对象哪个 view 将会被 scale,最简单的方式是保持一个对 source image view 的引用,但用 Protocols 来实现更好一些
定义一个 Protocol ,返回一个可以被 Scale 的 View
protocol ViewScaleable { var scaleView: UIView { get } } 任何使用自定义的 segue 的 VC 都能实现这个 ViewScaleable 协议,确定哪个 View 能被 Scale
我们在 AnimalDetailViewController.swift ( Presenting VC )中实现这一 Protocol
extension AnimalDetailViewController: ViewScaleable { var scaleView: UIView { return imageView } } 表示可以被 Scale 的 view 是 imageView ,即本例中的金鱼图片
之前的过渡动画没有用到 fromVC ,而现在从 fromView 的位置(即 scaleView)直接展开大图,所以需要在创建 toVC 同时获取到 fromVC
let fromViewController = transitionContext .viewControllerForKey( UITransitionContextFromViewControllerKey)! let fromView = transitionContext .viewForKey(UITransitionContextFromViewKey) 将之前的从左上角开始 toView?.frame = .zero 替代为从 scaleView 的位置开始:
var startFrame = CGRect.zero if let fromViewController = fromViewController as? ViewScaleable { startFrame = fromViewController.scaleView.frame } else { print("Warning: Controller /(fromViewController) does not " + "conform to ViewScaleable") } toView?.frame = startFrame 设置 toView 的起始位置为 scaleView 的位置
因为使用了 ViewScaleable 协议解耦,animator 除了 scaleView 外并不了解关于 source view controller 的信息
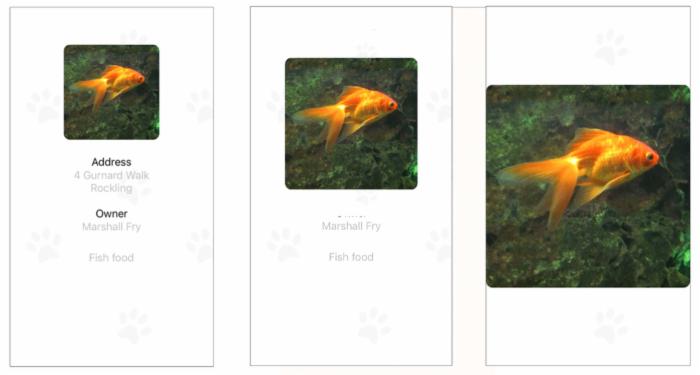
再次运行,现在点击是从原始位置放大了
Working with the view hierarchy
我们之前通过 transitionContext.viewForKey(_:) 来获取 toView
let toView = transitionContext.viewForKey(UITransitionContextToViewKey) 或许你会有疑问,为什么不用 PresentedVC(toVC) 的 view 属性直接获取?这是因为 transition context 会基于 size class 处理各种 presentations
在 regular-sized 情形下 modal 视图会以 sheet 的形式展示,并不会铺满整个屏幕。此时我们将屏幕展示的 presentation layer 看做两部分:
- 暗下去的背景
- sheet 展示 toVC 的内容
在 compact-sized 情形下 modal 视图会全屏展示,此时没有 presentation layer 存在
结论:在 iPhone 设备上,除了 iPhone 6 Plus 横屏,destination controller(PresentedVC)的 view 与 UITransitionContextToViewKey 得到的 view 是一致的。而在 iPad 和 iPhone 6 Plus 横屏情形下,destination controller(PresentedVC)被封装在 presentation layer 进行展示
from view 也是一样,通过 transitionContext.viewForKey(UITransitionContextFromViewKey) 得到的 view 与 source view controller's view 在不同 size class 下也不相同
compact-sized 下,二者一样; regular-sized 下 UITransitionContextFromViewKey 方式得到的 view 会是 nil
最后我们在 compact-sized 下也让 fromView 随过渡动画的发生暗淡下去
UIView.animateWithDuration(duration, animations: { toView?.frame = finalFrame toView?.layoutIfNeeded() fromView?.alpha = 0.0 }, completion: { finished in fromView?.alpha = 1.0 // 5. Clean up the transition context transitionContext.completeTransition(true) }) 上面 fromView?.alpha 仅仅会影响 iPhone,因为在 iPad 上通过 viewForKey 得到的 fromView 为 nil
Handling embedded view controllers
在 Main.storyboard 中选中最左边的 Navigation Controller 设回 Is Initial View Controller (之前是 AnimalDetailViewController )
运行点击缩略图,发现整个过程凌乱了,大图从左上角跑出来了。。。

原因很简单,之前 AnimalDetailViewController 是 presentingVC,决定哪个 view 可以被 scale,而现在 AnimalDetailViewController 被嵌入到 Nav 中,由 Nav 来接管,Nav 并没有实现 ViewScaleable 协议,所以不知道哪个 view 会被 scale,也就得不到 fromView 的初始位置。
取到的 fromViewController 先做判断,如果是 Nav ,再向下取一次 topViewController
var fromViewController = transitionContext .viewControllerForKey( UITransitionContextFromViewControllerKey)! if let fromNC = fromViewController as? UINavigationController { if let controller = fromNC.topViewController { fromViewController = controller } } Completing the scale segue dismissal
除了注意 fromVC 和 toVC 与之前 Presenting 不同外,还要注意添加到 containerView 中的顺序
if let fromView = fromView, toView = toView { transitionContext.containerView()? .insertSubview(toView, belowSubview: fromView) } 正文到此结束
热门推荐


相关文章


Loading...
![[HBLOG]公众号](https://www.liuhaihua.cn/img/qrcode_gzh.jpg)

