Auto Layout压缩阻力及内容吸附讲解

本文为投稿文章,作者: 梁炜V
在Auto Layout的使用中,有两个很重要的布局概念: Content Compression Resistance 和 Content Hugging ,从字面的翻译我们大概可以分别翻译为: 压缩阻力 以及 内容吸附 。但是光从字面意思来理解很难知道它们如何使用以及确切的设计意图。我最开始也是很迷糊而且在使用Auto Layout的过程中也没有使用过它们,直到最近稍稍研究了一下,发现它们的作用甚是巨大,所以我为了加深记忆,把我最近学习到的关于它们的概念在此稍作整理加以记录。
> 注:以下为了表述方便,将`Content Compression Resistance`记为`压缩阻力`,将`Content Hugging`记为`内容吸附`。
Content Compression Resistance
压缩阻力 属性为了记忆更加形象我们可以把它理解为 离我远点,不许挤到我, 它的优先级(Priority)越高,它的这种抗挤压的能力也就越强,我们可以通过代码在控件的水平或垂直方向上分别设置1(最低优先级)到1000(最高优先级)之间的优先级,默认是750,例如我们可以为一个 UILabel 控件设置一个它在水平方向上优先级为 500 的压缩阻力:
[label setContentCompressionResistancePriority:500 forAxis:UILayoutConstraintAxisHorizontal];
用图来表示,我们可以大致表示如下,视图的压缩阻力就好似它自身往外的张力,优先级越高,视图自己维持自身显示完整性的能力就越强:
Content Hugging
内容吸附 属性为了记忆方便我们可以把它理解为 抱紧(Hug) ,视图的大小不会随着superView的变大而扩大,而是只维持能完全显示自己内容的大小,它的这种优先级越高,吸附的能力就越强,和 压缩阻力 一样, 内容吸附 的优先级也 可以通过代码来设置,只是它的默认优先级是 250 :
[label setContentHuggingPriority:251 forAxis:UILayoutConstraintAxisHorizontal];
用图来表示,我们可以大致表示如下,视图的内容吸附就好似视图自己有向内抱紧自己的力量一样,优先级越高,它的这种能力就越强:
以上讲了 内容吸附 和 压缩阻力 的基本概念,但是这两个属性是建立在 Intrinsic Content Size 这一概念上的,我们暂且把它翻译为 固有尺寸 ,所有基于UIView的视图都有 intrinsicContentSize 这个属性,下面我们就介绍一下什么是 固有尺寸。
Intrinsic Content Size
每个视图都有压缩阻力优先级(Content Compression Resistance Priority)和内容吸附优先级(Content Hugging Priority),但只有视图明确了它的 固有尺寸 后,这两种优先级才会起作用。我们首先来看一下官方的解释:
Custom views typically have content that they display of which the layout system is unaware. Overriding this method allows a custom view to communicate to the layout system what size it would like to be based on its content. This intrinsic size must be independent of the content frame, because there’s no way to dynamically communicate a changed width to the layout system based on a changed height, for example.
If a custom view has no intrinsic size for a given dimension, it can return UIViewNoIntrinsicMetric for that dimension.
大致的意思就是我们自定义的视图在默认情况下,它的固有尺寸是返回(UIViewNoIntrinsicMetric,UIViewNoIntrinsicMetric),也就是(-1,-1),只有我们根据自定义视图本身的Content来重写该方法,我们自定义的视图才能明确的知道他在显示系统中该展示的大小。
UILabel和UIButton等这些控件,系统默认是根据他们的内容实现了固有尺寸,所以我们在使用的时候只需要确定origin或者Center它们就能正确的显示。
由此可见,固有尺寸是为了实现视图的 大小自适应 而存在的。
以下我来自定义一个视图,来测试一下 固有尺寸 是否有效,由于项目中大家都是用[Masonry](http://https://github.com/SnapKit/Masonry)来处理Auto Layout,所以一下的例子都使用 Masonry 来布局。
重写Intrinsic Content Size
我们新建一个继承自UIView的自定义视图IntrinsicView,在一个ViewController中添加一个我们自定义的视图,设置它水平居中,顶部和父视图对齐。
- (void)layoutSubIntrinsicView { IntrinsicView *intrinsicView = [IntrinsicView new]; intrinsicView.backgroundColor = [UIColor colorWithRed:.2 green:.4 blue:.6 alpha:1]; [self.view addSubview:intrinsicView]; [intrinsicView mas_makeConstraints:^(MASConstraintMaker *make) { make.centerX.mas_equalTo(self.view); make.top.mas_equalTo(self.mas_topLayoutGuideBottom); }]; } 运行后发现什么也没显示,因为我们没有设置它的宽高,而它默认的固有尺寸是(-1 ,-1)。我们去重写IntrinsicView的- (CGSize)intrinsicContentSize方法:
@implementation IntrinsicView - (CGSize)intrinsicContentSize { return CGSizeMake(150, 66); } @end 运行后显示如下:
1、测试内容吸附优先级
为了测试内容吸附优先级我们在页面上添加两个 IntrinsicView ,分别是 topView 和 bottomView ,设置他们都水平居中,然后分别和页面的顶部和底部对齐:
- (void)layoutSubIntrinsicView { IntrinsicView *topView = [IntrinsicView new]; topView.backgroundColor = [UIColor colorWithRed:.2 green:.4 blue:.6 alpha:1]; [self.view addSubview:topView]; [topView mas_makeConstraints:^(MASConstraintMaker *make) { make.centerX.mas_equalTo(self.view); make.top.mas_equalTo(self.mas_topLayoutGuideBottom);//和导航栏底部对齐 }]; IntrinsicView *bottomView = [IntrinsicView new]; bottomView.backgroundColor = [UIColor colorWithRed:.2 green:.4 blue:.6 alpha:1]; [self.view addSubview:bottomView]; [bottomView mas_makeConstraints:^(MASConstraintMaker *make) { make.centerX.mas_equalTo(self.view); make.bottom.mas_equalTo(self.mas_bottomLayoutGuideBottom);//和页面底部对齐 }]; } 运行后展示如下:
下面我们设置 topView 和 bottomView 之间的间距为 40 ,也就是 topView.bottom + 40 = bottomView.top 。
- (void)layoutSubIntrinsicView { IntrinsicView *topView = [IntrinsicView new]; topView.backgroundColor = [UIColor colorWithRed:.2 green:.4 blue:.6 alpha:1]; [self.view addSubview:topView]; [topView mas_makeConstraints:^(MASConstraintMaker *make) { make.centerX.mas_equalTo(self.view); make.top.mas_equalTo(self.mas_topLayoutGuideBottom);//和导航栏底部对齐 }]; IntrinsicView *bottomView = [IntrinsicView new]; bottomView.backgroundColor = [UIColor colorWithRed:.2 green:.4 blue:.6 alpha:1]; [self.view addSubview:bottomView]; [bottomView mas_makeConstraints:^(MASConstraintMaker *make) { make.centerX.mas_equalTo(self.view); make.top.mas_equalTo(topView.mas_bottom).offset(40); make.bottom.mas_equalTo(self.mas_bottomLayoutGuideBottom);//和页面底部对齐 }]; } 运行后展示效果如下:
我们发现 topView 被拉伸了,如果我们不想 topView 被拉伸,就可以利用 内容吸附 的特性,因为我们定义了 IntrinsicView 的固有尺寸,设置 topView 的 内容吸附 优先级比 bottomView 的优先级高,我们上面介绍了 内容吸附 的默认优先级是 250 ,我们把 topView 的 内容吸附 优先级设置为 251 ,在原来 layoutSubIntrinsicView 函数的最后添加如下语句:
[topView setContentHuggingPriority:251 forAxis:UILayoutConstraintAxisVertical];
运行后如下所示,达到了我们想要的效果:
>251是我随意定的比250大的值,可以是大于250小于1000的任何值。
2、测试压缩阻力优先级
我们通常会遇到如下图所示的需求:
在某个页面上水平放置两个UILabel, leftLabel 的左边和父视图的间距固定, rightLabel 的右边和父视图的右边有一个小于等于某个间隔的约束, leftLabel 和 rightLabel 之间有一个固定间距,它们的宽度根据他们显示的内容自适应,关键代码如下:
[leftLabel mas_makeConstraints:^(MASConstraintMaker *make) { //左边和父视图间隔固定为10 make.left.mas_equalTo(self.view).offset(10); make.top.mas_equalTo(80);//随意设定的值 }]; [rightLabel mas_makeConstraints:^(MASConstraintMaker *make) { make.top.mas_equalTo(leftLabel); //和leftLabel的右边间距固定为20 make.left.mas_equalTo(leftLabel.mas_right).offset(20); //这里注意是‘lessThanOrEqualTo’,也就是‘rightLabel’的右边界 //和父视图的间距至少为10,内容少时,间距自动调大 make.right.mas_lessThanOrEqualTo(self.view).offset(-10); }]; 在他们的显示内容宽度不超过父视图宽度时,两个label的内容都能正常的完全显示,但是当它们需要显示的内容长度总和超过父视图的宽度时,就会显示如下:
一个label被压缩了, rightLabel 显示不完全,如果在这种情况下,我们想 leftLabel 被压缩,而 rightLabel 尽量完全显示,由于UILabel这类控件,系统自己已经根据它们显示的实际内容实现了 固有尺寸 的方法,我们可以利用 压缩阻力 的特性,将 rightLabel 的 压缩阻力 优先级设置得比 leftLabel 高,上面介绍了 压缩阻力 的默认优先级是 750 ,我们把` rightLabel `的优先级设置为 751 ,在上面代码的最下面添加如下代码:
[rightLabel setContentCompressionResistancePriority:751 forAxis:UILayoutConstraintAxisHorizontal];
运行后显示如下,达到了我们预期的效果:
3、在自动计算UITableViewCell高度中的使用
对于变高cell的处理,以前我们都是在`heightForRowAtIndexPath`方法里面,拼凑要展示的变高cell的高度,当我们改变cell中两个控件在垂直方向的布局,或者再添加一个控件时,还要去修改计算cell高度的方法来适应新的变化,非常不方便。但是有了自动布局后,利用好`压缩阻力`和`内容吸附`的优先级,可以很精确很简单的由系统来计算出变高cell的高度。
假定我们有如下需求:
我们看到,这个变高cell里面高度不定的是中间的`ContentLabel`,它会根据内容长度来折行显示,UILabel要折行显示我们需要设置它的`preferredMaxLayoutWidth`和`numberOfLines`两个属性的值。
首先假定`Model`的定义如下:
@interface CellModel : NSObject @property (nonatomic, copy) NSString *name; @property (nonatomic, copy) NSString *company; @property (nonatomic, copy) NSString *content; @property (nonatomic, assign) CGFloat cacheHeight;//缓存当前Model显示的cell高度 @end
自定义的`UITableViewCell`的关键代码如下:
//图片距左边距离为10,上下居中 [_cellImageView mas_makeConstraints:^(MASConstraintMaker *make) { make.left.mas_equalTo(self.contentView).offset(10); make.centerY.mas_equalTo(self.contentView); make.top.mas_greaterThanOrEqualTo(self.contentView).offset(10); make.bottom.mas_lessThanOrEqualTo(self.contentView).offset(-10); }]; //标题Label,一行显示 [_nameLabel mas_makeConstraints:^(MASConstraintMaker *make) { make.left.mas_equalTo(self.cellImageView.mas_right).offset(6); make.right.mas_lessThanOrEqualTo(self.contentView).offset(-10); make.top.mas_equalTo(self.contentView).offset(10); }]; //内容label,多行显示 _contentLabel.numberOfLines = 0; [self.contentView addSubview:_contentLabel]; [_contentLabel mas_makeConstraints:^(MASConstraintMaker *make) { make.left.mas_equalTo(self.nameLabel); make.top.mas_equalTo(self.nameLabel.mas_bottom).offset(6); }]; //标题Label,一行显示 [_companyLabel mas_makeConstraints:^(MASConstraintMaker *make) { make.left.mas_equalTo(self.contentLabel); make.right.mas_lessThanOrEqualTo(self.contentView).offset(-10); make.top.mas_equalTo(self.contentLabel.mas_bottom).offset(6); make.bottom.mas_equalTo(self.contentView).offset(-10);//设定了这个自动计算cell高度时才知道具体cell的高度 }]; [_nameLabel setContentHuggingPriority:UILayoutPriorityRequired forAxis:UILayoutConstraintAxisVertical]; [_companyLabel setContentHuggingPriority:UILayoutPriorityRequired forAxis:UILayoutConstraintAxisVertical]; [_contentLabel setContentHuggingPriority:UILayoutPriorityRequired forAxis:UILayoutConstraintAxisVertical]; 上面的代码中设置了几个`UILabel`的`内容吸附`优先级为最高,这样它们就不会随着cell高度的变化而拉伸高度。上面设置了`contentLabel`的`numberOfLines = 0`,还需要设置`preferredMaxLayoutWidth`才能正确换行显示。由于`UITableViewCell`在显示出来之前是不知道宽度的,但是为了获取正确的宽度我们可以在`- (void)layoutSubviews`方法里面设置:
- (void)layoutSubviews { _contentLabel.preferredMaxLayoutWidth = CGRectGetWidth(self.contentView.frame) - 128 - 10 - 6;//后面的数字是前后以及图片的宽度 [super layoutSubviews];//这个调用是为了改变后更新布局 } 这样我们设置好cell以及Model以后,其他的方法都和普通的使用一样,唯一不一样的就是计算cell高度的`UITableView`代理方法`heightForRowAtIndexPath`,它的实现如下:
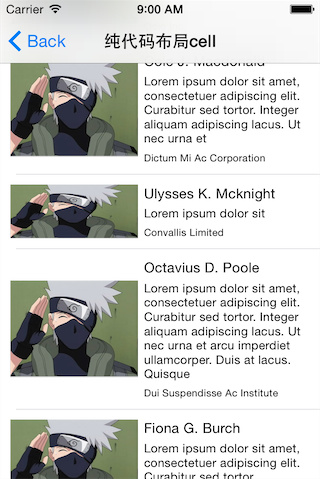
- (CGFloat)tableView:(UITableView *)tableView heightForRowAtIndexPath:(NSIndexPath *)indexPath { static CodeLayoutCell *singleCell = nil; static dispatch_once_t onceToken; dispatch_once(&onceToken, ^{ //这里持有一个cell是为了下面自动计算cell高度的需要 singleCell = [tableView dequeueReusableCellWithIdentifier:kCellIdentifier]; }); //取出Model,如果有缓存的高度值就不计算了 CellModel *model = _dataSourceArray[indexPath.row]; if (model.cacheHeight != 0) { return model.cacheHeight; } [singleCell layoutIfNeeded];//强制布局,得到contentView的宽度 [singleCell setNewCellModel:model]; //由系统根据我们设定的Layout规则来计算cell显示的Size CGSize size = [singleCell.contentView systemLayoutSizeFittingSize:UILayoutFittingCompressedSize]; model.cacheHeight = size.height + 1;//cell和cell.contentView的高度相差1 return model.cacheHeight; } 运行的效果如下:

当图片的高度大于三个`UIlabel`加上各自上下的间隔的高度时,由于我们设置了三个Label的`内容吸附`最高的优先级,所以为了满足它们的高度,图片的内容就进行了压缩,如下:
第二个cell的图片被压缩了,如何才能保证它不被压缩呢?留给读到这里的人自己实现吧!????
暂时先写到这里吧,由于刚接触这两个属性,难免会有遗误之处,请大家多多谅解!
完整的Demo,请戳 [这里]
正文到此结束
热门推荐


相关文章

近期评论
-
ws0132613@gmail.comhttps://getmacos.com/gopanel/william smith
-
谢谢
-
https://www.newcmy.com/register?aff=HBVX建议您试试草莓云机场,可以流畅观看youtube和tiktok,上reddit/x也没有问题,还有各种ai优化节点。
-
-
-
想购买您这个站,我的联系方式QQ741756694微信同步 能卖联系
-
-
-
-
Loading...
![[HBLOG]公众号](https://www.liuhaihua.cn/img/qrcode_gzh.jpg)

