在云中构建天气跟踪应用程序,第 1 部分
还记得调到晚间新闻来收看第二天的天气预报的情形吗?这些日志过去很久了!如今,通过许多专门针对天气的应用程序和 API,天气信息会实时更新和在线提供。所以,如果您是一位考虑将天气信息构建到移动或 Web 应用程序中的开发人员,您找对了时间和地点。
如何开始?这是本教程的出发点。在第 1 部分中,我将介绍如何创建一个基础应用程序,使用一个在线服务检索和存储世界城市的经纬度坐标。然后,在第 2 部分 中,我将介绍来自 IBM 的新 Insights for Weather 服务,展示如何使用来自第 1 部分的城市信息来跟踪您选择的 5 个世界城市的天气,然后将最终的应用程序托管在 IBM Bluemix 上。
运行示例应用程序
获取示例应用程序的代码
完成您的应用程序的前提条件
观看 Vikram 分步演示代码
抄本本教程中介绍的示例应用程序允许用户选择最多 5 个城市来跟踪天气。该应用程序检索每个城市的当前温度和天气条件,并在一个同时适合智能电话和桌面计算机的移动优化的视图中显示此信息。用户还可以访问每个城市的 7 天预报信息,所有天气信息都通过 Insights for Weather 提供。
在客户端上,我将使用 jQuery Mobile 为应用程序创建一个移动友好的用户界面。在服务器上,我将使用 Silex PHP 微型框架管理应用程序流,使用 Twig 模板引擎呈现页面模板,并使用 MongoDB 存储选定城市的列表。该应用程序托管在 IBM Bluemix 上,将连接到 Insights for Weather 服务来获取天气数据,并连接到 GeoNames 服务来获取城市信息。
这里使用了许多技术,所以您需要满足以下条件:
- 基本熟悉 jQuery Mobile 和 PHP 。
- 一个包含 Apache (具有 mod_rewrite 和 .htaccess 文件支持)或 NGINX 的本地 PHP 开发环境。
- 一个包含配置的数据库、用户和密码的本地或远程 MongoDB 部署。要获得 MongoDB 的免费或付费部署,请注册一个 MongoLab 帐户。
- 一个 Bluemix 帐户(注册您的免费试用版帐户,或者如果您已经有一个帐户,请 登录到 Bluemix )。
- 一个启用了 Web 服务访问的免费的 GeoNames 帐户。
- Composer (PHP 依赖项管理器)。
- CloudFoundry 命令行工具 。
- 一个文本编辑器或 IDE。
“ 本教程将介绍如何使用 GeoNames API 和 IBM Bluemix 构建一个在云中使用的简单的天气监视器。 ”
备注:任何使用 GeoNames Web 服务的应用程序都必须遵守 GeoNames 条款和条件 。类似地,任何使用 IBM Insights for Weather 服务的应用程序都必须遵守该服务的使用条款,如 Bluemix 文档 中所述。开始实现您的项目之前,花几分钟时间阅读一下这些要求,确保您的应用程序满足它们,
第 1 步. 创建空的应用程序
第一步是使用 Silex PHP 微型框架和 Twig 模板引擎初始化一个基本应用程序。
阅读: Silex 文档
- 使用 PHP 依赖项管理器 Composer 下载 Silex PHP 微型框架和 Twig 模板引擎。使用以下 Composer 配置文件,并将它保存在 $APP_ROOT /composer.json(其中 $APP_ROOT 是您的项目目录)。
{ "require": { "silex/silex": "*", "twig/twig": "*" }, "minimum-stability": "dev", "prefer-stable": true } - 使用 Composer 通过以下命令安装 Silex 和 Twig:
shell> php composer.phar install
- 设置应用程序的主要控制脚本。以下脚本将会加载 Silex 框架并初始化 Silex 应用程序。其中还包含对应用程序的每个路线的回调,每个回调定义在该路线与一个传入请求匹配时要执行的代码。因为该应用程序必须支持列出、添加、删除和搜索城市,所以您可以定义 URL 路线
/index、/add、/delete和/search,如下所示。请注意,此脚本应保存为 $APP_ROOT /index.php。<?php // use Composer autoloader require 'vendor/autoload.php'; require 'config.php'; // load classes use Symfony/Component/HttpFoundation/Request; use Symfony/Component/HttpFoundation/Response; use Silex/Application; // initialize Silex application $app = new Application(); // load configuration from file $app->config = $config; // register Twig template provider $app->register(new Silex/Provider/TwigServiceProvider(), array( 'twig.path' => __DIR__.'/views', )); // register URL generator $app->register(new Silex/Provider/UrlGeneratorServiceProvider()); // index page handlers $app->get('/', function () use ($app) { return $app->redirect($app["url_generator"]->generate('index')); }); $app->get('/index', function () use ($app, $db) { // CODE }) ->bind('index'); // search form $app->get('/search', function () use ($app) { // CODE }) ->bind('search'); // search processor $app->post('/search', function (Request $request) use ($app) { // CODE }); // handler to add city to database $app->get('/add/{gid}', function ($gid) use ($app, $db) { // CODE }) ->bind('add'); // handler to remove city from database $app->get('/delete/{id}', function ($id) use ($app, $db) { // CODE }) ->bind('delete'); // error page handler $app->error(function (/Exception $e, $code) use ($app) { // CODE }); $app->run(); - 为该应用程序呈现的各种视图构造一个简单的页面模板。以下是一个示例:
<!DOCTYPE html> <html> <head> <meta charset="utf-8"> <meta http-equiv="X-UA-Compatible" content="IE=edge"> <meta name="viewport" content="width=device-width, initial-scale=1"> <link rel="stylesheet" href="https://ajax.googleapis.com/ajax/libs/jquerymobile/1.4.5/jquery.mobile.min.css"> <script src="https://ajax.googleapis.com/ajax/libs/jquery/1.11.3/jquery.min.js"></script> <script src="https://ajax.googleapis.com/ajax/libs/jquerymobile/1.4.5/jquery.mobile.min.js"></script> </head> <body> <div data-role="page"> <div data-role="header"> <h1>Weather Tracker</h1> </div> <div data-role="content"> </div> <div data-role="footer"> </div> </div> </body> </html>
此页面从 Google Content Delivery Network (CDN) 获取 jQuery 和 jQuery Mobile 库文件,并定义一个基本的 jQuery Mobile 页面。从上面的代码可以看到,该页面目前包含一个页眉、一个内容区域和一个页脚。随着我们继续学习本教程,此页面模板将被填入每个视图的内容。
第 2 步. 实现位置搜索
来自 IBM developerWorks 的强大工具
通过 developerWorks Premium 会员计划在云中快速投入生产。在它的许多特别待遇中,您会获得 Bluemix 的 12 个月订阅,以及用于使用 Bluemix 服务(比如 Insights for Weather、Watson、IoT 和移动等)开发应用程序的 240 美元贷款。了解 developerWorks Premium 会员的所有权益。
IBM Insights for Weather 服务需要(作为其 API 的强制性输入)请求天气的位置的经纬度值。但是,因为要求用户提供他们想要监视的所有位置的这些值是不合理的,所以该应用程序需要采用某种方式来将位置名称映射到相应的地理坐标。
此功能由 GeoNames 地理数据库提供,其中包含超过 800 万个位置的数据,包括地理坐标以及人口数据和特征。此数据库可以使用 GeoNames Web 服务进行访问,这使得将 GeoNames 数据集成到 PHP 应用程序中变得很容易。
阅读: GeoNames API
- 要使用 GeoNames,请注册一个免费 GeoNames 帐户 ,然后为该帐户启用 Web 服务访问。然后,您可以通过请求一个 URL 来访问该 API,比如
http://api.geonames.org/search?q=london&maxRows=20&username=USERNAME,该 URL 生成一组与搜索查询匹配的位置名称,如下所示:
- 请注意,每个结果都包含一个唯一的 GeoNames ID,以及纬度、经度、城市名、国家名和编码。使用这些信息来实现应用程序的搜索接口很容易:
<?php // search form $app->get('/search', function () use ($app) { return $app['twig']->render('search.twig', array()); }) ->bind('search'); // search processor $app->post('/search', function (Request $request) use ($app) { // search for location string against Geonames database // for each result, store location name, country and Geonames ID $query = urlencode(strip_tags($request->get('query'))); $sxml = simplexml_load_file('http://api.geonames.org/search?q=' . $query . '&maxRows=20&username=' . $app->config['geonames_uid']); if ($sxml === FALSE) { throw new Exception("Could not connect to Geonames API."); } $data = array(); foreach ($sxml->geoname as $g) { $data[] = array( 'gid' => (int)$g->geonameId, 'location' => (string)$g->name, 'country' => (string)$g->countryName, ); } return $app['twig']->render('search.twig', array('data' => $data, 'query' => urldecode($query))); }); - 第一个
GET处理函数将会呈现一个包含文本输入字段的简单的搜索表单。在用户提交此表单时,第二个POST处理函数负责:
- 将搜索查询插入到一个 GeoNames Web 服务调用中
- 迭代结果
- 创建一个包含该位置的 GeoNames ID、位置名称和国家名称的数组
然后将此数组传输到搜索模板,该数据在搜索模板中显示为一个列表。这是位于 $APP_ROOT /views/search.twig 中的搜索表单和结果模板的代码:
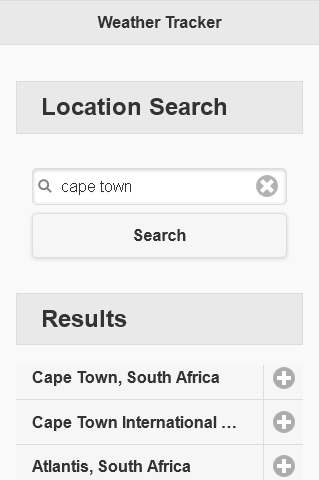
<div data-role="content"> <div id="search"> <h2 class="ui-bar ui-bar-a">Location Search</h2> <div class="ui-body"> <form method="post" data-ajax="false" action="{{ app.url_generator.generate('search') }}"> <input type="search" name="query" value="{{ query}}" /> <input type="submit" name="submit" value="Search" /> </form> </div> {% if data %} <h2 class="ui-bar ui-bar-a">Results</h2> <div class="ui-body"> <ul data-role="listview" data-split-icon="plus" data-split-theme="d"> {% for item in data %} <li> <a>{{ item.location }}, {{ item.country }}</a> <a href="{{ app.url_generator.generate('add', {'gid': item.gid}) }}" data-ajax="false">Add</a> </li> {% endfor %} </ul> </div> {% endif %} </div> </div>这是该表单的外观示例:
第 3 步. 将选定的位置添加到数据库
继续后面的操作之前,您需要使用来自 $APP_ROOT /config.php 文件的信息来初始化一个 MongoDB 数据库连接。以下是完成此任务的代码段:
<?php // configure MongoDB client $dbn = substr(parse_url($app->config['db_uri'], PHP_URL_PATH), 1); $mongo = new MongoClient($app->config['db_uri'], array("connectTimeoutMS" => 30000)); $db = $mongo->selectDb($dbn); 您会在上一步的模板中注意到,搜索结果中的每个位置包含一个 Add 按钮,它超链接到 /add 路由,该路由将该位置的唯一 GeoNames ID 传递给处理函数。接下来看看该处理函数:
// handler to add location to database $app->get('/add/{gid}', function ($gid) use ($app, $db) { // use Geonames ID to get location latitude/longitude from Geonames service // connect to MongoDB and save in database $collection = $db->locations; $query = (int)urlencode(strip_tags($gid)); $sxml = simplexml_load_file('http://api.geonames.org/get?geonameId=' . $query . '&username=' . $app->config['geonames_uid']); if ($sxml === FALSE) { throw new Exception("Could not connect to Geonames API."); } $location = new stdClass; $location->gid = trim(strip_tags($sxml->geonameId)); $location->location = trim(strip_tags($sxml->name)); $location->country = trim(strip_tags($sxml->countryCode)); $location->lat = trim(strip_tags($sxml->lat)); $location->lng = trim(strip_tags($sxml->lng)); $cursor = iterator_to_array($collection->find()); // disallow if 5 locations already exist if (count($cursor) >= 5) { throw new Exception("A maximum of 5 locations are supported. Please remove a location and try again."); } // disallow if selected location already exists foreach ($cursor as $key => $value) { if ($value['gid'] == $location->gid) { throw new Exception("The selected location already exists in the location list."); } } $collection->save($location); return $app->redirect($app["url_generator"]->generate('index')); }) ->bind('add'); /add 路由处理函数收到一个 GeoNames ID 作为路由参数。然后,它连接到 GeoNames Web 服务,这一次使用 /get API 端点来仅检索选定的位置的详细信息。然后,来自该 Web 服务的信息被转换为一个 PHP 对象,该对象的属性对应于位置的 GeoNames ID ( gid )、位置名称 ( location )、国家编码 ( country )、纬度 ( lat ) 和经度 ( lng )。然后使用 MongoDB 连接对象将此对象保存到一个 locations 集合中的 MongoDB 数据库中。
请注意,在将选定的位置保存到数据库之前, /add 路由处理函数还包含两项额外的检查:它通过检查来确认数据库中还没有选定的位置,确认数据库中的最大位置数量未超过 5。第一个检查的目的应该不言自明。执行第二个检查的原因是,Insights for Weather 服务的免费版本只允许有限数量的 API 调用,而且必须对每个维度/经度对执行一次单独的 API 调用。因此,将位置数量限制到 5 有助于应用程序保持在服务配额内,而且由于需要的请求数量更小,能够更快地获得所有必要的天气数据。
结束语
在这一部分中,您学习了如何创建一个基础应用程序,并使用一个在线服务检索和存储世界城市的经纬度坐标。在第 2 部分 中,我将介绍 Bluemix 中的新 IBM Insights for Weather 服务。然后,我将介绍如何使用来自第 1 部分的城市信息,跟踪您选择的 5 个世界城市的天气,最后,我介绍了如何将该应用程序托管在 IBM Bluemix 上。
正文到此结束
- 本文标签: App web list ip http 贷款 API Select 服务器 Ajax CDN UI 智能 rewrite value shell src cat 管理 parse Nginx provider js 免费 jquery apache 时间 key db lib 数据库 CSS MongoDB root 开发 https 下载 配置 目录 代码 XML IBM client find IDE HTML PHP 参数 git 删除 安装 云 Google json tab Developer 数据
- 版权声明: 本文为互联网转载文章,出处已在文章中说明(部分除外)。如果侵权,请联系本站长删除,谢谢。
- 本文海报: 生成海报一 生成海报二
热门推荐


相关文章

近期评论
-
https://www.newcmy.com/register?aff=HBVX
建议您试试草莓云机场,可以流畅观看youtube和tiktok,上reddit/x也没有问题,还有各种ai优化节点。 -
出现OpenClaw "device signature expired"。the Gateway rejects if Math.abs(Date.now() - signedAt) > 10 * 60 * 1000 (10 minutes)
-
-
想购买您这个站,我的联系方式QQ741756694微信同步 能卖联系
-
-
-
-
-
https://www.liuhaihua.cn/archives/40657.html 这篇博客中的图片打不开了
-
不会英语啊。
Loading...
![[HBLOG]公众号](https://www.liuhaihua.cn/img/qrcode_gzh.jpg)

