Houdini 缠绕美女 之 反弹原理应用以及生成穿过控制点的Bezier曲线
前几天看到机器猫的一片博客讲到了用曲线填充几何体的方法,其中很受启发的地方是按照他的叫做“弹弹弹”的方法,其实就是raytrace的一个物理上的实现。这里是原博客地址: http://blog.csdn.net/cuckon/article/details/43710653
他应该是在maya里面实现的这一方法,出于好奇于是尝试看能不能在Houdini里面也作出类似的效果出来,纯粹是照虎画猫了。这是完成的效果图:


接下来谈谈在Houdini里面实现的方法:
1;首先当然需要实现所谓“弹弹弹”的方法,这个主要是碰撞反弹的物理模型,查阅资料有发现vex里面有两个函数能够起到关键性作用。第一个是intersect(),这个函数能够计算出某一点沿着法线方向射到另一几何体表面的坐标值,那么现在知道了碰撞之后下一个“弹”的起始点了。还是一个关键矢量就是弹完之后的反射方向,vex里面恰好有个函数叫reflect()专门就干这个是的,输入入射法线和反弹表面法线就能直接得出反射法线。
既然这两个关键的因素都能在vex里面完成那相当于问题就解决了一半,另外无非就是设定最多反弹多少次以及判定要是没有反射了也直接结束。
值得注意的是,在houdini里面如果直接用intersect求出的位置来进行下一次反弹的计算时,出错的概率是非常大的。原因在于该点就是在反射表面上的。在这种点与面重叠的情况下,intersect就搞不清下一个碰撞点是该点本身还是要算其他地方。所以在进行下一次交叉运算之前把这个位置稍微加上一点点反弹方向的向量,这样下一个位置又精确有保证了不会出现重叠的错误。
下面是在attrib wrangle里面实现的代码,选择的是在detail级别下,所以只需要计算一次,效率还是非常高的:
float radius = 1000; int maxIterate = ch("maxNumber"); vector origPosition = point(geoself(), "P", 0); vector origNormal = point(geoself(), "N", 0); origNormal *= radius; //get the reflection normal direction vector getReflection(vector origPosition; vector nextPosition; int primNum){ vector direction, primNormal; vector reflect; direction = normalize(nextPosition - origPosition); primNormal = prim(1, "N", primNum); reflect = reflect(direction, primNormal); return reflect; } int flag = 0; while(flag < maxIterate){ int primNum; int pointNum; float u, v; vector nextPosition,nextNormal; //find the intersection point primNum = intersect(1, origPosition, origNormal, nextPosition, u, v); if(primNum != -1){ i@primNum = primNum; pointNum = addpoint(geoself(), nextPosition); nextNormal = getReflection(origPosition, nextPosition, primNum); setattrib(geoself(), "point", "N", pointNum, 0, nextNormal, "set"); //extend the original position out of the surface a little bit //this way can avoid some errors from the intersection origPosition = nextPosition + normalize(nextNormal)*0.00001; origNormal = normalize(nextNormal) * radius; }if(primNum == -1){ break; } flag += 1; } 2:第二个问题是把计算出来的点用曲线的方式穿起来。个人感觉其实这才是这个效果的难点地方,vex里面没有提供在几何体级别下操作曲线的方法,但是hou模块中有直接操作曲线的createNURBSCurve和createBezierCurve,顺着这个思路,那么接下来的工作就绪要转入到python中去进行了。最开始的时候我使用了createNURBSCurve这个函数来把所有之前生成的点连接起来,但是有一个很大的问题就是除了起点和末点其他点都不在曲线身上,虽然这是NURBS的特点,但效果肯定不能使用这个方法。为了解决这个问题也查找了不少资料,最后确定在了BezierCurve曲线上面,这是一个非常特殊的样条曲线,可以理解为BezierCurve是B样条曲线的特例,而B样条曲线是NURBS的一个特例。而且正好hou模块里面有生成这个曲线的方法,如下图:

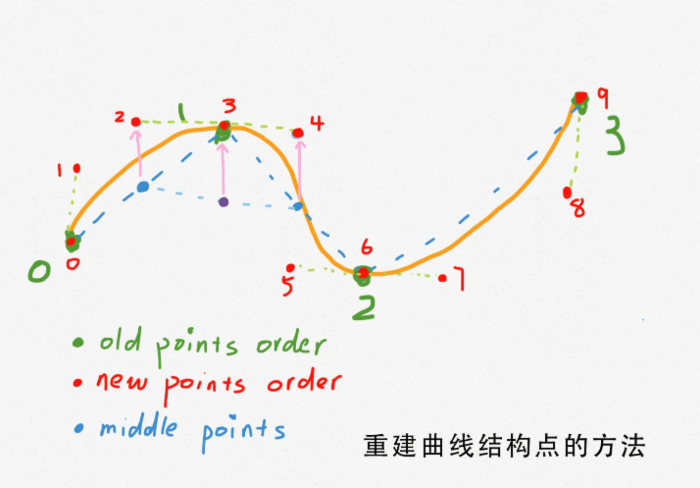
使用的要求就是非闭合曲线的生成点数量必须满足3n+1,其中曲线会穿过3n的点,其他点都会成为权重点。另外为了达到穿过这些点的时候曲线的曲率是连续的,权重点和对应穿过的点必须保证在同一条直线上。基于这些条件下图为我能想到的实现方法:
运用这个模型开始在python里面添加新的点,从而使生成的曲线能够穿过之前“弹”出来的点,下面是在python中的代码:
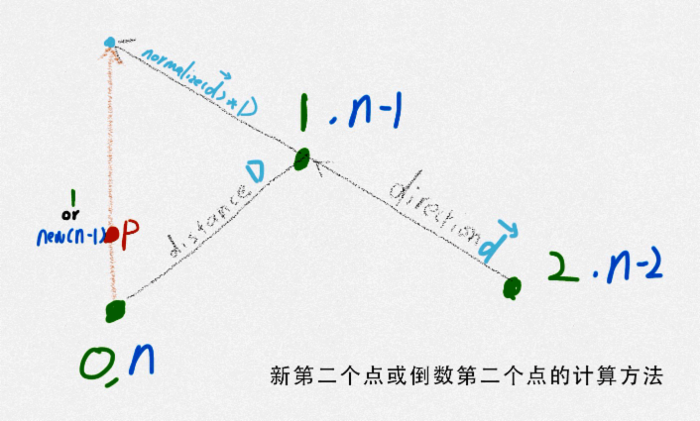
node = hou.pwd() geo = node.geometry() #get the weight value from the interface weight = node.evalParm("weight") # Add code to modify contents of geo. # Use drop down menu to select examples. #get all the point instances from the geo itself points = geo.points() pointNum = len(points) #define the up direction for cross product up = hou.Vector3(0, 1, 0) #put all the new points in this list newPointList = [] # the function to get the center point between two positions def getCenterPosition(firstPosition, secondPosition): centerPosition = (firstPosition + secondPosition) * 0.5 return centerPosition #the function to get the second or last second point position def getSecondPosition(currentPosition, nextPosition, thirdPosition): mirrorDirection = nextPosition - thirdPosition tmpDirection = currentPosition - nextPosition mirrorLength = tmpDirection.length() mirrorPosition = mirrorLength * mirrorDirection.normalized() + nextPosition secondPosition = (getCenterPosition(mirrorPosition, currentPosition) - currentPosition) * 0.2 + currentPosition return secondPosition # Set the weight for Bezier Curve def setWeight(currentPosition, weightPosition, weight): direction = weightPosition - currentPosition direction *= weight newWeightPosition = currentPosition + direction return newWeightPosition if pointNum >= 3: #create the new position list based on the original points for i in range(0, pointNum): #for the first point if i == 0 : #to find the position of the second position currentPosition = points[i].position() nextPosition = points[i+1].position() thirdPosition = points[i+2].position() secondPosition = getSecondPosition(currentPosition, nextPosition, thirdPosition) #add the first and second point into the list newPointList.append(currentPosition) newPointList.append(secondPosition) #for the last point elif i == pointNum - 1: #to find the position of the last second position currentPosition = points[i].position() nextPosition = points[i-1].position() thirdPosition = points[i-2].position() secondPosition = getSecondPosition(currentPosition, nextPosition, thirdPosition) #add the first and second point into the list newPointList.append(secondPosition) newPointList.append(currentPosition) #for the rest of points else: #find the center positions between the previous and next point currentPosition = points[i].position() previousPosition = points[i-1].position() nextPosition = points[i+1].position() previousCenterPosition = getCenterPosition(currentPosition, previousPosition) nextCenterPosition = getCenterPosition(currentPosition, nextPosition) #get the new center position based on the two center positions calculated above newCenterPosition = getCenterPosition(previousCenterPosition, nextCenterPosition) #get the displacement value and use it to push the two center positions out #this method can make sure the Bezier Curve can pass through the original point positions displacement = currentPosition - newCenterPosition newPreviousCenterPosition = previousCenterPosition + displacement newPreviousCenterPosition = setWeight(currentPosition, newPreviousCenterPosition, weight) newNextCenterPosition = nextCenterPosition + displacement newNextCenterPosition = setWeight(currentPosition, newNextCenterPosition, weight) #add the new positions to the list newPointList.append(newPreviousCenterPosition) newPointList.append(currentPosition) newPointList.append(newNextCenterPosition) #clean the original points geo.deletePoints(points) #create the curve instance and sign the new positions to this curve one by one curve = geo.createBezierCurve(len(newPointList)) for i in range(0, len(newPointList)): vertex = curve.vertices()[i] position = newPointList[i] vertex.point().setPosition(position) if pointNum < 3: geo.deletePoints(points) 在实现了一条曲线的原型之后,把这个方法放到foreach里面循环一下就能够实现很多条曲线缠绕的效果了,注意的是原始点也不能够是贴在反弹几何体的表面的,最好把位置加上一点点法向量的矢量值。
正文到此结束
热门推荐


相关文章

近期评论
-
ws0132613@gmail.comhttps://getmacos.com/gopanel/william smith
-
谢谢
-
https://www.newcmy.com/register?aff=HBVX建议您试试草莓云机场,可以流畅观看youtube和tiktok,上reddit/x也没有问题,还有各种ai优化节点。
-
-
-
想购买您这个站,我的联系方式QQ741756694微信同步 能卖联系
-
-
-
-
Loading...
![[HBLOG]公众号](https://www.liuhaihua.cn/img/qrcode_gzh.jpg)

