在Android中使用Protocol Buffers
Protocol Buffers是一个序列化结构数据的灵活、高效且自动化的机制——类似于XML,但更小,更快,更简单。定义一次结构化数据的方式,然后就可以使用专门生成的代码简单地写入,或用不同的语言从大量的数据流读出结构化数据。甚至可以更新数据结构而不破坏已部署的基于 老 格式编译的程序。这里我们看一下要如何将 Protocol Buffers 用到我们的Android项目中。
#总览
先来看一下 Protocol Buffers 项目已经为我们提供了什么,我们在使用 Protocol Buffers 时需要做什么的整体流程。如下图:

在使用 Protocol Buffers 时,我们需要以特殊的方式定义我们的结构化数据,保存为 .proto 消息定义文件。 Protocol Buffers 项目为我们提供了编译器,可以将 .proto 文件编译为Java文件以用于我们的Java 或 Android应用项目。这个编译器在我们的PC机上编译并运行。产生的Java文件是依赖于 Protocol Buffers 的Java库的,比如这些文件实现了库的借口等。我们将生成的这些Java文件和 Protocol Buffers 的Java库引入我们的Android应用项目,就可以方便地以 Protocol Buffers 的二进制格式操作结构化数据了。
每次手动执行 Protocol Buffers 编译器将 .proto 文件转换为Java文件显然有点太麻烦了。 Protocol Buffers 项目的开发者显然也想到了这一点,因而他们还为我们提供了一个Android Studio gradle插件 protobuf-gradle-plugin ,以便于在我们项目的编译期间自动地执行 Protocol Buffers 编译器。
我们可以为 protobuf-gradle-plugin 指定本地 Protocol Buffers 编译器的路径让它使用本地的编译执行编译,也可以使用 Protocol Buffers 项目提供的另外一个工具,在编译时动态地下载并执行编译过程。
后面我们详细地来看这个过程。
下载编译Protocol编译器
我们可以在如下位置:
https://github.com/google/protobuf/releases
下载打包好的protobuf,也可以直接clone protobuf的代码,自己手动编译编译器。这里我们从GitHub上clone代码并手动编译编译器:
$ git clone https://github.com/google/protobuf.git
正克隆到 'protobuf'...
remote: Counting objects: 38993, done.
remote: Compressing objects: 100% (17/17), done.
remote: Total 38993 (delta 4), reused 0 (delta 0), pack-reused 38974
接收对象中: 100% (38993/38993), 36.14 MiB | 239.00 KiB/s, 完成.
处理 delta 中: 100% (26220/26220), 完成.
检查连接... 完成。
下载代码之后,进入protobuf目录并执行 autogen.sh :
$ cd protobuf
$ ./autogen.sh
Google Mock not present.  Fetching gmock-1.7.0 from the web...
  % Total    % Received % Xferd  Average Speed   Time    Time     Time  Current
                                 Dload  Upload   Total   Spent    Left  Speed
100   129    0   129    0     0    111      0 --:--:--  0:00:01 --:--:--   112
100  362k  100  362k    0     0  67764      0  0:00:05  0:00:05 --:--:-- 92816
  % Total    % Received % Xferd  Average Speed   Time    Time     Time  Current
                                 Dload  Upload   Total   Spent    Left  Speed
100   129    0   129    0     0    112      0 --:--:--  0:00:01 --:--:--   112
100  618k  100  618k    0     0  56321      0  0:00:11  0:00:11 --:--:--  115k
+ autoreconf -f -i -Wall,no-obsolete
libtoolize: putting auxiliary files in AC_CONFIG_AUX_DIR, 'build-aux'.
......
这个脚本主要用于下载测试用的gmock-1.7.0,并生成用于编译配置的 configure 等文件。可以通过如下命令了解我们可以对protobuf的编译做哪些配置,以及默认配置的信息:
$ ./configure --help
`configure' configures Protocol Buffers 3.1.0 to adapt to many kinds of systems.

Usage: ./configure [OPTION]... [VAR=VALUE]...

To assign environment variables (e.g., CC, CFLAGS...), specify them as
VAR=VALUE.  See below for descriptions of some of the useful variables.

Defaults for the options are specified in brackets.

Configuration:
  -h, --help              display this help and exit
      --help=short        display options specific to this package
      --help=recursive    display the short help of all the included packages
  -V, --version           display version information and exit
  -q, --quiet, --silent   do not print `checking ...' messages
      --cache-file=FILE   cache test results in FILE [disabled]
  -C, --config-cache      alias for `--cache-file=config.cache'
  -n, --no-create         do not create output files
      --srcdir=DIR        find the sources in DIR [configure dir or `..']

Installation directories:
  --prefix=PREFIX         install architecture-independent files in PREFIX
                          [/usr/local]
  --exec-prefix=EPREFIX   install architecture-dependent files in EPREFIX
                          [PREFIX]

By default, `make install' will install all the files in
`/usr/local/bin', `/usr/local/lib' etc.  You can specify
an installation prefix other than `/usr/local' using `--prefix',
for instance `--prefix=$HOME'.

For better control, use the options below.

Fine tuning of the installation directories:
  --bindir=DIR            user executables [EPREFIX/bin]
......
执行configure对编译进行配置:
$ ./configure
checking whether to enable maintainer-specific portions of Makefiles... yes
checking build system type... x86_64-pc-linux-gnu
checking host system type... x86_64-pc-linux-gnu
checking target system type... x86_64-pc-linux-gnu
checking for a BSD-compatible install... /usr/bin/install -c
checking whether build environment is sane... yes
checking for a thread-safe mkdir -p... /bin/mkdir -p
......
这样就生成了makefile文件,编译并安装:
$ make
$ sudo make install
这个过程在编译并安装 Protocol Buffers 编译器之外,还会为host编译用于支持在C++中使用 Protocol Buffers 的库。(编译生成的二进制文加在 protobuf/src/.libs 下。)
安装之后执行如下命令以确认已经装好:
$ protoc --version
libprotoc 3.1.0
在执行protoc时通过给它加上 –help 参数可以了解到这个工具更多的用法。
$ protoc --help
Usage: protoc [OPTION] PROTO_FILES
Parse PROTO_FILES and generate output based on the options given:
  -IPATH, --proto_path=PATH Specify the directory in which to search for
                              imports.  May be specified multiple times;
                              directories will be searched in order.  If not
                              given, the current working directory is used.
  --version Show version info and exit.
  -h, --help Show this text and exit.
  --encode=MESSAGE_TYPE Read a text-format message of the given type
                              from standard input and write it in binary
                              to standard output.  The message type must
                              be defined in PROTO_FILES or their imports.
  --decode=MESSAGE_TYPE Read a binary message of the given type from
                              standard input and write it in text format
                              to standard output.  The message type must
                              be defined in PROTO_FILES or their imports.
  --decode_raw Read an arbitrary protocol message from
                              standard input and write the raw tag/value
                              pairs in text format to standard output.  No
                              PROTO_FILES should be given when using this
                              flag.
  -oFILE,                     Writes a FileDescriptorSet (a protocol buffer,
    --descriptor_set_out=FILE defined in descriptor.proto) containing all of
                              the input files to FILE.
  --include_imports When using --descriptor_set_out, also include
                              all dependencies of the input files in the
                              set, so that the set is self-contained.
  --include_source_info When using --descriptor_set_out, do not strip
                              SourceCodeInfo from the FileDescriptorProto.
                              This results in vastly larger descriptors that
                              include information about the original
                              location of each decl in the source file as
                              well as surrounding comments.
  --dependency_out=FILE Write a dependency output file in the format
                              expected by make. This writes the transitive
                              set of input file paths to FILE
  --error_format=FORMAT Set the format in which to print errors.
                              FORMAT may be 'gcc' (the default) or 'msvs'
                              (Microsoft Visual Studio format).
  --print_free_field_numbers Print the free field numbers of the messages
                              defined in the given proto files. Groups share
                              the same field number space with the parent
                              message. Extension ranges are counted as
                              occupied fields numbers.

  --plugin=EXECUTABLE Specifies a plugin executable to use.
                              Normally, protoc searches the PATH for
                              plugins, but you may specify additional
                              executables not in the path using this flag.
                              Additionally, EXECUTABLE may be of the form
                              NAME=PATH, in which case the given plugin name
                              is mapped to the given executable even if
                              the executable's own name differs.
  --cpp_out=OUT_DIR Generate C++ header and source.
  --csharp_out=OUT_DIR Generate C# source file.
  --java_out=OUT_DIR Generate Java source file.
  --javanano_out=OUT_DIR Generate Java Nano source file.
  --js_out=OUT_DIR Generate JavaScript source.
  --objc_out=OUT_DIR Generate Objective C header and source.
  --php_out=OUT_DIR Generate PHP source file.
  --python_out=OUT_DIR Generate Python source file.
  --ruby_out=OUT_DIR Generate Ruby source file.
创建 .proto 文件
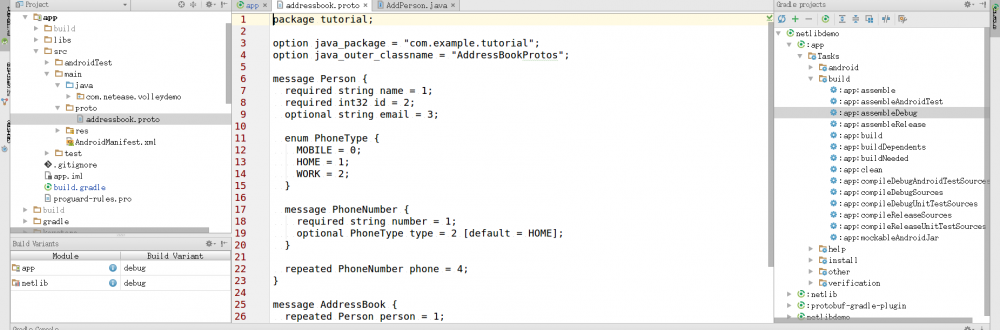
.proto 文件中的定义很简单:为每个想要序列化的数据结构添加一个 消息(message) ,然后为消息中的每个字段指定一个名字和类型以及一个tag数字。如官方提供的一个例子addressbook.proto:
package tutorial;

option java_package = "com.example.tutorial";
option java_outer_classname = "AddressBookProtos";

messagePerson{
  required string name = 1;
  required int32 id = 2;
  optional string email = 3;

  enumPhoneType{
    MOBILE = 0;
    HOME = 1;
    WORK = 2;
  }

  messagePhoneNumber{
    required string number = 1;
    optional PhoneType type = 2 [default = HOME];
  }

  repeated PhoneNumber phone = 4;
}

messageAddressBook{
  repeated Person person = 1;
}
可以参考 在Java中使用Protocol Buffers 一文了解更多关于创建 .proto 文件的基础知识。
编译 .proto 文件
可以通过如下命令编译 .proto 文件:
protoc -I=$SRC_DIR --java_out=$DST_DIR $SRC_DIR/addressbook.proto
-I,–java_out 分别用于指定源目录 (放置应用程序源代码的地方 —— 如果没有提供则使用当前目录),目的目录 (希望放置生成的代码的位置;通常与$SRC_DIR相同),最后的参数为 .proto 文件的路径。protoc会按照标准Java风格,生成Java类及目录结构。如对于上面的例子,会生成 com/example/tutorial/ 目录结构,及 AddressBookProtos.java 文件。
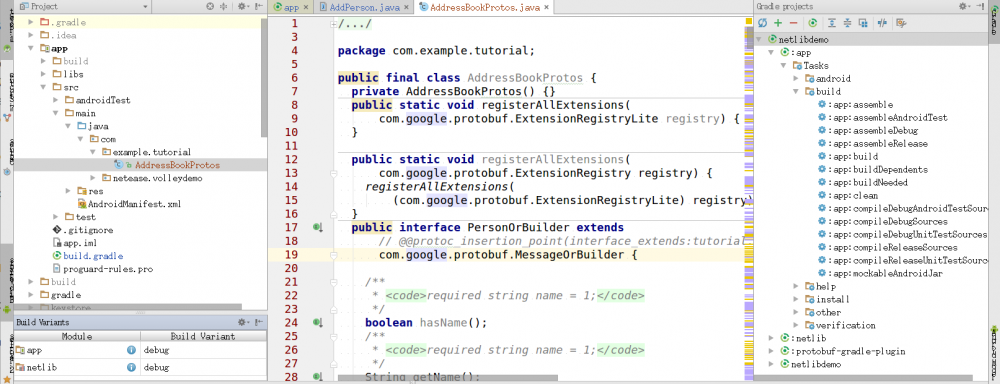
在Android项目中使用 Protocol Buffers
我们将 由 .proto 文件生成的Java文件复制到我们的Android项目中:
在我们app的build.gradle中添加对 protobuf-java 的依赖,就像依赖其它那些Java库一样:
dependencies {
    compile fileTree(dir: 'libs', include: ['*.jar'])
    testCompile 'junit:junit:4.12'

    compile 'com.android.support:appcompat-v7:23.4.0'
    compile 'com.google.protobuf:protobuf-java:3.0.0'
}
添加访问Protocol Buffers的类的类。这里我们添加两个类,AddPerson用于构造Person对象:
package com.netease.volleydemo;

import com.example.tutorial.AddressBookProtos.Person;

public class AddPerson{
    static Person PromptForAddress() {
        Person.Builderperson = Person.newBuilder();

        int id = 13958235;
        person.setId(id);

        String name = "zhangsan";
        person.setName(name);

        String email = "zhangsan@gmail.com";
        person.setEmail(email);

        Person.PhoneNumber.BuilderphoneNumber = Person.PhoneNumber.newBuilder();
        phoneNumber.setType(Person.PhoneType.HOME);
        phoneNumber.setNumber("0157-23443276");

        person.addPhone(phoneNumber.build());

        phoneNumber = Person.PhoneNumber.newBuilder();
        phoneNumber.setType(Person.PhoneType.MOBILE);
        phoneNumber.setNumber("136183667387");

        person.addPhone(phoneNumber.build());

        return person.build();
    }
}
AddressBookWriter类则用于构造AddressBook对象:
package com.netease.volleydemo;

import com.example.tutorial.AddressBookProtos;

import java.io.ByteArrayOutputStream;
import java.io.IOException;

public classAddressBookWriter{
    public static String writer_main() {
        AddressBookProtos.AddressBook.Builder addressBook = AddressBookProtos.AddressBook.newBuilder();
        addressBook.addPerson(AddPerson.PromptForAddress());
        ByteArrayOutputStream baos = new ByteArrayOutputStream();
        try {
            addressBook.build().writeTo(baos);
        } catch (IOException e) {
        }
        return addressBook.build().toString();
    }
}
使用protobuf-gradle-plugin
每次单独执行protoc编译 .proto 文件总是太麻烦,通过protobuf-gradle-plugin可以在编译我们的app时自动地编译 .proto 文件,这样就大大降低了我们在Android项目中使用 Protocol Buffers 的难度。
首先我们需要将 .proto 文件添加进我们的项目中,如:
然后修改 app/build.gradle 对protobuf gradle插件做配置:
-
为buildscript添加对
protobuf-gradle-plugin的依赖:buildscript { repositories { jcenter() mavenCentral() } dependencies { classpath 'com.google.protobuf:protobuf-gradle-plugin:0.8.0' } } -
在
apply plugin: 'com.android.application'后面应用protobuf的plugin:apply plugin: 'com.android.application' apply plugin: 'com.google.protobuf'
-
添加protobuf块,对protobuf-gradle-plugin的执行做配置:
protobuf {
    protoc {
        path = '/usr/local/bin/protoc'
    }

    generateProtoTasks {
        all().each { task ->
            task.builtins {
                remove java
            }
            task.builtins {
                java { }
                // Add cpp output without any option.
                // DO NOT omit the braces if you want this builtin to be added.
                cpp { }
            }
        }
    }
}
protoc 块用于配置Protocol Buffers编译器,这里我们指定用我们之前手动编译的编译器。
task.builtins 的块必不可少,这个块用于指定我们要为那些编程语言生成代码,这里我们为C++和Java生成代码。缺少这个块的话,在编译时会报出如下的错误:
Information:Gradle tasks [:app:generateDebugSources, :app:mockableAndroidJar, :app:prepareDebugUnitTestDependencies, :app:generateDebugAndroidTestSources, :netlib:generateDebugSources, :netlib:mockableAndroidJar, :netlib:prepareDebugUnitTestDependencies, :netlib:generateDebugAndroidTestSources]
Error:Execution failed for task ':app:generateDebugProto'.
> protoc: stdout: . stderr: /media/data/CorpProjects/netlibdemo/app/build/extracted-protos/main: warning: directory does not exist.
  /media/data/CorpProjects/netlibdemo/app/src/debug/proto: warning: directory does not exist.
  /media/data/CorpProjects/netlibdemo/app/build/extracted-protos/debug: warning: directory does not exist.
  /media/data/CorpProjects/netlibdemo/app/build/extracted-include-protos/debug: warning: directory does not exist.
  Missing output directives.
提示说没有指定输出目录的路径。
这是由于 protobuf-gradle-plugin 执行的protobuf编译器命令的参数是在 protobuf-gradle-plugin/src/main/groovy/com/google/protobuf/gradle/GenerateProtoTask.groovy 中构造的:
def cmd= [ tools.protoc.path ]
cmd.addAll(dirs)

// Handle code generation built-ins
builtins.each { builtin ->
  String outPrefix = makeOptionsPrefix(builtin.options)
  cmd+="--${builtin.name}_out=${outPrefix}${getOutputDir(builtin)}"
}

// Handle code generation plugins
plugins.each { plugin ->
  String name = plugin.name
  ExecutableLocator locator = tools.plugins.findByName(name)
  if (locator == null) {
    throw new GradleException("Codegen plugin ${name} not defined")
  }
  String pluginOutPrefix = makeOptionsPrefix(plugin.options)
  cmd+="--${name}_out=${pluginOutPrefix}${getOutputDir(plugin)}"
  cmd+="--plugin=protoc-gen-${name}=${locator.path}"
}

if (generateDescriptorSet) {
  def path = getDescriptorPath()
  // Ensure that the folder for the descriptor exists;
  // the user may have set it to point outside an existing tree
  def folder = new File(path).parentFile
  if (!folder.exists()) {
    folder.mkdirs()
  }
  cmd+="--descriptor_set_out=${path}"
  if (descriptorSetOptions.includeImports) {
    cmd+="--include_imports"
  }
  if (descriptorSetOptions.includeSourceInfo) {
    cmd+="--include_source_info"
  }
}

cmd.addAll protoFiles
logger.log(LogLevel.INFO, cmd.toString())
def stdout = new StringBuffer()
def stderr = new StringBuffer()
Process result = cmd.execute()
result.waitForProcessOutput(stdout, stderr)
def output = "protoc: stdout: ${stdout}. stderr: ${stderr}"
logger.log(LogLevel.INFO, cmd)
if (result.exitValue() == 0) {
  logger.log(LogLevel.INFO, output)
} else {
  throw new GradleException(output)
}
可以看到,输出目录是由builtins构造的。
- 指定 .proto 文件的路径
sourceSets {
    main {
        java {
            srcDir 'src/main/java'
        }
        proto {
            srcDir 'src/main/proto'
        }
    }
}
这样我们就不用那么麻烦每次手动执行protoc了。
对前面的protobuf块做一点点修改,我们甚至来编译protobuf编译器都不需要了。修改如下:
protobuf {
    protoc {
        artifact = 'com.google.protobuf:protoc:3.0.0'
    }

    generateProtoTasks {
        all().each { task ->
            task.builtins {
                remove java
            }
            task.builtins {
                java { }
                cpp { }
            }
        }
    }
}
关于 .proto 文件的编写方法,Protocol Buffers API等更多内容,可以参考 Protobuf开发者指南 、 在Java中使用Protocol Buffers 及其它相关官方文档。
Done。
正文到此结束
- 本文标签: parse 测试 example ip map 下载 GitHub 目录 插件 remote ask 开发者 plugin Android 编译 Java类 mail cat python Google id linux input file cmd src js UI ORM App PHP 开发 maven description Architect API 希望 value tab lib https 配置 JavaScript CTO web dependencies 自动化 find ACE IDE IO XML classpath build git 安装 message 代码 java 参数 db tar http 数据 cache
- 版权声明: 本文为互联网转载文章,出处已在文章中说明(部分除外)。如果侵权,请联系本站长删除,谢谢。
- 本文海报: 生成海报一 生成海报二
热门推荐


相关文章


Loading...
![[HBLOG]公众号](https://www.liuhaihua.cn/img/qrcode_gzh.jpg)

