java基础系列:集合基础(3)

好好学java
java知识分享/学习教程免费分享

精彩内容
你所需要的java全套视频教程
你所需要的java电子图书
你所需要的大数据视频教程
你所需要的java练习项目
新集合
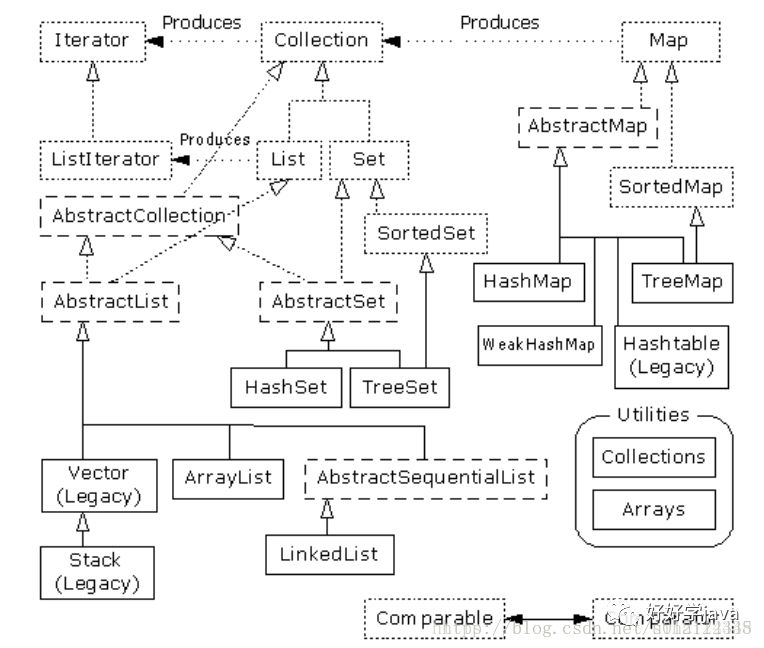
这张图刚开始的时候可能让人有点儿摸不着头脑,相信大家会真正理解它实际只有三个集合组件: Map, List 和 Set。而且每个组件实际只有两、三种实现方式
虚线框代表“接口”,点线框代表“抽象”类,而实线框代表普通(实际)类。点线箭头表示一个特定的类准备实现一个接口(在抽象类的情况下,则是“部分”实现一个接口)。双线箭头表示一个类可生成箭头指向的那个类的对象。
致力于容纳对象的接口是 Collection, List, Set 和 Map。在传统情况下,我们需要写大量代码才能同这些接口打交道。而且为了指定自己想使用的准确类型,必须在创建之初进行设置。所以可能创建下面这样的一
个 List:
List x = new LinkedList();
当然,也可以决定将 x 作为一个 LinkedList 使用(而不是一个普通的 List),并用 x 负载准确的类型信息。使用接口的好处就是一旦决定改变自己的实施细节,要做的全部事情就是在创建的时候改变它,就象下面这样:
List x = new ArrayList();
在类的分级结构中,可看到大量以“ Abstract ”(抽象)开头的类,这刚开始可能会使人感觉迷惑。它们实际上是一些工具,用于“部分”实现一个特定的接口。举个例子来说,假如想生成自己的Set,就不是从 Set接口开始,然后自行实现所有方法。相反,我们可以从 AbstractSet 继承,只需极少的工作即可得到自己的新类。尽管如此,新集合库仍然包含了足够的功能,可满足我们的几乎所有需求。所以考虑到我们的目的,可忽略所有以“ Abstract”开头的类。
因此,在观看这张示意图时,真正需要关心的只有位于最顶部的“接口”以及普通(实际)类—— 均用实线方框包围。通常需要生成实际类的一个对象,将其上溯造型为对应的接口。以后即可在代码的任何地方使用那个接口。下面是一个简单的例子,它用 String 对象填充一个集合,然后打印出集合内的每一个元素:
public class SimpleCollection {
    public static void main(String[] args) {
        Collection c = new ArrayList();
        for (int i = 0; i < 10; i++)
            c.add(Integer.toString(i));
        Iterator it = c.iterator();
        while (it.hasNext())
            System.out.println(it.next());
    }
}
main()的第一行创建了一个 ArrayList 对象,然后将其上溯造型成为一个集合。由于这个例子只使用了Collection 方法,所以从 Collection 继承的一个类的任何对象都可以正常工作。但 ArrayList 是一个典型的 Collection,它代替了 Vector 的位置。
add()方法的作用是将一个新元素置入集合里。然而,用户文档谨慎地指出 add()“保证这个集合包含了指定的元素”。这一点是为 Set 作铺垫的,后者只有在元素不存在的前提下才会真的加入那个元素。对于ArrayList 以及其他任何形式的 List, add()肯定意味着“直接加入”。
利用 iterator()方法,所有集合都能生成一个“反复器”( Iterator)。反复器其实就象一个“枚举”( Enumeration),是后者的一个替代物,只是:
(1)它采用了一个历史上默认、而且早在 OOP 中得到广泛采纳的名字(反复器)。
(2)采用了比 Enumeration 更短的名字: hasNext()代替了 hasMoreElement(),而 next()代替了nextElement()。
(3)添加了一个名为 remove()的新方法,可删除由 Iterator 生成的上一个元素。所以每次调用 next()的时候,只需调用 remove()一次
使用 C o l l e c t i o n s
下面这张表格总结了用一个集合能做的所有事情(亦可对 Set 和 List 做同样的事情,尽管 List 还提供了一
些额外的功能)。 Map 不是从 Collection 继承的,所以要单独对待
boolean add(Object) *保证集合内包含了自变量。如果它没有添加自变量,就返回 false(假)
boolean addAll(Collection) *添加自变量内的所有元素。如果没有添加元素,则返回 true(真)
void clear() *删除集合内的所有元素
boolean contains(Object) 若集合包含自变量,就返回“真”
boolean containsAll(Collection) 若集合包含了自变量内的所有元素,就返回“真”
boolean isEmpty() 若集合内没有元素,就返回“真”
Iterator iterator() 返回一个反复器,以用它遍历集合的各元素
boolean remove(Object) *如自变量在集合里,就删除那个元素的一个实例。如果已进行了删除,就返回
“真”
boolean removeAll(Collection) *删除自变量里的所有元素。如果已进行了任何删除,就返回“真”
boolean retainAll(Collection) *只保留包含在一个自变量里的元素(一个理论的“交集”)。如果已进
行了任何改变,就返回“真”
int size() 返回集合内的元素数量
Object[] toArray() 返回包含了集合内所有元素的一个数组
*这是一个“可选的”方法,有的集合可能并未实现它。若确实如此,该方法就会遇到一个
UnsupportedOperatiionException,即一个“操作不支持”违例。
下面这个例子向大家演示了所有方法。同样地,它们只对从集合继承的东西有效,一个ArrayList 作为一种“不常用的分母”使用
public class Collection1 {
    // Fill with 'size' elements, start
    // counting at 'start':
    public static Collection fill(Collection c, int start, int size) {
        for (int i = start; i < start + size; i++)
            c.add(Integer.toString(i));
        return c;
    }
    // Default to a "start" of 0:
    public static Collection fill(Collection c, int size) {
        return fill(c, 0, size);
    }
    // Default to 10 elements:
    public static Collection fill(Collection c) {
        return fill(c, 0, 10);
    }
    // Create & upcast to Collection:
    public static Collection newCollection() {
        return fill(new ArrayList());
        // ArrayList is used for simplicity, but it's
        // only seen as a generic Collection
        // everywhere else in the program.
    }
    // Fill a Collection with a range of values:
    public static Collection newCollection(int start, int size) {
        return fill(new ArrayList(), start, size);
    }
    // Moving through a List with an iterator:
    public static void print(Collection c) {
        for (Iterator x = c.iterator(); x.hasNext();)
            System.out.print(x.next() + " ");
        System.out.println();
    }
    public static void main(String[] args) {
        Collection c = newCollection();
        c.add("ten");
        c.add("eleven");
        print(c);
        // Make an array from the List:
        Object[] array = c.toArray();
        // Make a String array from the List:
        String[] str = (String[]) c.toArray(new String[1]);
        // Find max and min elements; this means
        // different things depending on the way
        // the Comparable interface is implemented:
        System.out.println("Collections.max(c) = " + Collections.max(c));
        System.out.println("Collections.min(c) = " + Collections.min(c));
        // Add a Collection to another Collection
        c.addAll(newCollection());
        print(c);
        c.remove("3"); // Removes the first one
        print(c);
        c.remove("3"); // Removes the second one
        print(c);
        // Remove all components that are in the
        // argument collection:
        c.removeAll(newCollection());
        print(c);
        c.addAll(newCollection());
        print(c);
        // Is an element in this Collection?
        System.out.println("c.contains(/"4/") = " + c.contains("4"));
        // Is a Collection in this Collection?
        System.out.println("c.containsAll(newCollection()) = "
                + c.containsAll(newCollection()));
        Collection c2 = newCollection(5, 3);
        // Keep all the elements that are in both
        // c and c2 (an intersection of sets):
        c.retainAll(c2);
        print(c);
        // Throw away all the elements in c that
        // also appear in c2:
        c.removeAll(c2);
        System.out.println("c.isEmpty() = " + c.isEmpty());
        c = newCollection();
        print(c);
        c.clear(); // Remove all elements
        System.out.println("after c.clear():");
        print(c);
    }
}
newCollection()的两个版本都创建了 ArrayList,用于包含不同的数据集,并将它们作为集合对象返回。所以很明显,除了 Collection 接口之外,不会再用到其他什么。
使用 L i s t s
List(接口) 顺序是 List 最重要的特性;它可保证元素按照规定的顺序排列。List 为 Collection 添加了大量方法,以便我们在 List 中部插入和删除元素(只推荐对 LinkedList 这样做)。 List 也会生成一个ListIterator(列表反复器),利用它可在一个列表里朝两个方向遍历,同时插入和删除位于列表中部的元素(同样地,只建议对 LinkedList 这样做)
ArrayList 由一个数组后推得到的 List。作为一个常规用途的对象容器使用,用于替换原先的 Vector。允许我们快速访问元素,但在从列表中部插入和删除元素时,速度却嫌稍慢。一般只应该用ListIterator 对一个 ArrayList 进行向前和向后遍历,不要用它删除和插入元素;与 LinkedList 相比,它的效率要低许多LinkedList 提供优化的顺序访问性能,同时可以高效率地在列表中部进行插入和删除操作。但在进行随机访问时,速度却相当慢,此时应换用 ArrayList。也提供了 addFirst(), addLast(), getFirst(),getLast(), removeFirst() 以及 removeLast() (未在任何接口或基础类中定义),以便将其作为一个规格、队列以及一个双向队列使用
public class List1 {
    // Wrap Collection1.fill() for convenience:
    public static List fill(List a) {
        return (List) Collection1.fill(a);
    }
    // You can use an Iterator, just as with a
    // Collection, but you can also use random
    // access with get():
    public static void print(List a) {
        for (int i = 0; i < a.size(); i++)
            System.out.print(a.get(i) + " ");
        System.out.println();
    }
    static boolean b;
    static Object o;
    static int i;
    static Iterator it;
    static ListIterator lit;
    public static void basicTest(List a) {
        a.add(1, "x"); // Add at location 1
        a.add("x"); // Add at end
        // Add a collection:
        a.addAll(fill(new ArrayList()));
        // Add a collection starting at location 3:
        a.addAll(3, fill(new ArrayList()));
        b = a.contains("1"); // Is it in there?
        // Is the entire collection in there?
        b = a.containsAll(fill(new ArrayList()));
        // Lists allow random access, which is cheap
        // for ArrayList, expensive for LinkedList:
        o = a.get(1); // Get object at location 1
        i = a.indexOf("1"); // Tell index of object
        // indexOf, starting search at location 2:
        i = a.indexOf("1", 2);
        b = a.isEmpty(); // Any elements inside?
        it = a.iterator(); // Ordinary Iterator
        lit = a.listIterator(); // ListIterator
        lit = a.listIterator(3); // Start at loc 3
        i = a.lastIndexOf("1"); // Last match
        i = a.lastIndexOf("1", 2); // ...after loc 2
        a.remove(1); // Remove location 1
        a.remove("3"); // Remove this object
        a.set(1, "y"); // Set location 1 to "y"
        // Keep everything that's in the argument
        // (the intersection of the two sets):
        a.retainAll(fill(new ArrayList()));
        // Remove elements in this range:
        a.removeRange(0, 2);
        // Remove everything that's in the argument:
        a.removeAll(fill(new ArrayList()));
        i = a.size(); // How big is it?
        a.clear(); // Remove all elements
    }
    public static void iterMotion(List a) {
        ListIterator it = a.listIterator();
        b = it.hasNext();
        b = it.hasPrevious();
        o = it.next();
        i = it.nextIndex();
        o = it.previous();
        i = it.previousIndex();
    }
    public static void iterManipulation(List a) {
        ListIterator it = a.listIterator();
        it.add("47");
        // Must move to an element after add():
        it.next();
        // Remove the element that was just produced:
        it.remove();
        // Must move to an element after remove():
        it.next();
        // Change the element that was just produced:
        it.set("47");
    }
    public static void testVisual(List a) {
        print(a);
        List b = new ArrayList();
        fill(b);
        System.out.print("b = ");
        print(b);
        a.addAll(b);
        a.addAll(fill(new ArrayList()));
        print(a);
        // Shrink the list by removing all the
        // elements beyond the first 1/2 of the list
        System.out.println(a.size());
        System.out.println(a.size() / 2);
        a.removeRange(a.size() / 2, a.size() / 2 + 2);
        print(a);
        // Insert, remove, and replace elements
        // using a ListIterator:
        ListIterator x = a.listIterator(a.size() / 2);
        x.add("one");
        print(a);
        System.out.println(x.next());
        x.remove();
        System.out.println(x.next());
        x.set("47");
        print(a);
        // Traverse the list backwards:
        x = a.listIterator(a.size());
        while (x.hasPrevious())
            System.out.print(x.previous() + " ");
        System.out.println();
        System.out.println("testVisual finished");
    }
    // There are some things that only
    // LinkedLists can do:
    public static void testLinkedList() {
        LinkedList ll = new LinkedList();
        Collection1.fill(ll, 5);
        print(ll);
        // Treat it like a stack, pushing:
        ll.addFirst("one");
        ll.addFirst("two");
        print(ll);
        // Like "peeking" at the top of a stack:
        System.out.println(ll.getFirst());
        // Like popping a stack:
        System.out.println(ll.removeFirst());
        System.out.println(ll.removeFirst());
        // Treat it like a queue, pulling elements
        // off the tail end:
        System.out.println(ll.removeLast());
        // With the above operations, it's a dequeue!
        print(ll);
    }
    public static void main(String args[]) {
        // Make and fill a new list each time:
        basicTest(fill(new LinkedList()));
        basicTest(fill(new ArrayList()));
        iterMotion(fill(new LinkedList()));
        iterMotion(fill(new ArrayList()));
        iterManipulation(fill(new LinkedList()));
        iterManipulation(fill(new ArrayList()));
        testVisual(fill(new LinkedList()));
        testLinkedList();
    }
}
在 basicTest()和 iterMotiion() 中,只是简单地发出调用,以便揭示出正确的语法。而且尽管捕获了返回
值,但是并未使用它。在某些情况下,之所以不捕获返回值,是由于它们没有什么特别的用处。在正式使用
它们前,应仔细研究一下自己的联机文档,掌握这些方法完整、正确的用法。
ArrayList使用实例
import java.awt.List;
import java.util.ArrayList;
import java.util.Iterator;
/**
 * @author sihai
 * @time 2018/4/19
 * ArrayList用法示例说明
 *
 */
public class Main {
    public static void main(String[] args) {
        //ArrayList用法示例
        ArrayList<String> m_ArrayList=new ArrayList<String>();
        m_ArrayList.add("Evankaka");
        m_ArrayList.add("sihai");
        m_ArrayList.add("德德");
        m_ArrayList.add("Evankaka");
        m_ArrayList.add("小红");
        m_ArrayList.set(2,"sihai2");// 将索引位置为2的对象修改
        m_ArrayList.add(3,"好好学java");// 将对象添加到索引位置为3的位置
        //ArrayList遍历方法1
        Iterator<String> it_ArrayList = m_ArrayList.iterator();
        System.out.println("ArrayList遍历方法1");
        while (it_ArrayList.hasNext()) {
        System.out.println(it_ArrayList.next());
        }
        //ArrayList遍历方法2
        System.out.println("ArrayList遍历方法2");
        for(Object o:m_ArrayList){
            System.out.println(o);
        }
        //ArrayList遍历方法2
        System.out.println("ArrayList遍历方法3");
        for(int i = 0; i<m_ArrayList.size(); i++){
            System.out.println(m_ArrayList.get(i));
            }
        //删除元素
        m_ArrayList.remove("Evankaka");
        it_ArrayList = m_ArrayList.iterator();
        System.out.println("ArrayList删除元素后的遍历");
        while (it_ArrayList.hasNext()) {
            String m_String=it_ArrayList.next();
         if(m_String.equals("好好学java")){
             it_ArrayList.remove();
         }else{
        System.out.println(m_String);
          }
        }
    }
}
输出结果:
ArrayList遍历方法1
Evankaka
sihai
sihai2
好好学java
Evankaka
小红
ArrayList遍历方法2
Evankaka
sihai
sihai2
好好学java
Evankaka
小红
ArrayList遍历方法3
Evankaka
sihai
sihai2
好好学java
Evankaka
小红
ArrayList删除元素后的遍历
sihai
sihai2
Evankaka
小红
ArrayList注意
(1)使用Iterator迭代集合过程中,不可修改集合元素,否则会引发异常。并且Iterator只能向后迭代
(2)如果你想在循环过程中去掉某个元素,只能调用it.remove方法, 不能使用list.remove方法, 否则一定出并发访问的错误.
-
QQ群: 766946816
-
参考资料:《java编程思想》
回复以下关键字获取更多学习资源
java基础|html5|css|js|jquery|angularJs|ajax|node.js|javaEE基础| |struts2|hibernate|spring|svn|maven|springmvc|mybatis|linux|oracle| |luncene|solr|redis|springboot|架构师资源|dubbo|php|webservice|c++基础|nginx|mysql|sqlserver|asp.net|大数据|php|android
更多学习资源逐步更新,请置顶公众号不要错过更新
想了解更多?
那就赶紧来关注我们

长按二维码 关注我们
推送java优质文章、视频教程
微信公众号:好好学java
正文到此结束
- 本文标签: 总结 DDL 数据 图片 需求 LinkedList maven value AngularJS cat 文章 NSA WebService java Android mybatis js src UI Service 代码 索引 node Collections Ajax Oracle ACE CSS Struts2 spring HTML 二维码 https collection1 jquery queue HTML5 架构师 Nginx 实例 dubbo find 删除 IDE Collection mysql App equals ip SpringMVC solr map 微信公众号 Node.js springboot PHP DOM java基础 tar http redis IO linux CTO ArrayList SVN list QQ群 sql 免费 大数据 id web 遍历
- 版权声明: 本文为互联网转载文章,出处已在文章中说明(部分除外)。如果侵权,请联系本站长删除,谢谢。
- 本文海报: 生成海报一 生成海报二
热门推荐


相关文章

近期评论
-
ws0132613@gmail.comhttps://getmacos.com/gopanel/william smith
-
谢谢
-
https://www.newcmy.com/register?aff=HBVX建议您试试草莓云机场,可以流畅观看youtube和tiktok,上reddit/x也没有问题,还有各种ai优化节点。
-
-
-
想购买您这个站,我的联系方式QQ741756694微信同步 能卖联系
-
-
-
-
Loading...
![[HBLOG]公众号](https://www.liuhaihua.cn/img/qrcode_gzh.jpg)

