spring mvc 2.5.6两例
spring 2.5.6用的已经很少了, 相关例子已经很少也不好找, 完整的能好用的就更少了, 下面是两个相对完整的, 并且有源代码的
另外, 下面项目最好在 jdk1.6的环境运行, 高版本的jdk可能有些问题, 例如jdk1.8 会报异常
Spring MVC hello world annotation example
This tutorial is based on Spring 2.5.6, quite outdated. Try considering the new tutorials :
- Gradle + Spring 4 MVC Hello World
- Maven + Spring 3 MVC Hello World
In this tutorial, we will take the previous Spring MVC hello world XML-based , and convert it to a annotation-based project.
Technologies used :
- Spring 2.5.6
- JDK 1.6
- Maven 3
- Eclipse 3.6
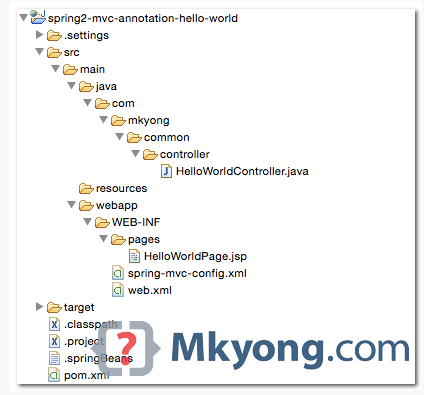
1. Directory Structure
如下图
2. Maven
Spring’s annotation is bundled in the same spring-webmvc.jar .
pom.xml
<project xmlns="http://maven.apache.org/POM/4.0.0"
	xmlns:xsi="http://www.w3.org/2001/XMLSchema-instance"
	xsi:schemaLocation="http://maven.apache.org/POM/4.0.0
	http://maven.apache.org/maven-v4_0_0.xsd">
	<modelVersion>4.0.0</modelVersion>
	<groupId>com.mkyong.common</groupId>
	<artifactId>spring2-mvc-annotation-hello-world</artifactId>
	<packaging>war</packaging>
	<version>1.0-SNAPSHOT</version>
	<name>Spring 2 MVC</name>

	<properties>
		<jdk.version>1.6</jdk.version>
		<spring.version>2.5.6</spring.version>
		<jstl.version>1.2</jstl.version>
		<servletapi.version>2.5</servletapi.version>
	</properties>

	<dependencies>

		<!-- Spring MVC framework -->
		<dependency>
			<groupId>org.springframework</groupId>
			<artifactId>spring-webmvc</artifactId>
			<version>${spring.version}</version>
		</dependency>

		<!-- JSTL -->
		<dependency>
			<groupId>javax.servlet</groupId>
			<artifactId>jstl</artifactId>
			<version>${jstl.version}</version>
		</dependency>

		<!-- for compile only, your container should have this -->
		<dependency>
			<groupId>javax.servlet</groupId>
			<artifactId>servlet-api</artifactId>
			<version>${servletapi.version}</version>
			<scope>provided</scope>
		</dependency>

	</dependencies>

	<build>

	  <plugins>
		<plugin>
			<groupId>org.apache.maven.plugins</groupId>
			<artifactId>maven-compiler-plugin</artifactId>
			<version>3.3</version>
			<configuration>
				<source>${jdk.version}</source>
				<target>${jdk.version}</target>
			</configuration>
		</plugin>

		<plugin>
			<groupId>org.eclipse.jetty</groupId>
			<artifactId>jetty-maven-plugin</artifactId>
			<version>9.2.11.v20150529</version>
			<configuration>
				<scanIntervalSeconds>10</scanIntervalSeconds>
				<webApp>
					<contextPath>/spring2</contextPath>
				</webApp>
			</configuration>
		</plugin>

		<plugin>
			<groupId>org.apache.maven.plugins</groupId>
			<artifactId>maven-eclipse-plugin</artifactId>
			<version>2.9</version>
			<configuration>
				<downloadSources>true</downloadSources>
				<downloadJavadocs>true</downloadJavadocs>
				<wtpversion>2.0</wtpversion>
				<wtpContextName>spring2</wtpContextName>
			</configuration>
		</plugin>

	  </plugins>

	</build>

</project>
3. Controller & Handler Mapping
Now, you can use @Controller and @RequestMapping to replace the XML configuration.
- Controller – The controller class is no longer need to extend the base controller like AbstractController or SimpleFormController , just simply annotate the class with a @Controller annotation.
- Handler Mapping – No more declaration for the handler mapping like BeanNameUrlHandlerMapping , ControllerClassNameHandlerMapping or SimpleUrlHandlerMapping , all are replaced with a standard @RequestMapping annotation.
HelloWorldController.java
package com.mkyong.common.controller;

import org.springframework.stereotype.Controller;
import org.springframework.web.bind.annotation.RequestMapping;
import org.springframework.web.bind.annotation.RequestMethod;
import org.springframework.web.servlet.ModelAndView;

@Controller
@RequestMapping("/welcome")
public class HelloWorldController{

	@RequestMapping(method = RequestMethod.GET)
	public ModelAndView helloWorld(){

		ModelAndView model = new ModelAndView("HelloWorldPage");
		model.addObject("msg", "hello world");

		return model;
	}
}
Copy
If the @RequestMapping is applied at the class level (can apply at method level with multi-actions controller ), it required to put a RequestMethod to indicate which method to handle the mapping request.
In this case, if a URI pattern /welcome is requested, it will map to this HelloWorldController , and handle the request with helloWorld() method.
4. Spring XML Configuration
You still need to configure the view resolver and component scanning in XML file.
/WEB-INF/spring-mvc-config.xml
<beans xmlns="http://www.springframework.org/schema/beans"
	xmlns:xsi="http://www.w3.org/2001/XMLSchema-instance"
	xmlns:context="http://www.springframework.org/schema/context"
	xsi:schemaLocation="http://www.springframework.org/schema/beans

http://www.springframework.org/schema/beans/spring-beans-2.5.xsd


http://www.springframework.org/schema/context

	http://www.springframework.org/schema/context/spring-context-2.5.xsd">

	<bean id="viewResolver"
		class="org.springframework.web.servlet.view.InternalResourceViewResolver">
		<property name="prefix">
			<value>/WEB-INF/pages/</value>
		</property>
		<property name="suffix">
			<value>.jsp</value>
		</property>
	</bean>

	<context:component-scan base-package="com.mkyong.common.controller" />

</beans>
Copy
5. JSP Page
A simple JSP page for demonstration.
HelloWorldPage.jsp.
<%@ taglib prefix="c" uri="http://java.sun.com/jsp/jstl/core"%>
<html>
<body>
	<h1>Spring MVC Hello World Annotation Example</h1>

	<h2>${msg}</h2>
</body>
</html>
Copy
6. web.xml
web.xml
<web-app id="WebApp_ID" version="2.4"
	xmlns="http://java.sun.com/xml/ns/j2ee"
	xmlns:xsi="http://www.w3.org/2001/XMLSchema-instance"
	xsi:schemaLocation="http://java.sun.com/xml/ns/j2ee
	http://java.sun.com/xml/ns/j2ee/web-app_2_4.xsd">

	<display-name>Spring Web MVC Application</display-name>

	<servlet>
		<servlet-name>mvc-dispatcher</servlet-name>
		<servlet-class>org.springframework.web.servlet.DispatcherServlet</servlet-class>
		<init-param>
			<param-name>contextConfigLocation</param-name>
			<param-value>/WEB-INF/spring-mvc-config.xml</param-value>
		</init-param>
		<load-on-startup>1</load-on-startup>
	</servlet>

	<servlet-mapping>
		<servlet-name>mvc-dispatcher</servlet-name>
		<url-pattern>*.htm</url-pattern>
	</servlet-mapping>

</web-app>
Copy
7. Demo
6.1 To run with the embedded Jetty, type :
$ mvn jetty:run
Copy
URL : http://localhost:8080/spring2/welcome.htm

6.2 To import into Eclipse IDE.
$ mvn eclipse:eclipse
Copy
Note
If you compare this Spring MVC annotation-based hello world example with previously XML-based example , you can see that this annotation approach is easier and flexible in wiring the controller class and URL handler mapping, because you do not need to declare the controller class explicitly or extends any particular class.
Download Source Code
Download it – spring2-mvc-annotation.zip (15 KB)
References
- Controller Javadoc
- RequestMapping Javadoc
- Spring MVC hello world XML-based example
- Spring auto scanning components
annotation hello world spring mvc
本文地址: http://www.mkyong.com/spring-mvc/spring-mvc-hello-world-annotation-example/
下面的例子是,没有使用注解方式的例子, 另外, 这个例子里面, 有spring mvc的基本原理等, 值得学习, 上面的例子适合在 有很多 controller的项目用, 因为,自己配置 xml太多的时候, 就效率低了。
Spring MVC hello world example
This tutorial is based on Spring 2.5.6, quite outdated. Try considering the new tutorials :
- Gradle + Spring 4 MVC Hello World
- Maven + Spring 3 MVC Hello World
In this tutorial, we will show you a Spring MVC hello world web application.
Technologies used :
- Spring 2.5.6
- JDK 1.6
- Eclipse 3.6
- Maven 3
1. MVC Basic
In Spring MVC web application, it consists of 3 standard MVC (Model, Views, Controller) components :
- Models – Domain objects that are processed by the service layer (business logic) or persistent layer (database operation).
- Views – Display data, normally it’s a JSP page written with the Java Standard Tag Library (JSTL).
- Controllers – URL mapping and interact with service layer for business processing and return a Model.
The following figures demonstrates how the Spring MVC web application handles a web request.
Figure 1.1 – Image is copied from Spring MVC reference with slightly modified.
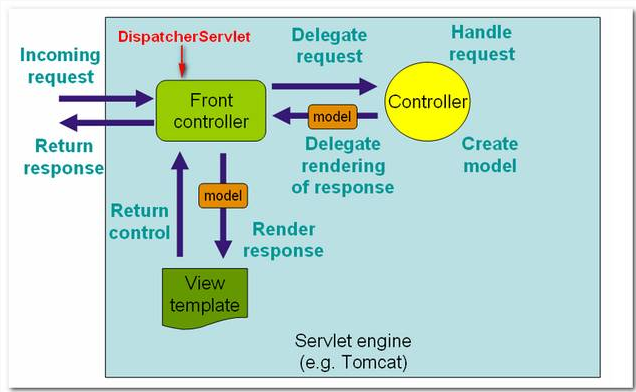
这个图片比较全面的说明了 spring mvc的工作过程, 很重要的, 需要多多理解。
Figure 1.2 – Image is copied from this book : Spring Recipes

Note
In Spring MVC , the core dispatcher component is the DispatcherServlet , which act as the front-controller (design pattern). Every web request has to go through this DispatcherServlet , and the DispatcherServlet will dispatch the web request to suitable handlers.
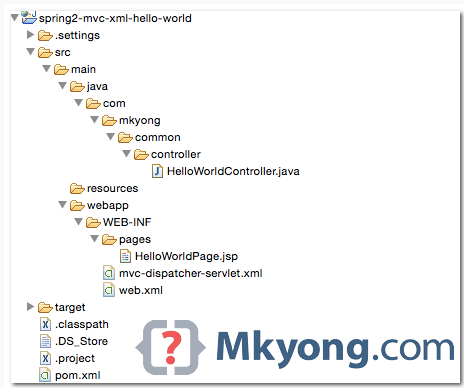
2. Directory Structure
A standard Maven project directory structure.
3. Maven
Declares the spring-webmvc dependency, Maven will help you manage the transitive dependencies automatically (download other dependencies that are required by spring-webmvc , like spring-context or spring-beans ).
If you are using the JSP page with JSTL technology, include the jstl dependency also.
pom.xml
<project xmlns="http://maven.apache.org/POM/4.0.0"
	xmlns:xsi="http://www.w3.org/2001/XMLSchema-instance"
	xsi:schemaLocation="http://maven.apache.org/POM/4.0.0
	http://maven.apache.org/maven-v4_0_0.xsd">
	<modelVersion>4.0.0</modelVersion>
	<groupId>com.mkyong.common</groupId>
	<artifactId>spring2-mvc-xml-hello-world</artifactId>
	<packaging>war</packaging>
	<version>1.0-SNAPSHOT</version>
	<name>Spring 2 MVC</name>

	<properties>
		<jdk.version>1.6</jdk.version>
		<spring.version>2.5.6</spring.version>
		<jstl.version>1.2</jstl.version>
		<servletapi.version>2.5</servletapi.version>

	</properties>

	<dependencies>

		<!-- Spring MVC framework -->
		<dependency>
			<groupId>org.springframework</groupId>
			<artifactId>spring-webmvc</artifactId>
			<version>${spring.version}</version>
		</dependency>

		<!-- JSTL -->
		<dependency>
			<groupId>javax.servlet</groupId>
			<artifactId>jstl</artifactId>
			<version>${jstl.version}</version>
		</dependency>

		<!-- for compile only, your container should have this -->
		<dependency>
			<groupId>javax.servlet</groupId>
			<artifactId>servlet-api</artifactId>
			<version>${servletapi.version}</version>
			<scope>provided</scope>
		</dependency>

	</dependencies>

	<build>

	  <plugins>
		<plugin>
			<groupId>org.apache.maven.plugins</groupId>
			<artifactId>maven-compiler-plugin</artifactId>
			<version>3.3</version>
			<configuration>
				<source>${jdk.version}</source>
				<target>${jdk.version}</target>
			</configuration>
		</plugin>

                <!-- embedded jetty, good for testing -->
		<plugin>
			<groupId>org.eclipse.jetty</groupId>
			<artifactId>jetty-maven-plugin</artifactId>
			<version>9.2.11.v20150529</version>
			<configuration>
				<scanIntervalSeconds>10</scanIntervalSeconds>
				<webApp>
					<contextPath>/spring2</contextPath>
				</webApp>
			</configuration>
		</plugin>

                <!-- configure Eclipse workspace -->
		<plugin>
			<groupId>org.apache.maven.plugins</groupId>
			<artifactId>maven-eclipse-plugin</artifactId>
			<version>2.9</version>
			<configuration>
				<downloadSources>true</downloadSources>
				<downloadJavadocs>true</downloadJavadocs>
				<wtpversion>2.0</wtpversion>
				<wtpContextName>spring2</wtpContextName>
			</configuration>
		</plugin>

	  </plugins>

	</build>

</project>
4. Spring Controller
Spring comes with many Controllers, normally, you just need to extend the AbstractController , and override the handleRequestInternal() method.
HelloWorldController.java
package com.mkyong.common.controller;

import javax.servlet.http.HttpServletRequest;
import javax.servlet.http.HttpServletResponse;

import org.springframework.web.servlet.ModelAndView;
import org.springframework.web.servlet.mvc.AbstractController;

public class HelloWorldController extends AbstractController{

	@Override
	protected ModelAndView handleRequestInternal(HttpServletRequest request,
		HttpServletResponse response) throws Exception {

		ModelAndView model = new ModelAndView("HelloWorldPage");
		model.addObject("msg", "hello world");

		return model;
	}
}
4.1 ModelAndView(“HelloWorldPage”) – To identify which view should return back to the user, in this example HelloWorldPage.jsp will be returned.
4.2 model.addObject(“msg”, “hello world”) – Add a “hello world” string into a model named “msg”, later you can use EL ${msg} to display the “hello world” string.
5. View (JSP page)
In this case, “view” is a JSP page, you can display the value “hello world” that is stored in the model “msg” via expression language (EL) ${msg}.
HelloWorldPage.jsp
<%@ taglib prefix="c" uri="http://java.sun.com/jsp/jstl/core"%>
<html>
<body>
	<h1>Spring MVC Hello World Example</h1>

	<h2>${msg}</h2>
</body>
</html>
Copy
Note
If the ${msg} is displayed as it is, not the value inside the “msg” model, it may caused by the old JSP 1.2 descriptor, which make the expression languages disabled by default, see the solution here.
6. Spring XML Configuration
6.1 Declared the Spring Controller and viewResolver.
mvc-dispatcher-servlet.xml
<beans xmlns="http://www.springframework.org/schema/beans"
	xmlns:xsi="http://www.w3.org/2001/XMLSchema-instance"
	xsi:schemaLocation="http://www.springframework.org/schema/beans
	http://www.springframework.org/schema/beans/spring-beans-2.5.xsd">

    <bean name="/welcome.htm"
		class="com.mkyong.common.controller.HelloWorldController" />

    <bean id="viewResolver"
    	class="org.springframework.web.servlet.view.InternalResourceViewResolver" >
        <property name="prefix">
            <value>/WEB-INF/pages/</value>
        </property>
        <property name="suffix">
            <value>.jsp</value>
        </property>
    </bean>

</beans>
1. Controller – Declared a bean name /welcome.htm and map it to HelloWorldController . It means, if an URL with /welcome.htm pattern is requested, the HelloWorldController controller will handle the request.
2. viewResolver – Define how Spring will look for the view template. In this case, the controller HelloWorldController will return a view named HelloWorldPage , the viewResolver will find the file with following mechanism : prefix + view name + suffix , which is /WEB-INF/pages/HelloWorldPage.jsp .
Note
Actually, you don’t need to define the BeanNameUrlHandlerMapping in the web.xml , by default, if no handler mapping can be found, the DispatcherServlet will create a BeanNameUrlHandlerMapping automatically. See this article – BeanNameUrlHandlerMapping example for detail.
6.2 In web.xml , declared a DispatcherServlet servlet to act as the front-controller to handle all the entire web request which end with htm extension.
web.xml
<web-app id="WebApp_ID" version="2.4"
	xmlns="http://java.sun.com/xml/ns/j2ee"
	xmlns:xsi="http://www.w3.org/2001/XMLSchema-instance"
	xsi:schemaLocation="http://java.sun.com/xml/ns/j2ee
	http://java.sun.com/xml/ns/j2ee/web-app_2_4.xsd">

  <display-name>Spring Web MVC Application</display-name>

  <servlet>
  	<servlet-name>mvc-dispatcher</servlet-name>
        <servlet-class>
             org.springframework.web.servlet.DispatcherServlet
        </servlet-class>
        <load-on-startup>1</load-on-startup>
  </servlet>

  <servlet-mapping>
 	<servlet-name>mvc-dispatcher</servlet-name>
        <url-pattern>*.htm</url-pattern>
  </servlet-mapping>

</web-app>
Note
The mvc-dispatcher is used to define which file to load the Spring XML configurations. By default, it will look for Spring XML configuration file by joining the servlet name mvc-dispatcher with -servlet.xml .In this example, Spring will look for this file – mvc-dispatcher-servlet.xml .
7. Demo
7.1 To run this project with Maven :
$ mvn jetty:run
7.2 To run this project in Eclipse IDE, create Eclipse project settings with the following Maven command :
$ mvn eclipse:eclipse
Imports the project manually and start with the server plugin.
URL : http://localhost:8080/spring2/welcome.htm
How it works?
- http://localhost:8080/spring2/welcome.htm is requested.
- URL is end with “.htm” extension, so it will redirect to “DispatcherServlet” and send requests to the default BeanNameUrlHandlerMapping.
- BeanNameUrlHandlerMapping return HelloWorldController to the DispatcherServlet.
- DispatcherServlet forward request to the HelloWorldController.
- HelloWorldController process it and return a ModelAndView object, with view name “HelloWorldPage”.
- DispatcherServlet received the ModelAndView and call the viewResolver to process it.
- viewResolver return the
/WEB-INF/pages/HelloWorldPage.jspback to the DispatcherServlet. - DispatcherServlet return the “HelloWorldPage.jsp” back to the user.
Download Source Code
Download it – spring2-mvc-xml-hello-world.zip (14 KB)
References
- Spring MVC documentation
hello world maven spring mvc
本文地址: http://www.mkyong.com/spring-mvc/spring-mvc-hello-world-example/
另外上面文章的 例子很多 , 有时间的可以多学习一下。
正文到此结束
- 本文标签: UI bus DOM pom core tar ORM 时间 apache schema servlet 2015 配置 id Document maven src js bean 代码 zip dependencies 文章 map IO HTML tab lib https Service API java value jetty ACE cat 图片 App JavaDocs build struct Action IDE spring XML eclipse http find plugin CTO web example ip Property
- 版权声明: 本文为互联网转载文章,出处已在文章中说明(部分除外)。如果侵权,请联系本站长删除,谢谢。
- 本文海报: 生成海报一 生成海报二
热门推荐


相关文章

近期评论
-
https://www.newcmy.com/register?aff=HBVX
建议您试试草莓云机场,可以流畅观看youtube和tiktok,上reddit/x也没有问题,还有各种ai优化节点。 -
出现OpenClaw "device signature expired"。the Gateway rejects if Math.abs(Date.now() - signedAt) > 10 * 60 * 1000 (10 minutes)
-
-
想购买您这个站,我的联系方式QQ741756694微信同步 能卖联系
-
-
-
-
-
https://www.liuhaihua.cn/archives/40657.html 这篇博客中的图片打不开了
-
不会英语啊。
Loading...
![[HBLOG]公众号](https://www.liuhaihua.cn/img/qrcode_gzh.jpg)

