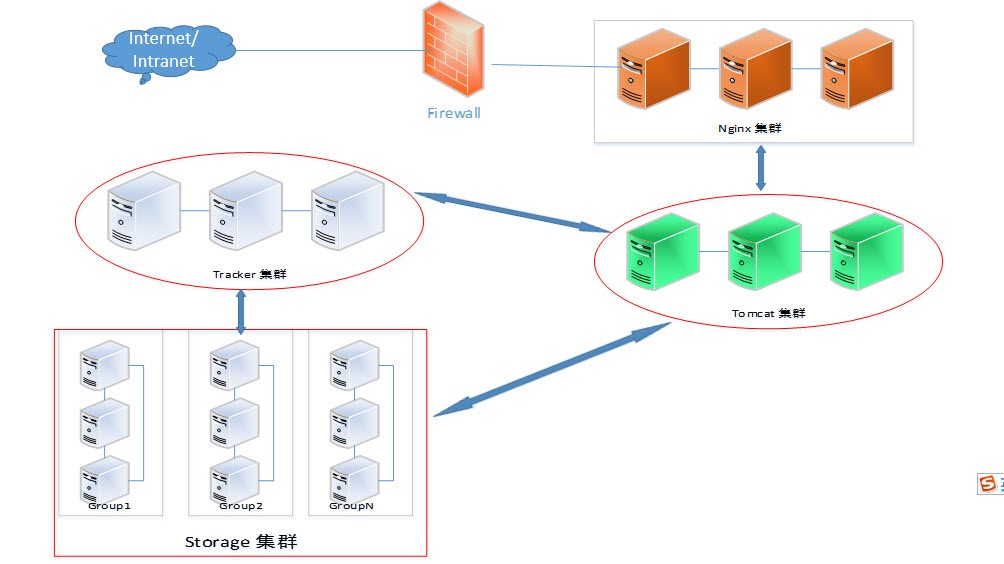
四、 FastDFS安装部署
 192.168.80.139
nginx—tracerserver—storeserver
192.168.80.139
nginx—tracerserver—storeserver
1.1. 下载EPEL 的rpm 安装包
wget http://download.fedoraproject.org/pub/epel/6/i386/epel-release-6-8.noarch.rpm rpm -ivh epel-release-6-8.noarch.rpm yum repolist
1.2. FastDFS
wget https://github.com/happyfish100/libfastcommon/archive/master.zip unzip master.zip cd libfastcommon-master ./make.sh ./make.sh install
wget https://github.com/happyfish100/fastdfs/archive/V5.05.tar.gz tar -zxvf V5.05.tar.gz cd fastdfs-5.05/ ./make.sh ./make.sh install安装之后配置文件在目录/etc/fdfs。
mv storage.conf.sample storage.conf mv tracker.conf.sample tracker.conf修改配置文件: storage.conf
# the base path to store data and log files base_path=/data/fdfs启动:
/usr/bin/fdfs_trackerd /etc/fdfs/tracker.conf start修改配置文件: /etc/fdfs/storage.conf,修改路径到/data/fdfs目录,同时配置tracker_server地址。
# the base path to store data and log files base_path=/data/fdfs # tracker_server can ocur more than once, and tracker_server format is # "host:port", host can be hostname or ip address tracker_server=192.168.1.36:22122 # store_path#, based 0, if store_path0 not exists, it's value is base_path # the paths must be exist store_path0=/data/fdfs #store_path1=/home/yuqing/fastdfs2启动
/usr/bin/fdfs_storaged /etc/fdfs/storage.conf start
1.3. Nginx+ fastdfs-nginx-module
[root@storage1]# wget http://fastdfs.googlecode.com/files/FastDFS_v3.06.tar.gz [root@storage1]# wget http://fastdfs.googlecode.com/files/fastdfs-nginx-module_v1.10.tar.gz [root@storage1]# wget http://nginx.org/download/nginx-1.0.11.tar.gz [root@storage1]# tar xvzf nginx-1.0.11.tar.gz [root@storage1]# tar xvzf fastdfs-nginx-module_v1.10.tar.gz [root@storage1]# cd nginx-1.0.11 [root@storage1]# ./configure --prefix=/usr/local/nginx --add-module=/root/fastdfs-nginx-module/src/ [root@storage1]# make [root@storage1]# make installvi /etc/fdfs/storage.conf 修改/etc/fdfs/storage.conf,主要修改以下几处,如有其他调整,可参考文档自行调整,默认的配置也可以工作。
# HTTP settings # 关闭内置的web server http.disabled=true # the port of the web server on this storage server # web server的端口改成80 http.server_port=80 # the name of the group this storage server belongs to # 此台storage1所属的服务器组名,同组内storage数据完全相同 group_name=group1 # the base path to store data and log files # 放置data和log的目录 base_path=/home/storage1/fastdfs # store_path#, based 0, if store_path0 not exists, it's value is base_path # the paths must be exist # 放置文件的目录 store_path0=/home/storage1/fastdfs # tracker_server can ocur more than once, and tracker_server format is # "host:port", host can be hostname or ip address # tracker server的ip和端口,此处可以写多个tracker server,每行一个 tracker_server=192.168.80.138:22122cp /root/fastdfs-nginx-module/src/mod_fastdfs.conf /etc/fdfs/
1.4. 测试
/usr/bin/fdfs_test /etc/fdfs/client.conf upload /tmp/test.html http://192.168.80.138/group1/M00/00/00/wKhQilfuKY-AYKiEAAAAJdR5Z_E81_big.html1.5. 常见错误
nginx启动不了,报错:[2015-04-28 11:30:14] ERROR - file: ini_file_reader.c, line: 315, include file "http.conf" not exists, line: "#include http.conf" [2015-04-28 11:30:14] ERROR - file: /root/fastdfs-nginx-module-master/src/common.c, line: 155, load conf file "/etc/fdfs/mod_fastdfs.conf" fail, ret code: 2 2015/04/28 11:30:14 [alert] 19969#0: worker process 2753 exited with fatal code 2 and cannot be respawned解决办法:
cp /root/fastdfs-master/conf/http.conf /root/fastdfs-master/conf/mime.types /etc/fdfsNginx报错:open log file "/home/plocc/fastdfs/logs/mod_fastdfs.log"to write fail, 修改文件访问劝降
正文到此结束
- 本文标签:
- 版权声明: 本文由HARRIES原创发布,转载请遵循《署名-非商业性使用-相同方式共享 4.0 国际 (CC BY-NC-SA 4.0)》许可协议授权
- 本文海报: 生成海报一 生成海报二
热门推荐


相关文章

近期评论
-
收到
-
https://www.liuhaihua.cn/archives/40657.html 这篇博客中的图片打不开了
-
不会英语啊。
-
-
-
https://pplx.ai/floraliu4199466 这个链接打不开是什么原因?
-
-
-
-
来看看,最近更新了一波,顺着友联过来的,几年过去了,网站越搞越好,厉害
Loading...
![[HBLOG]公众号](https://www.liuhaihua.cn/img/qrcode_gzh.jpg)

