180609-Spring之事件驱动机制的简单使用
文章链接: liuyueyi.github.io/hexblog/hex…
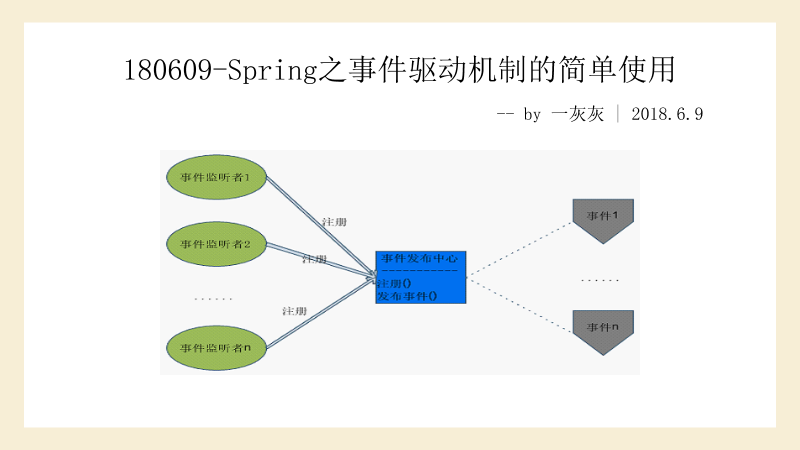
Spring之事件驱动机制的简单使用
关于事件的发起与相应,在客户端的交互中可算是非常频繁的事情了,关于事件的发布订阅,在Java生态中,EventBus可谓是非常有名了,而Spring也提供了事件机制,本文则主要介绍后端如何在Spring的环境中,使用事件机制
I. 使用姿势
主要借助 org.springframework.context.ApplicationEventPublisher#publishEvent(org.springframework.context.ApplicationEvent) 来发布事件,而接受方,则直接在处理的方法上,添加 @@EventListener 注解即可
1. 事件定义
发布一个事件,所以第一件事就是要定义一个事件,对Spring而言,要求自定义的事件继承自 ApplicationEvent 类, 一个简单的demo如下
public class NotifyEvent extends ApplicationEvent {
    @Getter
    private String msg;

    public NotifyEvent(Object source, String msg) {
        super(source);
        this.msg = msg;
    }
}
2. 发布事件
发布时间则比较简单,直接拿到ApplicationContext实例,执行publish方法即可,如下面给出一个简单的发布类
@Component
public class NotifyPublisher implements ApplicationContextAware {
    private ApplicationContext apc;

    @Override
    public void setApplicationContext(ApplicationContext applicationContext) throws BeansException {
        this.apc = applicationContext;
    }

    // 发布一个消息
    public void publishEvent(int status, String msg) {
        if (status == 0) {
            apc.publishEvent(new NotifyEvent(this, msg));
        } else {
            apc.publishEvent(new NewNotifyEvent(this, msg, ((int) System.currentTimeMillis() / 1000)));
        }
    }
}
3. 事件监听器
在方法上添加注解即可,如下
@Component
public class NotifyQueueListener {

    @EventListener
    public void consumerA(NotifyEvent notifyEvent) {
        try {
            Thread.sleep(5000);
        } catch (InterruptedException e) {
            e.printStackTrace();
        }
        System.out.println("A: " + Thread.currentThread().getName() + " | " + notifyEvent.getMsg());
    }

    @EventListener
    public void consumerB(NewNotifyEvent notifyEvent) {
        System.out.println("B: " + Thread.currentThread().getName() + " | " + notifyEvent.getMsg());
    }


    @EventListener
    public void consumerC(NotifyEvent notifyEvent) {
        System.out.println("C: " + Thread.currentThread().getName() + " | " + notifyEvent.getMsg());
    }
}
II. 疑问及解答
1. 发布与监听器的关联
上面给出了使用的姿势,看起来并不复杂,也比较容易使用,但是一个问题需要在使用之前弄明白了,发布事件和监听器是怎么关联起来的呢?
- 根据方法的参数类型执行
那么如果发布者,推送的是一个 NotifyEvent 类型的事件,那么接收者是怎样的呢?
- 参数为NotifyEvent以及其子类的监听器,都可以接收到消息
测试用例如下:
NewNotifyEvent 继承自上面的 NotifyEvent
public class NewNotifyEvent extends NotifyEvent {
    @Getter
    private int version;

    public NewNotifyEvent(Object source, String msg) {
        super(source, msg);
    }
    public NewNotifyEvent(Object source, String msg, int version) {
        super(source, msg);
        this.version = version;
    }
}
然后借助上面的消息发布者发送一个消息
@Test
public void testPublishEvent() throws InterruptedException {
    notifyPublisher.publishEvent(1, "新的发布事件! NewNotify");
    System.out.println("---------");
    notifyPublisher.publishEvent(0, "旧的发布事件! Notify");
}
输出结果如下,对于NewNotifyEvent, 参数类型为NotifyEvent的consumerA, consumerC都可以接收到
A: main | 新的发布事件! NewNotify
C: main | 新的发布事件! NewNotify
B: main | 新的发布事件! NewNotify
---------
A: main | 旧的发布事件! Notify
C: main | 旧的发布事件! Notify
2. 消息接收的顺序
上面消息处理是串行的,那么先后顺序怎么确定? (下面的答案不确定,有待深入源码验证!!!)
- 先扫描到的bean先处理
- 同一个bean中,按精确匹配,先后定义顺序进行
3. 异步消费
对于异步消费,即在消费者方法上添加一个 @Async 注解,并需要在配置文件中,开启异步支持
@Async
@EventListener
public void processNewNotifyEvent(NewNotifyEvent newNotifyEvent) {
    System.out.println("new notifyevent: " + newNotifyEvent.getMsg() + " : " + newNotifyEvent.getVersion());
}
配置支持
@Configuration
@EnableAsync
public class AysncListenerConfig implements AsyncConfigurer {
    /**
     * 获取异步线程池执行对象
     *
     * @return
     */
    @Override
    public Executor getAsyncExecutor() {
        return new ThreadPoolExecutor(5, 10, 1, TimeUnit.MINUTES, new LinkedBlockingQueue<Runnable>(),
                new DefaultThreadFactory("test"), new ThreadPoolExecutor.CallerRunsPolicy());
    }
}
III. 其他
一灰灰Blog: https://liuyueyi.github.io/hexblog
一灰灰的个人博客,记录所有学习和工作中的博文,欢迎大家前去逛逛
声明
尽信书则不如,已上内容,纯属一家之言,因个人能力有限,难免有疏漏和错误之处,如发现bug或者有更好的建议,欢迎批评指正,不吝感激
- 微博地址:小灰灰Blog
- QQ: 一灰灰/3302797840
正文到此结束
热门推荐


相关文章

近期评论
-
ws0132613@gmail.comhttps://getmacos.com/gopanel/william smith
-
谢谢
-
https://www.newcmy.com/register?aff=HBVX建议您试试草莓云机场,可以流畅观看youtube和tiktok,上reddit/x也没有问题,还有各种ai优化节点。
-
-
-
想购买您这个站,我的联系方式QQ741756694微信同步 能卖联系
-
-
-
-
Loading...
![[HBLOG]公众号](https://www.liuhaihua.cn/img/qrcode_gzh.jpg)

