深入 Spring DispatcherServlet
Spring MVC 与其他 Web 框架一样,围绕前端控制器模式设计,其中中央 Servlet DispatcherServlct 为接收到的请求处理提供了共享算法,实际工作则由配置的组件执行。
DispatcherServlet 与任何 Servlet 一样,需要使用 Java 配置或 Web.xml 根据规范进行声明和映射。反过来, DispatcherServlet 使用 Spring 配置来发现请求映射、视图解析、异常处理等所需的委托组件。
举个栗子,下面的web.xml 注册和初始化 DispathcerServlet:
<web-app>

    <listener>
        <listener-class>org.springframework.web.context.ContextLoaderListener</listener-class>
    </listener>

    <context-param>
        <param-name>contextConfigLocation</param-name>
        <param-value>classpath*:spring-*.xml</param-value>
    </context-param>

    <servlet>
        <servlet-name>app</servlet-name>
        <servlet-class>org.springframework.web.servlet.DispatcherServlet</servlet-class>
        <init-param>
            <param-name>contextConfigLocation</param-name>
            <param-value>classpath:mvc-*.xml</param-value>
        </init-param>
        <load-on-startup>1</load-on-startup>
    </servlet>

    <servlet-mapping>
        <servlet-name>app</servlet-name>
        <url-pattern>/app/*</url-pattern>
    </servlet-mapping>

</web-app>
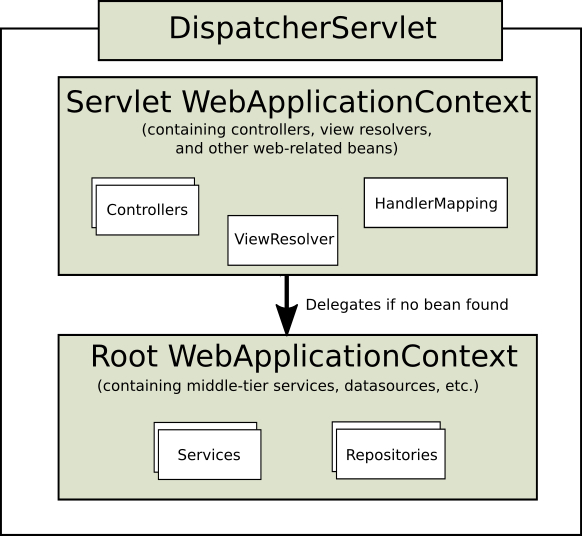
上下文架构
Dispatcher 需要一个继承自 ApplicationContext 的 WebApplicationServlet 来配置。
WebApplicationServlet 有一个获取 ServletContext 的方法,可以获取与之关联的 Servlet 。它还绑定到 ServletContext ,以便在需要时可以通过 RequestContextUtils#findWebApplicationContext 这个静态方法获取。
public interface WebApplicationContext extends ApplicationContext {
    //ignore some codes...
    @Nullable
    ServletContext getServletContext();
}
对于大多数应用来说,一个 WebApplicationContext 就足够了。但也有可能一个 WebApplicationContext 被多个 ServletContext 共享使用,或者每个 ServletContext 都有自己的 WebApplicationContext 。
WebApplicationContext 又区分为 Servlet ApplicationContext 和 Root ApplicationContext 。其中, Servlet ApplicationContext 主要包含控制器、视图解析器等组件, Root ApplicationContext 主要包含数据存储层和业务逻辑层等。
如下图所示:
几个特殊的Bean
-
HandlerMapping将请求映射到处理器(
Handler)以及用于预处理和后处理的拦截器(interceptor)列表。主要有两个实现类:
RequestMappingHandlerMapping
SimpleUrlHandlerMapping
-
HandlerAdapter帮助
DispatcherServlet调用处理器处理请求,屏蔽具体的调用过程(例如调用注解声明的控制器需要处理注解)。 -
HandlerExceptionResolver解决异常,可将异常映射到处理器(
handler),HTML错误页或其他目标。 -
ViewResolver将从处理器(
handler)返回的逻辑基于字符串的视图名称解析为用于呈现给响应的实际View。 -
LocaleResolver,LocaleContextResolver解析客户端正在使用的区域设置以及可能的时区,以便能够提供国际化视图。
-
ThemeResolver解决Web应用程序可以使用的主题,例如提供个性化主题。
-
MultipartResolver解析 multi-part 请求(例如,浏览器上传请求)的接口(
interface)。public interface MultipartResolver { // 检查 request 是否包含 multipart 内容 boolean isMultipart(HttpServletRequest request); // 将 HTTP 请求解析为 multipart 文件和参数 MultipartHttpServletRequest resolveMultipart(HttpServletRequest request) throws MultipartException; // 清理资源 void cleanupMultipart(MultipartHttpServletRequest request); } -
FlashMapManager存储和读取“输入”和“输出”的
FlashMap,在从一个请求(request)重定向(redirect)到另一个(request)时,FlashMap 能够传递参数。
流程
-
DispathcerServlet
了解下 Servlet 的生命周期:
-
Servlet 通过调用 init () 方法进行初始化。
-
Servlet 调用 service() 方法来处理客户端的请求。
-
Servlet 通过调用 destroy() 方法终止(结束)。
-
最后,Servlet 是由 JVM 的垃圾回收器进行垃圾回收的。
-
-
配置的读取
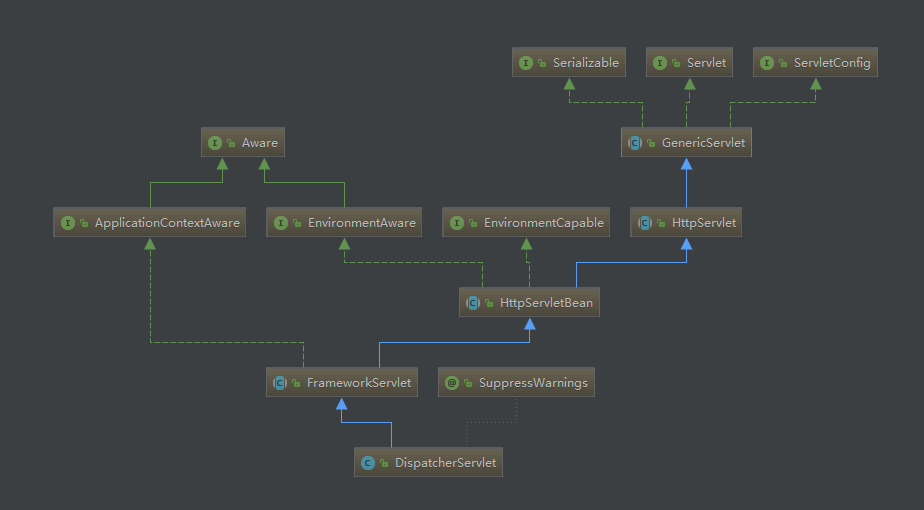
DispatcherServlet 作为 Servlet 的实现类,init() 方法在 HttpServletBean 类中实现了。
   @Override
public final void init() throws ServletException {
	if (logger.isDebugEnabled()) {
		logger.debug("Initializing servlet '" + getServletName() + "'");
	}

	// Set bean properties from init parameters.
	PropertyValues pvs = new ServletConfigPropertyValues(getServletConfig(), this.requiredProperties);
	if (!pvs.isEmpty()) {
		try {
			BeanWrapper bw = PropertyAccessorFactory.forBeanPropertyAccess(this);
			ResourceLoader resourceLoader = new ServletContextResourceLoader(getServletContext());
			bw.registerCustomEditor(Resource.class, new ResourceEditor(resourceLoader, getEnvironment()));
			initBeanWrapper(bw);
			bw.setPropertyValues(pvs, true);
		}
		catch (BeansException ex) {
			if (logger.isErrorEnabled()) {
				logger.error("Failed to set bean properties on servlet '" + getServletName() + "'", ex);
			}
			throw ex;
		}
	}

	// Let subclasses do whatever initialization they like.
	initServletBean();

	if (logger.isDebugEnabled()) {
		logger.debug("Servlet '" + getServletName() + "' configured successfully");
	}
}
代码中的第二个 if 代码段就是获取配置的关键。 通过
PropertyValues、BeanWrapper、ResourceLoader等类将配置从 web.xml 等配置文件中读取进来。 -
容器上下文的建立
在上面的代码中,有一行代码留待子类实现,这段代码就是调用建立容器上下文的逻辑。
initServletBean();
DispatcherServlet的父类FraneworkServlet实现了这个函数:protected final void initServletBean() throws ServletException { getServletContext().log("Initializing Spring FrameworkServlet '" + getServletName() + "'"); if (this.logger.isInfoEnabled()) { this.logger.info("FrameworkServlet '" + getServletName() + "': initialization started"); } long startTime = System.currentTimeMillis(); try { this.webApplicationContext = initWebApplicationContext(); initFrameworkServlet(); } catch (ServletException | RuntimeException ex) { this.logger.error("Context initialization failed", ex); throw ex; } if (this.logger.isInfoEnabled()) { long elapsedTime = System.currentTimeMillis() - startTime; this.logger.info("FrameworkServlet '" + getServletName() + "': initialization completed in " + elapsedTime + " ms"); } }initWebApplicationContext():protected WebApplicationContext initWebApplicationContext() { WebApplicationContext rootContext = WebApplicationContextUtils.getWebApplicationContext(getServletContext()); WebApplicationContext wac = null; if (this.webApplicationContext != null) { wac = this.webApplicationContext; if (wac instanceof ConfigurableWebApplicationContext) { ConfigurableWebApplicationContext cwac = (ConfigurableWebApplicationContext) wac; if (!cwac.isActive()) { if (cwac.getParent() == null) { // The context instance was injected without an explicit parent -> set // the root application context (if any; may be null) as the parent cwac.setParent(rootContext); } configureAndRefreshWebApplicationContext(cwac); } } } if (wac == null) { wac = findWebApplicationContext(); } if (wac == null) { wac = createWebApplicationContext(rootContext); } if (!this.refreshEventReceived) { onRefresh(wac); } if (this.publishContext) { String attrName = getServletContextAttributeName(); getServletContext().setAttribute(attrName, wac); if (this.logger.isDebugEnabled()) { this.logger.debug("Published WebApplicationContext of servlet '" + getServletName() + "' as ServletContext attribute with name [" + attrName + "]"); } } return wac; }-
获取 ServletContext 作为 rootContext;
-
若 webApplicationContext 不为空,则这个Servlet类是通过代码
(ServletContext.addServlet())注入到容器中的,上下文也由代码传入。若这个传入的上下文还没被初始化,将它的父上下文设置为
rootContext,然后初始化,否则直接使用; -
若 wac 仍然为空,则说明上一步未找到合适的上下文,在此继续进行查找。在
findWebApplicationContext()中通过WebApplicationContextUtils.getWebApplicationContext(getServletContext(), getContextAttribute());查找,若找到则直接使用; -
在前面二步中都未找到,则直接创建一个以
rootContext为父上下文的context,分配给wac; -
回调在DispatcherServlet类中被覆写的
onRefresh(ApplicationContext context)方法,完成SpringMVC中默认实现类的初始化; -
若
publishContext为true,则发布上下文到ServletContext中; -
返回此过程生成的
webApplicationContext。initFrameworkServlet()则没有任何实际作用:protected void initFrameworkServlet() throws ServletException { }
-
-
初始化Spring MVC的默认实现类
来看看建立上下文时,回调的
onRefresh(ApplicationContext context)方法:protected void onRefresh(ApplicationContext context) { initStrategies(context); }可见,
onRefresh(ApplicationContext context)方法直接调用了initStrategies(ApplicationContext context)方法。protected void initStrategies(ApplicationContext context) { initMultipartResolver(context); initLocaleResolver(context); initThemeResolver(context); initHandlerMappings(context); initHandlerAdapters(context); initHandlerExceptionResolvers(context); initRequestToViewNameTranslator(context); initViewResolvers(context); initFlashMapManager(context); }在
initStrategies(ApplicationContext context)中,初始化了9个默认实现类。其中,
initMultipartResolver(context)、initLocaleResolver(context)、initThemeResolver(context)、initRequestToViewNameTranslator(context)、initFlashMapManager(context)这五个方法的初始化逻辑一样,都是通过context.getBean(String name, @Nullable Class<T> requiredType)获取。例如:private void initMultipartResolver(ApplicationContext context) { try { this.multipartResolver = context.getBean(MULTIPART_RESOLVER_BEAN_NAME, MultipartResolver.class); if (logger.isDebugEnabled()) { logger.debug("Using MultipartResolver [" + this.multipartResolver + "]"); } } catch (NoSuchBeanDefinitionException ex) { // Default is no multipart resolver. this.multipartResolver = null; if (logger.isDebugEnabled()) { logger.debug("Unable to locate MultipartResolver with name '" + MULTIPART_RESOLVER_BEAN_NAME + "': no multipart request handling provided"); } } }另外的
initHandlerMappings(context)、initHandlerAdapters(context)、initHandlerExceptionResolvers(context)、initViewResolvers(context)四个方法的初始化逻辑也一样,都是通过beansOfTypeIncludingAncestors(ListableBeanFactory lbf, Class<T> type, boolean includeNonSingletons, boolean allowEagerInit)获取。例如:private void initHandlerMappings(ApplicationContext context) { this.handlerMappings = null; if (this.detectAllHandlerMappings) { // 找出 ApplicationContext 中的所有 HandlerMappings,包括 ancestor contexts 里面的。 Map<String, HandlerMapping> matchingBeans = BeanFactoryUtils.beansOfTypeIncludingAncestors(context, HandlerMapping.class, true, false); if (!matchingBeans.isEmpty()) { this.handlerMappings = new ArrayList<>(matchingBeans.values()); // 保持 HandlerMappings 有序 AnnotationAwareOrderComparator.sort(this.handlerMappings); } } else { try { HandlerMapping hm = context.getBean(HANDLER_MAPPING_BEAN_NAME, HandlerMapping.class); this.handlerMappings = Collections.singletonList(hm); } catch (NoSuchBeanDefinitionException ex) { // 忽略异常,稍后添加默认的 HandlerMapping } } // 如果没有找到任何 HandlerMapping,注册默认的 HandlerMapping if (this.handlerMappings == null) { this.handlerMappings = getDefaultStrategies(context, HandlerMapping.class); if (logger.isDebugEnabled()) { logger.debug("No HandlerMappings found in servlet '" + getServletName() + "': using default"); } } }至此,
Servlet的第一个生命周期(调用init()方法)总算完成了。 -
提供服务
Servlet的第二个生命周期(调用service()方法)要开始了。DispatcherServlet的service()方法在FrameworkServlet类和HttpServlet类中都有实现:FrameworkServlet#service:若获取到的请求方法为PATCH或null,则调用processRequest(request, response),否则调用HttpServlet中的实现protected void service(HttpServletRequest request, HttpServletResponse response) throws ServletException, IOException { HttpMethod httpMethod = HttpMethod.resolve(request.getMethod()); if (httpMethod == HttpMethod.PATCH || httpMethod == null) { processRequest(request, response); } else { super.service(request, response); } }HttpServlet#service:根据请求方法进行调用doGet、doPOST、doPUT等方法(HttpServlet中有实现,但FrameworkServlet重写了这些方法)。protected void service(HttpServletRequest req, HttpServletResponse resp) throws ServletException, IOException { String method = req.getMethod(); if (method.equals(METHOD_GET)) { long lastModified = getLastModified(req); if (lastModified == -1) { // servlet doesn't support if-modified-since, no reason // to go through further expensive logic doGet(req, resp); } else { long ifModifiedSince = req.getDateHeader(HEADER_IFMODSINCE); if (ifModifiedSince < lastModified) { // If the servlet mod time is later, call doGet() // Round down to the nearest second for a proper compare // A ifModifiedSince of -1 will always be less maybeSetLastModified(resp, lastModified); doGet(req, resp); } else { resp.setStatus(HttpServletResponse.SC_NOT_MODIFIED); } } } else if (method.equals(METHOD_HEAD)) { long lastModified = getLastModified(req); maybeSetLastModified(resp, lastModified); doHead(req, resp); } else if (method.equals(METHOD_POST)) { doPost(req, resp); } else if (method.equals(METHOD_PUT)) { doPut(req, resp); } else if (method.equals(METHOD_DELETE)) { doDelete(req, resp); } else if (method.equals(METHOD_OPTIONS)) { doOptions(req,resp); } else if (method.equals(METHOD_TRACE)) { doTrace(req,resp); } else { // // Note that this means NO servlet supports whatever // method was requested, anywhere on this server. // String errMsg = lStrings.getString("http.method_not_implemented"); Object[] errArgs = new Object[1]; errArgs[0] = method; errMsg = MessageFormat.format(errMsg, errArgs); resp.sendError(HttpServletResponse.SC_NOT_IMPLEMENTED, errMsg); } }doGET、doPOST、doPut、doDelete四个方法都是调用processRequest(HttpServletRequest request, HttpServletResponse response)方法,doPatch和doTrace则为例外。protected final void doGet(HttpServletRequest request, HttpServletResponse response) throws ServletException, IOException { processRequest(request, response); }在进入
processRequest(HttpServletRequest request, HttpServletResponse response)方法后,DispatcherServlet的doService终于被调用了,在方法尾部还发布了一个事件ServletRequestHandledEvent。protected final void processRequest(HttpServletRequest request, HttpServletResponse response) throws ServletException, IOException { long startTime = System.currentTimeMillis(); Throwable failureCause = null; LocaleContext previousLocaleContext = LocaleContextHolder.getLocaleContext(); LocaleContext localeContext = buildLocaleContext(request); RequestAttributes previousAttributes = RequestContextHolder.getRequestAttributes(); ServletRequestAttributes requestAttributes = buildRequestAttributes(request, response, previousAttributes); WebAsyncManager asyncManager = WebAsyncUtils.getAsyncManager(request); asyncManager.registerCallableInterceptor(FrameworkServlet.class.getName(), new RequestBindingInterceptor()); initContextHolders(request, localeContext, requestAttributes); try { doService(request, response); } catch (ServletException | IOException ex) { failureCause = ex; throw ex; } catch (Throwable ex) { failureCause = ex; throw new NestedServletException("Request processing failed", ex); } finally { resetContextHolders(request, previousLocaleContext, previousAttributes); if (requestAttributes != null) { requestAttributes.requestCompleted(); } if (logger.isDebugEnabled()) { if (failureCause != null) { this.logger.debug("Could not complete request", failureCause); } else { if (asyncManager.isConcurrentHandlingStarted()) { logger.debug("Leaving response open for concurrent processing"); } else { this.logger.debug("Successfully completed request"); } } } publishRequestHandledEvent(request, response, startTime, failureCause); } } -
doService()protected void doService(HttpServletRequest request, HttpServletResponse response) throws Exception { if (logger.isDebugEnabled()) { String resumed = WebAsyncUtils.getAsyncManager(request).hasConcurrentResult() ? " resumed" : ""; logger.debug("DispatcherServlet with name '" + getServletName() + "'" + resumed + " processing " + request.getMethod() + " request for [" + getRequestUri(request) + "]"); } // Keep a snapshot of the request attributes in case of an include, // to be able to restore the original attributes after the include. Map<String, Object> attributesSnapshot = null; if (WebUtils.isIncludeRequest(request)) { attributesSnapshot = new HashMap<>(); Enumeration<?> attrNames = request.getAttributeNames(); while (attrNames.hasMoreElements()) { String attrName = (String) attrNames.nextElement(); if (this.cleanupAfterInclude || attrName.startsWith(DEFAULT_STRATEGIES_PREFIX)) { attributesSnapshot.put(attrName, request.getAttribute(attrName)); } } } // Make framework objects available to handlers and view objects. request.setAttribute(WEB_APPLICATION_CONTEXT_ATTRIBUTE, getWebApplicationContext()); request.setAttribute(LOCALE_RESOLVER_ATTRIBUTE, this.localeResolver); request.setAttribute(THEME_RESOLVER_ATTRIBUTE, this.themeResolver); request.setAttribute(THEME_SOURCE_ATTRIBUTE, getThemeSource()); if (this.flashMapManager != null) { FlashMap inputFlashMap = this.flashMapManager.retrieveAndUpdate(request, response); if (inputFlashMap != null) { request.setAttribute(INPUT_FLASH_MAP_ATTRIBUTE, Collections.unmodifiableMap(inputFlashMap)); } request.setAttribute(OUTPUT_FLASH_MAP_ATTRIBUTE, new FlashMap()); request.setAttribute(FLASH_MAP_MANAGER_ATTRIBUTE, this.flashMapManager); } try { doDispatch(request, response); } finally { if (!WebAsyncUtils.getAsyncManager(request).isConcurrentHandlingStarted()) { // Restore the original attribute snapshot, in case of an include. if (attributesSnapshot != null) { restoreAttributesAfterInclude(request, attributesSnapshot); } } } }-
保存
request的属性快照,以便在需要时进行恢复; -
使框架对象对于
handlers和view对象可见; -
FlashMap 处理;
-
执行
doDispatch()进行请求分发; -
通过快照恢复现场。
-
-
doDispatch()请求分发服务堆上代码:
protected void doDispatch(HttpServletRequest request, HttpServletResponse response) throws Exception { HttpServletRequest processedRequest = request; HandlerExecutionChain mappedHandler = null; boolean multipartRequestParsed = false; WebAsyncManager asyncManager = WebAsyncUtils.getAsyncManager(request); try { ModelAndView mv = null; Exception dispatchException = null; try { processedRequest = checkMultipart(request); multipartRequestParsed = (processedRequest != request); // Determine handler for the current request. mappedHandler = getHandler(processedRequest); if (mappedHandler == null) { noHandlerFound(processedRequest, response); return; } // Determine handler adapter for the current request. HandlerAdapter ha = getHandlerAdapter(mappedHandler.getHandler()); // Process last-modified header, if supported by the handler. String method = request.getMethod(); boolean isGet = "GET".equals(method); if (isGet || "HEAD".equals(method)) { long lastModified = ha.getLastModified(request, mappedHandler.getHandler()); if (logger.isDebugEnabled()) { logger.debug("Last-Modified value for [" + getRequestUri(request) + "] is: " + lastModified); } if (new ServletWebRequest(request, response).checkNotModified(lastModified) && isGet) { return; } } if (!mappedHandler.applyPreHandle(processedRequest, response)) { return; } // Actually invoke the handler. mv = ha.handle(processedRequest, response, mappedHandler.getHandler()); if (asyncManager.isConcurrentHandlingStarted()) { return; } applyDefaultViewName(processedRequest, mv); mappedHandler.applyPostHandle(processedRequest, response, mv); } catch (Exception ex) { dispatchException = ex; } catch (Throwable err) { // As of 4.3, we're processing Errors thrown from handler methods as well, // making them available for @ExceptionHandler methods and other scenarios. dispatchException = new NestedServletException("Handler dispatch failed", err); } processDispatchResult(processedRequest, response, mappedHandler, mv, dispatchException); } catch (Exception ex) { triggerAfterCompletion(processedRequest, response, mappedHandler, ex); } catch (Throwable err) { triggerAfterCompletion(processedRequest, response, mappedHandler, new NestedServletException("Handler processing failed", err)); } finally { if (asyncManager.isConcurrentHandlingStarted()) { // Instead of postHandle and afterCompletion if (mappedHandler != null) { mappedHandler.applyAfterConcurrentHandlingStarted(processedRequest, response); } } else { // Clean up any resources used by a multipart request. if (multipartRequestParsed) { cleanupMultipart(processedRequest); } } } }-
检查是否设置了
multipartResolver和是否是multipart请求,若是,则将request标识为multipart request处理; -
根据当前
request,获取handler(HandlerExecutionChain,包括一个处理器、多个HandlerInterceptor拦截器); -
根据当前
request,获取handlerAdapter(HandlerAdapter); -
如果
handler支持last-modifiedheader,则进行处理; -
调用
handler的preHandle方法; -
通过
handlerAdapter真正调用handler,处理请求; -
设置默认视图;
-
调用
handler的postHandle方法; -
处理异常或者视图渲染;
-
若为
multipart request,则进行资源清理。
-
-
视图渲染
在上一步 doService 中,调用了
processDispatchResult进入视图渲染过程。processDispatchResult(processedRequest, response, mappedHandler, mv, dispatchException);
processDispatchResult主要处理异常、请求状态及触发请求完成事件,视图的渲染工作由DispatcherServlet#render()完成。DispatcherServlet#render()的过程:-
完成本土化操作(
Locale); -
根据
ModelAndView的viewName是否为空决定用viewResolver获取View或者直接从ModelAndView中获取View对象; -
调用
View对象的render方法渲染视图。
-
-
完成使命
期待已久的
destroy()方法终于可以上场了,DispatcherServlet的父类FrameworkServlet重写了这个方法,用来关闭这个Servlet的上下文相关资源。
总结
-
读取参数配置
-
建立容器上下文
-
initStrategies初始化九个组件 -
通过
service->doService->doDispatch进行请求分发 -
doDispatch:-
检查是否设置了
multipartResolver和是否是multipart请求,若是,则将request标识为multipart request处理; -
根据当前
request,获取handler(HandlerExecutionChain,包括一个处理器、多个HandlerInterceptor拦截器); -
根据当前
request,获取handlerAdapter(HandlerAdapter); -
如果
handler支持last-modifiedheader,则进行处理; -
调用
handler的preHandle方法; -
通过
handlerAdapter真正调用handler,处理请求; -
设置默认视图;
-
调用
handler的postHandle方法; -
处理异常或者视图渲染;
-
完成本土化操作(
Locale); -
根据
ModelAndView的viewName是否为空决定用viewResolver获取View或者直接从ModelAndView中获取View对象; -
调用
View对象的render方法渲染视图。
-
-
若为
multipart request,则进行资源清理。
-
-
清理资源
正文到此结束
- 本文标签: CEO 垃圾回收 list 生命 tab 配置 bean 解析 ArrayList final java message 代码 Collection value http classpath map Service HTML HashMap 参数 spring trigger https IDE IO XML 静态方法 src root cat Property App bug REST rmi IOS ip 数据 本土化 Collections JVM build web find BeanDefinition CTO id SpringMVC ACE servlet UI ORM parse equals 总结 update tar 处理器
- 版权声明: 本文为互联网转载文章,出处已在文章中说明(部分除外)。如果侵权,请联系本站长删除,谢谢。
- 本文海报: 生成海报一 生成海报二
热门推荐


相关文章

近期评论
-
ws0132613@gmail.comhttps://getmacos.com/gopanel/william smith
-
谢谢
-
https://www.newcmy.com/register?aff=HBVX建议您试试草莓云机场,可以流畅观看youtube和tiktok,上reddit/x也没有问题,还有各种ai优化节点。
-
-
-
想购买您这个站,我的联系方式QQ741756694微信同步 能卖联系
-
-
-
-
Loading...
![[HBLOG]公众号](https://www.liuhaihua.cn/img/qrcode_gzh.jpg)

