原 荐 SpringBoot | 第三十三章:Spring web Servcies集成和使用
前言
最近有个单位内网系统需要对接统一门户,进行单点登录和待办事项对接功能。一般上政府系统都会要求做统一登录功能,这个没啥问题,反正业务系统都是做单点登录的,改下 shiro 相关类就好了。看了接入方案,做坑爹的是需要业务系统提供一个 webService 服务,供统一平台调用。对于 ws 服务,是真的除了大学期间要去写个调用天气预报的作业后,就再也没有接触过了。查阅了 SpringBoot 文档后,发现确实有一章节是将 webService 的,所以,今天就来简单介绍下 Spring Web Service 的集成和使用吧。
一点知识
何为WebService
Web Service 技术,能使得运行在不同机器上的不同应用无须借助附加的、专门的第三方软件或硬件, 就可相互交换数据或集成。依据 Web Service 规范实施的应用之间,无论它们所使用的语言、平台或内部协议是什么,都可以相互交换数据。
简单的说,WebService就是一种跨编程语言和跨操作系统平台的远程调用技术。
WebServcie技术支持
以下内容摘自百度百科: Web Service
Web Service 平台需要一套协议来实现分布式应用程序的创建。任何平台都有它的 数据表示方法和类型系统 。要实现互操作性, Web Service 平台必须提供一套 标准的类型系统 ,用于沟通不同平台、编程语言和组件模型中的不同类型系统。这些协议有:
XML和XSD
可扩展的标记语言是 Web Service 平台中表示数据的基本格式。除了易于建立和易于分析外, XML 主要的优点在于它既与平台无关,又与厂商无关。 XML 是由万维网协会(W3C)创建,W3C制定的XML SchemaXSD定义了一套标准的数据类型,并给出了一种语言来扩展这套数据类型。 Web Service 平台是用 XSD 来作为数据类型系统的。当你用某种语言如 VB. NET 或 C# 来构造一个Web Service时,为了符合 Web Service 标准,所有你使用的数据类型都必须被转换为 XSD 类型。如想让它使用在不同平台和不同软件的不同组织间传递,还需要用某种东西将它包装起来。这种东西就是一种协议,如 SOAP 。
XSD 全称为 XML Schemas Definition ,即: XML结构定义 。是 描述xml的,同时遵循xml规范。
SOAP
SOAP 即简单对象访问协议(Simple Object Access Protocol),它是用于交换XML(标准通用标记语言下的一个子集)编码信息的轻量级协议。它有三个主要方面:XML-envelope为描述信息内容和如何处理内容定义了框架,将程序对象编码成为XML对象的规则,执行远程过程调用(RPC)的约定。SOAP可以运行在任何其他传输协议上。例如,你可以使用 SMTP,即因特网电子邮件协议来传递SOAP消息,这可是很有诱惑力的。在传输层之间的头是不同的,但XML有效负载保持相同。 Web Service 希望实现不同的系统之间能够用“软件-软件对话”的方式相互调用,打破了软件应用、网站和各种设备之间的格格不入的状态,实现“基于Web无缝集成”的目标。
WSDL
Web Service 描述语言 WSDL 就是用机器能阅读的方式提供的一个正式描述文档而基于 XML 的语言,用于 描述Web Service及其函数、参数和返回值 。因为是基于XML的,所以WSDL既是机器可阅读的,又是人可阅读的。
UDDI
UDDI 的目的是为电子商务建立标准; UDDI 是一套基于Web的、分布式的、为 Web Service 提供的、信息注册中心的实现标准规范,同时也包含一组使企业能将自身提供的 Web Service 注册,以使别的企业能够发现的访问协议的实现标准。
何为Spring-Web-Services
Spring Web services 是 Spring 推出的一款构建 webservice 服务的框架。其主要侧重点是创建文档驱动的Web服务。 Spring Web Services 项目促进了 契约优先 的SOAP服务开发,提供了多种方式来创建灵活的Web服务,这些服务可以通过多种方式处理XML负载。可无缝地使用Spring依赖注入和配置等概念。
Spring-WS 项目由由以下几个项目组成:
-
Spring-WS Core(
spring-ws-core.jar) - 它是主要模块,提供WebServiceMessage和SoapMessage等中央接口,服务器端框架,强大的消息分发功能和支持类来实现Web服务端点。 它还提供Web Service消费者客户端作为:WebServiceTemplate。 -
Spring-WS Support(
spring-ws-support.jar) − 该模块为JMS,电子邮件等提供支持。 -
Spring-WS Security(
spring-ws-security.jar) - 该模块负责提供与核心Web服务模块集成的WS-Security实现。 使用这个模块,可以添加主体令牌,签名,加密和解密SOAP消息。该模块允许使用现有的Spring Security实现进行认证和授权。 -
Spring XML(
spring-xml.jar) − 该模块为Spring Web Services提供XML支持类。 该模块由Spring-WS框架内部使用。 -
Spring OXM- 该模块提供了XML与对象映射的支持类。
之间的依赖关系,如下图所示:
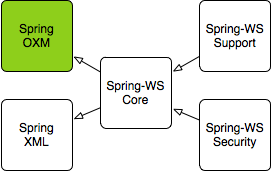
简单来说,看了官网文档后,一切遵循契约优先原则,请求和响应的参数都应遵循约定,不然 wsdl 文件生成是错误的,这里踩了坑。。
Spring-WS服务端发布
spring-ws 像 spring-mvc 一样,在集成到web项目时,前端有个servlet分发请求消息的概念。 这个servlet接受soap消息,通过映射转发到后端的服务实现类方法中(Endpiont) 在请求进来处理过程中,可以添加,拦截器(Interceptor),异常处理器(ExceptionResolver)。 通过拦截器可以做一些额外的定制功能,比如安全。通过异常处理器定制异常信息显示,处理等。
这个servlet就是 MessageDispatcher ,来看看官网给出的处理流程图:
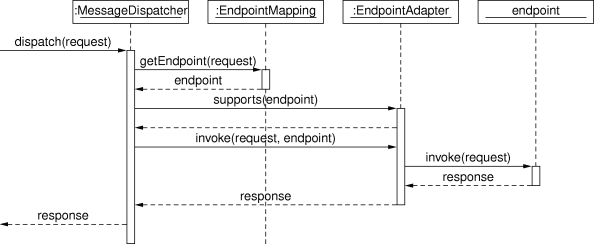
所以在需要对请求参数或者响应参数做处理时,可以编写对应的拦截器进行处理的。
现在,以一个简单示例来发布一个 webService 服务。创建工程: spring-boot-webservice-server 。
0.引入POM依赖。
<!-- spirng ws 依赖 -->
        <dependency>
            <groupId>org.springframework.boot</groupId>
            <artifactId>spring-boot-starter-web-services</artifactId>
        </dependency>
        <!-- 生成wsdl文件 -->
        <dependency>
            <groupId>wsdl4j</groupId>
            <artifactId>wsdl4j</artifactId>
        </dependency>
1.创建一个 xsd 文件,用来描述请求和响应的各实体信息。这里简单以一个获取作者信息为例子。 author.xsd
<?xml version="1.0" encoding="UTF-8"?>
<xs:schema xmlns:xs="http://www.w3.org/2001/XMLSchema" xmlns:tns="http://www.lqdev.cn/webservice"
           targetNamespace="http://www.lqdev.cn/webservice" elementFormDefault="qualified">

    <!-- 定义请求实体 -->
    <xs:element name="authorRequest">
        <xs:complexType>
            <xs:sequence>
                <xs:element name="name" type="xs:string"/>
            </xs:sequence>
        </xs:complexType>
    </xs:element>

     <!-- 定义响应实体 -->
    <xs:element name="authorResponse">
               <xs:complexType>
            <xs:sequence>
                <xs:element name="author" type="tns:author"/>
            </xs:sequence>
        </xs:complexType>
    </xs:element>

    <!-- 定义请求实体 -->
    <xs:element name="authorListRequest">
        <xs:complexType>
            <xs:sequence>
                <xs:element name="nonce" type="xs:string" />
            </xs:sequence>
        </xs:complexType>
    </xs:element>

    <!-- 定义响应实体 -->
    <xs:element name="authorListResponse">
        <xs:complexType>
            <xs:sequence>
                <xs:element name="author" type="tns:author" minOccurs="1" maxOccurs="unbounded" />
            </xs:sequence>
        </xs:complexType>
    </xs:element>

    <!-- 定义作者 信息 -->
    <xs:complexType name="author">
        <xs:sequence>
                <xs:element name="name" type="xs:string" />
                <!-- 爱好 列表形式 nillable=true 可为空 ,maxOccurs=unbouned 无限 -->
                <xs:element name="hobby" type="xs:string" nillable="true" maxOccurs="unbounded" />
                <!-- 性别 枚举类型 限定 -->
                <xs:element name="sex" type="tns:sex" />
                <!-- 生日 -->
                <xs:element name="birthday" type="xs:string" />
                <!-- 描述 -->
                <xs:element name="description" type="xs:string" />
        </xs:sequence>
    </xs:complexType>

    <!-- 枚举类型 性别:男 女 -->
    <xs:simpleType name="sex">
        <xs:restriction base="xs:string">
            <xs:enumeration value="male"/>
            <xs:enumeration value="female"/>
        </xs:restriction>
    </xs:simpleType>
</xs:schema>
这里需要注意,请求和返回的名字是有要求的, 两个名字前面要一样,后缀分别是固定的配置,默认为Request和Response ; 当然可以通过 requestSuffix 和 responseSuffix 属性来修改默认值的,在配置小节会说到。
关于 xsd 规则,可以查看: http://www.w3school.com.cn/schema/index.asp 。
2.根据XSD文件创建实体对象。这里直接使用 maven 创建自动生成。pom中加入插件: jaxb2-maven-plugin 。
<plugin>
                <groupId>org.codehaus.mojo</groupId>
                <artifactId>jaxb2-maven-plugin</artifactId>
                <version>1.6</version>
                <executions>
                    <execution>
                        <id>xjc</id>
                        <goals>
                            <goal>xjc</goal>
                        </goals>
                    </execution>
                </executions>
                <configuration>
                    <schemaDirectory>${project.basedir}/src/main/resources/</schemaDirectory>
                    <outputDirectory>${project.basedir}/src/main/java</outputDirectory>
                    <clearOutputDir>false</clearOutputDir>
     <!-- 包名路径 -->               <packageName>cn.lqdev.learning.springboot.ws.webservice</packageName>
                </configuration>
            </plugin>
然后运行下命令: mvn install 就会自动创建了。正常情况下,添加后, xsd 文件有变动,都会实时创建对应实体对象的。此时,生成的对象如下:
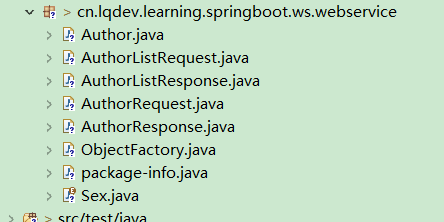
3.创建Endpoint服务,有点类似 Controller ,请求服务的入口。
/**
 * 创建endpoint 类似于创建controller了。
 * @author oKong
 *
 */
@Endpoint
public class AuthorEndpoint {

    @PayloadRoot(namespace = WsConst.NAMESPACE_URI, localPart = "authorRequest")
    @ResponsePayload
    public AuthorResponse getAuthor(@RequestPayload AuthorRequest authorReq){
        AuthorResponse resp = new AuthorResponse();
        Author author = new Author();
        author.setBirthday("1990-01-23");
        author.setName("姓名:" + authorReq.getName());
        author.setSex(Sex.FEMALE);
        author.getHobby().addAll(Arrays.asList("电影","旅游"));
        author.setDescription("描述:一枚趔趄的猿。现在时间:" + new Date().getTime());
        resp.setAuthor(author);
        return resp;
    }

    @PayloadRoot(namespace = WsConst.NAMESPACE_URI, localPart = "authorListRequest")
    @ResponsePayload
    public AuthorListResponse getAuthorList(@RequestPayload AuthorListRequest request){
        AuthorListResponse resp = new AuthorListResponse();
        Author author = new Author();
        author.setBirthday("1990-01-23");
        author.setName("姓名:oKong");
        author.setSex(Sex.FEMALE);
        author.getHobby().addAll(Arrays.asList("电影","旅游"));
        author.setDescription("描述:一枚趔趄的猿。现在时间:" + new Date().getTime());
        resp.getAuthor().add(author);
        resp.getAuthor().add(author);
        return resp;
    }
}
示例代码,只是为了演示,大部分信息都固定写死了。实际开发中,可以加入各自的业务逻辑,引入相应的 service 类的。
而且,这里需要注意:
- 方法声明上的
@PayloadRoot标注中的namespace和localPart分别就是wsdl中的targetNamespace和soap方法名称。 -
@ResponsePayload和@RequestPayload这两个标注的用法,以及它们对应的数据类型就是此前通过maven插件对wsdl定义生成的java类。
关于请求参数的类型,是否需要加 @RequestPayload 说明:
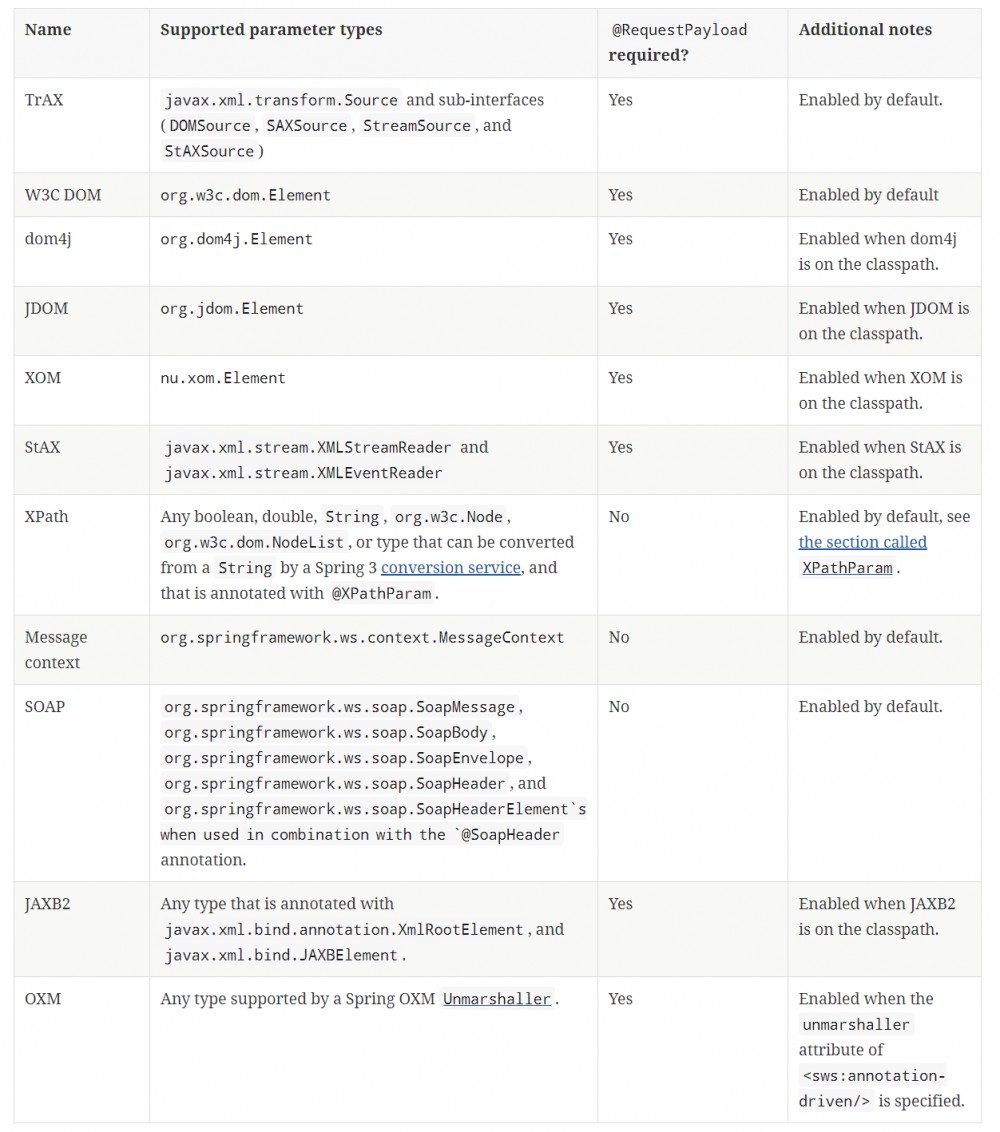
一般上,都是使用 JAXB2 对象了,也就是先前生成的实体对象。当然,有兴趣的同学可以试试,其他的对象参数,可以获取到不同的参数值的。
比如:
public void handle(@RequestPayload Element element)
一个 org.w3c.dom.Element 对象。
public void handle(@RequestPayload DOMSource domSource, SoapHeader header)
这样,能获取到 SOAP 的头部信息。
其他相关用法,可以查看此地址: https://docs.spring.io/spring-ws/docs/2.4.2.RELEASE/reference/#server-atEndpoint-methods
关于响应的参数,是否需要加 @ResponsePayload ,一下是官网给出的说明信息:
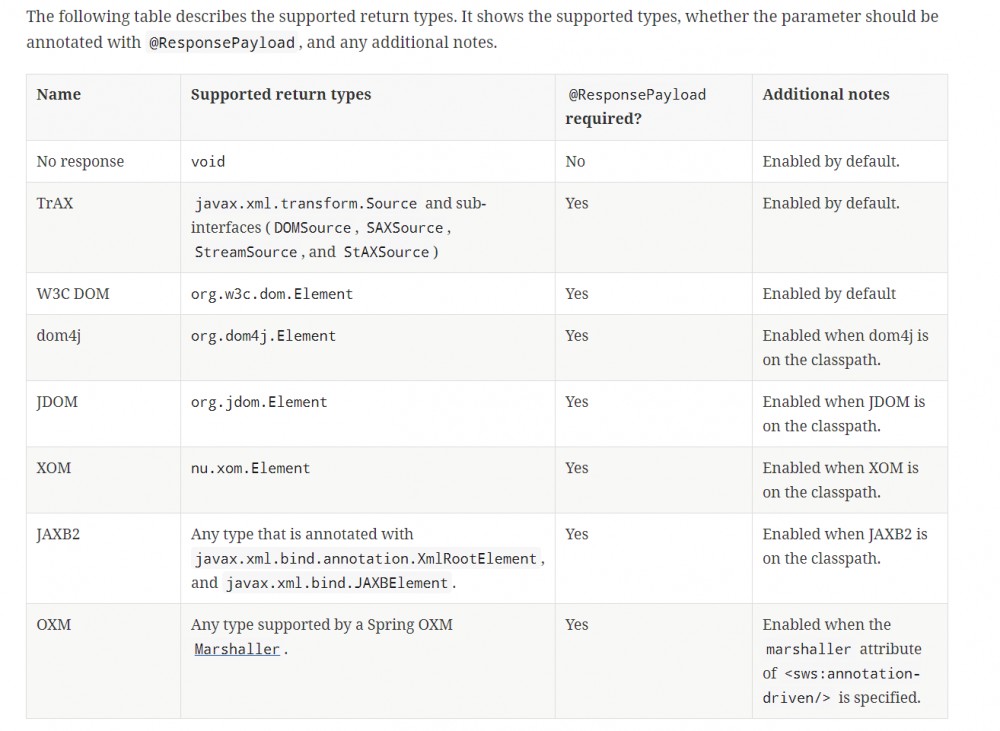
这个有个坑:尝试无参数请求时,使用postman发送xml数据可以正常请求,但使用 spirng-ws 调用就调用不到了,嗯,我想应该是我调用方法不多。。⊙﹏⊙‖∣
4.创建配置类,生效webservice服务。
/**
 * ws-配置
 * @author oKong
 *
 */
@EnableWs //开启webService
@Configuration
public class WebServiceConfig extends WsConfigurerAdapter{

    @Bean
    public ServletRegistrationBean messageDispatcherServlet(ApplicationContext applicationContext) {
        MessageDispatcherServlet servlet = new MessageDispatcherServlet();
        servlet.setApplicationContext(applicationContext);
        servlet.setTransformWsdlLocations(true);//true 地址会进行转换,不然都是本地地址
      //这里可以设置 请求的工厂类,实现有两个:SaajSoapMessageFactory 和 AxiomSoapMessageFactory
        //默认是 SaajSoapMessageFactory
//        servlet.setMessageFactoryBeanName(messageFactoryBeanName);
        return new ServletRegistrationBean(servlet, "/ws/*");
    }

    //name 就是对应 wsdl名如 :/ws/author.wsdl
    @Bean(name = "author")
    public DefaultWsdl11Definition defaultWsdl11Definition(XsdSchema authorSchema) {
        DefaultWsdl11Definition wsdl11Definition = new DefaultWsdl11Definition();
        wsdl11Definition.setPortTypeName("AuthorPort");
        wsdl11Definition.setLocationUri("/ws");
        wsdl11Definition.setSchema(authorSchema);
        wsdl11Definition.setTargetNamespace(WsConst.NAMESPACE_URI);
        return wsdl11Definition;
    }

    //可自定义SaajSoapMessageFactory 然后指定其SOAP版本
    @Bean
    public SaajSoapMessageFactory messageFactory() {
        SaajSoapMessageFactory messageFactory = new SaajSoapMessageFactory();
        //指定版本
        messageFactory.setSoapVersion(SoapVersion.SOAP_11);//SoapVersion.SOAP_12
        return messageFactory;
    }

    @Bean
    public XsdSchema authorSchema() {
        return new SimpleXsdSchema(new ClassPathResource("author.xsd"));
    }

    @Override
    public void addInterceptors(List<EndpointInterceptor> interceptors) {
        //可以自定义拦截器
    }
}
常量类: WsConst.java
/**
 * 常量类
 * @author oKong
 *
 */
public class WsConst {
    public static final String NAMESPACE_URI = "http://www.lqdev.cn/webservice";
}
5.编写启动类。
/**
 * web-service 简单示例
 *
 * @author oKong
 *
 */
@SpringBootApplication
@Slf4j
public class WebServiceApplication {
    public static void main(String[] args) throws Exception {
        SpringApplication.run(WebServiceApplication.class, args);
        log.info("spring-boot-webservice-server-chapter33启动!");
    }
}
6.启动应用,访问下: http://127.0.0.1:8090/ws/author.wsdl ,可以看见wsdl文件内容了。
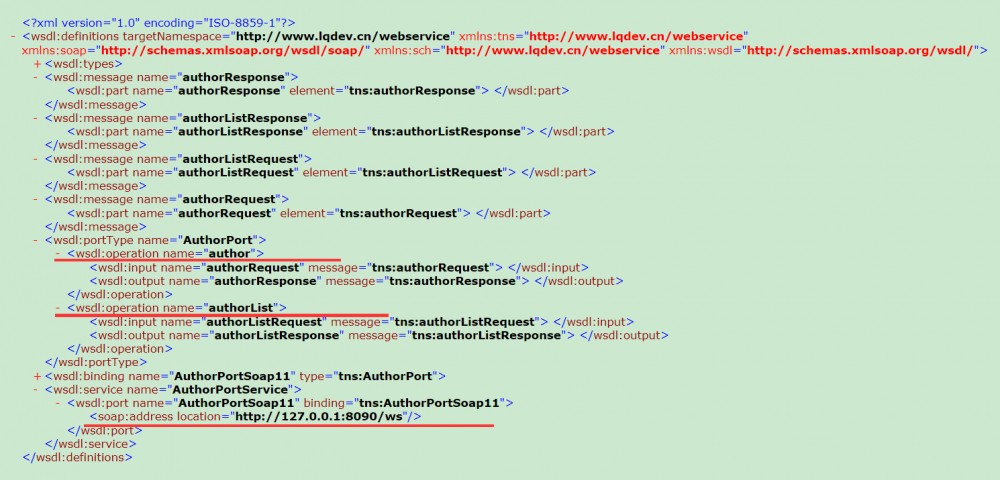
接着,我们使用 postman 调用下:POST http://127.0.0.1:8090/ws
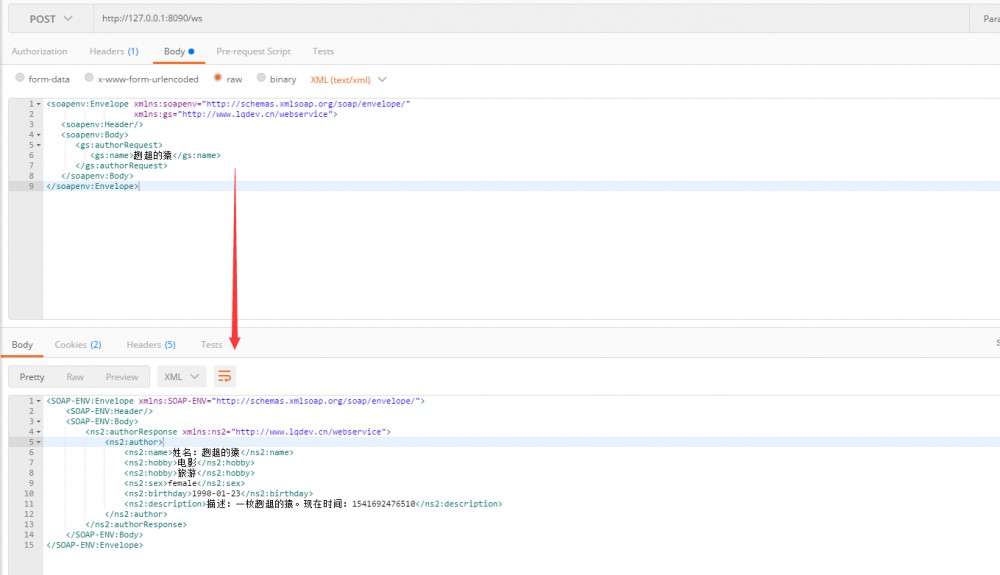
说明已经正常发布了。接下来,我们使用 spring-ws 直接调用。
Spirng-WS客户端调用
创建一个新工程: spring-boot-webservice-client
0.引入POM依赖。
<dependency>
            <groupId>org.springframework.boot</groupId>
            <artifactId>spring-boot-starter-web-services</artifactId>
        </dependency>
        <dependency>
            <groupId>wsdl4j</groupId>
            <artifactId>wsdl4j</artifactId>
        </dependency>
1.获取wsdl文件,放入 src/main/resources/schemas/ 文件夹中,同时加入 maven 插件: maven-jaxb2-plugin 使其生成对应实体列。
<plugin>
                <groupId>org.jvnet.jaxb2.maven2</groupId>
                <artifactId>maven-jaxb2-plugin</artifactId>
                <version>0.13.3</version>
                <executions>
                    <execution>
                        <goals>
                            <goal>generate</goal>
                        </goals>
                    </execution>
                </executions>
                <configuration>
                    <schemaLanguage>WSDL</schemaLanguage>
                    <generatePackage>cn.lqdev.webservice</generatePackage>
                    <generateDirectory>${basedir}/src/main/java</generateDirectory>
                    <schemas>
                        <schema>
                            <fileset>
                                <!-- Defaults to schemaDirectory. -->
                                <directory>${basedir}/src/main/resources/schemas</directory>
                                <!-- Defaults to schemaIncludes. -->
                                <includes>
                                    <include>*.wsdl</include>
                                </includes>
                            </fileset>
                        </schema>
                    </schemas>
                </configuration>
            </plugin>
wsdl文件就不贴了。目录为:
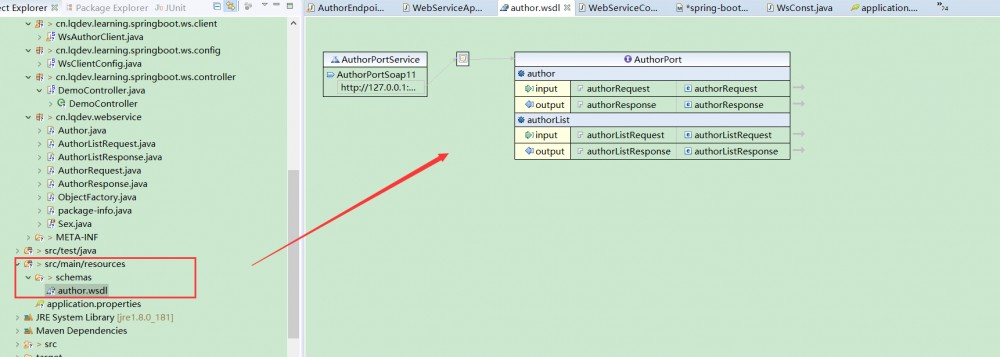
生成后对应实体类为:

注意:写此文章前,尝试过使用 cxf 进行调用,而调用过程中,发现请求的实体需要在包 cn.lqdev.webservice 路径下,不然校验不通过。所以为了兼容,我直接写成此路径了。对于 spring ws 而言,包名可以自定义的。不知道 cxf 是不是可以修改,跟踪了下源码也没有找到具体这个规则是怎么来的,不知道是不是和 targetNamespace 的值 http://www.lqdev.cn/webservice 有关,有待测试。
2.创建客户端调用类。
/**
 * 编写客户端 继承WebServiceGatewaySupport 类 方便调用
 * @author oKong
 *
 */
public class WsAuthorClient extends WebServiceGatewaySupport{

    /**
     *  获取作者信息
     *  @author oKong
     */
    public AuthorResponse getAuthor(String name) {
        AuthorRequest req = new AuthorRequest();
        req.setName(name);
        //使用 marshalSendAndReceive 进行调用
        return (AuthorResponse) getWebServiceTemplate().marshalSendAndReceive(req);
    }

    /**
     *  获取作者列表信息
     *  @author oKong
     */
    public AuthorListResponse getAuthorList(){
        AuthorListRequest request = new AuthorListRequest();
        request.setNonce(UUID.randomUUID().toString());
        return (AuthorListResponse) getWebServiceTemplate().marshalSendAndReceive(request);
    }
}
此类,就是调用webservice服务的。
4.创建配置类.
/**
 * 客户端调用配置
 * @author oKong
 *
 */
@Configuration
public class WsClientConfig {

    @Bean
    public Jaxb2Marshaller marshaller() {
        Jaxb2Marshaller marshaller = new Jaxb2Marshaller();
        //会扫描此类下面的对应的 jaxb2实体类 因为是使用 Marshaller和 unmarshaller来进行xml和bean直接转换的
        //具体是判断此路径下是否包含 ObjectFactory.class 文件
        //设置 JAXBContext 对象
        marshaller.setContextPath("cn.lqdev.webservice");
        //或者使用 以下方式设置
//        marshaller.setPackagesToScan(packagesToScan);
//        marshaller.setClassesToBeBound(classesToBeBound);
        return marshaller;
    }

    /*
     * 创建bean
     */
    @Bean
    public WsAuthorClient wsClient(Jaxb2Marshaller marshaller) {
        WsAuthorClient client = new WsAuthorClient();
        //默认对应的ws服务地址 client请求中还能动态修改的
        client.setDefaultUri("http://127.0.0.1:8090/ws");
        client.setMarshaller(marshaller);//指定转换类
        client.setUnmarshaller(marshaller);
        return client;
    }
}
关于 marshaller 和 unmarshaller 解析xml和读取xml相关知识,没有过多了解,感兴趣的可以自行搜索相关资料下。
5.创建示例控制层,调用各服务接口。
/**
 * 简单调用示例
 * @author oKong
 *
 */
@RestController
@RequestMapping("/author")
public class DemoController {

    @Autowired
    WsAuthorClient authorClient;

    @GetMapping("/get")
    public AuthorResponse getAuthor(String name) {
        return authorClient.getAuthor(name);
    }

    @GetMapping("/list")
    public AuthorListResponse getAuthorList() {
        return authorClient.getAuthorList();
    }
}
6.修改端口号为:8096,同时启动应用。
server.port=8096
使用 Postman ,访问: http://127.0.0.1:8096/author/get?name=程序员
正常情况下可以看见以下返回内容:
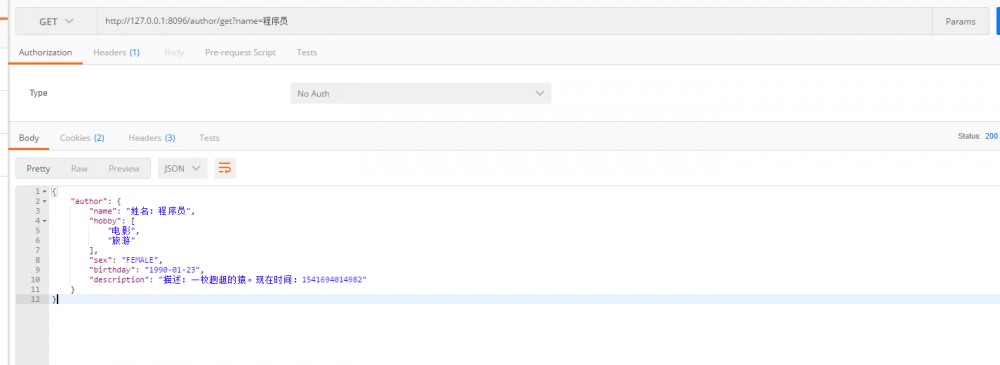
说明调用成功了。
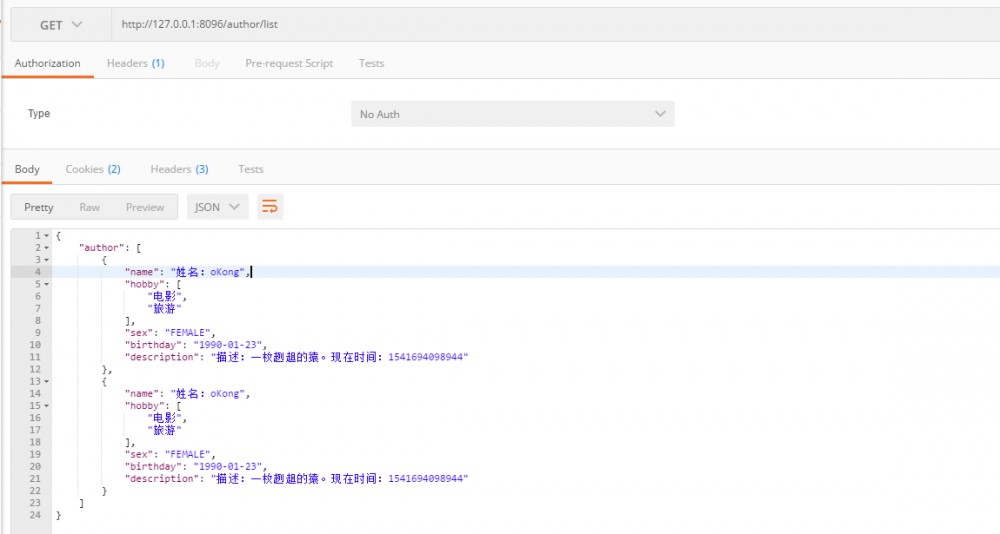
访问下列表: http://127.0.0.1:8096/author/list
简单使用CXF调用webService
接下类,尝试下使用 cxf 来访问下服务。
0.引入 cxf 相关依赖。
<dependency>
        <groupId>org.apache.cxf</groupId>
        <artifactId>cxf-spring-boot-starter-jaxws</artifactId>
        <version>3.1.11</version>
    </dependency>
1.controller类新增一个方法,使用cxf方式调用服务。
@GetMapping("/cxf/{method}")
    public Object cxf(@PathVariable String method,String name) throws Exception{
        //获取客户端工厂类
        JaxWsDynamicClientFactory dcf = JaxWsDynamicClientFactory.newInstance();
        //创建client对象
        Client client = dcf.createClient("http://127.0.0.1:8090/ws/author.wsdl");

        AuthorListRequest listReq = new AuthorListRequest();
        listReq.setNonce(UUID.randomUUID().toString());

        AuthorRequest req = new AuthorRequest();
        req.setName(name);
        //调用 第一个方法是operation 值,即调用方法,
        //其后是调用参数。
        Object[] objects = new Object[0];
        //相关 operation值 可以根据 client.getEndpoint().getBinding().getBindingInfo().getOperations(); 获取
        //有兴趣可以看下 client.getEndpoint().getBinding().getBindingInfo()提供的一些方法。

        //这里就简单的判断了
        if("authorList".equalsIgnoreCase(method)) {
          objects = client.invoke("authorList", listReq);
        } else {
             objects = client.invoke("author", req);
        }
        //返回的对象objects[0]即为返回的值
        return objects[0];
    }
这里需要注意:对应的实体类,需要符合wsdl文件中解析出来的type Classes 对应上,本例子为: cn.lqdev.webservice.AuthorListRequest ,猜猜应该和 targetNamespace 值有关,不然会出现以下类似提示:
Part {http://www.lqdev.cn/webservice}authorListRequest should be of type cn.lqdev.webservice.AuthorListRequest, not cn.lqdev.learning.webservice.AuthorListRequest
最后发现使用 cxf 也很简单呀,下次试试。是利用 JAX-WS 规范的。
2.重启应用,访问下: http://127.0.0.1:8096/author/cxf/author?name=趔趄的猿 最后效果是一样的。

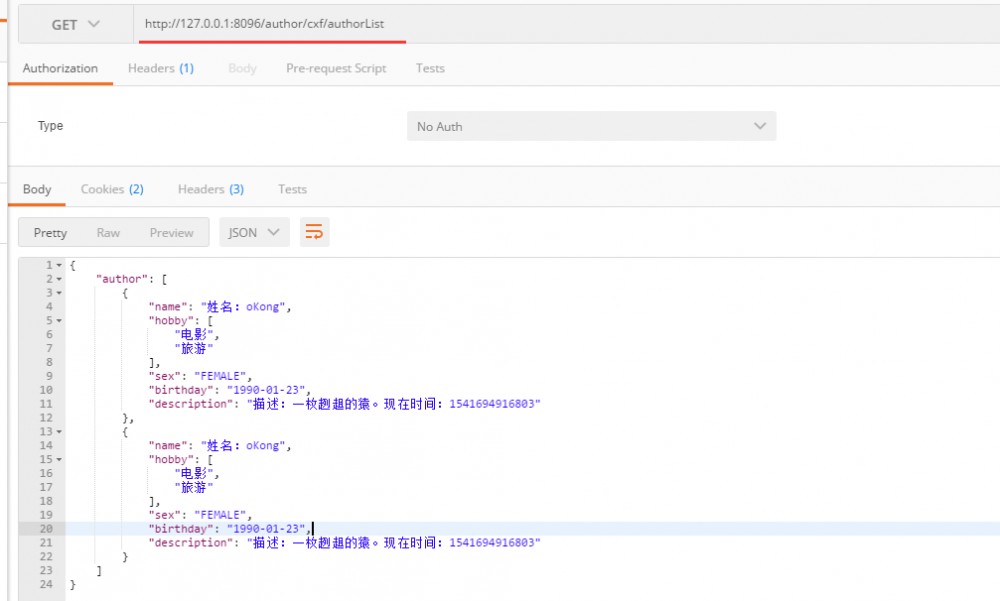
访问: http://127.0.0.1:8096/author/cxf/authorList
有待补充
以上只是基于官方文档,简单的示例了一遍,具体一些高级用法以及相关安全校验、过滤器等等,没有过多涉及的。之后有时间再填坑吧,毕竟这个用的真的不多呀。
参考资料
-
https://docs.spring.io/spring-ws/docs/2.4.2.RELEASE/reference/
-
https://spring.io/guides/gs/producing-web-service/
-
https://spring.io/guides/gs/consuming-web-service/
总结
本章节主要简单介绍了 spring-ws 的使用。原本是没有打算写关于 WebService 相关的。只是机缘巧合下刚好有个对接系统需要用上,就临时尝试一下了。还有很多深入的功能,就没有过多涉及了。等到时候真正开始对接时,有碰到一些问题或者有些知识点补充的,再来补充吧。毕竟,我想现在除了旧系统和政府部门的系统,应该很少再去开发 webservice 服务了吧。官网文档大致看了下,也确实觉得有点复杂呀,不知道是不是理解能力问题,⊙﹏⊙‖∣。理论上,按着规则走,问题应该也不是很大。就是一些比如无参数如何调用,或者返回参数节点自定义问题,这些理论上都可以使用提供的拦截器来完成的。有问题,还是建议查看官网吧,真的比较详细。最后看了 cxf ,也比较简单。下一篇就来写写使用 cxf 来发布 webservice ,多尝试几种方式~
最后
目前互联网上很多大佬都有 SpringBoot 系列教程,如有雷同,请多多包涵了。 原创不易,码字不易 ,还希望大家多多支持。若文中有所错误之处,还望提出,谢谢。
老生常谈
499452441
lqdevOps

个人博客: http://blog.lqdev.cn
完整示例: https://github.com/xie19900123/spring-boot-learning/tree/master/chapter-33
原文地址: http://blog.lqdev.cn/2018/11/09/springboot/chapter-thirty-three/

正文到此结束
- 本文标签: XML 自动生成 源码 开发 分布式 js 配置 core CTO 处理器 服务器 插件 Master pom 互联网 Java类 equals SOA ACE spring DOM plugin classpath 操作系统 Spring Security https map src 时间 Security root 组织 希望 maven description 百度 注册中心 IDE 博客 目录 解析 ORM 测试 参数 id git 安全 client 代码 message web list WebService 端口 tar 总结 模型 数据 http 程序员 bean 定制 REST CXF ip 网站 schema 电子商务 JMS apache value IO 认证 final springboot UI W3C App Service 协议 软件 服务端 servlet 加密 cat 企业 GitHub 文章 java
- 版权声明: 本文为互联网转载文章,出处已在文章中说明(部分除外)。如果侵权,请联系本站长删除,谢谢。
- 本文海报: 生成海报一 生成海报二
热门推荐


相关文章

近期评论
-
ws0132613@gmail.comhttps://getmacos.com/gopanel/william smith
-
谢谢
-
https://www.newcmy.com/register?aff=HBVX建议您试试草莓云机场,可以流畅观看youtube和tiktok,上reddit/x也没有问题,还有各种ai优化节点。
-
-
-
想购买您这个站,我的联系方式QQ741756694微信同步 能卖联系
-
-
-
-
Loading...
![[HBLOG]公众号](https://www.liuhaihua.cn/img/qrcode_gzh.jpg)

