上手spring cloud(三)统一配置中心
统一配置中心
Spring Cloud Config为各应用环境提供了一个中心化的外部配置。配置服务器默认采用git来存储配置信息,这样就有助于对配置进行版本管理,并且可以通过git客户端工具来方便维护配置内容。当然它也提供本地化文件系统的存储方式。
使用集中式配置管理,在配置变更时,可以通知到各应用程序,应用程序不需要重启。
Config Server
创建Config Server端工程config-server:
File -> New->Product... -> 选择Spring Initializr -> Project SDK用1.8 -> Next -> 输入Product Metadata -> Next
(springboot选择2.0以上)
选择Cloud Discovery -> 选择Eureka Discovery
选择Cloud Config -> 选择Config Server
由于选择了Eureka Discovery和Config Server,创建成功后pom.xml里已经帮你引入了以下依赖:
<dependency>
    <groupId>org.springframework.cloud</groupId>
    <artifactId>spring-cloud-config-server</artifactId>
</dependency>
<dependency>
    <groupId>org.springframework.cloud</groupId>
    <artifactId>spring-cloud-starter-netflix-eureka-client</artifactId>
</dependency>
Config Server也是要注册到Eureka,作为Eureka Client,我们还要加入如下依赖:
<dependency>
    <groupId>org.springframework.boot</groupId>
    <artifactId>spring-boot-starter-web</artifactId>
</dependency>
<!-- 避免后面的数据库配置出错,mysql依赖也加了 -->
<dependency>
    <groupId>mysql</groupId>
    <artifactId>mysql-connector-java</artifactId>
</dependency>
再给启动类加上注解@EnableDiscoveryClient和@EnableConfigServer:
package com.hicoview.config;

import org.springframework.boot.SpringApplication;
import org.springframework.boot.autoconfigure.SpringBootApplication;
import org.springframework.cloud.client.discovery.EnableDiscoveryClient;
import org.springframework.cloud.config.server.EnableConfigServer;

@SpringBootApplication
@EnableDiscoveryClient
@EnableConfigServer
public class EurekaApplication {

    public static void main(String[] args) {
        SpringApplication.run(EurekaApplication.class, args);
    }

}
配置application.yml:
eureka:
  client:
    service-url:
      defaultZone: http://localhost:8761/eureka/
spring:
  application:
    name: config
  cloud:
    config:
      server:
        git:
          uri: http://code.hicoview.com:8000/backend/config.git
          username: root
          password: 8ggf9afd6g9gj
          # 配置文件下载后存储的本地目录
          basedir: /Users/zhutx/springcloud/config/basedir
server:
  port: 9999
然后按照配置的git仓库地址,在github或gitlab上创建config仓库。
以商品微服务的配置来演示,在config仓库创建product-dev.yml:
server:
  port: 8080
spring:
  datasource:
    driver-class-name: com.mysql.jdbc.Driver
    username: root
    password: passwd_1986
    url: jdbc:mysql://127.0.0.1:3306/SpringCloud_Sell?characterEncoding=utf-8&useSSL=false
启动作为Config Server的config-server工程,查看 http://localhost:8761 :

访问配置服务端的以下任意地址,都可以显示出对应格式的配置内容:
http://localhost:9999/product-dev.yml
http://localhost:9999/product-dev.properties
http://localhost:9999/product-dev.json 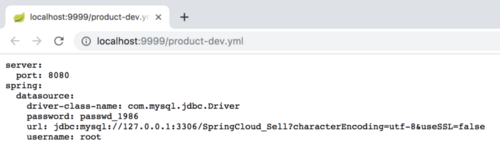
可见,Config Server获取到了远程git仓库上的配置,并将其作为自身的REST服务提供了出去。
接下来我们看看配置客户端Config Client(即product-server)怎么引用配置。
Config Client
我们给product-server加入配置客户端的依赖:
<dependency>
    <groupId>org.springframework.cloud</groupId>
    <artifactId>spring-cloud-config-client</artifactId>
</dependency>
修改application.yml配置:
spring:
  application:
    name: product
  cloud:
    config:
      discovery:
        enabled: true
        service-id: CONFIG
      profile: dev
eureka:
  client:
    service-url:
      defaultZone: http://localhost:8761/eureka/
这样子就可以从Eureka服务注册中心找到CONFIG服务,并拿到product-dev.yml了。
启动product-server,查看eureka注册中心,CONFIG这个Config Server服务已经注册上去了:

如果代码里有操作数据库,那么启动其实会出错,因为spring boot不知道配置加载顺序。
我们期望先拿到CONFIG的配置,再初始化数据库。
解决办法是把product-server的application.yml改成bootstrap.yml就好。
微服务工程使用配置服务的情况下,注意将application.yml都改成bootstrap.yml。并且,让bootstrap.yml文件只保留Eureka配置和获取Config Server服务的配置;
另外,如果生产环境要使用统一配置中心,可以启动多个Config Server进程,保持高可用。
同样的操作,把order-server配置也抽取到外部
Spring Cloud Bus
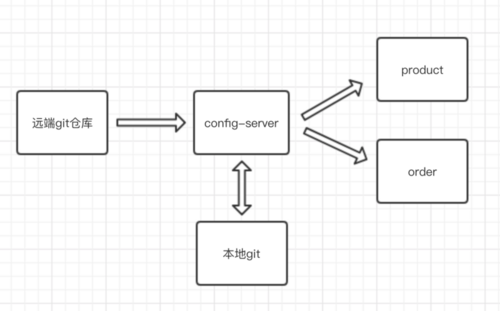
下图是当前的配置工作机制,config-server拉取远端git配置,并在本地存一份。然后config-server通过把自身注册到Eureka从而提供了拉取配置的服务,而配置客户端(product和order)通过引入config-client依赖,在启动时便能获取加载到了配置。
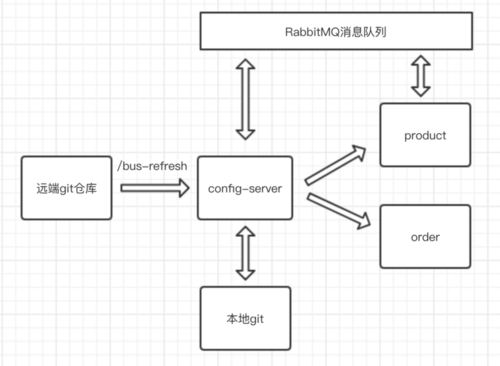
我们需要做到修改远程配置,应用程序不重启,还需要借助Spring Cloud Bus。Spring Cloud Bus集成了MQ,并为config-server提供了这个配置刷新服务(bus-refresh)。
如下图所示,做法是远端git修改配置后,通过webhook调用config-server的/bus-refresh服务,发布RabbitMQ消息,config-client接收消息并更新配置。
我们先安装RabbitMQ:
# docker安装rabbitmq
docker run -d --hostname my-rabbit -p 5672:5672 -p 15672:15672 rabbitmq:3.7.9-management
# 验证下
docker ps | grep 'rabbitmq'
能成功访问RabbitMQ控制台 http://localhost:15671 ,继续。
修改Config Server端,增加依赖:
<dependency>
    <groupId>org.springframework.cloud</groupId>
    <artifactId>spring-cloud-starter-bus-amqp</artifactId>
</dependency>
修改application.yml,增加以下配置,把包括bus-refresh在内的所有config server的服务都暴露出来:
management:
  endpoints:
    web:
      exposure:
        include: "*"
我们拿product-server来演示,修改product-server的pom增加依赖:
<dependency>
    <groupId>org.springframework.cloud</groupId>
    <artifactId>spring-cloud-starter-bus-amqp</artifactId>
</dependency>
然后提供一个接口,方便我们在配置变验证结果:
@RestController
@RequestMapping("/env")
@RefreshScope
public class EnvController {

    @Value("${env}")
    private String env;

    @GetMapping("/print")
    public String print() {
        return env;
    }
}
测试下,我们修改远端git配置,先增加env配置:
server:
  port: 8080
spring:
  datasource:
    driver-class-name: com.mysql.jdbc.Driver
    username: root
    password: passwd_1986
    url: jdbc:mysql://127.0.0.1:3306/SpringCloud_Sell?characterEncoding=utf-8&useSSL=false
# 增加了该配置
env:
  dev
重启下config-server和product-server。
访问 product-server http://localhost:8080/env/print ,显示dev
然后我们把远端env配置项改成test
调用config-server的配置刷新服务 bus-refresh:
curl -v -X POST http://localhost:9999/actuator/bus-refresh
再次访问 product-server http://localhost:8080/env/print ,显示test
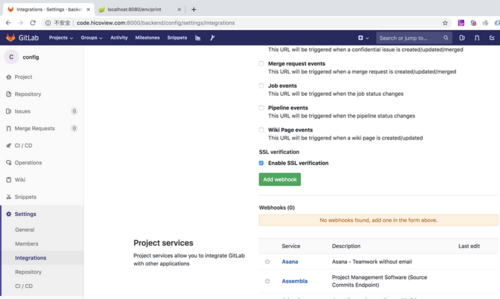
至此,已经做到了变更配置不重启应用。我们再借助Git仓库的webhook功能,在push指令发生后帮我们发个bus-refresh请求就完美了。Gitlab的话在仓库的这个位置:
Repository -> Settings -> Integrations -> Add webhook
正文到此结束
- 本文标签: Spring cloud 配置 JDBC mysql json http db Spring Boot 进程 配置中心 管理 web Eureka IO js springcloud 安装 服务注册 App src 测试 id 数据库 Config Server Bootstrap java value Service https rabbitmq map 注册中心 CTO client ssl 服务端 grep Spring Cloud Config 数据 spring XML 下载 git springboot sql amqp 代码 dataSource 服务器 文件系统 tar Netflix UI 微服务 目录 Docker Word pom 高可用 cat bus GitHub root REST MQ
- 版权声明: 本文为互联网转载文章,出处已在文章中说明(部分除外)。如果侵权,请联系本站长删除,谢谢。
- 本文海报: 生成海报一 生成海报二
热门推荐


相关文章

近期评论
-
ws0132613@gmail.comhttps://getmacos.com/gopanel/william smith
-
谢谢
-
https://www.newcmy.com/register?aff=HBVX建议您试试草莓云机场,可以流畅观看youtube和tiktok,上reddit/x也没有问题,还有各种ai优化节点。
-
-
-
想购买您这个站,我的联系方式QQ741756694微信同步 能卖联系
-
-
-
-
Loading...
![[HBLOG]公众号](https://www.liuhaihua.cn/img/qrcode_gzh.jpg)

