Spring Security 源码分析十:认证跳转逻辑 (login redirect)
本文是对 Spring Security Core 4.0.4 Release 进行源码分析的系列文章之一;
本文为作者的原创作品,转载需注明出处;
简介
笔者一直对 Spring Security 的认证跳转逻辑比较感兴趣,准备撰写一篇文章来专门进行深入的分析,包括其源码执行相关的逻辑;认证跳转主要有这样的一个核心的应用场景,直接访问未被授权的链接,将会被拦截,并跳转至登录界面,登录成功以后,再跳转回之前未被认证的页面;将此场景弄懂以后,其它的场景自然也就迎刃而解了;
继续以 DemoApplication 为例,
@Controller
@EnableAutoConfiguration
public class DemoApplication {

    // 通过 ViewControllerRegistry 快速的注册 controller 与 html 页面之间的映射,注意必须使用到 thymeleaf
    @Configuration
    static class MvcConfig extends WebMvcConfigurerAdapter {
        @Override
        public void addViewControllers(ViewControllerRegistry registry) {

         // 备注,login Getter 登录路径必须配置在 Spring Security 的相对路径中;否则 csrf token 等与 Spring Security 相关的信息并不会返回;
            registry.addViewController("/web/login").setViewName("login");

            registry.addViewController("/web/report").setViewName("report");

            registry.addViewController("/").setViewName("index");

        }
    }

    /**
     * 在执行过程中,测试了两个 Filter Chain,两者是使用的不同的 SecurityChainFilter 对象,一个是对象的 ID 是 92 一个是 138
     *
     * @author shangyang
     */

    @Configuration
    @EnableWebSecurity
    @Order(1)
    static class WebSecurityConfig extends WebSecurityConfigurerAdapter {

      @Autowired
      public void configUser(AuthenticationManagerBuilder builder) throws Exception {

         builder
            .inMemoryAuthentication()
               .withUser("user").password("password").roles("USER").and()
               .withUser("manager").password("password").roles("MANAGER");

      }

        @Override
        protected void configure(HttpSecurity http) throws Exception {

            http.antMatcher("/web/**") // the filter chain defined for web request
               .authorizeRequests()
                  .antMatchers("/web/report/**").hasRole("MANAGER")
                  .anyRequest().authenticated()
               .and()
               .formLogin()
                  // login 的相对路径必须与 security chain 的的相对路径吻合,这里是 /web/**;注意 login 分两步,一步是 Getter 会到 login.html,另外一步是从 login.html -> post -> /web/login/
                  .loginPage("/web/login")
                  // 允许访问
                  .permitAll();

        }
    }
}
从上述配置中我们可以读出,访问 /web/report/** 链接是需要 Manager 权限的;否则将会被拦截跳转至登录界面身份验证,认证成功以后,将会再次跳转回之前未被认证的链接 /web/report/** 中;
源码分析
流程
同样,笔者将千言万语汇聚到如下的这样一张流程图中,
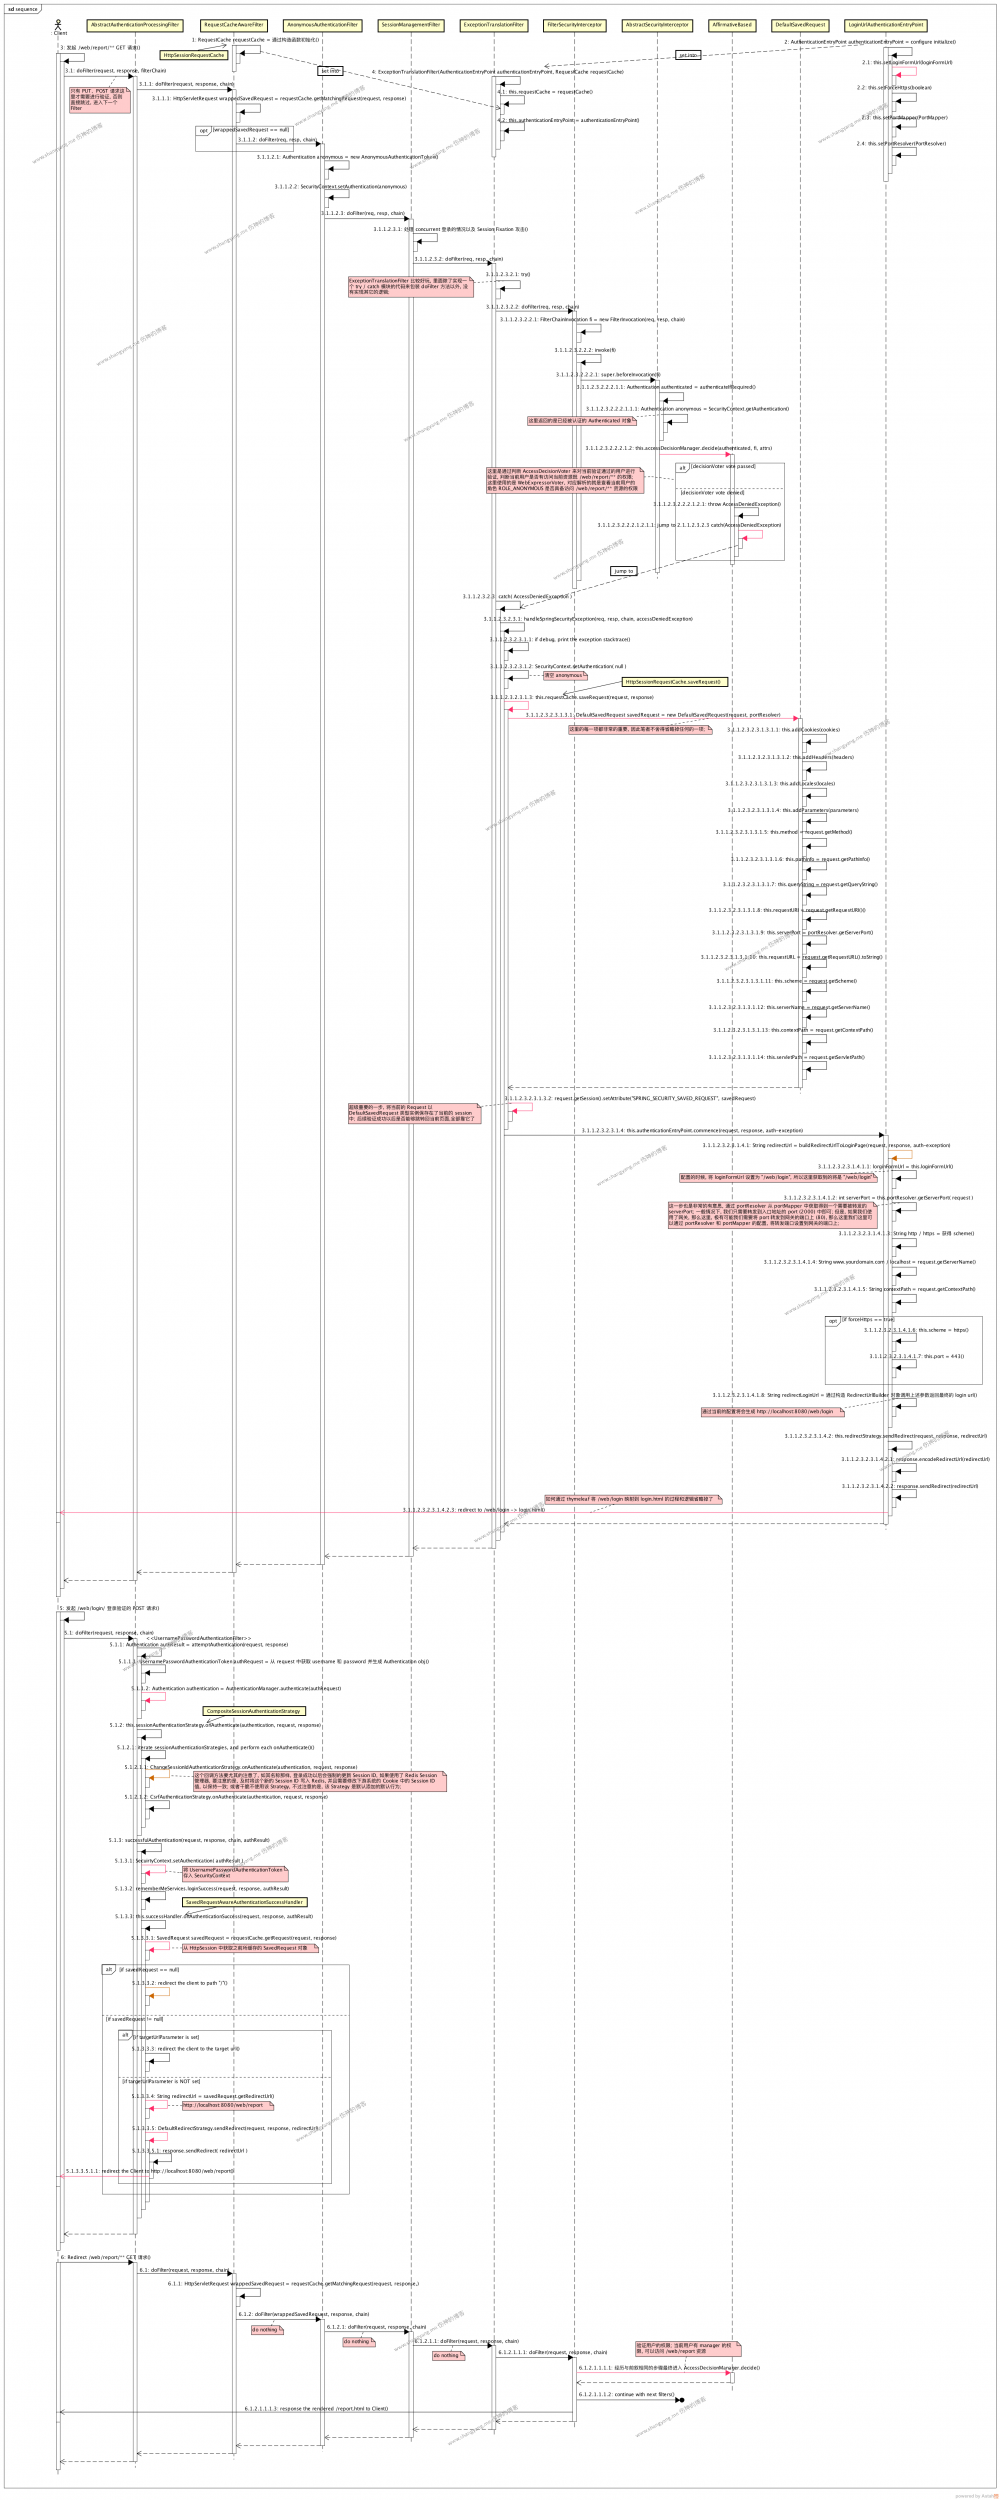
上述流程中,归纳起来有三个重要的步骤,分别总结如下,
三个重要的步骤
访问受保护资源
这一步是客户端发起对被保护资源 /web/report/** 的 GET 请求,此步骤对应的是流程图中的 _ Step 3 以及其相关的所有子步骤;_
相关步骤详细描述如下 ,
-
首先,因为是 GET 请求, AbstractAuthenticationProcessingFilter ( 既 UsernamePasswordAuthenticationFilter )不会对其做任何的验证请求;
-
然后,因为没有传入任何的验证信息, AnonymousAuthenticationFilter 会为当前的请求创建一个 Anonymous 账户,生成 Anonymous Authentication 对象并将其加入 SecurityContext 中;
-
然后, ExceptionTranslationFilter 在 doFilter() 方法上包裹了一层异常捕获处理的模块,专门用来捕获 AccessDeniedException 异常,并做相应的转发处理;这一步比较的关键,后续的认证失败跳转到登录链接全靠它了;
-
然后,进入 FilterSecurityInterceptor ,这一步便是验证当前的账户既 Authentication 是否有权限访问 /web/report/** 资源,通过 AccessDecisionManager.decide() 方法来验证用户是否有访问 /web/report/** 资源的权限,参考步骤 3.1.1.2.3.2.2.2.1.2,显然未登录的 Anonymous 账户不具备这样的权限,因此不能访问,将会抛出 AccessDeniedException ;
-
然后,该异常 AccessDeniedException 将会被 ExceptionTranslationFilter 的 catch 异常的模块所捕获,见步骤 3.1.1.2.3.2.3,该处理流程中,两个步骤非常关键,
-
把当前的 Request 对象封装成为 DefaultSavedRequest
见步骤 3.1.1.2.3.2.3.1.3.1,过程中会保存当前的 cookies,headers,locales,请求参数,请求方法 method,scheme,访问路径等等与当前请求相关的所有属性内容,这一步为什么重要,是因为后续登录认证后跳转回当前链接 /web/report/** 就全靠它了 DefaultSavedRequest,最后,将 DefaultSavedRequest 对象以 “SPRING_SECURITY_SAVED_REQUEST” 为键保存在 HttpSession 中,供后续的请求访问;
-
Redirect client to login page
见步骤 3.1.1.2.3.2.3.1.4
生成 login URL
该步骤中根据用户所设定的规则生成登录访问的地址,具体详情参考相关的子步骤;该步骤将会生成登录地址,注意,如果是强制使用了 https 那么在生成该访问地址的时候,会将 scheme 改成 https;最后所生成的登录地址为 http://localhost:8080/web/login
Redirect Client to login URL
见步骤 3.1.1.2.3.2.3.1.4.2,可见该步骤很简单,直接通过 response.sendRedirect() 方法使得客户端 Client 跳转到 login path 之上;
-
总结 ,
对于学习者来说,弄清楚里面的来龙去脉固然重要,但是最为重要的是,能够用一两句话来对复杂的事物进行总结,这样,这个知识才能够被固化并长时间的驻留在你的大脑中;所以,笔者试着用一两句话来总结该步骤;当 Client 访问被保护资源的时候,Spring Security 默认使用 Anonymous 账户进行登录,最后,通过判断 Anonymous 账户不具备对被保护资源的访问权限,抛出 AccessDenied 异常并构造出登录连接,redirect Client to login page(登录地址),即完成了该步骤的整个操作;
登录认证跳转
此步骤对应的是 Step 5 以及其相关的所有子步骤 ;对应的也就是上一个重要步骤之后的跳转步骤,将 Client redirect 到登录地址 /web/login 之上;
相关步骤详细描述如下 ,
-
首先,用户在 login page 输入 Manager 的账户信息,点击登录;
注意,在构造 login 页面中的 <form> 的 action 属性的值的时候,需要使用 /web/login 地址;
-
然后,进入 AbstractAuthenticationProcessingFilter( 既 UsernamePasswordAuthenticationFilter )中,因为是 POST 请求,所以会执行如下的三个核心的步骤,
步骤 5.1.1 验证用户身份
此步骤中,从 request 中获取到 username 和 password 的相关信息,然后通过 AuthenticationManager 来对用户的身份进行验证,如果验证通过,返回 Authentication 对象;
步骤 5.1.2 Session Authentication Strategies onAuthenticate
比步骤中尤其要注意 ChangeSessionIdAuthenticationStrategy ,当用户登录成功以后,Spring Security 会默认的修改该 Session ID 的值;如果是一个集群,并且使用到了 Session 管理器,那么一定要确保 Session 管理器的 Session ID 和 Cookie 中的 Session ID 同时被更新,否则会导致集群中的 Session 不一致;
步骤 5.1.3 验证成功后处理
首先将验证通过的用户信息 Authentication 保存到 SecurityContext 中;然后,重点来了,通过从 Http Session( 既是 RequestCache ) 中获取用户之前第一次访问被保护资源时候所存储的 SavedRequest,并根据该对象构建出用户认证成功以后需要跳转的地址,既是还原第一次访问资源时候的地址 http://localhost:8080/web/report ,(备注,如果强制使用了 https,那么这里对应的 Scheme 将会是 https 协议 );最后将 Client redirect 到被保护资源 http://localhost:8080/web/report 中;
总结 ,
让我感到比较意外的是,这里在 UsernamePasswordAuthenticationFilter 中认证成功以后既跳转;后来想想,如果是我来设计的话,我也会这样做,因为当前所访问的是 http://localhost:8080/web/login 资源,且目的是对用户进行 登录认证 (仅仅是对用户名、密码进行验证),自然需要跳转回被保护资源 http://localhost:8080/web/report 对当前 manager 用户账户 Authentication 做进一步的 权限验证 ;
再次访问受保护资源
继之后,再次对 http://localhost:8080/web/report 资源进行访问,该逻辑从步骤 6 开始,其余步骤基本上于第一次的步骤一致,有几个地方的变化如下,
-
RequestCacheAwareFilter 处理逻辑
这一步的时候要关注的是,它会使用 SavedRequest 替换当前的 Request 对象进行后续的 Filters 的操作;目的很明显,保持当前的 Request 对象与第一次[访问受保护资源]时候所使用到的 Request 对象一致;
-
FilterSecurityInterceptor 处理逻辑
这里,通过 AccessDecisionManager 的 decide 方法验证当前的用户 manager 具备对 http://localhost:8080/web/report 资源的访问权限;于是,验证通过,并且继续进入后续的 Filters 操作
-
最终将 report.html 经过 Spring MVC 渲染以后,返回给 Client
源码分析
根据分析中,笔者就自己认为比较重要和感兴趣的部分源码进行分析,
AbstractAuthenticationProcessingFilter
笔者在的步骤 3.1 给了注释,当调用 AbstractAuthenticationProcessingFilter 对用户进行认证操作的时候,如果当前的请求是 GET 请求,将不会进行后续的认证操作,笔者将相关核心代码摘录如下,
AbstractAuthenticationProcessingFilter.java
public void doFilter(ServletRequest req, ServletResponse res, FilterChain chain)
      throws IOException, ServletException {

   HttpServletRequest request = (HttpServletRequest) req;
   HttpServletResponse response = (HttpServletResponse) res;

   // ① 如果访问请求不是 POST 或 PUT 操作将不会执行后续的操作
   if (!requiresAuthentication(request, response)) {
      chain.doFilter(request, response);

      return;
   }

   ......

   // ② 进行验证和跳转操作

   Authentication authResult;

   try {
      // 2.1 使用相关子类进行用户认证操作,这里使用的是 UsernamePasswordAuthentcationFilter
      authResult = attemptAuthentication(request, response);
      if (authResult == null) {
         return;
      }
      // 2.2 认证成功以后,使用 Session Authentication Strategies 进行后续处理
      sessionStrategy.onAuthentication(authResult, request, response);
   }
   catch (InternalAuthenticationServiceException failed) {
      logger.error(
            "An internal error occurred while trying to authenticate the user.",
            failed);
      // 认证异常处理流程
      unsuccessfulAuthentication(request, response, failed);

      return;
   }
   catch (AuthenticationException failed) {
      // Authentication failed
      unsuccessfulAuthentication(request, response, failed);

      return;
   }

   ...

   // 2.3 成功以后的跳转逻辑
   successfulAuthentication(request, response, chain, authResult);
}
从 ① 中可以知道,如果当前的访问不是 POST / PUT 请求将直接跳过余下的步骤,并直接进入下一个 Filter 执行;如果是 POST / PUT 请求,将执行后续的操作,2.1 认证; 2.2 通过认证以后,使用 Session Authentication Strategies 进行后续处理;2.3 处理成功以后的跳转逻辑;
RequestCacheAwareFilter
该对象的实现异常的简单,但是却异常的重要,该对象通过获取得到 SavedRequest,当认证跳转后,依然使用的是用户第一次访问时候的 Request 对象,就像线程被中断保护一样,当线程再次启动的时候,需要重现该线程的保护现场,既相关的所有数据;
public class RequestCacheAwareFilter extends GenericFilterBean {

   private RequestCache requestCache;

   public RequestCacheAwareFilter() {
      this(new HttpSessionRequestCache());
   }

   public RequestCacheAwareFilter(RequestCache requestCache) {
      Assert.notNull(requestCache, "requestCache cannot be null");
      this.requestCache = requestCache;
   }

   public void doFilter(ServletRequest request, ServletResponse response,
         FilterChain chain) throws IOException, ServletException {

      HttpServletRequest wrappedSavedRequest = requestCache.getMatchingRequest(
            (HttpServletRequest) request, (HttpServletResponse) response);

      chain.doFilter(wrappedSavedRequest == null ? request : wrappedSavedRequest,
            response);
   }

}
ExceptionTranslationFilter
看一下其 doFilter 方法,
public void doFilter(ServletRequest req, ServletResponse res, FilterChain chain)
      throws IOException, ServletException {
   HttpServletRequest request = (HttpServletRequest) req;
   HttpServletResponse response = (HttpServletResponse) res;

   try {
      chain.doFilter(request, response);

      logger.debug("Chain processed normally");
   }
   catch (IOException ex) {
      throw ex;
   }
   catch (Exception ex) {
      // Try to extract a SpringSecurityException from the stacktrace
      Throwable[] causeChain = throwableAnalyzer.determineCauseChain(ex);
      RuntimeException ase = (AuthenticationException) throwableAnalyzer
            .getFirstThrowableOfType(AuthenticationException.class, causeChain);

      if (ase == null) {
         ase = (AccessDeniedException) throwableAnalyzer.getFirstThrowableOfType(
               AccessDeniedException.class, causeChain);
      }

      if (ase != null) {
         handleSpringSecurityException(request, response, chain, ase);
      }
      else {
         // Rethrow ServletExceptions and RuntimeExceptions as-is
         if (ex instanceof ServletException) {
            throw (ServletException) ex;
         }
         else if (ex instanceof RuntimeException) {
            throw (RuntimeException) ex;
         }

         // Wrap other Exceptions. This shouldn't actually happen
         // as we've already covered all the possibilities for doFilter
         throw new RuntimeException(ex);
      }
   }
}
可以看到,该 ExceptionTranslationFilter.doFilter() 方法除了添加了一个 try … catch … 的程序模块以外,并没有实现其它的逻辑,目的是当,当后续的 AccessDecisionManager 在判断当前用户若不具备相应的访问权限以后,将会抛出 AccessDeniedException,这里将会拦截处理,并实现相应的跳转逻辑,这里的跳转逻辑会将 Client 重定向到 login path 中,既是 /web/login;该步骤是在 handleSpringSecurityException 方法中进行处理的,处理的过程中,尤其要注意其如何使用 DefaultSavedRequest 对当前的请求 Request 记性现场保护的操作,该步骤参考 3.1.1.2.3.2.3.1.3.1;
这里笔者所学到的东西既是,添加一个 Filter,通过该 Filter 来拦截某些异常,并进行自定义的处理;
FilterSecurityInterceptor
通过调用其父类 AbstractSecurityInterceptor#beforeInvocation() 方法对当前用户进行权限验证,判断该用户是否拥有访问当前资源( /web/report/** )资源的权限;过程中通过 AffirmBased 来判断该用户是否对被保护资源 /web/report/** 具有访问的权限;如果没有,将会抛出 AccessDeniedException 的错误;
LoginUrlAuthenticationEntryPoint
正如中 3.1.1.2.3.2.3.1.4 this.authenticationEntryPoint.commence() 所描述的那样,会根据 LoginUrlAuthenticationEntryPoint 实例中的配置来生成相关的 login 的链接来使得 Client 跳转到登录页面中,这里尤其要注意几个逻辑,1、PortResolver,可以通过 PortMapper 对象通过映射的方式取得用户自定义跳转端口对象,这个在使用 ZUUL 网关的时候,需要使得跳转链接使用网关端口的时候将会非常有用;2、如果是强制使用的 https,那么这里的跳转链接将会强制使用 https;相关核心代码逻辑在方法 buildRedirectUrlToLoginPage() 中;
protected String buildRedirectUrlToLoginPage(HttpServletRequest request,
      HttpServletResponse response, AuthenticationException authException) {

   String loginForm = determineUrlToUseForThisRequest(request, response,
         authException);

   if (UrlUtils.isAbsoluteUrl(loginForm)) {
      return loginForm;
   }

   int serverPort = portResolver.getServerPort(request);
   String scheme = request.getScheme();

   RedirectUrlBuilder urlBuilder = new RedirectUrlBuilder();

   urlBuilder.setScheme(scheme);
   urlBuilder.setServerName(request.getServerName());
   urlBuilder.setPort(serverPort);
   urlBuilder.setContextPath(request.getContextPath());
   urlBuilder.setPathInfo(loginForm);

   if (forceHttps && "http".equals(scheme)) {
      Integer httpsPort = portMapper.lookupHttpsPort(Integer.valueOf(serverPort));

      if (httpsPort != null) {
         // Overwrite scheme and port in the redirect URL
         urlBuilder.setScheme("https");
         urlBuilder.setPort(httpsPort.intValue());
      }
      else {
         logger.warn("Unable to redirect to HTTPS as no port mapping found for HTTP port "
               + serverPort);
      }
   }

   return urlBuilder.getUrl();
}
PortResolver
通过 PortMapper 提供的映射来生成跳转的链接的端口,这个在使用 ZUUL 网关的时候,需要使得跳转链接使用网关端口的时候将会非常有用;
PortMapper
定义映射关系,比如,可以将 2000 映射到 8000,比如,在 Spring Clound 集群中,通过 ZUUL 转发到后台的某个服务使用的是 2000 端口,经过该服务进行用户身份认证以后,执行跳转,默认会跳转到 2000 端口上,这样,就跳过了网关,就会导致访问错误,所以这个时候,需要通过 PortMapper 将端口 2000 映射到 8000 上,这样跳转的时候,会跳转到 8000 端口上,既是网关 ZUUL 上;
正文到此结束
- 本文标签: 协议 core ORM portmap EnableAutoConfiguration 管理 参数 authenticate 文章 id map 2019 CEO web src https bean zuul IDE value 认证 ACE IO 集群 equals 注释 java client servlet Service token 数据 实例 源码 Word cache cat session 时间 spring build Action bug UI HTML 测试 http mapper 线程 cookies 代码 rmi 总结 端口 Security Spring Security 配置 App
- 版权声明: 本文为互联网转载文章,出处已在文章中说明(部分除外)。如果侵权,请联系本站长删除,谢谢。
- 本文海报: 生成海报一 生成海报二
热门推荐


相关文章

近期评论
-
谢谢
-
https://www.newcmy.com/register?aff=HBVX建议您试试草莓云机场,可以流畅观看youtube和tiktok,上reddit/x也没有问题,还有各种ai优化节点。
-
-
-
想购买您这个站,我的联系方式QQ741756694微信同步 能卖联系
-
-
-
-
-
https://www.liuhaihua.cn/archives/40657.html 这篇博客中的图片打不开了
Loading...
![[HBLOG]公众号](https://www.liuhaihua.cn/img/qrcode_gzh.jpg)

