Go语言学习笔记-数据类型
类型 [n]T 是一个有 n 个类型为 T 的值的数组。
表达式:
var a [10]int
复制代码
定义变量 a 是一个有十个整数的数组。
数组的长度是其类型的一部分,因此数组不能改变大小。
var a [2]string
	a[0] = "Hello"
	a[1] = "World"

b := [6]int{2, 3, 5, 7, 11, 13}		//数组 声明并赋值
复制代码
切片
切片即 slice
[]T 是一个元素类型为 T 的 slice 。
一个 slice 会指向一个序列的值,并且包含了长度信息。
说人话, slice 其实类似于 Java 里的 ArrayList ,就是一个动态数组。
不同点在于, Java 里的 ArrayList 自己内部维护一个数组, slice 即可以内部维护一个数组,也可以在现有的数组上创造 slice 。
每次扩容 slice 会指向一个扩容后的数组。
nil slice
slice 的零值是 nil 。
一个 nil 的 slice 的长度和容量是 0 。
构造 slice
/*
	 * 切片不存储任何数据,它只描述底层数组的一部分。 更改切片的元素会修改其基础数组的相应元素。 共享相同底层数组的其他切片将看到这些更改。
	 * 切片就像是对数组的引用。
     */
     //数组
	names := [5]string{
		"0_John",
		"1_Paul",
		"2_George",
		"3_Ringo",
    }
    //构造一个对 names 数组的切片,[n:m] 说明引用哪部分
    slice := names[0:]

//slice 由函数 make 创建。这会分配一个零长度的数组并且返回一个 slice 指向这个数组:

a := make([]int, 5)  // len(a)=5
//为了指定容量,可传递第三个参数到 `make`:

b := make([]int, 0, 5) // len(b)=0, cap(b)=5

b = b[:cap(b)] // len(b)=5, cap(b)=5

b = b[1:]      // len(b)=4, cap(b)=4
复制代码
slice [n:m] 用法
-
slice[n:m]表示从n到m-1的slice 元素, 含两端 。 -
slice[n:n]是 空的 ,即nil。 -
slice[n:n+1]有 一个元素 。 -
slice[:m]表示从0到m-1的slice 元素, 含两端 。 -
slice[n:]表示从n到len(slice)的slice 元素, 含两端 。
向 slice 添加元素
/*
     * 将新元素附加到一个切片上是很常见的,因此Go提供了一个内置的append函数。
     func append(s T,vs.T)T的第一个参数s是一个类型T的切片,其余的是T值附加到片上。
     * append的结果是一个包含原始切片的所有元素和新提供的值的切片。
     如果s的后备数组太小,不足以容纳所有给定的值,那么就会分配更大的数组。
     返回的切片将指向新分配的数组。
	 */
    slice = append(slice, 2, 3, 4)

    /*slice1为另一个切片,
    *后面必须加 ... ,
    *这样才能将该切片指向的数组里的元素放入 append
    */
    slice = append(slice,slice1...)
复制代码
map
map 映射键到值。
map 在使用之前必须创建;值为 nil 的 map 是空的,并且 不能赋值 。
map 变量声明
//map[键的类型]值的类型
var m map[string]int
复制代码
map 构造
/*
 *  就是键值对儿,map的零值为nil。
 nil的map没有键,也不能添加键。
 make函数会 返回 指定类型的map,初始化并准备好使用。
 make(map[键的类型]值的类型)
 */
m = make(map[string]int)

var ma = map[string]int{
	"Bell Labs":1,
	"Google": 2,
}
//如果顶级类型只是一个类型名,可以省略它。
//如下:省略了Ver(结构体)。
var mapa = map[string]Ver{
	"Bell Labs": {40.68433, -74.39967},
	"Google":    {37.42202, -122.08408},
}
复制代码
用法
//设置键值对,没有key就新增 key:value 对,
//key 已存在就覆盖 value 值   m[键]= 值
    m["Bell Labs"] = 1

// 取值 v 为 key 对应的 value ,ok为该key是否存在的 bool 值,存在为 true,
//否则 false。 key 不存在时 v 为其类型对应的零值。
v, ok := m["Answer"]

//删除 key:value
delete(m, "Answer")
复制代码
iota
Go 的枚举用法
//1、iota常量 自动生成器,每隔一行,自动累加1
   //2、iota给常量赋值使用
   const (
   	a = iota //0
   	b = iota //1
   	c = iota //2
   )
   //3、iota遇到const,重置为0
   const d = iota //0
   //4、可以只写一个iota
   const (
   	e = iota //0
   	f        //1
   	g        //2
   )
   //5,如果是在同一行,值都一样
   const (
   	h = iota //0
   	i,j,k = iota,iota,iota //1,1,1
   	l=iota  //2
   )
复制代码
感觉这是 Go 的一个 bug 吧,要是别人传个数值型的进来就 gg 了。
error
error 是一个接口。
标准库里的定义如下:
// The error built-in interface type is the conventional interface for
// representing an error condition, with the nil value representing no error.
type error interface {
	Error() string
}
复制代码
只要实现了这个接口都是实现了 error 。
很多时候都要在函数的多返回值里接收error,判断是否有错误。
在 Go 里面 error 基本就是个字符串,用惯了 Java 的异常机制,还真不习惯这个。
指针
GO 里的指针不像 c/c++ 没有指针运算。
指针的用法: *变量=变量的值 &变量=变量的内存地址
i, j := 42, 2701

	p := &i         // point to i  					指向i

	fmt.Println(*p) // read i through the pointer	通过指针读取i
	fmt.Println(&p) // p的内存地址
	fmt.Println(&i) // i的内存地址

	*p = 21         // set i through the pointer	通过指针设置i
	fmt.Println(i)  // see the new value of i		看下i的新值

	p = &j         // point to j					指向j
	*p = *p / 37   // divide j through the pointer	通过指针进行除法运算
    fmt.Println(j) // see the new value of j		看下j的新值
复制代码
函数
函数也是值。它们可以像其他值一样传递。函数值可以用作函数参数和返回值。
//compute 函数 的参数 是一个函数,
//给这个函数 取了个变量名fn,fn函数的类型为 float64,
//compute函数的返回值也是float64。
func compute(fn func(float64, float64) float64) float64 {
	return fn(3, 4)
}
复制代码
//这里是定义了一个函数hypot,两个参数
//和 一个返回值 全为float64类型。 x*x+y*y,再开方
	hypot := func(x, y float64) float64 {
		return math.Sqrt(x*x + y*y)
	}
    fmt.Println(hypot(5, 12))  // 5*5+12*12,开方  结果为13

	fmt.Println(compute(hypot))		//把hypot这个函数 作为参数 传给函数compute 。3*3+4*4=25,开方,结果为5。
	fmt.Println(compute(math.Pow))	//内置函数 Pow(x, y float64) 计算x的y次方,3的4次方 结果为81。
复制代码
闭包
//函数的返回值是一个匿名函数,返回一个函数类型 func(int) int
func adder() func(int) int {
	sum := 0
	return func(x int) int {
		sum += x
		return sum
	}
}

/*
     * 返回值为一个匿名函数,返回一个函数类型,
     通过f来调用返回的匿名函数,f来调用闭包函数。
     * 它不关心这些捕获了的变量和常量是否已超出作用域,
     只要闭包还在使用它,这些变量就还会存在。
	 */
	f:=adder()
	fmt.Println(f(1))	//结果1
	fmt.Println(f(2))	//结果3
	fmt.Println(f(3))	//结果6
复制代码
接口
参考文档 第11章:接口(interface)与反射(reflection)
-
Go 的接口和 Java 类似,也是声明了一些方法,用来约束实现该接口的类(结构体)的行为。
-
Go 的接口不需要显示继承,只要结构体实现了接口声明的方法,就是实现了该接口。
-
Go 中接口可以通过组合的方式将其他接口声明的方法嵌套进接口当中。
定义
type Namer interface {
    Method1(param_list) return_type
    Method2(param_list) return_type
    ...
}

//嵌套接口
type Interface interface {
	Len() int
	Less(i, j int) bool
	Swap(i, j int)
}

type Interface interface {
	sort.Interface
	Push(x interface{})
	Pop() interface{}
}

//  等于
type Interface interface {
	Len() int
	Less(i, j int) bool
	Swap(i, j int)
	Push(x interface{})
	Pop() interface{}
}
复制代码
上面的 Namer 是一个 接口类型 。
(按照约定,只包含一个方法的)接口的名字由方法名加 [e]r 后缀组成,例如Printer、Reader、Writer、Logger、Converter 等等。还有一些不常用的方式(当后缀 er 不合适时),比如Recoverable,此时接口名以 able 结尾,或者以 I 开头(像 .NET 或 Java 中那样)。
Go 语言中的接口都很简短,通常它们会包含 0 个、最多 3 个方法。
不像大多数面向对象编程语言,在 Go 语言中接口可以有值,一个接口类型的变量或一个 接口值 :var ai Namer,ai是一个多字(multiword)数据结构,它的值是 nil。它本质上是一个指针,虽然不完全是一回事。指向接口值的指针是非法的,它们不仅一点用也没有,还会导致代码错误。
接口类型
接口也是一种类型,所以该类型的变量可以被赋值该接口的实现。
package main

import "fmt"

type Shaper interface {
    Area() float32
}

type Square struct {
    side float32
}

func (sq *Square) Area() float32 {
    return sq.side * sq.side
}

func main() {
    sq1 := new(Square)
    sq1.side = 5

    // var areaIntf Shaper
    // areaIntf = sq1
    // shorter,without separate declaration:
    // areaIntf := Shaper(sq1)
    // or even:
    areaIntf := sq1
    fmt.Printf("The square has area: %f/n", areaIntf.Area())
}
复制代码
类型断言
接口变量里的类型可能任何类型的值,如果需要在运行时判断出究竟是什么类型,可以用类型断言。
/*
* T 是你需要断言的类型,
*当 ok 为 true ,v 就是转换到 T 类型的值,
*当 ok 为false ,v 就是 T 类型的零值。
*/
if v, ok := varI.(T); ok {  // checked type assertion
    Process(v)
    return
}
// varI is not of type T
复制代码
类型判断:type-switch
接口变量的类型也可以使用一种特殊形式的 swtich 来检测: type-swtich
switch t := areaIntf.(type) {
case *Square:
    fmt.Printf("Type Square %T with value %v/n", t, t)
case *Circle:
    fmt.Printf("Type Circle %T with value %v/n", t, t)
case nil:
    fmt.Printf("nil value: nothing to check?/n")
default:
    fmt.Printf("Unexpected type %T/n", t)
}
复制代码
type-switch 不允许有 fallthrough 。
空接口
空接口不声明任何方法。类似于 Java 中的 Object 类,Go 中任何类型都实现了空接口。
用法也和 Java 中的 Object 类似,毕竟现在 Go 里面没有泛型,希望官方早点加入这个特性。
结构体
参考文档: 第10章:结构(struct)与方法(method)
Go 里面没有类的概念,自然也没有继承的概念。
所幸还有接口,所以可以用结构体+接口+方法+组合,实现oop。
定义结构体
/*
 *  结构的定义
 */
type Vertex struct {
	X int
	Y int
}
//带标签(tag)的结构体
type TagType struct { // tags
    field1 bool   "An important answer"
    field2 string "The name of the thing"
    field3 int    "How much there are"
}
复制代码
标签( tag ): 它是一个附属于字段的字符串,可以是文档或其他的重要标记。
标签的内容不可以在一般的编程中使用,只有包 reflect 能获取它。
它可以在运行时自省类型、属性和方法。
比如:在一个变量上调用 reflect.TypeOf() 可以获取变量的正确类型。
如果变量是一个 结构体类型 ,就可以通过 Field 来 索引结构体的字段 ,然后就可以使用 Tag 属性。
匿名字段和内嵌结构体
结构体可以包含一个或多个 匿名(或内嵌)字段 。
即这些字段没有显式的名字,只有字段的类型是必须的,此时类型也就是字段的名字。
匿名字段本身可以是一个结构体类型,即 结构体可以包含内嵌结构体 。
可以粗略地将这个和面向对象语言中的继承概念相比较,随后将会看到它被用来模拟类似继承的行为。
Go 语言中的继承是通过内嵌或组合来实现的,所以可以说,在 Go 语言中,相比较于继承,组合更受青睐。
示例1:
package main

import "fmt"

type innerS struct {
    in1 int
    in2 int
}

type outerS struct {
    b    int
    c    float32
    int  // anonymous field
    innerS //anonymous field
}

func main() {
    outer := new(outerS)
    outer.b = 6
    outer.c = 7.5
    outer.int = 60
    outer.in1 = 5
    outer.in2 = 10

    fmt.Printf("outer.b is: %d/n", outer.b)
    fmt.Printf("outer.c is: %f/n", outer.c)
    fmt.Printf("outer.int is: %d/n", outer.int)
    fmt.Printf("outer.in1 is: %d/n", outer.in1)
    fmt.Printf("outer.in2 is: %d/n", outer.in2)

    // 使用结构体字面量
    outer2 := outerS{6, 7.5, 60, innerS{5, 10}}
    fmt.Printf("outer2 is:", outer2)
}
复制代码
输出:
outer.b is: 6
outer.c is: 7.500000
outer.int is: 60
outer.in1 is: 5
outer.in2 is: 10
outer2 is:{6 7.5 60 {5 10}}
复制代码
示例2:
package main

import "fmt"

type A struct {
    ax, ay int
}

type B struct {
    A
    bx, by float32
}

func main() {
    b := B{A{1, 2}, 3.0, 4.0}
    fmt.Println(b.ax, b.ay, b.bx, b.by)
    fmt.Println(b.A)
}
复制代码
输出:
1 2 3 4
{1 2}
复制代码
通过类型 outer.int 的名字来获取存储在匿名字段中的数据,
于是可以得出一个结论:在一个结构体中对于每一种数据类型只能有一个匿名字段。
方法
一般 Go 里有函数和方法两种说法,本质上是一样的,只是方法是独属于一个结构体的函数,只能通过结构体的变量用 . 去调用。
定义如下:
func (recv struct_type) methodName(parameter_list) (return_value_list) { ... }
复制代码
在方法名之前, func 关键字之后的括号中指定 receiver。
如果 recv 是 struct_type 的实例, Method1 是它的方法名,那么方法调用遵循传统的 object.name 选择器符号: recv.Method1() 。
如果 recv 一个 指针 ,Go 会自动解引用。
如果方法不需要使用 recv 的值,可以用 _ 替换它,比如:
func (_ struct_type) methodName(parameter_list) (return_value_list) { ... }
复制代码
recv 就像是面向对象语言中的 this 或 self ,但是 Go 中并没有这两个关键字。
可以使用 this 或 self 作为 receiver 的名字。
使用结构体
v1.X = 4				//设置结构变量的值
fmt.Println("第 2 行:",v1.X)	//读取结构变量的值

p := &v1		//p指向 v1的内存地址
p.X = 1e9		//为p的X变量 重新赋值
fmt.Println("第 3 行:",v1)	//看下v1的新值
复制代码
container
Go 提供的容器数据类型,在container包中。
heap
堆结构
Go 中只定义了接口,没有给出实现。
type Interface interface {
	sort.Interface
	Push(x interface{}) // add x as element Len()
	Pop() interface{}   // remove and return element Len() - 1.
}
复制代码
如果想使用堆,只要实现以下五个方法就能实现该接口。
Len() int
	// Less reports whether the element with
	// index i should sort before the element with index j.
	Less(i, j int) bool
	// Swap swaps the elements with indexes i and j.
    Swap(i, j int)
    Push(x interface{}) // add x as element Len()
	Pop() interface{}   // remove and return element Len() - 1.
复制代码
list
双向链表
标准库里的定义如下:
// List represents a doubly linked list.
// The zero value for List is an empty list ready to use.
type List struct {
	root Element // sentinel list element, only &root, root.prev, and root.next are used
	len  int     // current list length excluding (this) sentinel element
}
复制代码
// Element is an element of a linked list.
type Element struct {
	// Next and previous pointers in the doubly-linked list of elements.
	// To simplify the implementation, internally a list l is implemented
	// as a ring, such that &l.root is both the next element of the last
	// list element (l.Back()) and the previous element of the first list
	// element (l.Front()).
	next, prev *Element

	// The list to which this element belongs.
	list *List

	// The value stored with this element.
	Value interface{}
}
复制代码
list对应的方法有:
type Element
    func (e *Element) Next() *Element
    func (e *Element) Prev() *Element
type List
    func New() *List
    func (l *List) Back() *Element   // 最后一个元素
    func (l *List) Front() *Element  // 第一个元素
    func (l *List) Init() *List  // 链表初始化
    func (l *List) InsertAfter(v interface{}, mark *Element) *Element // 在某个元素后插入
    func (l *List) InsertBefore(v interface{}, mark *Element) *Element  // 在某个元素前插入
    func (l *List) Len() int // 在链表长度
    func (l *List) MoveAfter(e, mark *Element)  // 把e元素移动到mark之后
    func (l *List) MoveBefore(e, mark *Element)  // 把e元素移动到mark之前
    func (l *List) MoveToBack(e *Element) // 把e元素移动到队列最后
    func (l *List) MoveToFront(e *Element) // 把e元素移动到队列最头部
    func (l *List) PushBack(v interface{}) *Element  // 在队列最后插入元素
    func (l *List) PushBackList(other *List)  // 在队列最后插入接上新队列
    func (l *List) PushFront(v interface{}) *Element  // 在队列头部插入元素
    func (l *List) PushFrontList(other *List) // 在队列头部插入接上新队列
    func (l *List) Remove(e *Element) interface{} // 删除某个元素
复制代码
ring
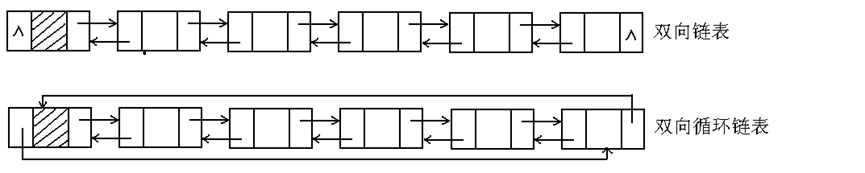
双向循环链表
双向链表和双向循环链表的结构示意图:
标准库里的定义如下:
// A Ring is an element of a circular list, or ring.
// Rings do not have a beginning or end; a pointer to any ring element
// serves as reference to the entire ring. Empty rings are represented
// as nil Ring pointers. The zero value for a Ring is a one-element
// ring with a nil Value.
//
type Ring struct {
	next, prev *Ring
	Value      interface{} // for use by client; untouched by this library
}
复制代码
环的结构有点特殊,环的尾部就是头部,所以每个元素实际上就可以代表自身的这个环。 它不需要像list一样保持list和element两个结构,只需要保持一个结构就行。
ring提供的方法有:
type Ring
    func New(n int) *Ring  // 初始化环
    func (r *Ring) Do(f func(interface{}))  // 循环环进行操作
    func (r *Ring) Len() int // 环长度
    func (r *Ring) Link(s *Ring) *Ring // 连接两个环
    func (r *Ring) Move(n int) *Ring // 指针从当前元素开始向后移动或者向前(n可以为负数)
    func (r *Ring) Next() *Ring // 当前元素的下个元素
    func (r *Ring) Prev() *Ring // 当前元素的上个元素
    func (r *Ring) Unlink(n int) *Ring // 从当前元素开始,删除n个元素
复制代码
类型别名&类型定义
参考资料 飞雪无情的博客
定义
type D = int   // 类型别名
type I int    // 类型声明
复制代码
类型别名有 = 号,类型声明没有。
类型别名
类型别名其实就是给原本的类型起多一个名字。 原本的类型该怎么用,该类型基本就怎么用(除非用类型别名改变了可导出性)。
这个特性的主要目的是用于已经定义的类型,在package之间的移动时的兼容。 比如我们有一个导出的类型 flysnow.org/lib/T1 ,现在要迁移到另外一个 package flysnow.org/lib2/T1 中。
没有 type alias 的时候我们这么做,会导致其他第三方引用旧的package路径的代码,要统一修改,不然无法使用。
有了 type alias 就不一样了,类型 T1 的实现我们可以迁移到 lib2 下,
同时我们在原来的 lib 下定义一个 lib2 下 T1 的别名,
这样第三方的引用就可以不用修改,也可以正常使用,
只需要兼容一段时间,再彻底的去掉旧的package里的类型兼容,
这样就可以渐进式的重构我们的代码,而不是一刀切。
类型定义
类型定义就是基于原本的类型创建了一个新类型,新类型和原本的类型是两个类型了。
这个特性多用于,你想给类型 a 添加新方法,但是类型 a 非本地类型,就无法添加。
这时,你可以用类型定义将其定义为类型 b ,这样就能添加新方法了。
正文到此结束
热门推荐


相关文章

近期评论
-
ws0132613@gmail.comhttps://getmacos.com/gopanel/william smith
-
谢谢
-
https://www.newcmy.com/register?aff=HBVX建议您试试草莓云机场,可以流畅观看youtube和tiktok,上reddit/x也没有问题,还有各种ai优化节点。
-
-
-
想购买您这个站,我的联系方式QQ741756694微信同步 能卖联系
-
-
-
-
Loading...
![[HBLOG]公众号](https://www.liuhaihua.cn/img/qrcode_gzh.jpg)

